C H A P T E R 3
Database Design and Creation
Now that you've installed SQL Server and examined the main tools you'll use as a SQL Server developer or administrator, it's almost time to start building the ApressFinancial database solution. However, you can't do this yet because you still don't know what the database will hold. At this point in time, all the information you have so far is that you'll be building a database to hold some financial transactions for a personal or corporate financial tool. You'll gear this database toward a financial tool that a corporation might use, because SQL Server can be scaled from one user to thousands of users very easily. The next step is to gather more information about the requirements of the solution and about what information is required to be stored in the database. Once the information-gathering stage is complete, you'll then be able to create the database within SQL Server throughout the book. Its main intent is to demonstrate to you how to build a database solution from the ground up.
The design of a database solution is not a simple task; it requires a great deal of work. This chapter will provide you with insight into the vast area that is database design, although there is an awesome book by Louis Davidson on this subject, called Pro SQL Server 2012 Relational Database Design and Implementation (Apress, 2012). Armed with this information, you'll proceed through arranging the data so that retrieval is as efficient as possible (this is referred to as normalizing the data) and ensuring that data duplication is minimal or, ideally, that no data duplication exists. You'll also need to know how the system and the data within it will be used on a day-to-day basis. Finally, you'll need to know what type of system is being built—for instance, whether it will receive instant data updates or just be used to analyze already defined data. Once the design is complete, building a database solution will be a much smoother process. A good design ensures you've gathered all the information you need to build the correct tables with the correct information without duplication.
Although the methods and processes involved with the design may not meet the needs of every organization, this chapter presents an overview of the processes involved and also shows you how to build up information and ensure that the design is well thought out. This chapter will cover the following topics:
- What a database is, what it consists of, and where it is stored
- How to define the type of system: transactional or analytical
- How to collect data about the current system and seek out information about the new system
- How to create a database through SQL Server Management Studio, a wizard, or a Query Editor window, and how to set database options in a Query Editor window
- How to review the database details
- How to remove a database using SQL Server Management Studio and a Query Editor window
![]() Note No specific formal design techniques will be used in this chapter's exercise, as this is not a book specifically on database design. However, the processes—both physical and logical—to get to the final design of the database will be the same.
Note No specific formal design techniques will be used in this chapter's exercise, as this is not a book specifically on database design. However, the processes—both physical and logical—to get to the final design of the database will be the same.
Defining a Database
A database is a container for objects that not only store data, but also enable data storage and retrieval to operate in a secure and safe manner. A SQL Server database can hold the following objects (among others):
- Table definitions
- Columns within those tables, which make up rows of data
- Programs (either stored procedures or triggers written in T-SQL or assemblies that are written in .NET) used to access or manipulate the data
- Indexes, which are used to speed up the retrieval of data
- Views, which are specialized ways of looking at the actual data
- Functions, which are repetitive tasks that can be applied to rows of data
The preceding list contains a fair number of technical terms, so let's take a few moments to look at their definitions:
- Tables: These are where data are kept within the database. A database must contain at least one table to be of use, although you can have a database with no user tables and only system tables. System tables are special tables that SQL Server uses to help it work with the database. These tables contain information within rows and columns, much like in Excel, but they have a great deal more power than cells within Excel. Temporary tables—another type of database table—can take several different forms. These will be discussed at several points within the book.
- Columns: These provide a definition of each single item of information that builds up to a table definition. A column consists of cells that all hold data, much like a column in Excel. Unlike in Excel, though, where each cell can hold a different type of data, a column within a SQL Server table is restricted to what the data within it relates to, the type of data it will hold, and how much information can be stored in it. Each table must have at least one column, although the column doesn't need to contain any information.
- Rows: A row consists of one cell from every column defined for the table. There can be any number of rows in a table; you are limited only by your disk space or the amount of disk space you defined as the maximum in your database creation definition or the amount of disk space on your server. A row will define a single unit of information, such as a user's bank account details or a product on an e-commerce site. Rows are also called records.
- Stored procedures: When it comes to requiring a program to manipulate or work with data, or perform the same data-intensive task repeatedly, it's often better to store this code in a stored procedure. Stored procedures contain one or more T-SQL statements, which are compiled and ready to be executed when required. Stored procedures are permanently stored in the database, ready for use at any time.
- T-SQL statements: This is a program statement that SQL Server can use to work with your data.
- Assemblies: Assemblies are similar to stored procedures, in that they can be used to manipulate or work with data, but they are used more for procedural logic, as you might find in a .NET program. An assembly can be more than a replacement for a stored procedure and can take on many different guises—for example, you can also build data types using an assembly.
- Indexes: These can be regarded as predefined lists of information that can inform the database how the data are physically sorted and stored, or they can be used by SQL Server to find rows of data quickly using information supplied by a T-SQL query and matching this information to data within columns. An index consists of one or more columns from the table it is defined for, but it is not possible for an index to cover more than one table. An index in SQL Server is very much like the index of a book, which is used to locate a piece of information faster than looking through the book page by page.
- Views: These can be thought of as virtual tables. Views can contain information combined from several tables and can present a more user-friendly interface to the data. Views can also add a great deal of security to an application, but they do give reduced functionality over the use of stored procedures or direct access to the tables. Views can also be indexed to speed processing of data within.
- Functions: A function is similar to a stored procedure, but it takes information one row at a time or produces information one row at a time as you work through the rows of data you are processing. For example, you would use a stored procedure to produce output to create a statement, but you would use a function to go through each transaction one at a time to calculate interest on a daily basis.
Also within every database is a set of system tables that SQL Server uses to maintain that database. These tables hold information about every column, information about every user, and many other pieces of information (such as metadata). System table security in SQL Server is such that you cannot access these tables directly—only through views. You don't need to investigate system tables at this point because their data can't be modified and the information they produce is useful only for working with advanced functionality.
Prebuilt Databases Within SQL Server
Several databases are installed and displayed when SQL Server is first installed. This section explores each of these databases, so that you'll know what each does and feel comfortable when you come across them outside of this book.
Let's first look at the most important database in SQL Server: the master database. I will then cover the tempdb, model, msdb, and AdventureWorks/AdventureWorksDW sample databases.
master
master is the most important database in SQL Server, so I must start off with a warning.
![]() Caution Directly alter this database at your own peril!
Caution Directly alter this database at your own peril!
There should be no reason to go into any of the system views within this database and alter the records or column information directly. There are system functions that allow a constructive alteration of any of the data in an orderly fashion, and these are the only approaches you should use to alter the master database.
The master database is at the heart of SQL Server, and if it should become corrupted, there is a very good chance that SQL Server will not work correctly. The master database contains the following crucial information:
- All logins, or roles, to which the user IDs belong
- Every system configuration setting (for example, data sorting information, security implementation, default language)
- The names of and information about the databases within the server
- The location of databases
- How SQL Server is initialized
- Specific system tables holding the following information (this list is not exhaustive):
- How the cache is used
- Which character sets are available
- A list of the available languages
- System error and warning messages
- Special SQL Server objects called assemblies (tables within every database that deal with SQL Server objects and therefore are not specific to the
masterdatabase)
The master database is the security guard of SQL Server, and it uses the preceding information to ensure that everything is kept in check.
![]() Note It is crucial that you regularly back up the
Note It is crucial that you regularly back up the master database. Ensure that doing so is part of your backup strategy. Backups are covered in more detail in Chapter 7.
tempdb
The tempdb database is—as its name suggests—a temporary database whose lifetime is the duration of a SQL Server session; once SQL Server stops, the tempdb database is lost. When SQL Server starts up again, the tempdb database is re-created, fresh and new, and ready for use. There is more to this process, but before I delve into that, you first need to know what the tempdb database is used for.
A database can hold data, and that data can be held in many tables. You use commands and functions to retrieve and manipulate that data. However, there may be times when you want to temporarily store a certain set of data for processing at a later time—for example, when you pass data from one stored procedure to another that is going to run right after the first one. One option is to store that data within a table within the tempdb database. Such a table could be thought of as a “permanent” temporary table, as it will exist until it is specifically deleted or until tempdb is re-created on a SQL Server restart. Another type of temporary table is one created within a stored procedure or query each time the stored procedure or query executes. This will also be placed within the tempdb database, although its lifetime will last only until all users of the table finish. You'll look at both of these types of tables in Chapter 13 when looking at essentials of coding T-SQL. Storing data in temporary tables is fine and something you will do in your lifetime as a developer, as long as the tempdb database is not refreshed. If it is, then your data will be gone, and you will need to rebuild them.
You may be thinking that this is not an ideal solution. After all, wouldn't it be wonderful if temporary information could be stored somewhere outside of the database? Well, that's not really where tempdb would be used. It really should be thought of only as transitional storage space.
Another reason tempdb is refreshed is that not only is it available for a developer to use, but also SQL Server itself uses tempdb. Actually, SQL Server uses tempdb all the time, and when you reinitialize SQL Server, it will want to know that any temporary work it was dealing with is cleaned out. After all, there could have been a problem with this temporary work that caused you to restart the service in the first place.
Being just like any other database, tempdb has size restrictions, and you must ensure that it is big enough to cope with your applications and any temporary information stored within it generated both by yourself and by SQL Server. An example of SQL Server using tempdb is when it has to hold data while it completes a sort of data for output. As you read through the next sections, you will see that a database has a minimum and a maximum size. tempdb is no exception to this, and you should ensure that its settings provide for expansion so it can grow as required.
![]() Caution Because
Caution Because tempdb has a limited size, you must take care when you use it that it doesn't get filled with records in tables from rogue procedures that indefinitely create tables with too many records. If this were to happen, not only would your process stop working, but also the whole server could stop functioning and therefore impact everyone on that server!
As indicated in the first paragraph of this section, there's more to say about tempdb's refresh process, which you'll examine in the next section.
model
Whenever you create a database, as you'll do shortly in this chapter, it has to be modeled on a predefined set of criteria. For example, if you want all your databases to have a specific initial size or to have a specific set of information, you would place this information into the model database, which acts as a template database for further databases. If you wanted all databases to have a specific table within them, for example, you would put this table in the model database.
The model database is used as the basis for creating the tempdb database as well as any other database created by you. Thus, you need to think ahead and take some care if you decide to alter the model database because any changes will be mirrored within the tempdb database. It is rare for the model database to be changed.
msdb
msdb is another crucial database within SQL Server because it provides the necessary information to run jobs to SQL Server Agent.
SQL Server Agent is a Windows service in SQL Server that runs any scheduled jobs that you set up (for example, jobs that contain backup processing). A job is a process defined in SQL Server that runs automatically without any manual intervention to start it.
As with tempdb and model, you should not directly amend this database, and there is no real need to do so. Many other processes use msdb. For example, when you create a backup or perform a restore, msdb is used to store information about these tasks.
AdventureWorks/AdventureWorksDW
AdventureWorks and AdventureWorksDW are the example databases that can be downloaded and installed from Microsoft's CodePlex web site, www.codeplex.com. Once these databases have been downloaded and installed on the computer, you have to attach these databases to SQL Server. Attaching databases will be demonstrated in Chapter 7. You will use the AdventureWorks database when looking at Advanced T-SQL in Chapter 14. These databases are based on a manufacturing company that produces bicycles. They exemplify the new features in SQL Server 2012 as well as demonstrate the features that arrived in SQL Server 2005 and 2008, such as Reporting Services, CLR functionality, and many others, in a simple, easy-to-follow way.
The following excerpt from the Microsoft documentation provides a concise overview of what the AdventureWorks databases are about:
Adventure Works Cycles, the fictitious company on which the AdventureWorks sample databases are based, is a large, multinational manufacturing company. The company manufactures and sells metal and composite bicycles to North American, European and Asian commercial markets. While its base operation is located in Bothell, Washington with 290 employees, several regional sales teams are located throughout their market base.
The example databases are not meant for novice SQL Server developers, although you'll have no problems with them after you learn the basics of SQL Server. They are also very good for practicing what you learn about SQL Server from this book with different data to check out what you're learning.
Now that you know what databases are in SQL Server, let's start building one! You'll start by deciding what type of database to create, depending on what it will be used for.
Choosing the Database System Type
Before you can design a database, you have to decide whether the system will be an Online Transaction Processing (OLTP) system or an Online Analytical Processing (OLAP) system. You could find this out prior to your first meeting with the users, or even during the first meeting, but the choice of OLTP or OLAP will probably be indicated in the initial proposal.
Before you make a decision, you need to understand these two key types of systems.
OLTP
An OLTP system provides instant updates of data. There is a good chance that an OLTP database system has a separate user front end written in a .NET language such as Visual Basic .NET (VB .NET), C#, or ASP.NET. This user front end calls through to the database and instantly updates any changes a user has made to the underlying data.
OLTP systems require many considerations to ensure they're fast and reliable and can keep the data integrity intact. When you design an OLTP system, it's crucial that you get not only the database structure right, but also where the data physically resides. It's common to find that OLTP systems are normalized to third normal form (more on what this term means later in the chapter), although this may not happen in every case. By normalizing your data, you will aid the achievement of one of the main goals of an OLTP system: keeping data updates as short as possible. When you normalize your data by removing redundant or duplicate columns, you should ensure that the data to be written is as compact as possible. In many OLTP systems, normalization is critical.
Backups
Many OLTP systems are in use 24 hours a day, 7 days a week. The high frequency of changes in such a system's data means that backing up the database is a necessary and mandatory task.
It is possible to back up a database while SQL Server is in use, although it is best to perform a backup either when SQL Server is not in use or when there will be a small amount of activity updating the data taking place. The ideal time frame might be in the middle of the night or even during a break period.
Whenever you decide to perform a backup, it's crucial you constantly monitor and check the backup to ensure that the system is still performing as desired. You would not be the first person to find that what you thought was a valid backup that could be restored in a disaster situation was in fact corrupt, incomplete, or just not happening. Therefore, periodically take a backup from production and reload it into a secure development area just to confirm that it works.
Indexes
Speed is essential to a successful OLTP system. You should see a higher number of indexes within an OLTP system as compared to an OLAP system, with these indexes used not only to help relate data from one table to another, but also to allow fast access to rows within tables.
![]() Note Chapter 6 covers how to build indexes, how indexes work, and how to manage indexes within your solutions.
Note Chapter 6 covers how to build indexes, how indexes work, and how to manage indexes within your solutions.
OLAP
When considering an OLTP system, you must keep in mind that an update to the database could happen at any moment in time, and that update must be reflected within the database instantly. It is also crucial that the system performs many updates simultaneously, and that it does not corrupt any data when it does so.
An OLAP system is designed with the premise that the data remains fairly static with infrequent updates. These updates could be every night, weekly, monthly, or any other time variant as long as updates aren't happening on a frequent basis, like in an OLTP system. As the name “Online Analytical Processing” suggests, in this system a large amount of the processing involves analysis of existing data. There should be little or no updating of that data—ostensibly only when the data within the analysis is found to be incorrect or, as mentioned previously, when more data are being applied for analysis. Backing up the data will probably take place only as a “final action,” after the database has had changes applied to it. There is no need to make it a regular occurrence.
OLAP systems tend to have two databases involved in their overall architecture. The first database is a normal SQL Server database in which you would store the data to be used to build your OLAP database. This could be your main database, although you would need to take care with the processing time and resources that can be taken up when the OLAP database extracts that data. An OLAP database has a completely different database infrastructure and objects compared to SQL Server and what you are going to learn in this book and does not have tables and indexes. Instead it uses the data loaded from the SQL Server database and stores the data in files on the servers where the data has been aggregated with measures and dimensions. OLAP databases require a totally different mindset and use different SQL called MDX to extract the data.
Systems designed for OLAP sometimes do not follow any design standards or normalization techniques. You tend to see no normalization in an OLAP system, as it is easier to take data and to slice and dice it without having to bring in data from a normalized table. There will be few or no updates taking place in an OLAP system, so performing transactions and keeping them compact aren't concerns. Most OLAP systems will contain no normalization. Quite often, you'll find one or two large flat tables—rather than several tables related together—and therefore as there are fewer relationships, there will be fewer indexes.
![]() Note OLAP systems are also known as data warehouses, although data warehousing is only one part of the overall OLAP system design. Put simply, a data warehouse is the database that holds the information used within the OLAP system.
Note OLAP systems are also known as data warehouses, although data warehousing is only one part of the overall OLAP system design. Put simply, a data warehouse is the database that holds the information used within the OLAP system.
Example System Choice
So, when you take into consideration all the information presented in the preceding sections, it is fairly obvious that although the data updates will be relatively infrequent in the example system (in other words, only when a financial transaction occurs or a statement is generated), there will be updates occurring online with instant results expected. Therefore, the system you will be building will be an OLTP system.
Gathering the Data
Among the first things you need to do before building a database is to find out what information the database system has to hold and then decide how that information should be stored (for example, numerical or text, length, and so on). To achieve this goal, you'll perform a data-gathering exercise, which could involve talking with those people who are the owners of the system and those who will be using the system.
For larger systems, you would hold several meetings, each of which would pinpoint one area of the system to discuss and research. Even then, several meetings may be spent going back and discussing each area. You could also conduct interviews, distribute questionnaires, or even just observe any existing processes in action, all in an effort to gather as much information as possible about the database and how it will be used.
The key indicator of whether a database solution is successful is not found so much in the building of the system, but rather in the information-gathering process before the first line of code is actually written. If you're working off an incorrect piece of information, or you're missing an element that might be crucial to the final solution, already the system is flawed. Involving the users as much as possible at the earliest stage and then including them as the design progresses should result in a significant reduction of errors and missing parts in the final product.
For the example financial program, the first people you would want to talk to are the owners of the data that will be displayed. These are the people in the banking department who handle checks, cash withdrawals, credit card transactions, and so forth, and also those people who handle the purchase and sale of stock shares, unit trusts, life insurance policies, and so on. These people will know what documentation or statements are sent to which customers, as well as the information those statements contain. In addition, these people will likely have a good idea about how customers may want to reconcile these statements, and also what data will be allowed to be downloaded and inserted into your SQL Server database.
At the first meeting, you examine all the documentation to see what information is stored in the current system. You find out at the meeting that the current system sends out different statements, one statement for the customer's current account and a separate statement for each financial product the customer owns. When you examine the statements, you focus on the information each contains that you need to capture to produce a similar statement. This could be not only customer-related information, but also regulatory statements.
With the information from all the documentation in hand, you can start discussions about what is required from the system you are to build. Obviously, a great deal of information will be discussed in these meetings; some of it is useful and some not. Make sure that the discussions are recorded in the order in which the people present make points and not in “logical” order. This simulates meetings where people “remember” items that have to be catered to, where one point raised may make someone remember a point elsewhere.
Out of the initial discussions, you note the following points:
- The software must be able to handle working with more than one product. The main product is a current checking account that a bank or a single user might use to hold banking details. The system also must be able to manage by-products such as loans, life insurance policies, and car insurance policies, and it should be able to record any trading of shares on the stock market.
- Statements are produced on a monthly basis or at any time the customer requests them from the system. If a customer requests a statement within the month, there will still be a statement produced for that month.
- Interest accrues daily on accounts that are in credit and is subtracted daily from overdrawn accounts.
- Annual, monthly, or single-premium products can be held for a customer or held by a customer in a stand-alone version of the system. You need to know when to start and stop collecting payments, and you also need to determine which products you send out a reminder for (for example, a notice to let a customer know her car insurance policy is up for renewal).
- If a collection for a product failed, the system needs to recognize this so the amount can be collected the next time a collection is due.
- Each product will have its own statement, but only banking statements will be produced on request.
- Trading of stock shares is allowed, so the system needs to record and display the current value for a customer's specific share at any time.
Notice how the information in this list is in no set order, because this is how information tends to come out. Also notice that there is a little bit of duplication of information in points 2 and 6; if this is not realized or understood, it could cause problems.
![]() Note This is the only data-gathering exercise performed for the example database. The information gathered here should be cross-checked later in the design phase with the users, although this is beyond the scope of this book.
Note This is the only data-gathering exercise performed for the example database. The information gathered here should be cross-checked later in the design phase with the users, although this is beyond the scope of this book.
Determining the Information to Store in the Database
Using the notes you took in the previous section, you'll now try to find every area each point has an interest in. Looking at the list of areas that require information to be recorded and stored within the database, it's clear you need to arrange them in some sort of order. You're still looking at your solution from a logical viewpoint, and you're not ready to start building anything in SQL Server yet.
First off, let's scan through the points listed and try to group the information into specific, related areas. The list items are numbered, so I will be able to easily demonstrate the groupings. The following list shows some initial groupings and reasons for them:
- Financial products
- 1: You are dealing with more than one product. You need to record each product.
- 2: Statements will be produced for each product, and specific product information for those statements will be recorded here, such as the name of the product.
- 4: You need to record what type of premium is associated with this product.
- 5: This point deals with a financial product's premium collection.
- 6: This point deals again with statement production.
- Customers
- 2: Customers can request statements.
- 3: You need to record the amount of interest for a customer.
- 4: A list of the different products associated with each customer is required.
- 7: For each share, you need to keep a current value.
- Customer addresses
- 2: You need each customer's address in order to send a statement.
- 6: As with point 2, you need the customer's address to send a statement.
- Shares
- 1: You trade shares on the stock market; therefore, you need to record share information.
- 7: You need to keep a given share's value.
- Transactions
- 2: A list of transactions is required for statement production.
- 3: Interest charges have to be calculated and recorded.
- 4: Regular and ad hoc premiums have to be recorded.
- 5: You need to record failed transaction collection.
- 6: Statements will be produced for each product.
These five distinct groups could translate into five distinct tables within the proposed database. At this point in the logical design process, you would base your design on these five tables. From here, it is then possible to start examining the information that should go into these logical tables. There might be duplication of data with columns in the “wrong” table, and the potential for multiple columns to hold “similar” information or the same column in more than one table.
Let's look at the list points in turn in the following sections and examine what information should be stored in each “table.” The information listed in the sections that follow is taken from the discussion with the users, and a list of the columns is supplied that may initially form the basis of the tables. Each column has a description, so when you go back to the users, they'll understand the purpose of the columns. Also at this stage, you will add columns to hold any identifiers for finding the records; in the following sections, these are denoted with (K). These are potentially the keys, which I'll cover in more detail later in the “Building Relationships” section of this chapter.
Financial Products
The aim of this table is to hold the different products the company sells. From bank accounts to life insurance, all products will be held here. This table will be used when producing statements and creating transactions when the user's balance changes—for example, when buying further shares:
- Financial Product ID (K): This is a unique identifier.
- Financial Product Name: This is the name of the product, such as checking account, share, loan, and so forth.
- Frequency of Payment: For each product, this indicates how often payments are collected for those products that require it, such as a loan, a regular savings account, and so on.
Customers
This table will hold customer details, such as the customer's products and balances. To clarify and reiterate, there will be items currently within this table that will no longer reside within it once you normalize the data. For example, you will see an attribute for “Account Numbers for Each Product.” When you proceed through normalization, you will see how attributes such as this are “moved”:
- Customer ID (K): This is a unique ID for each customer.
- Financial Product Balance: This is the current balance of each product.
- Title: This is the customer's title (Mr., Ms., and so on).
- First Name: This is the customer's first name.
- Last Name: This is the customer's last name.
- Address: This is the customer's address.
- Account Numbers for Each Product: This is the account number of each product the customer owns.
- Financial Products Details: These are the details of each financial product the customer owns.
Customer Addresses
As part of the analysis, you will not hold your own address information, and you will instead get this from a third-party system. This table will therefore not exist within your database.
Shares
This table holds the details of each stock share, such as its current price and its price history:
- Share Price ID (K): This is a unique ID for each share.
- Share Name: This is the name of the share.
- Current Price: This is the current price of the share.
- Previous Price: This contains previous prices of the share.
- Price Date: This is the date the price was set at this level.
- Stock Market Ticker ID: This is the ID for this share on the stock market.
Transactions
This table holds the details of each financial transaction that takes place for each product.
- Financial Transaction ID (K): This is a unique ID for each financial transaction.
- Customer ID: This is the customer's unique identifier, as defined in the “Customers” section earlier.
- Date of the Transaction: This is the date the transaction took place.
- Financial Product: This is a link to the financial products table.
- Amount: This is the amount the transaction is for.
- Debit/Credit: This flag denotes whether the transaction is a debit or a credit.
External and Ignored Information
At this point, you have a first draft of the logical tables and attributes, but there are still no relationships between these tables. There is one more piece of information that you need to know, which concerns information not recorded, because it won't be included within this database.
The example database will not hold every item of information that is required to make the system complete. This is to keep the example simple and to avoid having extra tables that will not be used within the book's exercises. However, there may be other times when you may want to implement only some of the tables—for example, when performing a viability study (in other words, when you're building part of a system to prove the viability of an idea). Or perhaps a third-party tool can fill in the gaps.
For example, a system might use an external addressing system, and instead of holding all customer addresses within the system, it may use a cross-reference ID. A table could also exist to hold all of the financial transactions for products not covered where specialized tables are required, such as for company pension plans.
Next, let's move on to consider relationships between the tables in the database.
Building Relationships
Much like people, databases can be temperamental creatures and need a bit of TLC. Good relationships can provide this kind of care and attention.
At the moment, the tables in the example database are essentially single, unrelated items. Of course, they have columns with the same name in different tables, but there is nothing tying them together. This is where defining relationships between the tables comes in. Binding the tables together in this way ensures that changes in one table do not cause data in another table to become invalid.
Using Keys
A key is a way of identifying a record in a database table. You can use keys to build relationships between tables because a key refers to a whole record—a property you can exploit when working with columns that, for example, have the same name in different tables. Using a key as a shortcut, you can make the link between the two very easily. Keys can also uniquely identify a record in a table when that is an important part of the database's design.
A key can be defined on a single column if that's enough to identify the record, or it can be defined on more than one column if not. The sections that follow introduce the three kinds of keys you can use in a database: primary, foreign/referencing, and candidate/alternate. You will also look at using a SQL Server method called a constraint instead of a primary key.
Primary Key
The primary key is probably the most important key type. First and foremost, the column (or combination of columns) on which the primary key is defined must contain only unique values. A primary key cannot be defined on a column, or a sequence of columns, that does not return a single row. To this end, it is not possible to define a primary key for any columns that allow NULL values. A further restraint is that a table may have only one primary key.
A primary key can be used to link data from one table to data from another. For instance, in your example database, you have two tables: one holding customers and another holding customer banking transactions. You will define a primary key on the Customers table on the customer ID that is generated uniquely each time a new customer record is inserted. This is then used to link to the many records within the banking transactions table, to return all the transactions for that customer ID. The link between these two tables is the customer ID, which as previously mentioned is defined as a primary key in the Customers table.
Later in this chapter, you'll see how to join tables together and define a relationship between them. A join and a relationship are essentially the same thing, a logical link between two or more tables that can be defined through a specific column or set of columns between the tables.
Foreign/Referencing Key
There will be times when you have two or more tables linked together in a relationship, as demonstrated in the earlier example, where the link between the Customers and Transactions tables is the customer ID column. This column returns a unique row in the Customers table; hence, it is defined as the primary key of the Customers table. However, there has to be a corresponding foreign (or referencing) key in the Transactions table to link back to the Customers table, which is the customer ID column of the Customers table.
When it comes to creating relationships within your example database, you will later see how a foreign key is created that will create a link, or a relationship, between two columns. This link is created through a constraint, which is a method SQL Server uses to check the details built into the relationship. From the viewpoint of a foreign key, this constraint, or check, will ensure that the relationship follows the conditions set with it. You'll examine foreign keys in more depth in the “More on Foreign Keys” section.
Candidate/Alternate Key
As mentioned previously, a table can have only one primary key. However, there may be another key that could just as easily be defined as a primary key. This is known as a candidate key, because it is a candidate for being the primary key.
There is no logical difference at all between the definition of a candidate key and a primary key. For example, if you have a table that holds spare parts for a General Motors (GM) vehicle, you could have an internal GM part number to use when ordering parts at the head office for various GM branches. This part number would be unique and would likely be used as the primary key. However, a part number is also created by each of the manufacturers, which is unique to them. This, too, could be a primary key if you include the supplier identifier in the database. You can't have two primary keys, and you've chosen the GM part number as the primary key, but you could create a candidate key using the manufacturer identifier and part number.
A Unique Constraint Instead of a Primary Key
This is where having a constraint defined will ensure that only unique values can be entered into columns defined within the constraint. This sounds very much like the previous primary key definition, but there are differences.
A unique constraint is not a primary key, but the column or columns defined within the constraint could be a primary key. Also, a unique constraint can contain NULL values, but recall that a primary key cannot. However, NULL is treated as any other value within a column; therefore, the columns used to make a unique constraint must remain unique, including the NULL value, when you're looking to insert or update data. Finally, it is possible to have multiple unique constraints, but you can have only one primary key. An example of a table with a unique constraint could be a table that holds the dates and numbers that correspond to the weeks of the year. Week 1 could begin on January 4, Week 2 would then begin on January 11, and so on. The primary key would be the week number; however, a unique constraint could also be placed on the date column.
Creating Relationships
A relationship in a SQL Server database is a logical link between two tables. It is impossible to have a physical link, although, as you will see later, a physical line is drawn between two tables when designing the database. Having a physical link would mean the actual data linking the two tables would be stored only once in a central location, and that information within the keys linking the tables would be stored more than once, which is just not the case.
When defining a logical relationship, you're informing SQL Server that you'll be linking a primary key from the master table to a foreign key in another table. So already there is a need for two keys: one on each table.
The following sections present specific details about relationships, starting with a look at how relationships work with the concept of referential integrity.
Relationships and Referential Integrity
A relationship can be used to enforce data integrity. In other words, if you are expecting data in one table because there is data in another, you can place a relationship between these two tables to ensure that no SQL command breaks this rule. However, don't confuse referential integrity with other processes that are associated with maintaining data integrity, such as placing checks or default values on columns to ensure that values for a specific column are valid.
Referential integrity revolves around the idea that there are two tables in the database that contain the same information, and it requires that the duplicated data elements are kept consistent. For example, if you have a primary key in one table and a foreign key in another table that have data that matches exactly, it is important that both pieces of data either change together or don't change at all. Relationships are not the only way referential integrity can be enforced; you can also use triggers to ensure that data remains valid (you will examine this further in Chapter 15).
For instance, the example banking system includes the Customers and Transactions tables. It is not possible to record customer transactions without a customer record. As a result, you have to use referential integrity to enforce data integrity between these two tables so that a customer record can't be removed from the database while there are customer transaction records for that customer. Similarly, this rule should allow the removal of a customer record when there are no customer transaction records.
Another result of enforcing referential integrity is that it isn't possible for a customer transaction to be entered using a customer reference number that doesn't exist within the Customers table. Instead, to enter a customer transaction in this situation, you first have to create the customer record, and then you can carry out the transaction.
Finally, if you had a customer record and related customer transaction records, you couldn't alter the customer reference number in the customer record without first altering the customer transaction records and checking that the reference you're altering the customer transaction records to already exists.
So, there are a number of rules to follow if you want to maintain the integrity of your data. If you so desired, you could use referential integrity to enforce data integrity. However, a flip side to all of this to be aware of is that you can keep data integrity within a system and not use referential integrity. Instead, you can create stored procedures or triggers, which are types of programs within SQL Server, to do this task. You will look at these topics in Chapters 12 and 15.
Using stored procedures and triggers is a possible but undesirable solution, because it leaves the system open to instances where data integrity is not kept, because of holes within the design of the system or perhaps because a developer doesn't have the correct processing sequence to ensure that all data are always valid. Not only that, but if someone adds data directly to a table, the referential integrity will be lost. That said, having the data integrity checks in an application does lead to less traffic flow over the network, because all the validation is done on the front end.
There is one more important point about referential integrity before I move on to discuss database relationship types: if you want to maintain referential integrity by creating a relationship between two tables, these two tables must be in the same database. It is not possible to have referential integrity between two databases.
Types of Relationships
Three main relationship types can exist in a database:
- One-to-one
- One-to-many
- Many-to-many
The sections that follow cover each type, so when it comes to creating a relationship, you'll know which one to create, when to create it, and why. You'll start off by looking at the one-to-one relationship, which is perhaps the easiest type of relationship to understand, although it is one of the least used.
One-to-One
This relationship type isn't very common within a working database. Typically, there is no real reason for one record in one table to match just one record in another. This scenario would exist, for example, only if you were splitting a very large table into two separate tables.
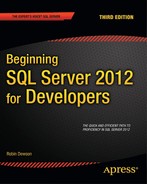
To illustrate the one-to-one relationship, imagine that in the example bank database there is a table that holds PINs for ATM cards, keeping them completely separate from the remainder of the customer records (see Figure 3-1). In most cases, there would be one PIN record for each customer record, but there may be exceptions—for instance, a high-interest deposit account may not have a card, and therefore there would be no associated PIN record.
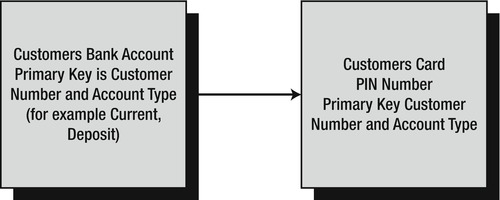
Figure 3-1. One-to-one relationship
One-to-Many
Perhaps the most common relationship found in a database is the one-to-many relationship. This is where one master record is linked with zero, one, or more records in a child table.
Using the banking example, say you have a customer master record along with any number of associated transaction records. The number of these transaction records could range from none, which corresponds to when a customer is new to the bank and hasn't made a deposit or performed a transaction, to one or more, which corresponds to when there has been an initial deposit in an account, and then further deposits or withdrawal transactions after that (see Figure 3-2).
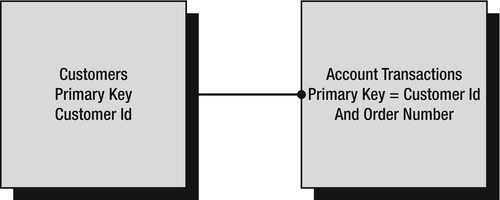
Figure 3-2. One-to-many relationship
You'll see this concept in action again in the customer-to-transactions relationship you will build for the solution.
Many-to-Many
Many-to-many is the final relationship type that can exist in a database. This relationship can happen relatively frequently where there are zero, one, or indeed many records in the master table related to zero, one, or many records in a child table.
An example of a many-to-many relationship might be where a company has several depots for dispatching goods, presented in the master table, which then dispatch goods to many stores, presented in the child table (see Figure 3-3). The depots could be located and organized so that different depots could all supply the same store, and they could be arranged in groups of produce, frozen, perishables, and bonded. In order for a store to be supplied with a full complement of goods, it would need to be supplied by a number of different depots, which would typically be in different locations.
Figure 3-3. Many-to-many relationship
When building relationships within a database, it is necessary to have a foreign key. I covered foreign keys briefly earlier in the chapter; let's take a closer look at them in the next section.
More on Foreign Keys
A foreign key is any key on a child table where a column, or a set of columns, can be directly matched with exactly the same number and information from the master table. By using this foreign key, you can build up the data to return via a relationship.
However, a foreign key does not have to map to a primary key on a master table. Although it is common to see a foreign key mapped to a primary key, as long as the key in the master table that is being mapped to is a unique key, you can build a relationship between a master table and a child table.
The whole essence of a foreign key lies in its mapping process and the fact that it is on the child table. A foreign key will exist only when a relationship has been created from the child table to the parent table. But what exactly are the master table and the child tables? To demonstrate, let's refer to the relationship examples. Take the one-to-many relationship. The master table would be on the left side, or the “one” side of the relationship, and the child table would be on the right side, or the “many” side of the relationship (see Figure 3-4).

There is one final point to mention concerning foreign keys, relationships, and the master and child tables. It is totally possible for the master table and the child table to be the same table, and for the foreign key and the unique key to both be defined within the same table. This is called a self-join or a reflexive relationship. You don't tend to see this much within a database, because it is quite an unusual situation, although you could use it to ensure that the data in one column exactly matches the information in another column, just as in any other join.
For example, say you have a table built around customers, and you have two columns, one of which is a parent customer ID, which holds an ID for the head office and is used to link all the branches. If the head office is also seen as a valid branch of the conglomerate, the second column could be the specific branch ID, and you could put a link between these two columns so that there is still a valid link for the head office as a branch as well (see Figure 3-5). Another example is in an employees table where all employees reside, with a self-join from an employee back to his or her manager.
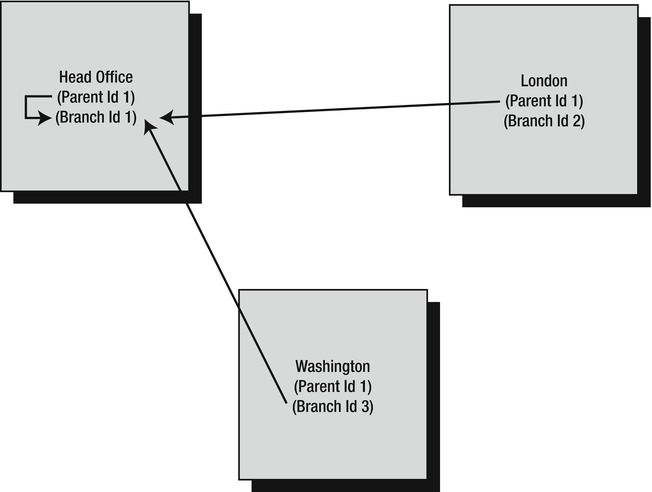
Figure 3-5. Foreign keys in same table
Now that we've looked at relationships, let's move on to see how to normalize the database.
Normalization
Normalizing a database means minimizing data redundancy to avoid update anomalies. Removing duplicate data leads to smaller, more compact databases. This avoids confusion over which column holds data and reduces the overhead of keeping data up to date.
![]() Note Just a reminder that you're still in the logical phase of building the solution, and you're not ready to start building your database within SQL Server.
Note Just a reminder that you're still in the logical phase of building the solution, and you're not ready to start building your database within SQL Server.
A database designer should not normalize with impunity, because this may negatively affect data retrieval. In good normalization, the removal of the duplication of data will provide faster sorting of data and queries that run faster, thereby improving performance. Although normalization can make a database more efficient, overnormalizing may create too many relationships and too many slim, small tables, so that to retrieve one piece of information requires access to many tables and many joins between these tables. Database design is an art, and a knowledgeable designer knows when to stop normalizing. In fact, after normalizing a design, it's often wise to denormalize it by adding back some redundancy to make critical queries run faster (see “Denormalization” later in this chapter).
In this section of the chapter, you'll model your example in a method known as logical modeling. The purpose of the logical model is to show the data that the application must store to satisfy business requirements. It demonstrates how these data are related and explores any integration requirements with business areas outside the scope of the development project. It is created without any specific computer environment in mind, so no optimization for performance, data storage, and so forth is done.
In logical modeling, the term entity is used to mean a conceptual version of a table. As you're still in the logical modeling stage of designing your database, I'll use “entity” rather than “table” in this discussion, since it is less tied to implementation. Also within logical modeling, a column of data is referred to as an attribute. To build the logical model, you will take the information gathered previously in the chapter and implement attributes in the entities. From that, you'll see how you need to alter the design.
The question remains, what should be contained in an entity? Three principles should govern the contents of an entity:
- Each entity should have a unique identifier.
- Store only information that directly relates to that entity.
- Avoid repeating values or columns.
The sections that follow provide more detail about each principle.
Each Entity Should Have a Unique Identifier
It must be possible to find a unique row in each entity. You can do this through the use of a unique identifying attribute or the combination of several attributes. However, no matter which method you use, it must be impossible for two rows to contain the same information within the unique identifying attribute(s).
Consider the possibility that there is no combination of attributes in an entity that can make a row unique, or perhaps you want to build a single value from a single attribute. SQL Server has a special data type, called unique identifier, that can do this, but a more common solution is to build a column attribute with an integer data type and then set this up as an identity column. You'll learn more about this technique when building the tables in Chapter 5.
Store Only Information That Directly Relates to That Entity
It can be very easy in certain situations to have too much information in one entity and therefore almost change the reason for the existence of the specific entity. Doing so could reduce efficiency in an OLTP system, where duplicate information has to be inserted. It could also lead to confusion when an entity that has been designed for one thing actually contains data for another.
Avoid Repeating Values or Columns
Having attributes of data where the information is an exact copy of another attribute within either the same entity or a related entity is a waste of space and resources. However, what tends to happen is that you have repeated values or attributes within two or more tables, and therefore the information is duplicated. It is in this scenario that you are expected to avoid the repeating values and move them elsewhere.
Normal Forms
Now that you know what should be contained within an entity, how do you go about normalizing the data? The normal forms addressed within this chapter are as follows:
- First normal form (1NF)
- Second normal form (2NF)
- Third normal form (3NF)
There are other, “higher” normal forms, but they are mainly of theoretical significance, so they will not be covered here.
First Normal Form
To achieve 1NF within a database, it is required that you eliminate any repeating groups of information. Any groups of data found to be repeated will be moved to a new table. Looking at each table in turn, you find that you have two tables in the example database that potentially flout the first requirement of 1NF: customers and shares.
Customers
There are two columns with possible repeating values in this table:
Title: A customer's title will be Mr., Miss, Ms., or Mrs., all of which you could put in to a reference table. Some corporations do this; others don't. It all depends on whether you want to restrict what users can enter.Address: The address should be split out into separate lines, one for each part of the address (for example, street, district, and so on.). It is probably well worth having a reference table for cities, states, and countries, for example.
Shares
There is one column that will possibly repeat: share name. This is really because of the Shares table actually doing two jobs: holding details about the share, such as its name and the market ticker, which really are unique; and holding a historical list of share prices. This table actually needs to be split into Share Details and Share Prices, which you'll see happening when we discuss the 3NF.
Second Normal Form
To achieve 2NF, each column within the table must depend on the whole primary key. This means that if you look at any single column within a table, you need to ask whether it is possible to get to this information using the whole key or just part of the key. If only part of the key is required, you must look to splitting the tables so that every column does match the whole key. So, you would look at each column within the table and ask, “Can I reach the information contained within this column just using part of the key?” All of the tables use an ID as the primary key, and only one column will define that ID. Therefore, to break 2NF with this is almost impossible. Where you are more likely to break 2NF is a scenario in which the primary key uses several columns.
If you look at all the tables within the example, every column within each table does require the whole key to find it.
Third Normal Form
To achieve 3NF, you must now have no column that is not part of the primary key be dependent on any other column within the table.
The Customers table does have data derived from another table, with account numbers for each product the customer has bought and financial product details. This means the account number plus details about the product such as the date opened, how much is paid with each payment, and the product type do not belong in the Customers table. If such information did remain in the table, Customers would have multiple rows for the same customer. Therefore, this table also now needs to be split into Customer details such as name and address, and CustomerProducts, such as a row for each product bought with the customer details about that product.
We have now reached full normalization to 3NF of the tables within the database. Let's take a moment to clarify where you are. Figure 3-6 shows that you're now moving from a logical model to a physical model, where you are physically defining what information is stored where.
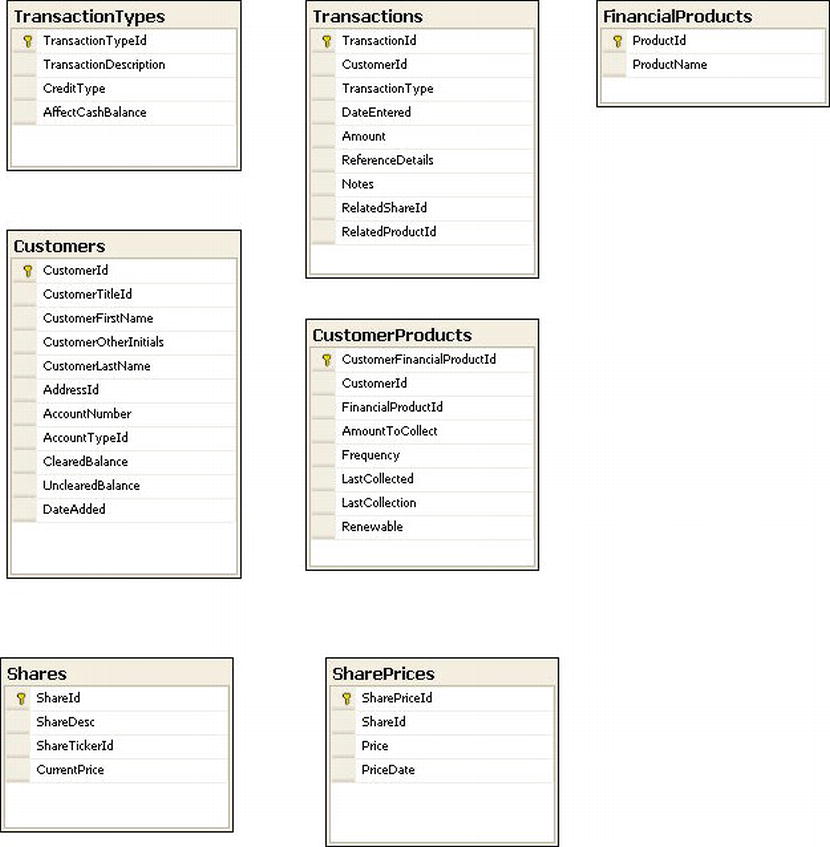
Figure 3-6. Physical database model
Denormalization
Despite having normalized your data to be more efficient, there will be times when denormalizing the data is a better option. Denormalization is the complete opposite of normalization: it is where you introduce data redundancy within a table to reduce the number of table joins and potentially speed up data access. Instances of denormalization can be found in production systems where the join to a table is slowing down queries, or perhaps where normalization is not required (for example, when working with a system in which the data are not regularly updated).
Just because others say your data should be totally normalized, it is not necessarily true, so don't feel forced down that route. The drawback of denormalizing your data too far, though, is that you'll be holding duplicate and unnecessary information that could be normalized out to another table and then just joined during a query. This will, therefore, create performance issues as well as use a larger amount of data storage space. However, the costs of denormalization can be justified if queries run faster. That said, data integrity is paramount in a system. It's no use having denormalized data in which there are duplications of data where one area is updated when there's a change, and the other area isn't updated.
Denormalization is not the route you want to take in the database example; now that you have all the data to produce the system, it's time to look at how these tables will link together.
Creating the Sample Database
Let's now begin to create your example database. In this section, you will examine two different ways to create a database in SQL Server:
- Using the SQL Server Management Studio graphical interface
- Using T-SQL code
Both methods have their own merits and pitfalls for creating databases, as you'll discover, but these two methods are used whenever possible throughout the book, and where you might find one method is good for one task, it may not be ideal for another. Neither method is right or wrong for every task, and your decision of which to use basically comes down to personal preference and what you're trying to achieve at the time. You may find that using T-SQL code for building objects provides the best results, because you will see instantly the different possible selections. Using T-SQL also provides you with a greater base from which to work with other programming languages and databases, although some databases do differ considerably in the language used to work with them. However, if the syntax for the commands is not familiar to you, you may well choose to use a wizard or SQL Server Management Studio. Once you become more comfortable with the syntax, then a Query Editor pane should become your favored method.
You'll also examine how to drop a database in SQL Server Management Studio.
Creating a Database in SQL Server Management Studio
The first method of creating a database you will look at is using SQL Server Management Studio, which was introduced in Chapter 2.
TRY IT OUT: CREATING A DATABASE IN SQL SERVER MANAGEMENT STUDIO
- Before creating the database, you'll need to start up SQL Server Management Studio. To do this, select Start
 All Programs Microsoft SQL Server 2012 SQL Server Management Studio.
 Tip I run all this book's examples from a server called
 FAT-BELLY-Sonyusing the named instanceAPRESS_DEV1. You will have your own name for your host computer and possibly even your own name for the installed instance. Therefore, throughout the book, when you seeFAT-BELLY-Sony, you should substitute your own host computer name. - Ensure that you have registered and connected to your server. If the SQL Server service was not previously started, it will automatically start as you connect, which may take a few moments. However, if you have not shut down your computer since the install of SQL Server, then everything should be up and running. SQL Server will stop only if you have shut down your computer and indicated not to start the SQL Server service automatically or the Windows account used to start the service has a problem, such as being locked out. To start SQL Server, or conversely, if you want to set up SQL Server not to start automatically when Windows starts, set this either from Control Panel or from the SQL Server Configuration Manager found under Start All Programs Microsoft SQL Server 2012 Configuration Tools.
- In Object Explorer, expand the Databases node until you see either just the system database and database snapshot nodes that always exist. Ensure that the
Databasesfolder is highlighted and ready for the next action, as shown in Figure 3-7.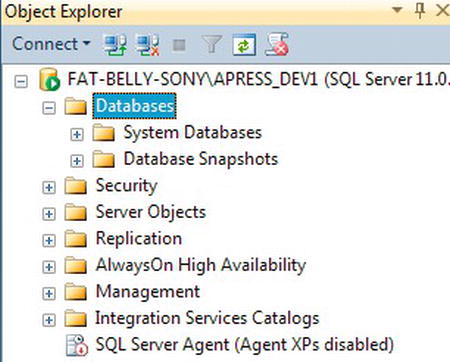
Figure 3-7. The
Databasesnode in Object ExplorerA minimum amount of information is required to create a database:
- The name the database will be given
- How the data will be sorted
- The size of the database
- Where the database will be located
- The name of the files used to store the information contained within the database
SQL Server Management Studio gathers this information using the New Database menu option.
- Right-click the
Databasesnode to bring up a pop-up menu with a number of different options. Select New Database, as shown in Figure 3-8.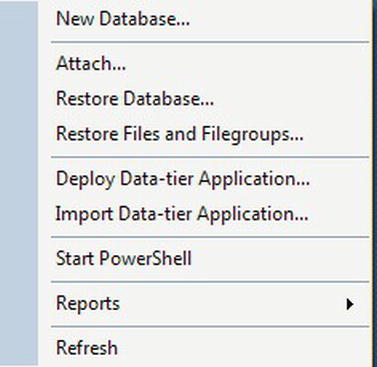
Figure 3-8. Selecting to create a new database
- You are now presented with the New Database dialog box set to the General tab. First enter the name of the database you want to create—in this case,
ApressFinancial. Notice as you type that the two file names in the Database Files list box also populate. This is simply an aid, and you can change the names (see Figure 3-9). However, you should have a very good reason to not accept the names that the screen is creating, as this is enforcing a standard.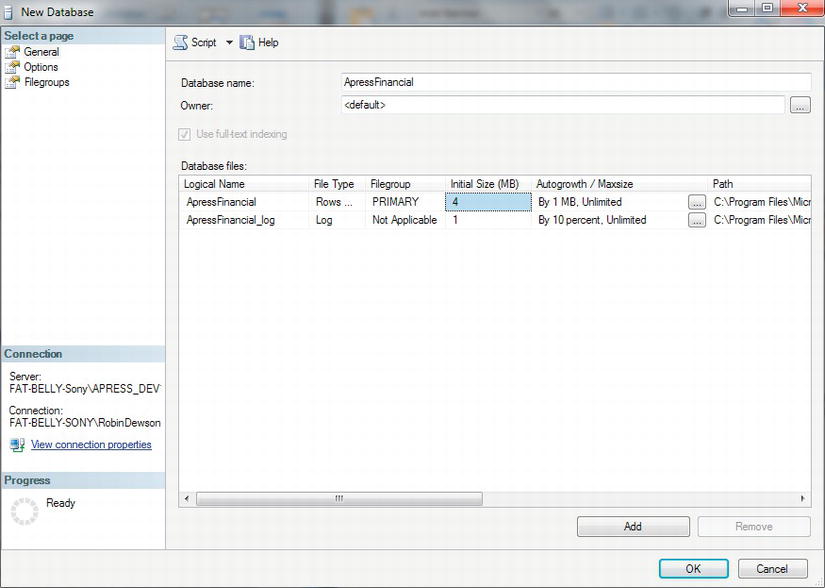
Figure 3-9. General settings in the New Database dialog
The General screen within this page collects the first two pieces of information. The first piece of information required is the database name. No checks are done at this point as to whether the database exists (this comes when you click OK); however, there is some validation in the field so that certain illegal characters will not be allowed.
Note Illegal characters for a database name are as follows:
" ' */?:<>Keep to alphabetic, numeric, underscore, or dash characters. Also, you may want to keep the database name short, as the database name has to be entered manually in many parts of SQL Server. Below the database name is the owner of the database—in other words, the login defined as having the ability to do anything within the database as well as determine what other logins can do with the database. This can be any login that has the authority to create databases. A server in many—but not all—installations can hold databases that belong to different development groups. Each group would have a login that was the database owner, and at this point, you would assign the specific owner. For the moment, let it default to the
<default>account, which will be the account currently logged in to SQL Server; you'll learn how to change this later. If you're using Windows authentication, then your Windows account will be your user ID, and if you're using SQL Server authentication, it will be the login ID you used at connection time.The database owner, which is often shortened to dbo, initially has full administration rights on the database, from creating the database, to modifying it or its contents, to even deleting the database. Because a dbo account has such power it is best to create either a user or a group specifically for administration rights. You will see groups discussed in Chapter 4.
Ignore the check box for Full-Text Indexing. You would select this option if you wanted your database to have columns that you could search for a particular word or phrase and Full-Text Indexing had been installed. For example, search engines could have a column that holds a set of phrases from web pages, and full-text searching could be used to find which web pages contain the words being searched for.
The File Name entry (off-screen to the right in Figure 3-9) is the name of the physical file that will hold the data within the database you're working with. By default, SQL Server takes the name of the database and adds a suffix of
_Datato create this name.Just to the left of the File Name option is the physical path where the files will reside. The files will typically reside in a directory on a local drive. Some larger companies attach network storage to the server, and the data will reside there, off the main computer, and in this case you would enter the network path. For an installation such as you are completing on a local machine, the path will normally be the path specified by default. That path is to a subfolder under the SQL Server installation directory. If, however, you are working on a server, although you will be placing the files on a local hard drive, the path may be different if the server has disk partitions or even a second hard drive specifically for the data, so that different teams' installations will be in different physical locations or even on different local hard drives.
The database files are stored on your hard drive with an extension of
.MDF—for example,ApressFinancial_Data.MDF. In this case,.MDFis not something used by DIY enthusiasts, but it actually stands for Master Data File and is the name of the primary data file. Every database must have at least one primary data file. This file may hold not only the data for the database, but also the location of all the other files that make up the database, as well as startup information for the database catalog. An MDF is an allocation of space on the hard drive where SQL Server places the tables as well as the rows of information that are within the tables.It is also possible to have secondary data files. These would have the suffix
.NDF. Again, you could use whatever name you wished, and, in fact, you could have an entirely different name from the primary data file. However, if you did so, the confusion that would abound is not worth thinking about. So do use the same name, and if you need a third, fourth, and so on, then add on a numerical suffix.Secondary data files allow you to spread your tables and indexes over two or more disks. The upside is that by spreading the data over several disks, you will get better performance. In a production environment, you may have several secondary data files to spread out your heavily used tables.
Note As the primary data file holds the database catalog information that will be accessed constantly during the operation of the server, it would be best, in a production environment at least, to place all your tables on a secondary data file.Finally, there will be another file type, which is
.LDF. This is the transaction log file that holds a record of certain actions you perform. This is covered in detail in Chapter 8 when we take a look at backup and restores. You would place the file name for a secondary data file in the row below theApressFinancial_Dataentry in the Data Files list box, after clicking the Add button. TheFile Typecolumn shows whether the file is a data file or a log file, as in a file for holding the data or a file for holding a record of the actions done to the data.The next column in the grid is titled
Filegroup. This allows you to specify thePRIMARYfilegroup and anySECONDARYdata filegroups for your database. Filegroups are for grouping logical data files together to manage them as a logical unit. You could place some of your tables in one filegroup, more tables in another filegroup, indexes in another, and so on. Dividing your tables and indexes into filegroups allows SQL Server to perform parallel disk operations and tasks if the filegroups are on different drives. You could also place tables that are not allowed to be modified together in one filegroup and set the filegroup to Read-Only. If you want to have another database file, you can click Add at the bottom of the General page. Figure 3-10 shows the dialog for creating a new filegroup, which is displayed if you click the combobox in the Filegroup column on any newly created database file. The top option allows you to create read-only filegroups. Finally, when creating a database object, the default filegroup is thePRIMARYfilegroup. In a production environment—and therefore in a development environment as well, so that it is simpler to move from development through to production—you would create a secondary filegroup and set it as the default. In this book, you will just keep to thePRIMARYfilegroup for simplicity. At this point, a third database file is not required.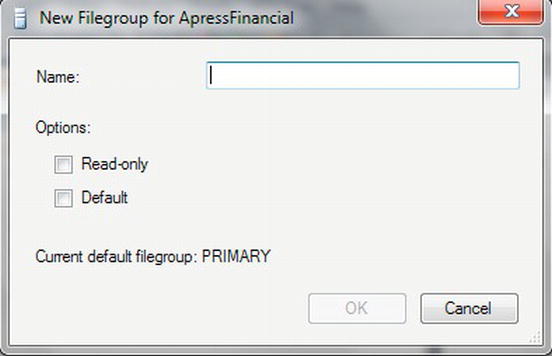
Figure 3-10. New filegroup
The logic behind secondary data files is relatively straightforward. A
PRIMARYfilegroup will always—and must always—contain the system tables that hold the information about the database, the tables, the columns, and so on. If you have the Autogrowth file option (covered shortly) switched off, thePRIMARYfilegroup is likely to run out of space at some point. If this happens and no secondary data files are specified, the database will grind to a halt until some space is added. However, in most instances, especially when you're first starting out, you can leave the database with only aPRIMARYfilegroup.Don't misunderstand filegroups and space, though: filegroups are there to help you organize your files within your database storage, and the files that make up the filegroup may span several disks for a performance issue. You will move files around filegroups for speed, efficiency, security, backups, and a number of other reasons. However, you can still hold all the files in one filegroup—the
PRIMARYfilegroup— which is what you'll do throughout this book. - Click Cancel in the New Filegroup dialog box, and then click Remove in the New Database dialog box to remove the third line within the database files grid if you added a line while checking out the filegroup discussion for Figure 3-10.
Note Remember that the
PRIMARYfilegroup may hold not only data, but also the system tables, so thePRIMARYfilegroup could fill up purely with information about tables, columns, and so forth used to run SQL Server.The next item in the New Database dialog box is the Initial Size (MB) column. The initial size of the database is its size when empty. Don't forget that the database won't be totally empty and is created from the
modelsystem database, and some of the space will be initially taken up with the system tables. It is impossible to say, “I'm creating a database, and the initial size must be nnMB”—the database size depends on many factors, such as the number of tables, how much static information is stored, to what size you expect the database to grow, and so on. It would be during the investigation phase that you would try to determine the size that you expect the database to reach over a given period of time. If anything, estimate larger rather than smaller to avoid fragmentation.Moving on to the next, and possibly most important, area: Autogrowth. This option indicates whether SQL Server will automatically handle the situation that arises if your database reaches the initial size limit. If you don't set this option, you will have to monitor your database and expand its size manually, if and when required. Think of the overhead in having to monitor the size, let alone having to increase the size! It is much easier and less hassle, and much less of a risk, to let SQL Server handle this when starting out. However, do set a maximum size so that you have some emergency disk space available in case it is required.
Note In a production environment, or even when you're developing in the future, it will be more common to switch Autogrowth on and fix the maximum size. This prevents your hard drive from filling up and your server from being unable to continue. At least when you fix the maximum size, you can keep some hard drive space in reserve to enable your SQL Server to continue running while the development team tries to clear out unwanted data, but also create an initial smaller size and allow growth if required.While SQL Server handles increasing the size of the database for you, it has to know by how much. This is where the Autogrowth option comes in. You can let SQL Server increase the database either by a set amount each time in megabytes or by a percentage. The default is By Percent, and at this stage, it doesn't really matter. In the example, the first increase will be 0.4MB; the second increase will be 0.44MB. For the example, this is sufficient, as there won't be a great deal of data being entered. However, the percentage option does give uneven increases, and it could mean that a larger 10% increase could be tens or hundreds of megabytes. This could be a large increase that could be unnecessary for the database. If you want to change these options by selecting the autogrowth options button (the ellipsis) to the right of the current setting, you can disable autogrowth of your database in the dialog that appears. You can also, as discussed, alter it to increase by By MB rather than By Percent, and, to repeat, this can be the better option when you come to developing your own database.
In the Autogrowth dialog, the Maximum File Size option sets a limit on how large the database is allowed to grow. The default is “unrestricted growth”—in other words, the only limit is the spare space on the hard drive. This is good, as you don't have to worry about maintaining the database too much. But what if you have a rogue piece of code entering an infinite loop of data? This scenario is rare, but not unheard of. It might take a long time to fill up the hard drive, but fill up the hard drive it will, and with a full hard drive, purging the data will prove troublesome. When it is time to start moving the database to a production environment, ensure the Restrict File Growth (MB) option is set to guard against such problems.
The final column that you will find in the New Database dialog box by scrolling to the right is Path. In this column, you define where the database files will reside on your hard drive. If SQL Server is installed on your
Cdrive, no paths for the data were changed, and you are working on a default instance, then you will find that the default isC:Program FilesMicrosoft SQL ServerMSSQL.11.MSSQLSERVERMSSQLData. Figure 3-9 shows I'm working on a mapped drive that has been given the drive letterC. The command button with the ellipsis (. . .) to the right of the path brings up an explorer-style dialog that allows you to change the location of the database files. For example, if you move to a larger SQL Server installation, moving the location of these files to a server relevant to the needs of your database will probably be a necessity.The line that has a File Type setting of Log includes the same information as a Data File Type setting, with one or two minor exceptions. The File Name places a suffix of
_Logonto the database name, and there is no ability to change theFilegroupcolumn, since the Transaction Log doesn't actually hold system tables, and so would fill up only through the recording of actions. It is possible, however, to define multiple log file locations. Filling the transaction log and not being able to process any more information because the log is full will cause your SQL Server to stop processing. Specifying more than one log location means that you can avoid this problem. The use of a failover log file in larger production systems is advisable.Let's now move on to discuss the Options page of the New Database dialog box (see Figure 3-11).
The first field in the Options page is labeled Collation—I discussed this option in Chapter 1 when installing SQL Server. If you need to alter a collation setting on a database, you can do so, but care is required. Note that altering the collation sequence on a server should be undertaken only by the system administrator, who will be aware of the issues and have the authority to perform this task.
The next setting is Recovery Model. You'll learn about backing up and restoring your database in Chapter 7, and this option forms part of that decision-making process. In development, the best option is to choose the Simple backup mode, as you should have your most up-to-date source being developed and saved to your local hard drive. The three modes are as follows:
- Full: Allows the database to be restored to where the failure took place; every transaction is logged; therefore, you can restore a database backup and then move forward to the individual point in time required using the transaction log.
- Bulk-Logged: Minimally logs bulk operations, so if you're performing a bulk operation such as bulk copying into SQL Server, or if you're inserting a bulk of rows of data, then only the action is recorded and not every row is inserted; this will increase performance during these sorts of operations, but if a problem occurs, then recovery can occur only to the end of the last log backup.
- Simple: Truncates the transaction log after each database backup; this allows restores to be created to the last successful data backup only, as no transaction log backups are taken. You should not use this mode in a production environment except in low-volume, low-risk applications.
Note It is possible to switch modes, and you may want to do this if you have a number of bulk-logged operations—for example, if you're completing a refresh of static data.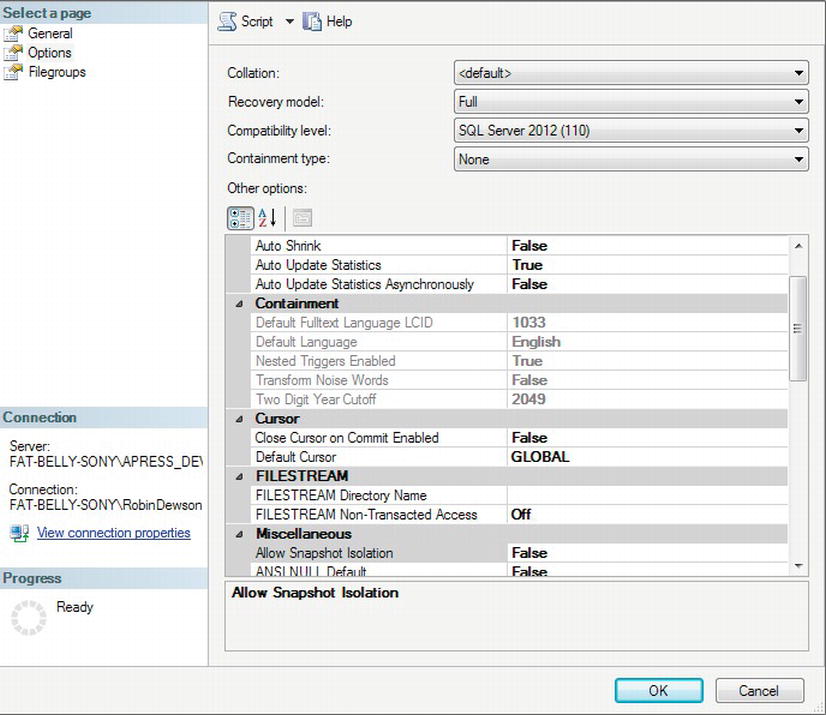
Figure 3-11. Options page of the New Database dialog
The third item in the Options page is Compatibility Level. It is possible to build a database for previous versions of SQL Server, provided you are willing to sacrifice the new functionality. This will allow you to connect to a SQL Server 2008 or earlier–defined database.
Among the next set of options, the ones of interest to you at the moment are the first five. You will examine the remaining options when you build the database using T-SQL.
- Auto Close: If you want the database to shut down when the last user exits, then set this option to True. The standard practice is a setting of False, and you should have a good reason to set this option to True, especially on a remote server.
- Auto Create Statistics: This option relates to the creation of statistics used when querying data. The standard practice is a setting of True; however, in a production environment, especially if you have a nightly or weekly process that generates statistics on your data, you would switch this to False. Creating and updating statistics while your system is being used does increase processing required on your server, and if your server is heavily used for inserting data, then you will find a performance degradation with this option set to True. To clarify, though, it is necessary to balance your choice with how much your system will have to query data.
- Auto Shrink: Database and transaction logs grow in size not only with increased data input, but also through other actions, which I'll discuss in more detail in Chapter 7. You can shrink the logical size of the log file through certain actions, some of which can be instigated by T-SQL and some as a by-product of actions being performed. Shrinking a database, whether automatically or manually, takes processing power and time. You should be in control of when shrinking takes place rather than leaving this to SQL Server, and therefore Auto Shrink should be set to False in a production environment. Even if the database is remote, alerts should be set up to warn you about database size reaching its limit rather than allowing SQL Server to perform this task unattended.
- Auto Update Statistics and Auto Update Statistics Asynchronously: These are more common options to have set to True, even on production servers, although there is still a performance degradation. These options will update statistics as data are inserted, modified, or deleted for tables for use in indexes, and they will also update statistics for columns within a table. I will discuss indexes further in Chapter 6. Statistics are used by SQL Server to find the best method to work with your data, and having good statistics will ensure the best method is normally chosen.
Tip You need not create the database at this point if you don't want to. There are several other options available to you to save the underlying T-SQL to a file, to the clipboard, or to the Query window. The first two options are very useful as methods of storing actions you're creating to keep in your source code repository, such as Visual SourceSafe. The first two options are also useful if you wish to keep T-SQL code to execute when deploying on several different computers at client sites. Clients may have SQL Server installed on a server but no SSMS installed locally from which to build a database graphically. Finally, by using T-SQL rather than dialog screens, you will achieve consistency and clarity when performing an action multiple times. The third option is ideal if you wish to add more options to your database than you have defined within the wizard setup. All of the options enable you to see the underlying code and understand what is required to create a database. You will look at the code in a moment. - Click the OK button at the bottom of the screen to create the database.
SQL Server will now perform several actions. First, it checks whether the database already exists; if so, you will have to choose another name. Second, once the database name is validated, SQL Server does a security check to make sure the user has permission to create the database. This is not a concern here, since by following this book, you will always be logged on to SQL Server with the proper permissions. Now that you have security clearance, the data files are created and placed on the hard drive. Provided there is enough space, these files will be successfully created, and it is not until this point that SQL Server is updated with the new database details in the internal system tables.
Once this is done, the database is ready for use. As you can see, this whole process is relatively straightforward.
When you return to Object Explorer in SQL Server Management Studio, refresh the contents manually if the explorer hasn't autorefreshed. You will see the new database listed, as shown in Figure 3-12.
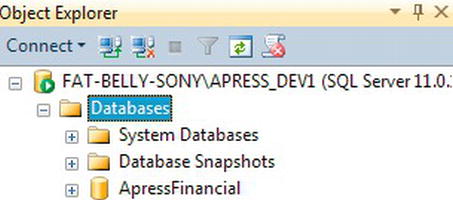
Figure 3-12. The new database within Object Explorer
SQL Server Management Studio is simply a GUI front end to running T-SQL scripts in the background. As you progress through the book, you'll see the T-SQL generated for each object type you're using, and you'll create the objects graphically, as you've just seen.
Once the database has been created, you can right-click and, as shown in Figure 3-13, have the details sent to one of four locations.
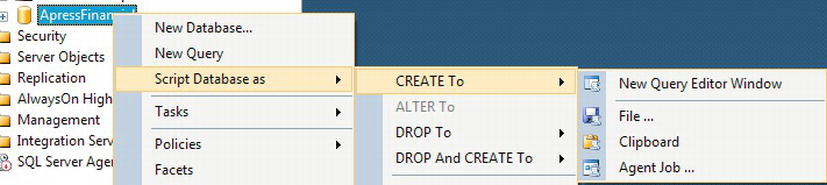
Figure 3-13. Scripting the database from SSMS
Whichever method you choose to use, the script will be the same, with the exception of a comment line when you create the script in the second option. The script for generating the database from this option is listed here, so you can go through what is happening. The fourth option allows you to schedule a re-create of the database at a certain point in time. This is ideal to use when building a database from scratch on a regular basis. For example, you might create a daily job for setting up a test area.
First of all, SQL Server points itself to a known database, as shown in the following snippet. master has to exist; otherwise, SQL Server will not work. The USE statement, which instructs SQL Server to alter its connection to default to the database after the USE statement, points further statements to the master database:
USE [master]


GO
Next, the script builds up the CREATE DATABASE T-SQL statement built on the options selected. (I'll walk you through the CREATE DATABASE syntax that could be used in the “Creating a Database in a Query Pane” section, as this statement doesn't cover all the possibilities.) Notice in the code that follows the next note that the name of the database is surrounded by square brackets: []. SQL Server does this as a way of defining that the information between the square brackets is to be used similarly to a literal and not as a variable. Also it defines that the information is to be treated as one unit. To clarify, if you want to name the database Apress Financial (i.e., with a space between “Apress” and “Financial”), then you and SQL Server need to have a method of knowing where the name of the database starts and ends. This is where the identifier brackets come in to play.
![]() Note Recall the Set Quoted Identifier option you encountered in Chapter 2, with the T-SQL command
Note Recall the Set Quoted Identifier option you encountered in Chapter 2, with the T-SQL command SET QUOTED_IDENTIFIER ON/OFF. Instead of using the square brackets around master as you see in the preceding text, you can define identifiers by surrounding them with double quotation marks using this command. Therefore, anything that has double quotation marks around it is seen as an identifier rather than a literal, if this option is set to ON. To get around this requirement, you can use single quotation marks, as shown in the example, but then if you do have to enter a single quotation mark—as in the word “don't”—you would have to use another single quotation mark. So as you can see, this situation can get a bit messy. I prefer to have QUOTED_IDENTIFIER set to OFF to reduce confusion.
The following code is generated by the script for creating the ApressFinancial database:
CREATE DATABASE ApressFinancial

CONTAINMENT = NONE

ON PRIMARY

( NAME = N'ApressFinancial',

FILENAME = N'C:Program FilesMicrosoft SQL ServerMSSQL11.APRESS_DEV1

MSSQLDATAApressFinancial.mdf' , SIZE = 4096KB ,

MAXSIZE = UNLIMITED, FILEGROWTH = 1024KB )

 LOG ON

( NAME = N'ApressFinancial_log',

FILENAME = N'C:Program FilesMicrosoft SQL ServerMSSQL11.APRESS_DEV1

MSSQLDATAApressFinancial_log.ldf' ,
SIZE = 1024KB , MAXSIZE = 2048GB , FILEGROWTH = 10%)

GO
![]() Note Most of the preceding code should be easy to understand and follow as it is taking the details entered in the database creation dialog screen and transforming those details into T-SQL. However, there is one item I would like to bring to your attention and that is the
Note Most of the preceding code should be easy to understand and follow as it is taking the details entered in the database creation dialog screen and transforming those details into T-SQL. However, there is one item I would like to bring to your attention and that is the CONTAINMENT = NONE argument. With SQL Server 2012, databases can be partially contained or non-contained. Future releases will expand this functionality to include fully contained databases as found on the SQL Azure (SQL Server in the cloud) platform. A fully contained database is one in which all of the objects, data, accounts, and metadata are contained within that database. You can then move databases between SQL Server instances and installations much more easily than is the case with partial or non-contained databases, as all of the information required to move a database is held by the database itself. Previous versions of SQL Server are seen as non-contained, and therefore porting databases have problems with database ownership and some of the metadata required to be rebuilt when placed on the new server. Partially contained databases have some of the information held within the database itself, although code can have dependence outside of its own database. One example would be when trying to retrieve customer information from the Customer database from within the Invoicing database. Finally, non-contained databases, as created for ApressFinancial, are built similarly to previous versions of SQL Server, where to move a database from one server to another requires some work. At this point, I am building the database as a non-contained database for simplicity of discussion throughout the book and to ensure you have the basics of databases clear in your mind before introducing these complexities.
The CREATE DATABASE command is followed by a GO command. This signals to SQL Server—or any other SQL Server utility—that this is the end of a batch of T-SQL statements, and the utility should send the batch of statements to SQL Server. You saw this in Chapter 2 when you were looking at Query Editor's options. Certain statements need to be in their own batch and cannot be combined with other statements in the same batch. To clarify, a GO statement determines that you have come to the end of a batch of statements and that SQL Server should process these statements before moving on to the next batch of statements.
![]() Note
Note GO statements are used only in ad hoc T-SQL, which is what I'm demonstrating here. Later in the book, you'll build T-SQL into programs called stored procedures. GO statements are not used in stored procedures.
Next, you define the new database's compatibility level. The following ALTER DATABASE statement sets the database's base level to SQL Server 2012. It is possible to define SQL Server to an earlier level, as far back as SQL Server 2000, by changing the version number. A base level of 100 actually means 10.0, as in version 10 (100), which equates to SQL Server 2008.
You then can define the remaining database options. The statements to set those options have GO statements separating them. But in this scenario, the GO statement is superfluous. So why are they included? When SQL Server is preparing the wizard, it is safer for it to place GO statements after each statement, because it then doesn't have to predict what the next statement is, and therefore whether the end of the batch of transactions has to be defined.
It is possible to initialize full-text indexing or remove all full-text catalogs from the current database. By default, all user-created databases in SQL Server 2012 are enabled for full-text indexing.
There is an IF statement around the following code that enables or disables full-text searching. This code is testing whether full-text indexing has been installed as part of the current instance. If it has not been installed, then by default the option is not enabled.
IF (1 = FULLTEXTSERVICEPROPERTY('IsFullTextInstalled'))

begin

EXEC [ApressFinancial].[dbo].[sp_fulltext_database] @action = 'enable'

end
There will be times when columns have no data in them. When a column is empty, it is said to contain the special value of NULL. Setting ANSI_NULL_DEFAULT to OFF means that a column's default value is NOT NULL. You'll learn about NULL values in Chapter 5 during the table creation discussion. The following is the statement to define the default setting for a new column definition when defining a new column within a table in SQL Server. If you define a new column for a table without defining whether it can hold NULL values, using the T-SQL ALTER TABLE command, then the column by default will not allow NULL values.
ALTER DATABASE [ApressFinancial] SET ANSI_NULL_DEFAULT OFF

GO
Still on the topic of NULL values, the ANSI standard states that if you are comparing two columns of data that have this special NULL value in them, then the comparison should fail and the two columns will not be considered equal. They also won't be considered not equal to each other. Setting ANSI NULLS to OFF alters that behavior, so that when you do compare two NULL values, they will be considered equal to each other. The following is the statement to use:
ALTER DATABASE [ApressFinancial] SET ANSI_NULLS OFF

GO
There are columns of characters that can store variable-length data. You'll come across these when you build your table in Chapter 5. If set to ON, this option makes every column of data contain the maximum number of characters, whether you sent through just one character or many more. It is common to have this set to OFF.
ALTER DATABASE [ApressFinancial] SET ANSI_PADDING OFF

GO
If an ANSI standard warning or error occurs, such as divide by zero, switching the ANSI_WARNINGS setting to OFF will suppress these. A value of NULL will be returned in any columns that have the error.
ALTER DATABASE [ApressFinancial] SET ANSI_WARNINGS OFF

GO
If the ANSI_WARNINGS setting were ON, and you performed a divide by zero, the query would terminate. To change this in combination with ANSI_WARNINGS set to ON, you tell SQL Server not to abort when there's an arithmetic error.
ALTER DATABASE [ApressFinancial] SET ARITHABORT OFF

GO
If you have a database that is “active” only when users are logged in, then switching the AUTO_CLOSE setting to ON would close down the database when the last user logged out. This is unusual, as databases tend to stay active 24/7, but closing unwanted databases frees up resources for other databases on the server to use if required. One example of when to switch this setting ON is for a database used for analyzing data by users through the day (for example, one in an actuarial department, where death rates would be analyzed).
ALTER DATABASE [ApressFinancial] SET AUTO_CLOSE OFF

GO
SQL Server uses statistics when returning data. If it finds that statistics are missing when running a query, having the following option ON will create these statistics.
ALTER DATABASE [ApressFinancial] SET AUTO_CREATE_STATISTICS ON

GO
If the volume of data within your database grows smaller (for example, if you have a daily or weekly archive process), you can reduce the size of the database automatically by setting the following option ON. It is standard to have the option OFF because the database size will simply increase as data are re-added. It would be switched ON only if a reduction in the database is required—due to disk space requirements, for example—but it is never a good idea for this option to kick in when the database is in use, so really it is best to keep it off.
ALTER DATABASE [ApressFinancial] SET AUTO_SHRINK OFF

GO
![]() Note It would be better to shrink the database manually by using the
Note It would be better to shrink the database manually by using the DBCC SHRINKDATABASE command. You will see this in Chapter 7.
When data are added or modified to SQL Server, statistics are created that are then used when querying the data. These statistics can be updated with every modification, or they can be completed via a T-SQL set of code at set times. There is a performance reduction as data are inserted, modified, or deleted, but this performance is gained back when you want to return data. Your application being a pure insertion, pure query, or a mix determines whether you'll want this option on. If you have a pure insertion application, you probably want this option switched off, for example, but this is an optimization decision.
ALTER DATABASE [ApressFinancial] SET AUTO_UPDATE_STATISTICS ON

GO
A cursor is an in-memory table built with T-SQL used for row-at-a-time processing. It's a temporary memory resident table, in essence. A cursor can exist for the lifetime of a program, but if you switch the following setting to ON, when a batch of data is committed or rolled back during a transaction, the cursor will be closed.
ALTER DATABASE [ApressFinancial] SET CURSOR_CLOSE_ON_COMMIT OFF

GO
A cursor can exist either locally or globally. This means that if GLOBAL is selected for this option, then any cursor created in a program is available to any subprogram that is called. LOCAL, the other option, indicates that the cursor exists only within that program that created it.
ALTER DATABASE [ApressFinancial] SET CURSOR_DEFAULT GLOBAL

GO
If you're concatenating character fields and if the following option is ON, then if any of the columns has a NULL value, the result is a NULL.
ALTER DATABASE [ApressFinancial] SET CONCAT_NULL_YIELDS_NULL OFF

GO
When you're working with some numeric data types, it is possible to lose precision of the numerics. This can occur when you move a floating-point value to a specific numeric decimal point location, and the value you're passing has too many significant digits. If the following option is set to ON, then an error is generated. OFF means the value is truncated.
ALTER DATABASE [ApressFinancial] SET NUMERIC_ROUNDABORT OFF

GO
As mentioned earlier, when you're defining database names, if there is a space in the name or the name is a reserved word, it is possible to tell SQL Server to ignore that fact and treat the contents of the squared brackets as a literal. You are using quoted identifiers when you use the double quotation mark instead of square brackets. I'll delve into this topic further when showing how to insert data in Chapter 9, as there are a number of details to discuss with this option.
ALTER DATABASE [ApressFinancial] SET QUOTED_IDENTIFIER OFF

GO
The following option relates to a special type of program called a trigger. A trigger can run when data are modified, and one trigger can call another trigger. A setting of OFF means that an AFTER trigger is not allowed to recursively cause itself to be invoked. This is known as a direct recursion.
ALTER DATABASE [ApressFinancial] SET RECURSIVE_TRIGGERS OFF

GO
Service Broker provides developers with a raft of functionality, such as asynchronous processing or the ability to distribute processing over more than one computer. Such a scenario might be heavy overnight batch processing that needs to be completed within a certain time window. By distributing the processing, it could mean that a process that wouldn't have been distributed could finish within that time frame.
ALTER DATABASE [ApressFinancial] SET DISABLE_BROKER

GO
I mentioned statistics earlier with another option and how they can be updated as data are modified. The following option is similar to AUTO_UPDATE_STATISTICS. If this option is set to ON, the query that triggers an update of the statistics will not wait for the statistics to be created. The statistics update will start, but it will do so in the background asynchronously.
If there is a relationship between two tables via a foreign key, by setting this option to ON, SQL Server will correlate statistics for the two tables to try to improve query optimization. Unless you have this scenario, the setting should be switched to OFF, which is the default:
ALTER DATABASE [ApressFinancial] SET DATE_CORRELATION_OPTIMIZATION OFF

GO
This option defines whether this database is seen as trustworthy with what resources it can access. For example, the option defines whether SQL Server can trust the database not to crash the server. By setting the option to OFF, you ensure (among other things) that SQL Server will not allow any code developed to have access to external resources.
ALTER DATABASE [ApressFinancial] SET TRUSTWORTHY OFF

GO
If you build a database that is set for replication—in other words, where data changes are replicated to another server, which you sometimes see for distributed solutions—then this option details how SQL Server deals with data you are trying to process when it is involved in a transaction. This is an advanced topic outside the scope of this book.
ALTER DATABASE [ApressFinancial] SET ALLOW_SNAPSHOT_ISOLATION OFF

GO
The basis of the following option is to inform SQL Server how best to work with code that has parameters within it and to decide the best and fastest way to work with that query. To clarify, when you try to retrieve data from a table, you are likely to have some sort of filtering such as a specific value, a range of values, and so on. This is a query parameter. SQL Server can discard the value when trying to figure out the best way to get the data from the database based on previous queries. SQL Server uses previous query executions to try to calculate the fastest method of getting that data, known as a query plan. By keeping the parameterization simple, SQL Server will look at the query, and if the query is a simple query with very few parameters, it will try to find a query plan that it has in memory to use. If the query is complex or SQL Server feels the number of parameters is too high to be deemed simple, then SQL Server will build a new query plan.
ALTER DATABASE [ApressFinancial] SET PARAMETERIZATION SIMPLE

GO
SQL Server has many features and techniques for ensuring that your data are correct, safe, and valid. In Chapter 9, you will see one way to keep your data correct when you look at transactions. There are two ways SQL Server can enforce data safety: either by locking data that are being updated in a transaction, or by keeping a version of the row prior to the modification in tempdb until it is committed via a transaction. This latter technique is known as row versioning. By setting READ_COMMITTED_SNAPSHOT to OFF as in the following example, you are indicating that you will be taking the approach that the data will be locked. You guarantee that the information being read contains the value currently committed to the database. If you set the option to ON, it is possible that you could be reading the data after it has been altered within T-SQL but before it has been committed to the database. There are pros and cons of both methods, and I will cover more about transactions in Chapter 9.
ALTER DATABASE [ApressFinancial] SET READ_COMMITTED_SNAPSHOT OFF

GO
The option HONOR_BROKER_PRIORITY, shown in the example to follow, is used with SQL Server Service Broker, which is used by SQL Server when XML messages are being passed from one SQL Server to another. One way of thinking about how Service Broker works would be to compare its use to having a chat conversation over the Internet in Facebook. The software accepts the message you type and sends it to the recipients, and the recipients send back an acknowledgement indicating that the message has been successfully received. A setting of ON indicates that if messages are given a priority, then SQL Server will process these in a priority order. A setting of OFF indicates that messages will be processed in order of generation.
ALTER DATABASE [ApressFinancial] SET HONOR_BROKER_PRIORITY OFF

GO
The following option defines how the filegroups are set: READ_WRITE or READ_ONLY. The use of READ_ONLY is ideal when you have a backup database that users can use to inspect data. The database is an exact mirror of a production database, for example, so it has the security on it set to allow updates to it, but by setting this option to READ_ONLY, you can be sure that no updates can occur.
ALTER DATABASE [ApressFinancial] SET READ_WRITE

GO
The next option determines how your data can be recovered when a failure such as a power outage happens. In other words, the following option defines the recovery model, as discussed earlier. You'll look at this in more detail when I discuss database maintenance in Chapter 7.
ALTER DATABASE [ApressFinancial] SET RECOVERY FULL

GO
The following option defines the user access to the database. MULTI_USER is the norm and allows more than one user into the database. The other settings are SINGLE_USER and RESTRICTED_USER, where only people who have powerful privileges can connect. You would set your database to RESTRICTED_USER after a media or power failure, for example, when a database administrator needs to connect to the database to ensure everything is okay. (The setting RESTRICTED_USER causes the database to allow only administrator logins.) Specify SINGLE_USER when you want to lock down the database so that no other person can connect—for example, when you are detaching the database from this instance and you are moving it to another instance. Specify MULTI_USE when you want to open the database up for general use, as in the following example:
ALTER DATABASE [ApressFinancial] SET MULTI_USER

GO
When you have an I/O error (e.g., a hard drive might be on its way to breaking down), then this option will report an error if checksums don't match:
ALTER DATABASE [ApressFinancial] SET PAGE_VERIFY CHECKSUM

GO
Finally, the following line is used for controlling whether permissions checks are required when referring to objects in another database:
ALTER DATABASE [ApressFinancial] SET DB_CHAINING OFF
Dropping the Database in SQL Server Management Studio
To follow the next section properly and build the database using code, it is necessary to remove the database just created. It is also handy to know how to do this anyway, for those times when you have made an error or when you want to remove a database that is no longer in use. Deleting a database is also known as dropping a database.
TRY IT OUT: DROPPING A DATABASE IN SQL SERVER MANAGEMENT STUDIO
- If SQL Server Management Studio should still be running from the previous example, expand the nodes until you see the database
ApressFinancial. - Right-click
ApressFinancialto bring up the context menu. - Click the Delete option, as shown in Figure 3-14.
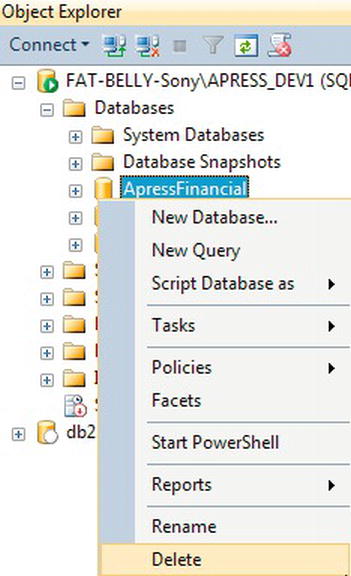
Figure 3-14. Deleting a database within SSMS
- The dialog shown in Figure 3-15 will display. Select Close Existing Connections, and then click OK.
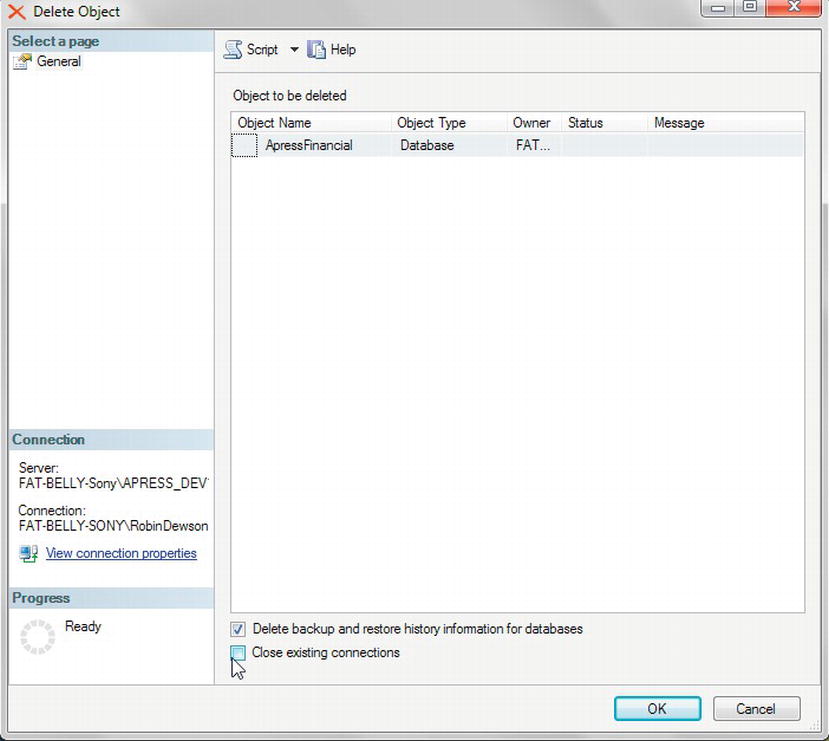
Figure 3-15. Selecting to delete a database in the Delete Object dialog
The first check box, Delete Backup and Restore History Information for Databases, gives you the option of keeping or removing the history information that was generated when completing backups or restores. If you want to keep this information for audit purposes, then uncheck the box.
The second check box is very important. If there is a program running against a database, or if you have any design windows or query panes open and pointing to the database you want to delete, then this option will close those connections. If you are deleting a database, then there really should be no connections there. This is a good check and will prevent accidents from happening, and it also allows any rogue databases to be removed without having to track down who is connected to them.
- Click OK. The database is now permanently removed. You will be re-creating the database in a moment, so it is okay for you to delete.
When you click the OK button, SQL Server actually performs several actions. First, a command is sent to SQL Server informing it of the name of the database to remove. SQL Server then checks that nobody is currently connected to that database. If someone is connected, through either SQL Server Query Editor or a data access method like ADO.NET, then SQL Server will refuse the deletion. Only if you select Close Existing Connections will this process be overridden.
For SQL Server to refuse the deletion, it does not matter whether anyone connected to the database is actually doing anything; all that is important is the existence of the connection. For example, if you selected ApressFinancial in Query Editor and then returned to SQL Server Management Studio and tried to drop the database, you would see the error shown in Figure 3-16.
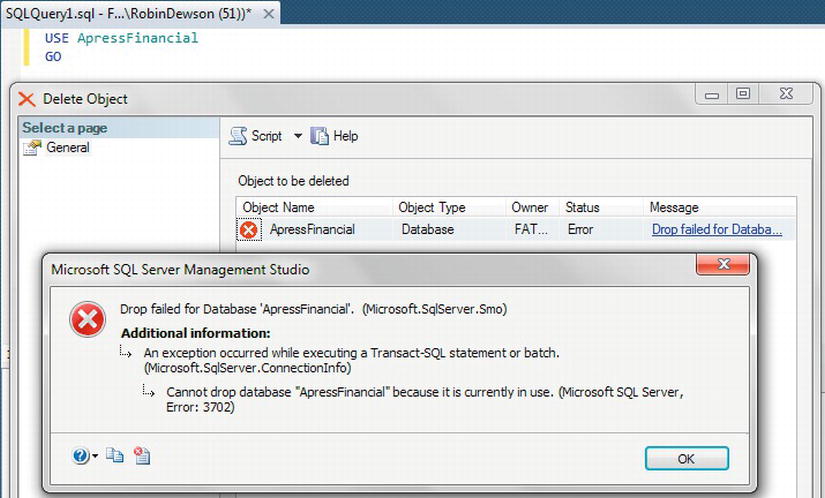
Figure 3-16. Failed database deletion
![]() Tip Errors like the one shown in Figure 3-16 on the screen in the background provide hyperlinks to documentation that can give you further help, as shown in the dialog box in the foreground.
Tip Errors like the one shown in Figure 3-16 on the screen in the background provide hyperlinks to documentation that can give you further help, as shown in the dialog box in the foreground.
Once SQL Server has checked that nobody is connected to the database, it then checks that you have permission to remove the database. SQL Server will allow you to delete the database if it was your user ID that created it, in which case you own this database and SQL Server allows you to do what you want with it. However, you are not alone in owning the database.
If you recall from Chapter 1, there was mention of the sa account when installing SQL Server. Since it is the most powerful ID and has control over everything within SQL Server, there were warnings about leaving the sa account without any password and also about using the sa account as any sort of login ID in general. This section also mentioned that the sa account was in fact a member of the sysadmin server role. A role is a way of grouping together similar users who need similar access to sets of data. Anyone in the sysadmin role has full administrative privileges—and this includes rights to remove any database on the server.
So regardless of whether you are logged in as yourself or as sysadmin, take care when using SQL Server Management Studio to drop a database.
Creating a Database in a Query Pane
To use the second method of creating databases, you first need to drop the ApressFinancial database as described in the previous section. Then you can continue with the following steps.
TRY IT OUT: CREATING A DATABASE IN A QUERY PANE
HOW IT WORKS: CREATING A DATABASE IN A QUERY
You may be thinking that it is a lot of work to type in the CREATE DATABASE T-SQL statement when there is a quick and simple screen that can do the job for you. This is true; however, there are limitations to using the screen that sometimes make T-SQL the better option. I have mentioned before that by using T-SQL you can place code in programs. You will see how to do that in Chapter 16. Using T-SQL also enables you to store the code in a source repository such as Visual SourceSafe that then allows you to track any amendments to the database code as you release upgrades to your application. T-SQL can also be read by other developers to ensure the code is delivering what is expected. Finally, in some institutions, auditors will visit your premises to check code releases to ensure that the release code matches what was sought.
Summary
In this chapter, you looked at designing and creating the example database. Though just a sample database, it still required careful thought.
In the next chapter, you will take a look at security and start investigating how to ensure your database is safe and secure from within and outside your organization.