With Xamarin.iOS, Xamarin.tvOS, and Xamarin.Mac, you have a set of tools and libraries that allow you to develop, build, and publish native apps for iPhone, iPad, Apple Watch, tvOS, and macOS with Visual Studio.
Xamarin allows you to fully access all the Apple frameworks, such as Cocoa, from C# code. If you have existing experience in developing apps with Xcode, you will see that object names in Xamarin and C# recall object names defined in the Apple frameworks. With Xamarin, you can build universal apps and take advantage of integrated, powerful design tools. In this chapter, you will get detailed information about what the Visual Studio IDE offers to build apps for iOS through a basic sample app. In addition, you will learn how to configure your app for publishing, which involves a number of steps that Visual Studio for Mac dramatically simplifies. I will often talk about Xamarin.iOS, but keep in mind that the same concepts apply to Xamarin.Mac and Xamarin.tvOS, except where expressly specified. Many of the concepts described in this chapter about project options and configuration will also be useful in the next chapter, where I will start covering Xamarin.Forms. At the end of the chapter, I will provide some useful hints about macOS and tvOS development.
Note
As with Android, providing a full reference and guidance about Xamarin.iOS and Xamarin.Mac is not possible in this chapter, where the focus is on the Visual Studio tooling. For a complete description about the platform and about writing code for it, you can read the official documentation at http://developer.xamarin.com/guides/ios/ . Additionally, it is important to mention that the sample app described in this chapter is based on the combination of two sample solutions from Xamarin’s GitHub repository, with a number of edits: choose a photo from the gallery ( http://bit.ly/2qel8V4 ) and send an e-mail ( http://bit.ly/2qhhr06 ).
Creating an iOS App with Xamarin
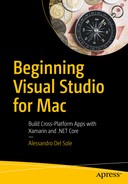
To understand the tools that Visual Studio offers to build iOS apps, in this chapter you will create a simple application that allows users to select an existing picture from the local library and to send the selected picture as an e-mail attachment. The steps required to create a Xamarin.iOS project are similar to what you saw for Android. In fact, you can either click New Project in the welcome page or select File ➤ New Solution. In the New Project dialog, locate the App template folder under iOS, and then you can select one of the available project templates described in Chapter 1 (see Figure 6-1). For the sake of simplicity, select the Single View App project template and then click Next.
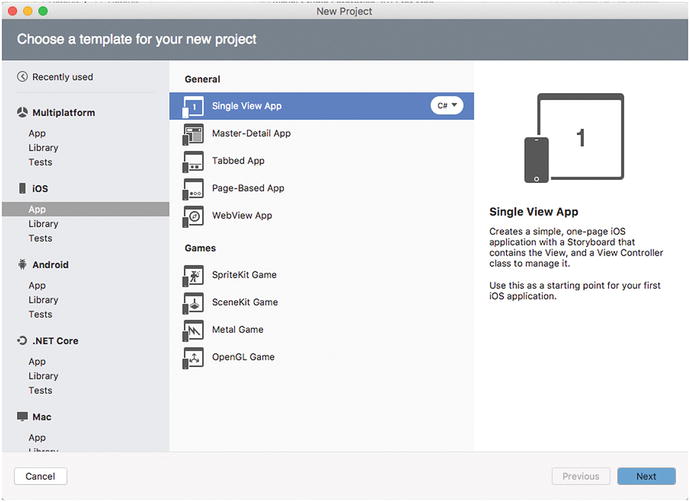
Figure 6-1. Creating a Xamarin.iOS project
On the next screen, you provide basic configuration settings for your project such as the app name, the organization identifier, and targets. Figure 6-2 shows an example.
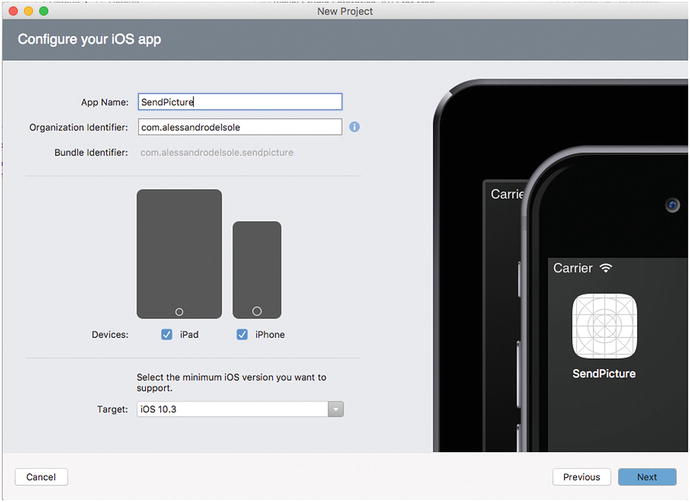
Figure 6-2. Configuring a Xamarin.iOS project
As the name implies, in the App Name text box you provide a name for your app. In the Organization Identifier text box, you enter your organization (or personal) identifier with the com. prefix. Visual Studio for Mac automatically generates the bundle identifier, which is read-only, based on the organization identifier and app name. If you want a different bundle identifier, then you must change either the app name or the organization identifier (later in the chapter you will also learn how to accomplish this in the Info.plist file). The bundle identifier is particularly important because it uniquely identifies an iOS app and will be bound to your distribution profile. By default, both the iPad and the iPhone are selected as target devices. This allows for generating universal apps, but you can certainly change this setting. In the Target combo box, you can select the minimum iOS version your app will run on. The higher the version, the most recent APIs you can take advantage of. As an implication, this will leave out all the devices that do not target that version. All these settings can be changed later in the Info.plist file and in the project options. When you click Next, you will be able to specify a different location for the project, and you will be also able to enable Git version control, exactly as you saw for Android in the previous chapter. This is not required at this point, so click Create, and after a few seconds your new Xamarin.iOS solution will be ready.
Understanding Fundamental Concepts About Xamarin.iOS Solutions
The structure of a Xamarin.iOS solution provides a C# representation of the typical elements of an iOS app. As usual, you can open the Solution pad to see how a solution is made. Table 6-1 describes the files and folders you get with a new project.
Table 6-1. Files and Folders in a Xamarin.iOS Solution
Element | Type | Description |
|---|---|---|
AppDelegate.cs | File | The C# counterpart of the iOS’s AppDelegate object and that starts the app UI. It defines the AppDelegate class that manages the application life cycle events (OnActivate, FinishedLaunching, DidEnterBackground) and that receives notifications from the operating system (including push notifications). |
Main.Storyboard | File | Defines the user interface for a flow of pages in the application. As demonstrated shortly, Visual Studio provides a convenient designer to work with .storyboard files. |
ViewController.cs | File | Contains the imperative code that is activated by visual elements (views) in the Main.Storyboard. It represents the counterpart of the concept of ViewController in iOS and recalls the Model-View-Controller pattern. |
Main.cs | File | Defines the Main method that represents the main entry point of an app, and then it is responsible for instantiating the AppDelegate class. This is because C# and Mono do not have the concept of AppDelegate, and therefore they need a Main method. |
Info.plist | File | A file that is common to iOS apps, which allows for specifying important project properties such as target devices and systems, icons, resources, background tasks, and the developer identity. |
Entitlements.plist | File | A file that is common to iOS apps, which allows for specifying services the app needs to use, such as maps, iCloud, Siri, the Wallet, and others. |
Assets.xcassets | File | Through a convenient window, allows for providing all the necessary icons, if different than default icons. |
Resources | Folder | Contains resources the app needs, including .xib files with control libraries and visual elements. |
LaunchScreen.storyboard | File | A storyboard that can be used when the app starts up instead of static images. |
AppDelegate.cs can also contain initialization code for the app. If you have existing experience with Xcode, you will be familiar with most file names and their descriptions.
Understanding References and NuGet Packages
You can add and consume libraries in a Xamarin.iOS solution by following the lessons learned in Chapter 2. The References node in the Solution pad holds a list of references to system or local libraries, including the Xamarin.iOS wrapper library. If you want to consume external libraries, you can download and install NuGet packages by right-clicking the Packages node and then selecting Add Packages in the pop-up menu.
Using Components
You can use the Component Store to find libraries, user controls, themes, or SDKs, which can be downloaded from the Internet. The Component Store in Xamarin.iOS works exactly like in Xamarin.Android (see Chapter 5); therefore, you can double-click the Components item in the Solution pad to access the store, where you will get a list of free, trial, and paid products (remember you need to supply a Xamarin account).
For your convenience, Figure 6-3 shows again the Component Store. Remember that you can filter a list by operating system by clicking one or more filters in the Tags box.
Figure 6-3. The Component Store dialog
Designing the User Interface
Visual Studio for Mac provides a powerful integrated designer that easily allows you to design the user interface of an iOS app. The designer is enabled every time you double-click a .storyboard file in the Solution pad. Actually, in iOS, the user interface can also be based on .xib files, which are certainly supported by Visual Studio for Mac, but .storyboard files are more modern and the most used with recent versions of the Apple SDKs and development tools.
For the sake of simplicity, in this chapter I will focus on one .storyboard file, but in real-world apps you will work with multiple .storyboard files most of the time. In the Solution pad, double-click the Main.Storyboard file. At this point, Visual Studio will show the designer and will display a list of available controllers, visual elements, and controls in the Toolbox pad. Figure 6-4 shows how the designer will appear after completing the steps described in this section, and it gives you a representation of the available tools.
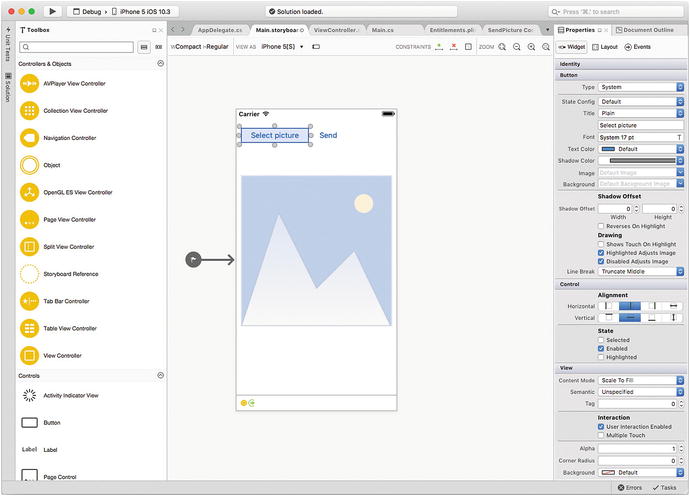
Figure 6-4. The iOS designer in Visual Studio for Mac
Note
The first time you create a Xamarin.iOS project in Visual Studio, the IDE will display the Toolbox pad on the right side of the workspace docked between the upper margin of the IDE and the Properties pad. For a better representation, Figure 6-4 shows the Toolbox pad docked at the left side of the IDE so that you have an extended view of both the Toolbox and Properties pads.
As you can imagine, you can drag controllers, controls, data views, gesture recognizers, and bars from the Toolbox onto the designer surface. The user interface for the sample app consists of two buttons and an image view, of type UIButton and UIImageView, respectively, that you can drag from the Toolbox and release on the designer. You can then resize and rearrange controls on the surface. In the Properties pad, you can set all the property values that a visual element supports. For example, for the two buttons, you can set the Title property to Plain in the first box, and then you can specify the text in the second box, such as Select picture and Send, respectively. In the Identity group, which is common to all visual elements, the Name property is important because here you can assign a name that you will use to interact with your controls in C# code. Assign the Name property for all three controls with SelectButton, SendButton, and ImageView, respectively. Describing all properties for each visual element is of course impossible in this chapter (the official reference at http://developer.xamarin.com/guides/ios/ provides full guidance), so now I will cover the most interesting features when working with the Toolbox. Generally speaking, you have selectors and pickers for all of those properties that accept values that you can choose from a list. Selecting colors deserves a particular mention. For instance, if you click the Text Color property value, you will see a list of default colors (see Figure 6-5).
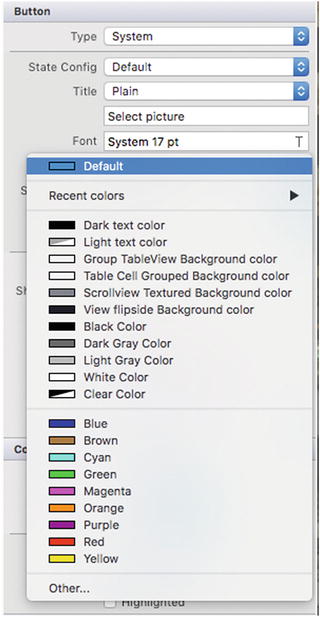
Figure 6-5. Selecting among default colors
If you then click Other, you can access a full color palette from which you can select a color that is not in the list, as demonstrated in Figure 6-6. You can also click the buttons at the top of the Colors title to display different palettes.
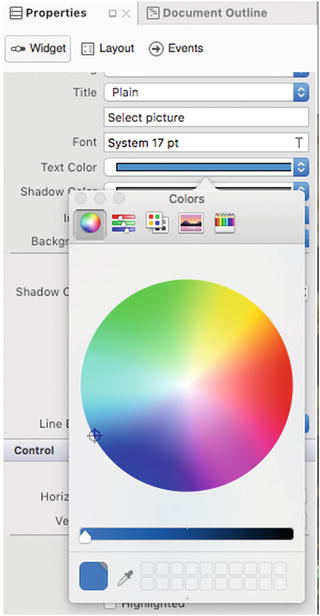
Figure 6-6. Selecting colors from a palette
For properties that require you to specify an image name, Visual Studio for Mac allows you to select an image from disk via the macOS file dialog instead of typing path names manually. The Properties pad has also a Layout tab, where you can find properties and values you can use to adjust the appearance and position of a visual element including margins. The Events tab is useful because it allows you to select an event handler from your C# code and associate it to a particular event. To add an event with this tool, follow these steps:
Place the cursor inside the text box corresponding to the event you want to add a handler for.
Write a name for the event handler and then press Enter.
When Visual Studio shows the code editor, follow the instructions in the tooltip (see Figure 6-7) and place the cursor where you want the event handler to be generated; then press Enter.
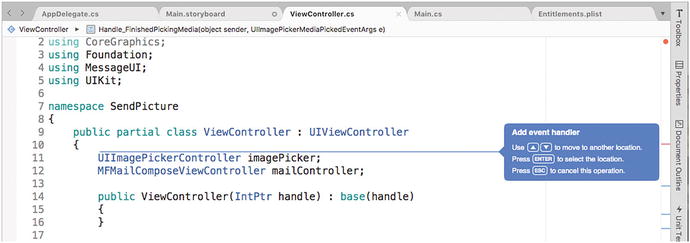
Figure 6-7. Adding an event handler
When you press Enter, Visual Studio generates a method stub whose signature respects the event requirements, and its body returns a NotImplementedException that you will need to replace with your code. This way, you can generate and associate event handlers faster. Of course, you can still add event handlers with the appropriate C# syntax, but here you have a convenient alternative.
When the user interface becomes more complex, it is useful to have a visual representation of this structure. The Document Outline pad is helpful, showing the hierarchy of visual elements, as shown in Figure 6-8.
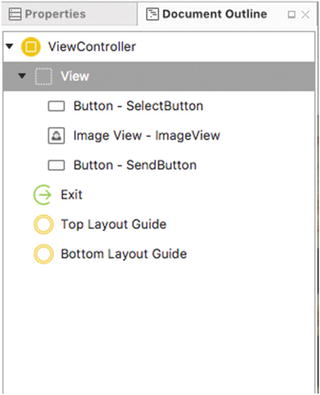
Figure 6-8. The Document Outline shows a hierarchical view of the UI
You can double-click a visual element and Visual Studio will select it in the designer and open the Properties pad for it. Now if you take a look back at Figure 6-4, you will notice a toolbar at the top of the designer. This toolbar provides a number of buttons that improve your productivity with the designer. The first button you encounter from left to right is called Width|Height and allows you to resize the device preview when the value of the VIEW AS combo box is Generic. From the latter, you can select one of the available form factors, and the device preview will be resized based on the selection. For instance, Figure 6-4 shows the device preview based on the iPhone 5S form factor. When a form factor is selected, changing the selection in Width|Height has no effect. Right next to the VIEW AS combo, you can find a nice button that allows you to change the orientation of the device preview by choosing between portrait (default) and landscape. Next to this, you will find the CONSTRAINTS buttons. In the iOS development, constraints allow for the so-called Auto Layout, which enables developers to create an adaptive user interface that responds appropriately to changes in screen size and device orientation. If you click the “Add recommended constraints” button (with the + icon), Visual Studio for Mac will automatically add the necessary layouts and visual elements required for Auto Layout. These new visual elements are visible not only in the designer but also in the Document Outline pad (see Figure 6-9), which makes it easier to detect changes in the UI hierarchy and to find new elements with complex layers. If you instead click the “Remove existing constraints” button, Visual Studio will be able to remove the constraints added previously.
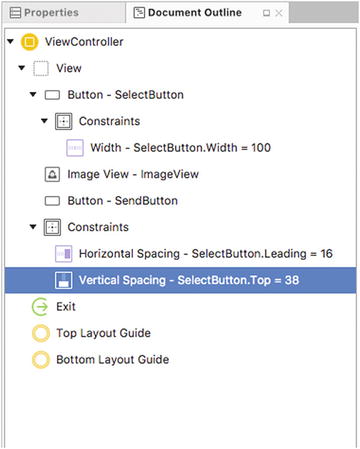
Figure 6-9. Constraints added by Visual Studio and visible in the Document Outline pad
You can finally click the ZOOM buttons to zoom in and out the device preview. After looking at the powerful tools available to define the user interface, it is time to see how to write C# code and leverage the iOS APIs. When the sample app is completed, you will discover other IDE amenities about project configuration and deployment.
Accessing the Apple APIs in C#
As you recall from the beginning, one of the biggest benefits of Xamarin is that it allows you to reuse your existing C# skills, and this certainly applies to iOS and Mac development too. Xamarin provides access to native libraries and frameworks, such as Cocoa, through C# namespaces, objects, and their members. In this section, you will use a couple of native APIs that include system features, such as accessing local folders and sending e-mails.
Do not forget to check out the official documentation for a complete programming reference. The core concept is that you write imperative code in a view controller, which can react to user actions in the user interface and therefore on a .storyboard file. In the Xamarin.iOS solution you created, the ViewController.cs file is the place where you will write the imperative code for the sample application. In real-world apps, you will have multiple view controllers as well as (normally) multiple .storyboard files.
Understanding Application Life Cycle Events
A view controller manages the life cycle of a storyboard through a number of events such as OnActivated, ViewDidLoad, and FinishedLaunching. ViewDidLoad is an important event, and its handler allows you to add initialization code to the view controller that will be executed after the view has been loaded. In this case, ViewDidLoad defines a couple of properties and sets up event handlers for the two buttons, as demonstrated in the following code:
using System;using Foundation;using MessageUI;using UIKit;namespace SendPicture{public partial class ViewController : UIViewController{UIImagePickerController imagePicker;MFMailComposeViewController mailController;public ViewController(IntPtr handle) : base(handle){}public override void ViewDidLoad(){base.ViewDidLoad();Title = "Choose Photo";View.BackgroundColor = UIColor.White;SelectButton.TouchUpInside += SelectButton_TouchUpInside;SendButton.TouchUpInside+= SendButton_TouchUpInside;}
Notice the following:
The using directives import some namespaces from the Apple frameworks, such as Foundation, UIKit, and MessageUI. MessageUI exposes objects for sending e-mails, while Foundation and UIKit provide the objects that are required to access the user interface APIs.
The class inherits from UIViewController, which is the base class for all controllers, and has an empty constructor. This might contain some startup code, but it’s not necessary in this case.
Two fields of type UIImagePickController and MFMailComposeViewController, respectively, are defined for later use.
The ViewDidLoad event handler must call its base class’s ViewDidLoad for initialization purposes, and after this invocation, it can execute initialization code. In this case, it is assigning a title to the page and a background color. More important, two event handlers are assigned to the two buttons in the UI using the typical C# syntax. The TouchUpInside event can be thought of as the counterpart of Click, Clicked, and Tapped events in other platforms.
Both event handle bodies are provided shortly.
Using System Features
The first feature that must be implemented is selecting a picture from the local library and displaying the selected picture inside the UIImageView control. This basically requires these three steps:
Handle the TouchUpInside event of the SelectButton control in order to display a UIImagePickerController, an iOS object that allows for selecting pictures from disk.
Handle the cancellation of the picture selection so that the UIImagePickerController is dismissed.
Handle the FinishPickingMedia event of the UIImagePickerController, which is raised once the user has selected the image and which is where the selected image is assigned to the UIImageView control.
The following is the code for the three event handlers, which includes detailed comments that explain each code snippet:
private void SelectButton_TouchUpInside(object sender, EventArgs e){// create a new picker controllerimagePicker = new UIImagePickerController();// set our source to the photo libraryimagePicker.SourceType = UIImagePickerControllerSourceType.PhotoLibrary;// set what media typesimagePicker.MediaTypes = UIImagePickerController.AvailableMediaTypes(UIImagePickerControllerSourceType.PhotoLibrary);imagePicker.FinishedPickingMedia += Handle_FinishedPickingMedia;imagePicker.Canceled += Handle_Canceled;// show the pickerPresentModalViewController(imagePicker, true);//UIPopoverController picc = new UIPopoverController(imagePicker);}void Handle_Canceled(object sender, EventArgs e){imagePicker.DismissModalViewController(true);}// This is a sample method that handles the FinishedPickingMediaEventprotected void Handle_FinishedPickingMedia(object sender,UIImagePickerMediaPickedEventArgs e){// determine what was selected, video or imagebool isImage = false;switch (e.Info[UIImagePickerController.MediaType].ToString()){case "public.image":isImage = true;break;case "public.video":break;}// if it was an image, get the other image infoif (isImage){// get the original imageUIImage originalImage = e.Info[UIImagePickerController.OriginalImage]as UIImage;if (originalImage != null){// do something with the imageImageView.Image = originalImage;}// get the edited imageUIImage editedImage = e.Info[UIImagePickerController.EditedImage] as UIImage;if (editedImage != null){// do something with the imageImageView.Image = editedImage;}}// if it's a videoelse{// simply return, we don't support videosreturn;}// dismiss the pickerimagePicker.DismissModalViewController(true);}
It is worth mentioning that you can invoke a controller that represents a system picker, such as the UIImagePickerController, and calls the ViewController.PresentModalViewController method, whose first argument is the controller that you want to display and the second argument is a bool value that determines whether displaying the picker should support an animation. To dismiss the picker, you instead call the DismissModalViewController method that is exposed by the instance of the object that represents the picker (in this case, UIImagePickerController).
Note
As you can imagine, an app must request permission to access the picture library. iOS 10 has changed the way you have to manage an app’s privacy, and this deserves an explanation in a proper paragraph that will be provided shortly.
Sending E-mails
The next step is handling the TouchUpInside event for the SendButton button, where you will write the code required to send an e-mail with the selected picture as an attachment. Here is the code required to accomplish this, followed by a number of explanations and considerations:
private void SendButton_TouchUpInside(object sender, EventArgs e){if (MFMailComposeViewController.CanSendMail){// an array of strings that represents recipientsvar to = new string[] { "[email protected]" };// MFMailComposeViewController calls the UI to send an emailif (MFMailComposeViewController.CanSendMail){mailController = new MFMailComposeViewController();mailController.SetToRecipients(to);mailController.SetSubject("A picture");mailController.SetMessageBody("Hi, I'm sending a picture from iOS", false);mailController.AddAttachmentData(ImageView.Image.AsJPEG(),"image/jpeg", "image.jpg");mailController.Finished += (object s, MFComposeResultEventArgs args) =>{BeginInvokeOnMainThread(() =>{args.Controller.DismissViewController(true, null);});};}PresentViewController(mailController, true, null);}}
The iOS APIs offer a specific controller that you can use to send e-mails, called MFMailComposeViewController, whose CanSendMail bool property allows you to understand if sending e-mails is supported on the current device.
Note
On the simulator, CanSendMail always returns false. For this reason, you should test the sample app on a physical device.
MFMailComposeViewController exposes a number of methods that you can use to set up a new e-mail message, such as SetToRecipients, which receives an array of strings representing the e-mail recipients; SetSubject, which allows for specifying the e-mail subject; and SetMessageBody, which you invoke to provide the e-mail body. Of course, invoking these methods is optional since users will be able to enter the required information in the user interface of the e-mail client. Here you have to pay particular attention to the AddAttachmentData method, which takes three arguments: an object of type NSData that represents the attachment, a string that represents the MIME type for the attachment file, and the file name. The NSData class offers static methods that allow you to generate an NSData object from different data sources, but in this case things are easier because the UIImageView.Image property, which represents the image you see in the UIImageView control, exposes methods such as AsJPEG and AsPNG that return an NSData object from the image, and so they do the whole job. You still need to supply the MIME type, which is image/jpeg for JPEG images, and a file name such as image.jpg (you can certainly supply a different file name). Notice how the code handles the Finished event of MFMailComposeViewController using the lambda expressions syntax. In the lambda’s body, the code calls the DismissViewController for MFMailComposeViewController, making sure this is invoked in the main UI thread via the BeginInvokeOnMainThread method. The ViewController.PresentViewController method is invoked to display the e-mail client’s UI; when displaying the image picker, you called PresentModalViewController, and that made sense because the picture selection happens in-app. In this case, the app is calling another app, the e-mail client, and therefore this must not be in a modal controller. Now comes one of the most important tasks in developing for iOS (and macOS): setting app properties and permissions.
Setting App Properties and Permissions
In iOS development, as well as for macOS and tvOS, there are two files that you edit to supply the proper app settings, properties, and permissions: Info.plist and Entitlements.plist. For both files, Visual Studio for Mac provides a convenient editor based on the user interface; you can use it to avoid having to write XML markup manually. Let’s start with Entitlements.plist, which is the simpler way to get started with the properties editor.
Understanding and Editing Entitlements.plist
With the Entitlements.plist file, you can specify a number of capabilities that your app will include and that must be explicitly specified in order to enable features such as (but not limited to) payments with the built-in Wallet feature or Siri integration. If you double-click the Entitlements.plist file in the Solution pad, the editor will appear and will look like Figure 6-10.
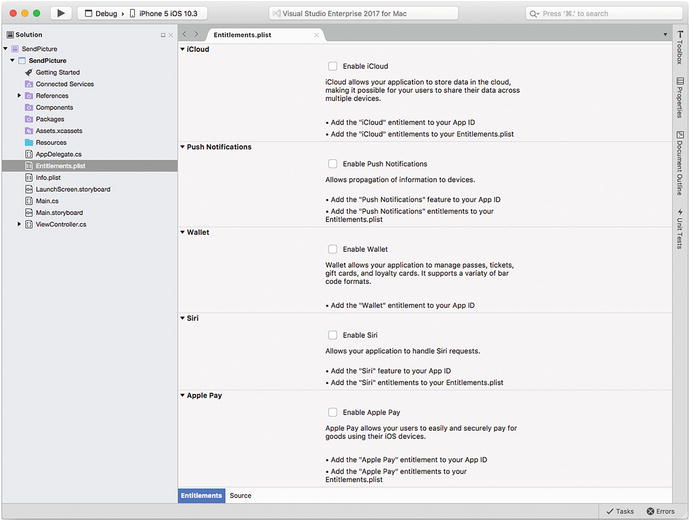
Figure 6-10. Editing the Entitlements.plist file
Visual Studio for Mac provides a description of each capability that you can enable by simply selecting the proper check box. Capabilities you can enable are iCloud support, push notifications, Wallet support, Siri support, Apple Pay, network access with a VPN, Keychain access, sharing audio with other apps with Inter-app Audio, associating domains to your app with associated domains, App Group interaction, HomeKit for home automation, HealthKit to access personal health information, and wireless access configuration. Notice that almost all of these capabilities require a paid developer account. Actually, you can click the Source tab at the bottom and add custom properties to include additional options. An example will be provided in the next paragraph about Info.plist.
Understanding and Editing Info.plist
The Info.plist file is the standard file you use to edit an app’s properties and settings, meaning it is also included in Xcode projects, not only Xamarin projects. The purpose of Info.plist is providing information about identity, deployment, icons and launch images, and basic capabilities. When you double-click the Info.plist in the Solution pad, the editor will look like Figure 6-11.
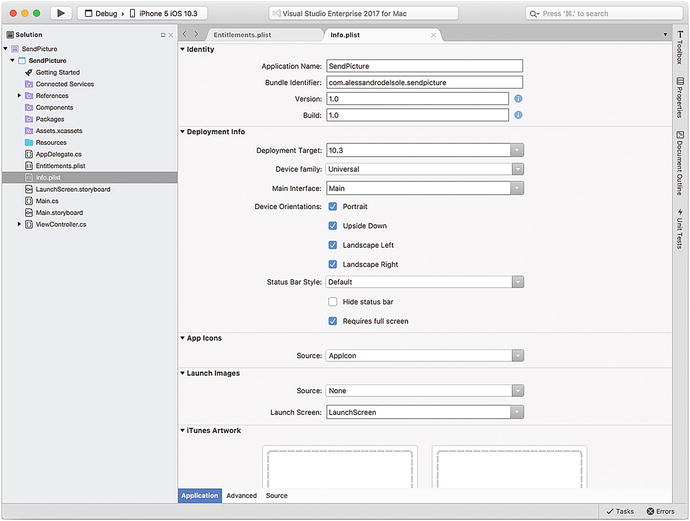
Figure 6-11. Editing the Info.plist file
In the Identity group, you will find the information you entered when creating the project, such as the name, bundle identifier, and version numbers. Here you can make edits; for example, you can change the version numbers when releasing app updates. In the Deployment Info group, you can specify your app targets by indicating the minimum iOS version (Deployment Target), the device family (iPhone, iPad, or Universal), the supported orientations, and the main interface, and you can control the appearance of the iOS status bar. If your app targets the iPad, you might want to select the “Requires full screen” check box. In the App Icon and Launch Images groups, you can specify the app icon and the images that will be used as splash screens. There are default settings that you can override by supplying your custom images through a specific editor, which you enable by double-clicking the Assets.xcassets folder in the Solution pad. This editor, which looks like Figure 6-12, allows you to specify icons and images for different screen factors based on the device. It shows the size for each image you need to supply and allows you to supply both app icons and launch images by clicking the desired item in the left bar.
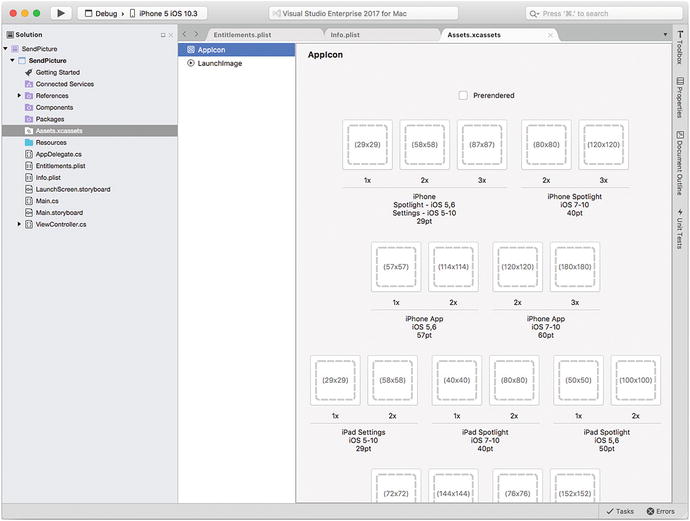
Figure 6-12. Supplying app icons and launch images
Going back to Info.plist, you can specify the so-called iTunes artwork—two images that will be used in the iTunes App Store to showcase the app. Regarding capabilities, here you can specify if your app needs to connect to the Game Center, if it supports Maps, and if it needs to run in the background.
Specifying Privacy Permissions
Info.plist is also important for another reason: it allows you to specify privacy permissions your app will request to the user, based on the device and system features it uses. For instance, the sample application needs to access the local photo library, and therefore it must request the user permission to do so. This is important, especially because of the more restrictive privacy requirements in iOS 10.
To specify a permission, first click the Source tab. Here you will see the list of properties that were already specified in the Application view of the editor, and here you can insert additional properties and options, including privacy settings. To add one, click “Add new entry.” When “Custom property” appears, click the drop-down arrow at the right, and scroll the list of properties until you see those whose name starts with Privacy. Among these, select Privacy – Photo Library Usage Description, then specify the String type in the Type column, and finally enter a description that the app will display when requesting the user permission, as exemplified in Figure 6-13.
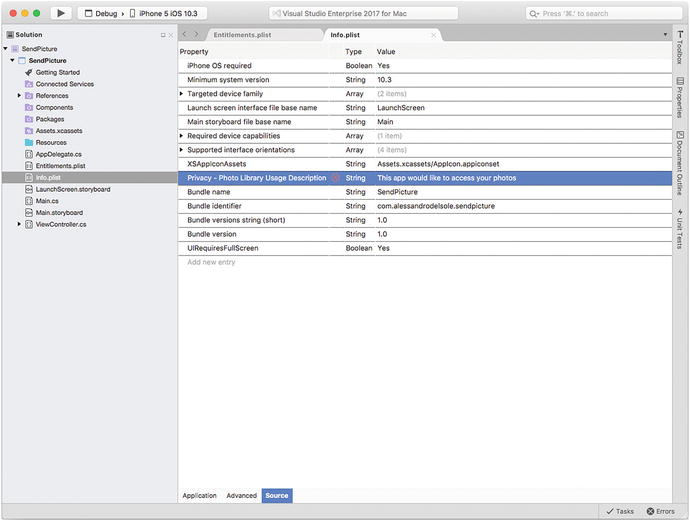
Figure 6-13. Specifying privacy permissions
You can specify additional privacy settings with the same steps, and the privacy items in the list are really self-explanatory. When you specify privacy items, iOS will ask the user permission to access a given resource displaying the informational message you supplied in the editor. Further information about iOS privacy permissions is available in the Xamarin official blog at https://blog.xamarin.com/new-ios-10-privacy-permission-settings/ .
Building and Debugging Apps
When you build an iOS app, Xamarin invokes the Xcode engine and the Apple SDKs to generate an .ipa app package. This affects the number of available build configurations, which are the same that Xcode uses. Other than the Debug and Release configurations, here you have two additional configurations: Ad-hoc and AppStore. Ad-hoc allows you to build the app package for local usage, such as for deploying the app to your physical device or for distributing the app to the selected testers via TestFlight, HockeyApp, or the Visual Studio Mobile Center.
AppStore, instead, prepares the .ipa app package for publication to the App Store. These are discussed in the next section, because they require both a physical device and a distribution certificate. For now, let’s focus on Debug and Release. You can use these configurations to run and test your apps against both the simulator and a physical device. For example, to test and debug your sample app, select the Debug configuration in the Visual Studio toolbar and then pick up one of the available device images from the Device combo box, as shown in Figure 6-14.
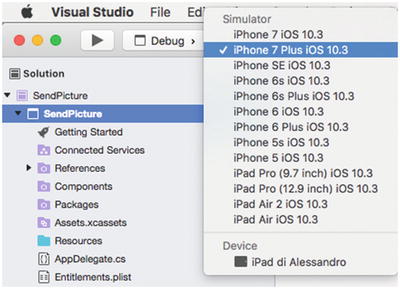
Figure 6-14. Selecting a device for deployment
I recommend you select a physical device, especially because sending e-mails will not work on the simulator; however, for the instructional purposes of this book, I will select a simulator image, such as the iPhone 7 Plus iOS 10.3. Notice that the list of available simulator images varies depending on the target version of the OS you selected in Info.plist. Once you have selected a target device, simply click the Start button. Visual Studio for Mac will build the iOS app at this point, which involves calling the Xcode engine, and therefore it might take a few minutes. It also needs to start up the simulator, which behaves like a virtual machine that needs to load the operating system. After a short wait, the sample app will be running in the simulator (or physical device), and you will be able to use all the debugging tools described in Chapter 3 (see Figure 6-15 for an example based on breakpoints and the Locals pad).
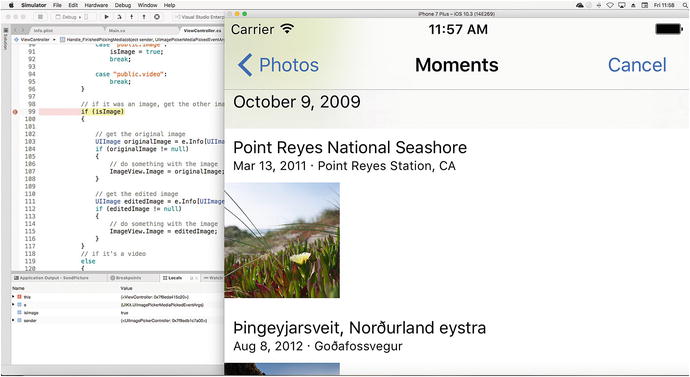
Figure 6-15. Debugging an iOS app with the simulator
You will instead select the Release configuration if you want to run the app without debugging.
Configuring the Build Process
In Chapter 2, you saw how to configure project options that are commonly available to all the supported project types in Visual Studio for Mac; then in Chapter 5, you saw how specific project options are available to Android projects and allow for configuring the build process. As you might expect, specific options are also available to iOS projects.
To manage these options, in the Solution pad right-click the project name and then select Options. Under the Build node of the Project Options dialog, you will find the iOS Build, iOS Debug, iOS On-Demand Resources, iOS Bundle Signing, and iOS IPA Options tabs. The iOS Build tab allows you to control the build process in a similar way to what you saw for Android in the previous chapter. For your convenience, I will summarize the most relevant options on the iOS Build tab, which is represented in Figure 6-16.

Figure 6-16. Controlling the build options
Like for Android, if you click the information icon, you will see a tooltip that explains what an option is about. Remember that options in the iOS Build dialog are per configuration, which means that Debug, Release, Ad-hoc, and AppStore might have different settings. Here I will cover the most relevant options. The “SDK version” option allows you to select which version of the Apple SDK must be used to build the app. I recommend you leave the Default selection so that Visual Studio knows what is the best version to use. Regarding the Linker Behavior option, you can decide to remove unused code, such as types and their members, from the build output to reduce the package size. It is recommended that you leave the default setting for each configuration, which is Link Framework SDKs Only. The “Supported architectures” box allows you to specify the supported processor architectures, and leaving the default value is the best choice. The “Enable incremental builds” and “Enable device-specific builds” options are intended to be enabled only when the active configuration is Debug. The first option only updates files that have changes from the previous build, while the second option optimizes the build for the selected target device. In the Internationalization group, you can specify one or more optional codesets so that the linker can include the appropriate resources in the build output. On the iOS Debug tab, you have options that are normally available to the Debug configuration. Among others, you can enable debugging over Wi-Fi and specify a port that the target device can use to connect. On the iOS On-Demand Resources tab, you can specify contents that are hosted on the App Store with a different bundle identifier and that your app will consume. More details are available at http://apple.co/2rHiY4i . On the iOS IPA Options tab, you can provide customizations to the information required by iTunes and that will be bundled into the .ipa app package. The iOS Bundle Signing tab contains probably the most important set of options and therefore needs a more thorough discussion. Figure 6-17 shows how this tab appears, which you can use as a reference.

Figure 6-17. The iOS Bundle Signing options
The first important concept to understand is that an iOS app package must be signed not only for publishing to the App Store but also for debugging. To accomplish this, Xcode (invoked by Visual Studio for Mac) needs you to specify the so-called signing identity, which is represented by a digital certificate that can be of different types, such as Developer or Distribution. By default, your Apple ID is enabled as a free developer account, with the limitations described in Chapter 1, and Xcode generates a development certificate for it. With this certificate, you can sign an app for debugging on both the simulator and a physical device. When you purchase a developer account on the Apple’s web site ( http://developer.apple.com ), you become eligible for removing all the restrictions on your developer account, which you can therefore use to debug and test multiple apps on a larger number of physical devices. You can also create distribution certificates that you can use to sign an app package once you are ready for publishing. This last step is explained in more detail in the next section, but it is interesting how Visual Studio for Mac can automatically detect the best signing identity based on the selected configuration. If you look at Figure 6-17, in the Signing Identity box you see Developer (Automatic). This means Visual Studio has detected that the Developer signing identity is appropriate for the selected configuration, which is Debug. Of course, you can choose a different signing identity, for example, when multiple Apple IDs are registered on the same machine. When you click the drop-down box, Visual Studio will display the list of available identities, and you will be able to understand to whom an identity belongs. Similarly, Visual Studio automatically selects the most appropriate provisioning profile based on the current configuration and signing identity. As you will see shortly, these settings will change when you want to distribute an app using the Ad-hoc and AppStore configurations. As you can imagine, if you are able to immediately start debugging your app, it is because Visual Studio automatically selected the proper signing identity and provisioning profile for you. Finally, you can supply a different, custom Entitlements.plist file, which I suggest you do only when you get experienced with Xamarin and iOS development.
Hints About the Xamarin Live Player
As you learned in Chapter 5, Microsoft offers the Xamarin Live Player app that you can install on Android and iOS devices and that allows you to debug an app on a physical device by pairing the device with Visual Studio. Using this app for debugging will not be covered in this chapter, because one of the app’s purposes is making it simpler to debug a Xamarin.iOS project for people who do not have a Mac, such as developers working with Visual Studio on Windows. This certainly does not apply to you since you are already working on a Mac.
Having a Mac with Visual Studio provides full development and debugging experiences with no limitations, so using the Xamarin Live Player app will not bring additional value to you with this book. You can always get further information at http://xamarin.com/live .
Preparing Apps for Publishing
Note
The steps described in this chapter require either that you have a paid Apple developer account or that your Apple ID is added to a team with permissions to publish applications. If you cannot join an existing team and you do not want a paid subscription, you can just read this section to understand where and how Visual Studio for Mac simplifies the process.
Visual Studio for Mac dramatically simplifies the process of preparing an app package for publication with a number of built-in tools that generate the .ipa file in a few steps. However, before you can publish an app, you need to do a few things, such as creating an app record on Apple’s developer web site and generating a distribution certificate, both necessary to see VS for Mac’s tools in action. Discussing all the steps in detail is beyond the scope of this chapter, so I will provide a summary of the required steps and links to the documentation where you can find the proper information. Having that said, the following is a list of requirements you must satisfy before you can publish an app:
Join the Apple Developer Program ( http://developer.apple.com ) by choosing your paid subscription level. The individual account, currently $99 per year, is enough to distribute iOS apps.
Once your subscription has been enabled, enter the iTunes Connect portal ( http://itunesconnect.apple.com ), where you can manage your applications and distributions.
Create an app record by following the instructions described in the documentation at http://apple.co/2r4NGS5 . Make sure you enter the bundle identifier you provided in your project because this will be mapped to the .ipa package at upload time.
Generating a distribution certificate for your app (see http://apple.co/2lzClJc ).
Once you have created your subscription, created the app record, and generated your distribution certificate, you are ready to publish your app. Make sure you connect a physical device to your Mac, and then in Visual Studio select the AppStore|iPhone configuration in the toolbar. Next, in the Solution pad , right-click the project name and then select Archive for Publishing. Visual Studio will rebuild the project based on the AppStore configuration. If the build succeeds, you will see the newly generated package in the Archives window visible in Figure 6-18.
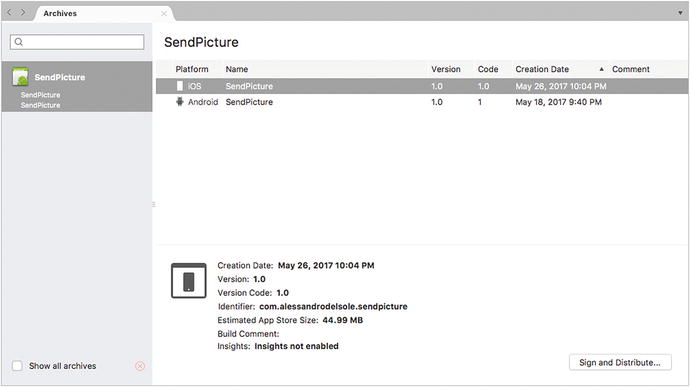
Figure 6-18. The archive list for the app packages
Before any other considerations, it is worth highlighting that Visual Studio for Mac shows the list of archives in the solution. Therefore, it includes Android archives, as you can see in Figure 6-18 where the archive generated in Chapter 5 is also visible. At this purpose, the Archive window reports the same kind of information regardless of the target platform both for items in the list and for the summary. If you click Sign and Distribute, you will be prompted with three options, as shown in Figure 6-19.
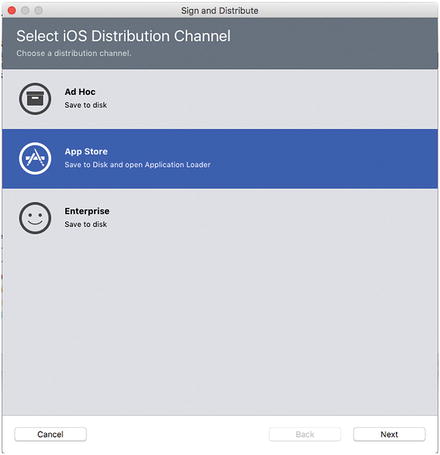
Figure 6-19. Choosing the iOS distribution channel
The Ad Hoc channel will allow you to save on disk the .ipa package and will allow you to distribute it via tools such as TestFlight or the Visual Studio Mobile Center. The App Store distribution channel will prepare the .ipa package for direct upload to the App Store via the Application Loader tool. This assumes you have created the app record on iTunes Connect and that you have registered the bundle identifier. The Enterprise distribution channel is available only to the same-name subscription level and allows for distributing app within the enterprise. By clicking Next, you will be able to upload your app package directly to the App Store, and the Application Loader tool will use the bundle identifier to correctly map your .ipa package to the app record you created previously. The official Apple documentation provides information about the Application Loader tool at http://apple.co/2r6QSid .
Hints on macOS and tvOS Development
Visual Studio for Mac allows you to create applications for macOS by leveraging the Xamarin.Mac platform and the Cocoa framework from Apple; you can also create games based on the SpriteKit, SceneKit, and Metal frameworks. When you create a new project using the Cocoa App template, you will be able to specify the minimum operating system version and options for the Dock. You will also be able to specify whether the application must rely on documents.
The structure of a Xamarin.Mac solution is similar to a Xamarin.iOS solution, which means you have .storyboard files, view controllers, Info.plist, Entitlements.plist, Assets.xcassets, and so on. This will make it simpler to write a macOS program with Visual Studio. A macOS app still relies on the bundle identifier and signing identities. At this writing, building apps for macOS is a hybrid process, meaning that editing .storyboard files cannot be done inside Visual Studio; instead, the IDE opens an instance of Xcode, and there you will be able to design storyboards and scenes. As an alternative, you can completely code your user interface in C#. Regarding tvOS development , this is really close to iOS development with Xamarin. In fact, a Xamarin.tvOS solution has the same structure as a Xamarin.iOS solution, with the same properties, requirements, and files. In Xamarin.tvOS, you can edit .storyboard files with the Visual Studio designer. Of course, tvOS has some differences in terms of screen factor and API availability, but the way you work with a tvOS solution is the same. Additionally, there is a specific Apple TV image for the simulator that you can use for debugging. So, with Visual Studio for Mac, you have everything in one place, and you can target all the Apple platforms by reusing your C# skills. Of course, you will need to know how the macOS, iOS, and tvOS operating systems work and the API they expose, but Visual Studio for Mac makes the development experience really straightforward.
Summary
Visual Studio for Mac allows you to build, debug, test, and deploy iOS, macOS, and tvOS applications using C# all in one place. In this chapter, you saw how to create a Xamarin.iOS project for the iPhone and the iPad, and you walked through important concepts such as the structure of a solution, adding NuGet packages and components, and designing the user interface with the built-in, integrated designer for .storyboard files.
Then you saw how to invoke the iOS APIs from the view controller in C# code to access the local photo library and to send an e-mail with an attachment. Actually, in iOS development there is much more than writing code, such as configuring project properties and metadata the proper way, so you saw how to use the .plist editor to customize the Info.plist and Entitlements.plist files. Info.plist is also the place where you add privacy permissions, and VS for Mac dramatically simplifies the way you do it. When it comes to debugging and testing an app, Visual Studio for Mac reveals all of its power, offering all the debugging tools you saw in Chapter 3. Additionally, the IDE makes it simple to control the build process with the Options dialog and the iOS tabs. If you have experience with other development environments, you will certainly appreciate how Visual Studio for Mac also makes it extremely simple to prepare an app for publication: you simply select the Archive for Publishing command, and the IDE will select the proper signing identities, generate the app package, and let you choose among three possible distribution options, including direct publication to the App Store with the Application Loader tool. In Chapter 5 and in this chapter, you saw platform-specific flavors of Xamarin: Xamarin.Android and Xamarin.iOS. Though all allow you to write C#, there is so much difference in terms of APIs between the two platforms, and you have to create two different solutions and two different packages and write code twice. In the next chapter, you will start working with Xamarin.Forms, the abstraction layer that makes it possible to write C# code once and generate cross-platform user interfaces.