As a developer, you will spend most of your time working with Visual Studio for Mac. This provides an integrated development environment (IDE) that includes not only a rich code editor but also a large number of integrated tools and features that make developers extremely productive.
Because Visual Studio for Mac is the tool you are going to use for your daily work, you need to know in detail most of the features and tools it offers, from the code editor to productivity features to how it handles file management. In this chapter, you will learn everything you need to know to get the most out of the IDE and out of the code editor, and you will get familiar with all the features that you will typically use in your developer life.
This is probably the most important chapter in the book, so I recommend you to read it carefully to get familiar both with the IDE and with the concepts that will be used throughout the rest of the book, especially in chapters where I explain how to build Xamarin and .NET applications. As a final note, keep in mind that there are keyboard shortcuts for every tool I describe in this chapter. I will not use keyboard shortcuts very often because I prefer you to learn where to find commands within menus, and there you will be able to see keyboard shortcuts.
Note
Visual Studio for Mac also allows working with the F# programming language against some specific project types. However, F# will not be used in this book because it is tailored to functional programming. C# is more popular, it is a general-purpose language, and it is fully supported by all of the available Xamarin and .NET Core projects you can create with VS for Mac.
Taking a Step Back in History: Xamarin Studio
When Xamarin was a stand-alone company and started to offer the Xamarin development platform, it also provided its own integrated development environment, called Xamarin Studio.
This IDE, which is still popular in the developer community, has some important points of strength: it runs on Windows and macOS ; it has adopted the Microsoft Visual Studio format for solutions and projects, which also allows a Xamarin project to be opened in Visual Studio 2015 and 2017; and it allows working in the same way regardless of the operating system. Microsoft immediately realized the potential of Xamarin Studio and of how it could fit into the mobile-first, cloud-first strategy . For this reason, when Microsoft acquired Xamarin, Microsoft decided to evolve Xamarin Studio and introduce two important additions: empowering the IDE with the .NET Compiler Platform (also known as Project Roslyn) for rich code editing and live code analysis experience, and adding support for .NET Core and cross-platform web development. As you can imagine, Visual Studio for Mac is the result of the evolution of Xamarin Studio, and this book explains how to get the most out of it.
Looking at the Welcome Page
When Visual Studio starts, the first thing you see is the welcome page. This contains a number of shortcuts and links that simplify common tasks. Figure 2-1 shows how the welcome page looks.
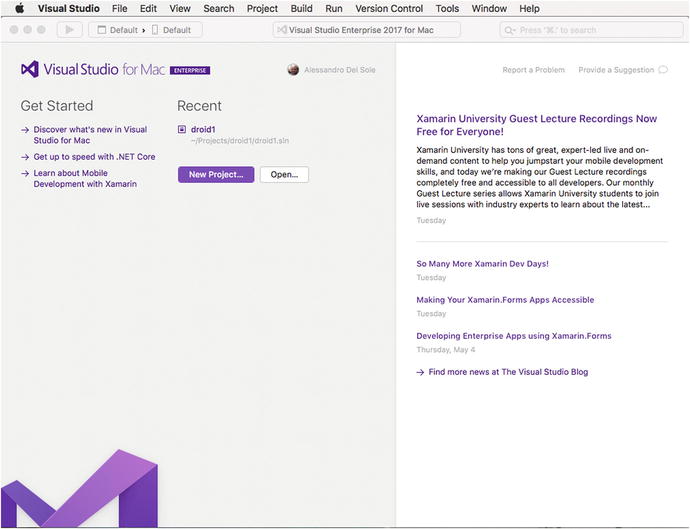
Figure 2-1. The welcome page in Visual Studio for Mac
You can visit the welcome page at any time by selecting Window ➤ Welcome Page. In the next subsections, you learn more about the various areas and shortcuts.
The Get Started Area
On the left side of the welcome page, you find the Get Started area. Here you find links to official online resources that you can read to get further information about Visual Studio for Mac, .NET Core, and Xamarin. Each link will open your web browser pointing to the appropriate learning resource.
The Recent Area
The Recent area displays the list of most recently used projects and is located on the right of the Get Started area. If this is the first time you are starting Visual Studio, the Recent area will be empty. In Figure 2-1 you can see a list of most the recently used projects as it appears on my machine.
Simply click a project name to open it. You can also filter the list by typing in the Filter text box. When you hover your mouse over a project name, you will also see an icon with the x symbol, which allows you to remove projects from the list. Notice that this action does not delete the project from disk; it just removes the project from the list of most recently used ones.
The News Area
The News area is located at the right side of the welcome page and aggregates news and updates from the Visual Studio team’s blog and other Microsoft online resources.
Simply click a hyperlink to open your web browser and read the full article or blog post online. This is a convenient way to receive updates from Microsoft official sources and learn about new features and releases of Visual Studio for Mac.
Reporting Problems and Providing Suggestions
At the top of the News area, you will also see two shortcuts called Report a Problem and Provide a Suggestion. The first shortcut allows you to report any problems found in Visual Studio directly to Microsoft.
Visual Studio opens a page on the Developer Community web site ( http://developercommunity.visualstudio.com ), where developers can report problems and monitor them for responses from the product team. The second shortcut, Provide a Suggestion, will open the User Voice web site in your browser. User Voice is the place where users can send their suggestions or feature requests about a particular Microsoft product.
Understanding Runtimes and SDKs
Like any other development tool, Visual Studio for Mac relies on specific runtimes and software development kits. These are necessary because both Visual Studio and the applications you build with Visual Studio require them to work.
Visual Studio for Mac relies on the following four main platforms:
The Mono framework: This is the popular cross-platform and open source porting of the .NET Framework to operating systems such as macOS and Linux. Mono is required by Visual Studio for Mac because it’s the engine that empowers mobile applications that you create with Xamarin. Additionally, as you will discover later, Mono allows you to build ASP.NET web applications and services for macOS exactly as you would on Windows with .NET and Visual Studio 2017.
The Java SDK: This is required to build Android apps using Xamarin in Visual Studio for Mac.
The .NET Core platform: This is the new cross-platform, open source, and modular runtime for the next generation of web applications that run on macOS, Windows, and Linux.
The Apple SDKs: Visual Studio for Mac needs these to compile Xamarin projects for iOS and macOS.
Except for the Apple SDKs and for .NET Core that you installed when reading Chapter 1, the runtime platforms are installed by the Visual Studio for Mac installer. You will get more detailed information about Mono and .NET Core in Chapters 4 and 9, respectively, but this minimum knowledge is necessary for a better understanding of the project types that you can create with VS for Mac.
Working with Projects
Note
If you have experience creating projects with C# in Microsoft Visual Studio for Windows, many concepts in this section will be familiar to you and will still be valid with Visual Studio for Mac.
Each time you want to develop an application, you create a project. A project is a collection of source code files, resources, metadata, references and all the other files you need to build (or make in other systems) an application or a library. In the Visual Studio family, a C# project is represented by a .csproj file, whose structure is based on the Extensible Markup Language (XML) and which contains all the information required by the IDE to fully represent a project.
An application or a library can be built from multiple projects linked together at compile time. For this reason, Visual Studio has the concept of solution. A solution can be thought of as a container of projects, and each can contain an infinite number of projects of different kinds, written in different programming languages and with different targets. For example, a solution can contain a Xamarin project, a .NET Core library, and an ASP.NET Web API service. Solutions are represented by .sln files, whose structure is based on XML. A solution file stores the information required by the IDE to manage all the projects a solution contains. It is important to mention that solution and project files are standard across operating systems; this means that Visual Studio for Mac can open a solution created with Visual Studio 2017 on Windows, and vice versa. Of course, Visual Studio for Mac will only be able to open solutions that contain supported projects, such as Xamarin and .NET Core projects. For a better understanding of why this is so important, think of team collaboration: both Visual Studio 2017 and Visual Studio for Mac support Git as a source control engine. As a consequence, people on a team can share their work on the source code, and they will be able to collaborate on the same solution regardless of the operating system and IDE. This makes particular sense with Xamarin, where it is common to have some people working on Mac computers and other people working on Windows PCs. In the next subsections, you will learn the fundamentals about creating, running, and managing projects in Visual Studio for Mac. Then, you will get more detailed information about specialized project templates starting from Chapter 4.
Creating Projects
Creating projects in Visual Studio for Mac is a simple task. You click the New Project button on the welcome page or select File ➤ New Solution. Both actions open the New Project dialog, where you can see the full list of available project templates. Figure 2-2 shows an excerpt of the full list, which you can see by scrolling the list on the left side of the dialog.
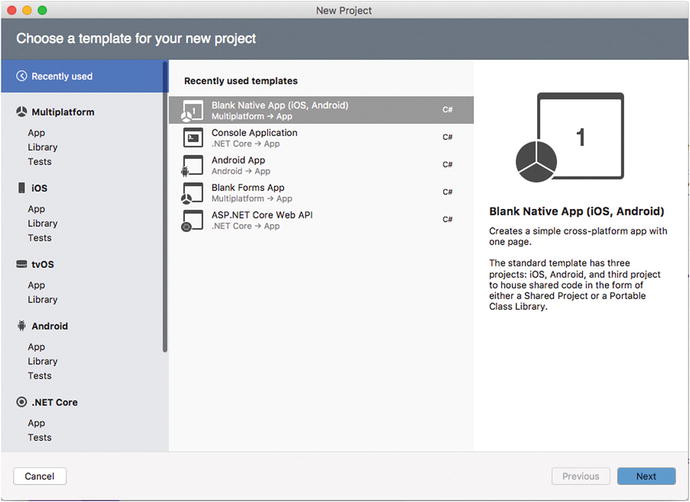
Figure 2-2. The New Project dialog presents the full list of available supported project types
In the next subsection, you will get a full explanation of the available project templates. Then in Chapters 4 to 11 you will learn how to use most of them in detail. As a tip, remember that you can simply click a project template to see a description on the right side of the dialog. For example, in Figure 2-2 you can see a description of the Blank Native App (iOS, Android) project template. In this case, the description explains how this project template generates a solution made of three projects: an iOS project, an Android project, and a project to share reusable code. You will get a similar description when clicking the other project templates.
Note
The New Project dialog also presents a tab called “Recently used,” where you will see a list of the most recently used project templates.
Understanding Available Project Types
Visual Studio for Mac allows for building applications for iOS, macOS, tvOS, Android and Android Wear, and Windows.
For iOS, macOS, tvOS, and Android, Visual Studio for Mac relies on Xamarin. More specifically, you create apps for iOS and tvOS with the Xamarin.iOS libraries; apps for macOS with the Xamarin.Mac libraries; apps for Android with the Xamarin.Android libraries; and cross-platform mobile apps for iOS and Android with Xamarin.Forms sharing a single C# codebase. For cross-platform console and web applications that run on macOS, Linux, and Windows, Visual Studio for Mac relies on .NET Core. At a higher level, available project templates in Visual Studio for Mac can be categorized as shown in Table 2-1.
Table 2-1. Project Categories
Category Name | Description |
|---|---|
Multiplatform | Contains Xamarin project templates that focus on code reuse to build cross-platform apps, games, and libraries. |
iOS | Contains project templates based on Xamarin.iOS that allow building apps, games, and libraries for the iPhone and the iPad. |
tvOS | Contains project templates based on Xamarin.TVOS that allow building apps, games, and libraries for the Apple tvOS. |
Android | Contains project templates based on Xamarin.Android that allow building apps, games, and libraries for Android devices, including wearable devices. |
.NET Core | Contains project templates that allow building cross-platform console and web applications based on .NET Core. |
Mac | Contains project templates based on Xamarin.Mac that allow building applications and games for macOS. |
Other | Contains miscellaneous project templates. The most relevant templates allow building console and ASP.NET web apps and services that run on Mono. |
I will now provide a complete explanation for each available template. Some of them will be used in the book to demonstrate how to build mobile and web applications using Xamarin and .NET Core, respectively.
Multiplatform Templates
The Multiplatform category offers project templates that aim to maximize code reuse. In this category, you find templates that allow sharing code by platform, such as Xamarin.Forms, or by project kind, such as Shared Projects and Portable Class Libraries, all explained very shortly.
The Multiplatform category is divided into three subcategories: App, Libraries, and Tests. The subcategory names are self-explanatory: App contains project templates that allow creating an app, Libraries contains project templates that allow producing reusable libraries, and Tests contains project templates that allow creating projects for UI test automation. You will find the same subcategories in the iOS and Android template categories. Table 2-2 summarizes the project templates in the App category.
Table 2-2. Project Templates in the App Category
Platform | Template Name | Description |
|---|---|---|
Xamarin.Forms | Forms App | Generates a solution that contains a cross-platform Xamarin.Forms project and an ASP.NET Web API back end based on .NET Core and optimized for publication to Microsoft Azure. The Xamarin.Forms project contains sample data and sample views to simulate a to-do list app, including CRUD operations and authentication. |
Xamarin.Forms | Blank Forms App | Generates a solution that contains a blank Xamarin.Forms project. |
Native (iOS, Android) | Native App (iOS, Android) | Generates a solution that contains a Xamarin.iOS project, a Xamarin.Android project, and a project to share code between the two Xamarin projects. This can be either a shared project or a portable class library. Xamarin projects include an ASP.NET Web API back end based on .NET Core and sample data and views to simulate a to-do list app, including CRUD operations and authentication. The back-end project is optimized for distribution to Microsoft Azure. |
Native (iOS, Android) | Blank Native App (iOS, Android) | Generates a solution that contains blank Xamarin.iOS and Xamarin.Android projects, plus a project to share code between the two, which can be either a shared project or a portable class library. |
Games (iOS, Mac) | SpriteKit Game | Generates a solution that contains a Xamarin.iOS project that allows creating 2D games based on the SpriteKit framework from Apple. |
Games (iOS, Mac) | SceneKit Game | Generates a solution that contains a Xamarin.iOS project that allows creating 3D games based on the SceneKit framework from Apple. |
The Library subcategory contains instead project templates that allow creating reusable libraries or shared projects. Table 2-3 summarizes the available project templates in this subcategory.
Table 2-3. Project Templates in the Library Category
Platform | Template Name | Description |
|---|---|---|
General | Shared Project | Generates a solution that contains a so-called Shared Project, which allows sharing loose assortments of files between projects. |
General | Portable Class Library | Generates a solution that contains a portable class library (PCL), which can be consumed in Windows, Mac, Windows Phone, Xamarin.iOS, and Xamarin.Android. |
General | Multiplatform Library | Generates a solution that contains a PCL and a corresponding NuGet package that can be compiled and distributed to the NuGet gallery. If you are new to NuGet, the “Adding and Managing Dependencies” section later in this chapter provides a detailed explanation about it. |
General | .NET Standard Library | Generates a solution that contains a C# library based on the .NET Standard specifications. At this writing, Visual Studio for Mac supports version 2.0 of .NET Standard. |
Xamarin.Forms | Class Library | Generates a solution that contains a PCL that can be consumed by Xamarin.Forms projects. |
While all the project templates in Table 2-3 have the goal of maximizing code reuse and of sharing code between projects, you might be confused by the three main types of Shared Project, Portable Class Library, and .NET Standard Library, so I will provide some clarifications.
The Shared Project type can be thought of as a loose assortment of files, such as code files, images, and XAML files. It does not produce a DLL library, and it can be just referenced from the projects in the solution it belongs to. With cross-platform Xamarin projects, such as Xamarin.Forms, it allows using preprocessor C# directives to invoke platform-specific code easily. For instance, using the Shared Project type, you could write something like the following:
#if __ANDROID__// Write code invoking the Android APIs#elseif __IOS__// Write code invoking the iOS APIs#else//Write code invoking the Windows APIs#endif
The Portable Class Library type is a special kind of library that will run on all the platforms and operating systems you specify. Thus, it offers a common set of APIs that varies and is restricted based on your selection. It does generate a compiled library that can be reused in other solutions and that can be distributed to other developers. It does not allow using preprocessor C# directives to invoke platform-specific code, so in platforms such as Xamarin.Forms, you have to use different patterns like the dependency service pattern.
The .NET Standard Library type provides a set of specifications for APIs that all the .NET development platforms, such as .NET Framework, .NET Core, and Mono must implement. This allows for unifying .NET platforms and avoids future fragmentation. By creating a .NET Standard Library project, you will be sure your code will run on any .NET platform without the need of selecting any targets. Microsoft has recently released version 2.0 of .NET Standard, which provides full unification for the .NET Framework, .NET Core, and Mono, and Visual Studio for Mac supports .NET Standard up to version 2.0. Microsoft has a well-done blog post about .NET Standard and its goals and implementations that you can find at https://blogs.msdn.microsoft.com/dotnet/2016/09/26/introducing-net-standard/ .
The last subcategory is called Tests and contains only one template called UI Test App. This project template generates a solution with a project that allows automating tests against the user interface both locally and on Xamarin Test Cloud, the platform that provides a cloud-based environment with dozens of devices that you can use to test the behavior of your apps.
iOS Templates and tvOS Templates
The iOS category is still divided into three subcategories called App, Library, and Test. In general, the iOS category contains project templates that allow generating Xamarin.iOS projects that you can use to build native iOS apps with C#.
Table 2-4 offers a detailed description of the iOS category.
Table 2-4. Project Templates in the App Category
Platform | Template Name | Description |
|---|---|---|
General | Single View App | Generates a solution that contains a Xamarin.iOS project for a single-page app with a Storyboard object that contains a View, a View Controller, and a C# class. |
General | Master-Detail App | Generates a solution that contains a Xamarin.iOS project based on a Master-Detail view and that displays a list of sample items. It is optimized for different screen form factors, including a Navigation Controller for the iPhone and a Split View on the iPad. |
General | Tabbed App | Generates a solution that contains a Xamarin.iOS project based on multiple pages contained in tabs. It includes a Tab Bar Controller and a View Controller for each tab bar item. |
General | Page-Based App | Generates a solution that contains a Xamarin.iOS project that shows how to implement navigation between multiple pages using a Page View Controller. |
General | WebView App | Generates a solution that contains a Xamarin.iOS project that allows displaying HTML contents inside a WebView object, based on the Razor templating engine. |
Games | SpriteKit Game | Generates a solution that contains a Xamarin.iOS project that allows creating 2D games based on the SpriteKit framework from Apple. |
Games | SceneKit Game | Generates a solution that contains a Xamarin.iOS project that allows creating 3D games based on the SceneKit framework from Apple. |
Games | Metal Game | Generates a solution that contains a Xamarin.iOS project that allows creating games based on Metal, a GPU-accelerated 3D framework from Apple. |
Games | OpenGL Game | Generates a solution that contains a Xamarin.iOS project that allows creating 2D and 3D games based on the OpenGL framework APIs. |
The Library subcategory offers two project templates: Class Library, which allows for generating C# class libraries that are tailored to Xamarin.iOS, and Bindings Library, a special project template that allows for generating C# class libraries that can consume third-party Objective-C libraries for iOS. This particular topic will not be covered in this book, but the Xamarin documentation has a specific page that you can find at https://developer.xamarin.com/guides/cross-platform/macios/binding/objective-c-libraries/ .
The Tests subcategory offers two project templates called UI Test App and Unit Test App. The first project template is similar to its corresponding template in the Multiplatform category, but it is tailored to Xamarin.iOS and allows for automating tests against the user interface both locally and on Xamarin Test Cloud. The second template creates a test project for Xamarin.iOS apps and libraries where you can write unit tests based on the Touch.Unit framework.
Regarding tvOS , Visual Studio for Mac offers project templates that generate Xamarin.iOS projects optimized for this kind of device. Supported project templates are Single View App, Tabbed App, SceneKit Game, SpriteKit Game, and Metal Game. The description for each project template is the same as provided in Table 2-4.
Android Templates
The Android category is divided into three subcategories called App, Library, and Test. In general, the Android category contains project templates that allow generating Xamarin.Android projects that you can use to build native Android apps with C#. Table 2-5 offers a detailed description of the Android category.
Table 2-5. Project Templates in the App Category
Platform | Template Name | Description |
|---|---|---|
General | Android App | Generates a solution that contains a Xamarin.Android project with a single sample screen (Activity) with a button and a label. |
General | Wear App | Generates a solution that contains a Xamarin.Android project that targets the Android Wear operating system. |
General | Blank Android App | Generates a solution that contains a Xamarin.Android project with a single sample screen (Activity) and empty user interface. |
General | WebView App | Generates a solution that contains a Xamarin.Android project that allows displaying HTML contents inside a WebView object, based on the Razor templating engine. |
Games | OpenGL Game | Generates a solution that contains a Xamarin.Android project that allows creating 2D and 3D games based on the OpenGL framework APIs. |
Games | OpenGL ES 2.0 Game | Generates a solution that contains a Xamarin.Android project that allows creating 2D and 3D games based on the OpenGL ES 2.0 APIs. ES stands for Embedded Systems. |
Games | OpenGL ES 3.0 Game | Generates a solution that contains a Xamarin.Android project that allows creating 2D and 3D games based on the OpenGL ES 3.0 APIs. This is a most recent version with new features and is backward compatible with 2.0. |
The Library subcategory offers two project templates: Class Library, which allows for generating C# class libraries that are tailored to Xamarin.Android, and Bindings Library, a project template that allows for generating C# class libraries that can consume third-party Java libraries for Android. This particular topic will not be covered in this book, but the Xamarin documentation has a specific page that you can find at https://developer.xamarin.com/guides/android/advanced_topics/binding-a-java-library/ .
The Tests subcategory offers two project templates called UI Test App and Unit Test App. Similarly to the iOS templates, the first project template is similar to its corresponding template in the Multiplatform category, but it is tailored to Xamarin.Android and allows for automating tests against the user interface both locally and on Xamarin Test Cloud. The second template creates a test project for Xamarin.Android apps and libraries where you can write unit tests.
.NET Core Templates
The .NET Core project templates are extremely important in Visual Studio for Mac because they represent one of the most evident points of evolution when comparing this IDE with Xamarin Studio. As you will learn in more detail in Chapter 9, .NET Core is an open source, modular, cross-platform runtime that allows building apps that run on Windows, Linux, and macOS with C#.
To build .NET Core apps, Visual Studio for Mac offers a number of specific project templates available in the .NET Core category. This is divided into the App and Tests subcategories. Table 2-6 describes project templates in the App subcategory.
Table 2-6. Project Templates in the App Category
Platform | Template Name | Description |
|---|---|---|
General | Console Application | Generates a solution that contains a C# project for a stand-alone, empty console application |
ASP.NET | ASP.NET Core Empty | Generates a solution that contains an empty ASP.NET Core web project |
ASP.NET | ASP.NET Core Web App | Generates a solution that contains an ASP.NET Core project that scaffolds a web application based on the MVC framework |
ASP.NET | ASP.NET Core Web PI | Generates a solution that contains an ASP.NET Core project that scaffolds a RESTful service based on the Web API framework |
The Tests subcategory contains only one project template called xUnit Test Project that allows creating unit tests based on the xUnit test framework.
Mac Templates
The Mac category is also interesting because it provides project templates that allow building applications, games, and libraries for the macOS operating system using Xamarin.Mac with C#. This category is divided into the App and Library subcategories, and Table 2-7 describes the App one in more detail.
Table 2-7. Project Templates in the App Category
Platform | Template Name | Description |
|---|---|---|
General | Cocoa App | Generates a solution that contains a Xamarin.Mac project with a Storyboard for a stand-alone Mac application based on the Cocoa framework from Apple |
Games | SpriteKit Game | Generates a solution that contains a Xamarin.Mac project that allows creating 2D games based on the SpriteKit framework from Apple |
Games | SceneKit Game | Generates a solution that contains a Xamarin.Mac project that allows creating 3D games based on the SceneKit framework from Apple |
Games | Metal Game | Generates a solution that contains a Xamarin.Mac project that allows creating games based on Metal, a GPU-accelerated 3D framework from Apple |
The Library subcategory contains the Class Library and Bindings Library project templates. Their purpose is the same as described for their counterparts in Xamarin.iOS, with an important clarification for the Class Library template: this one relies on the so-called Unified APIs, which means that code in this library can be shared between Xamarin.Mac and Xamarin.iOS on both 32-bit and 64-bit systems.
Other Templates
Not limited to Xamarin and .NET Core projects, Visual Studio for Mac allows working with a number of additional project types. Among the others, the most important thing to highlight at this point is that the IDE supports several classic .NET projects such as Console, ASP.NET MVC, and ASP.NET Web Forms projects.
This is possible because of the Mono runtime, which allows running these kinds of applications even on a Mac. The miscellaneous supported project types are available in the Other category, which is divided into the .NET, ASP.NET, and Miscellaneous subcategories. Except for where any differences are expressly stated, here .NET means the .NET Framework, not .NET Core.
Note
The project templates described in this subsection will not be used in this book, whose goal is to demonstrate how to use VS for Mac with a mobile-first, cloud-first strategy. Still, it is important that you know they exist and that you can use them to work on a variety of .NET projects even on a Mac. It is also worth mentioning that most of these projects not only support C# and F# but also Visual Basic as a programming language.
Table 2-8 describes the project templates in the .NET subcategory.
Table 2-8. Project Templates in the .NET Category
Template Name | Description |
|---|---|
Console Project | Generates a solution that contains an empty console project |
Empty Project | Generates a solution that contains an empty C# project with only the basic references |
Gtk# 2.0 Project | Generates a solution that contains a project based on Gtk#, a cross-platform framework for creating user interfaces |
Library | Generates a solution that contains an empty C# class library project for .NET |
F# Tutorial | Generates a solution that contains an F# project with a single file that contains a variety of code examples |
NUnit Library Project | Generates a solution that contains a library project for unit tests based on the NUnit framework |
NuGet Package | Generates a solution that contains a project that allows for building a NuGet package from files and libraries |
As I said before, VS for Mac also supports some classic ASP.NET project types, such as MVC and Web Forms. Supported projects are included in the ASP.NET subcategory, and they are described in Table 2-9. Regarding ASP.NET on Mono, it is worth mentioning that Mono is not supported for running web applications in production, whereas .NET Core is.
Table 2-9. Project Templates in the ASP.NET Category
Template Name | Description |
|---|---|
Empty ASP.NET Project | Generates a solution that contains an empty ASP.NET web project with its basic infrastructure |
ASP.NET MVC Project | Generates a solution that scaffolds an ASP.NET MVC web project using Razor views |
ASP.NET Web Forms Project | Generates a solution that scaffolds an ASP.NET project based on the Web Forms technology |
The projects described in Table 2-9 give Visual Studio for Mac great flexibility and allow you to work with your existing codebases even on a Mac. The last subcategory is called Miscellaneous and provides the project templates summarized in Table 2-10.
Table 2-10. Project Templates in the Miscellaneous Category
Template Name | Description |
|---|---|
Blank Solution | Generates an empty solution that you can populate with any of the project types described so far. |
Workspace | Generates a new workspace , which might be thought of as a container of solutions. Notice that workspaces are not supported in Visual Studio 2017 on Windows. |
Empty Project | Generates a solution that contains a completely empty C# project. |
After the detailed description of each project type, you should have a clearer idea of what kind of applications you can build with Visual Studio for Mac.
Opening Existing Solutions
You have different options to open existing solutions from disk. You can select a solution by clicking the Open button on the welcome page, or you can select File ➤ Open. Notice that Visual Studio for Mac is not limited to open solution files; it also allows opening individual project (.csproj) files, and then it will generate a root solution for the project.
Additionally, you can open solutions from the list of most recently used ones that is available on the welcome page, or you can do this by selecting File ➤ Recent Solutions and then select the solution you need from the submenu that appears. This submenu also provides a command called Clear that deletes the list of most recently used solutions.
Creating Your First C# Project
In this section, you will learn how to create your first C# project in Visual Studio for Mac. Though it might seem an easy step, and actually it is, you will also learn a number of concepts and features you will reuse with whatever project template you choose to work with. For the sake of simplicity, you will start with a C# console application based on .NET Core.
In fact, the focus of this chapter is not explaining how the various development platforms work; rather, the focus is on getting to know the most common and important features in the IDE that you need to know when working with any kind of project. Thus, the Console project template is perfect because it’s the simplest template possible. Having that said, click New Project on the welcome page or select File ➤ New Solution. When the New Project dialog appears, select the Console Application template in the .NET Core category and then click Next. If multiple versions of the .NET Core runtime are installed on your machine, VS for Mac will ask you to select one. Select either 1.1 or 2.0 and click Next. At this point, the New Project dialog asks you to specify a project name and a solution name, which is common to all the supported project templates. The Solution Name text box is automatically populated as you type the project name, but you can certainly provide a different solution name (which is not uncommon). Because everything starts with a Hello World example, type HelloWorld as the project name. Figure 2-3 shows how the New Project dialog appears at this point.
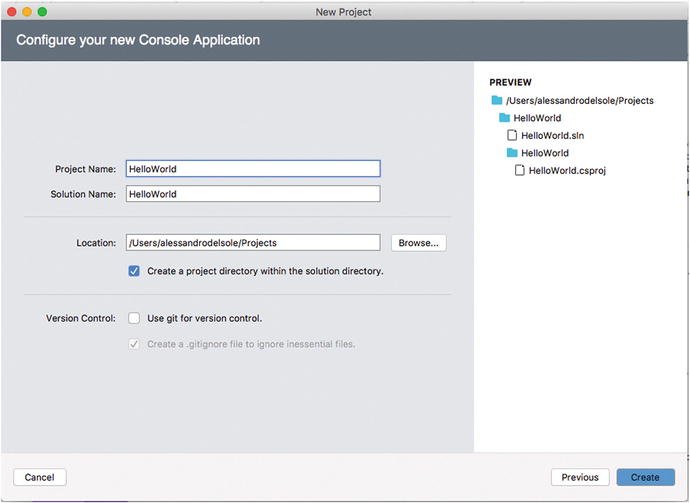
Figure 2-3. Creating a new project
The Location text box allows you to specify a folder for your new solution. By default, Visual Studio for Mac creates a Projects folder under the Home directory of your Mac. You can click Browse to select a different folder, or you can simply type a new folder name, and you can also change the default folder in the IDE options, as you will learn in Chapter 13. I recommend you leave the check box called “Create a project directory within the solution directory” selected. This option ensures that a root folder is created for the solution and that a subfolder in the solution folder is created for the new project. This helps keep the solution’s structure well organized, especially if you plan to add new or existing projects to the solution later. The New Project dialog provides a visual representation of the solution’s folder structure on the right side, under Preview. You will see how this preview changes depending on selecting or deselecting the directory check box. You also have an option to enable Git version control for the solution, but this will be discussed in more detail in Chapter 12, so let’s leave this out for now. Click Create when ready. After a few seconds, your new project will be ready. If you have never made customizations to the IDE before, by default you will see the Solution pad on the left side of the workspace and the code editor on the right side. You might also see additional pads, such as Errors. If you do not see the code editor, expand the project view in the Solution pad and double-click the Program.cs file. At this point, your workspace should look like Figure 2-4.
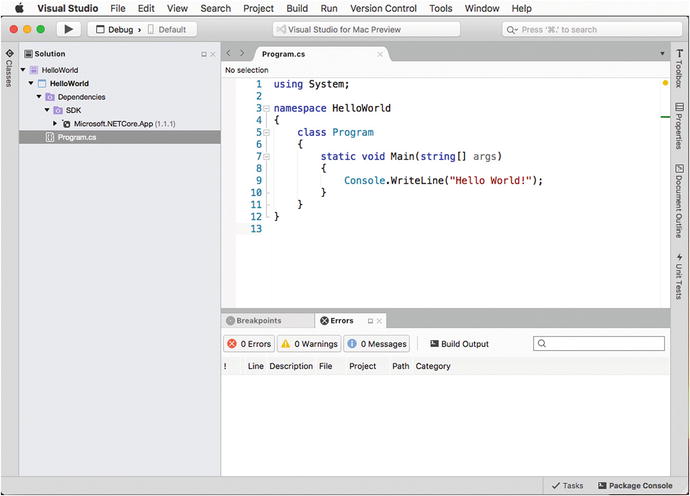
Figure 2-4. The workspace after the project has been created
When you create a new project or open an existing solution, Visual Studio for Mac will automatically attempt to refresh any references to external libraries, such as NuGet packages. This might take a few seconds, and you will see the progress of the restore operation in the upper status bar (where you can normally see the Visual Studio icon and product name). This is important to remember because you might have projects that have dependencies, and you might see some error squiggles in the code editor until the process of restoring libraries is completed. The Solution pad is an important tool, and you will work with it all the time. It basically provides a hierarchical view of your solution, and it allows you to browse for files and folders.
Note
Generally speaking, a pad is a pane that can be rearranged on the screen or hidden and that can either contain some kind of specific information or allow for executing contextualized actions. Visual Studio for Mac provides many pads that the section “Working with Pads” in this chapter will discuss intensively.
In the Solution pad , you can also right-click the solution name and then select Add ➤ New Project or Add ➤ Existing Project to add new or existing projects, respectively, which is common. You can also add individual files and folders (referred to as solution items) that will not be part of the build output but that you might need for several purposes, such as documents or images you might want to include for your team.
For each project in the solution, the Solution pad not only shows files but also dependencies your project has on specific SDKs (such as .NET Core in the current example) or on external libraries. Dependencies will also be covered in more detail in this chapter. Notice how the code editor provides syntax colorization for any of the supported languages, as you might certainly expect. While developing, you will need to test and debug an application many times, so you need to understand how to start an application for debugging and the concepts related to this task.
Building and Running an Application
Compiling code and running the resulting application in Visual Studio for Mac is certainly easy, but it requires you to be familiar with two concepts: assemblies and build configuration. This section explains both concepts, and then you learn how to start an application with or without the debugging tools attached.
Understanding the Concept of Assemblies
In .NET terminology, a very important word is assembly. Put succinctly, an assembly is the final compiled output that results from building a .NET or .NET Core project and can refer both to an executable and to a .dll library. Assemblies are self-describing units made of metadata and Intermediate Language (IL) code. Metadata describes the name, the version number, the icon, and the types and members defined in the assembly. The Intermediate Language is what compilers actually produce. Then when you start a .NET application, the IL in the assembly is compiled on the fly by the just-in-time compiler into machine language.
Discussing in more detail assemblies, how they are made, and how .NET manages assemblies is out of the scope of this chapter. Some more details and concepts will be provided in Chapter 9, while full documentation is available in the MSDN documentation at https://msdn.microsoft.com/en-us/library/8wxf689z(v=vs.110).aspx . For the purposes of this book, when you encounter the word assembly, remember it can refer to both an executable and a reusable .NET library.
Understanding Configurations
Build configurations , or simply configurations, influence the way your code is compiled into an assembly or app package. A configuration determines whether the compilation output should include debug symbols and which architecture your application should target, such as x86, x64, or both.
By default, Visual Studio for Mac offers two built-in configurations: Debug and Release. As its name implies, the Debug configuration is used when you want to test and debug an application at development time; it is optimized for debugging scenarios because it generates debug symbols that are included in the compilation output and attaches an instance of the debugger to the application. On the contrary, the Release configuration does not include debug symbols and does not attach an instance of the debugger to the application, so you will use this one when you want to release your app or library. The easiest way to select the build configuration is from the appropriate drop-down box in the toolbar, as shown in Figure 2-5.
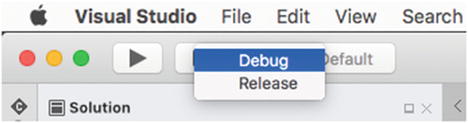
Figure 2-5. Selecting a build configuration
You can also create custom configurations, as discussed in the “Configuring Build Options” section later in this chapter. Now that you have knowledge of configurations, you can compile and run your first project.
Compiling and Building Projects
Before you can run, test, and debug an application, you need to build your solution. Building a solution means generating an assembly or app package by compiling the source code from all the projects into intermediate objects that are then linked to the appropriate libraries.
As for Visual Studio 2017 on Windows, in Visual Studio for Mac, solutions might be made of multiple projects of different kinds. This means that the various projects in a solution must be built individually and then linked to one another, and to the necessary libraries, into the final executable. Luckily enough, Visual Studio for Mac leverages the popular MSBuild engine that handles the entire build process for you from start to end, taking care of compiling projects in the appropriate order, invoking external tools when necessary, and then generating the complete build output. In Visual Studio for Mac, you build a solution (or individual projects) with commands from the Build menu or with same-named shortcuts available if you right-click the solution or project name in the Solution pad. More specifically, you have the following commands that target an entire solution:
Build All: This command builds a solution and generates the proper output, such as an executable, a library, and an app package.
Rebuild All: This command is similar to Build All, with an important difference: Build All performs a full build only the first time; the next time, it only updates the build output by compiling updated code. Rebuild All, instead, performs a full build of the solution every time.
Clean All: This command cleans the build output and is useful when you want to refresh the build process.
Note
Saying that building a solution produces an executable, a library, or an app package must be further clarified. In fact, there are situations in which building a solution generates more than one output. For instance, in a single solution you might have different project types, such as a Xamarin project and an ASP.NET Core back-end project. In such situations, Visual Studio does not produce a single app package or application; instead, it generates multiple build outputs, an app package, and an ASP.NET Core web application. Situations like this are extremely common, especially with solutions that contain many library projects and a project for an executable or app package.
The Build menu also offers Build, Rebuild, and Clean commands against individual projects in the solution. These can be useful when you make edits to a particular project and you want to see if it is compiled correctly. When you build a solution or an individual project, the IDE’s status bar shows the operation progress, and it offers a red Stop button that you can click to cancel the build operation. Remember that the time for the build process varies depending on the number of projects in the solution and on their complexity.
The build output, and thus one or more assemblies generated by the compiler, will be available by default in the BinDebug or BinRelease project subfolders, depending on the active build configuration. Later in the section called “Configuring Build Options,” I will explain how to change these paths. Once you have built your solution, you can run it for testing and debugging.
Running Applications with and Without a Debugger
You can run your solutions with the Start button in the toolbar and with two commands from the Run menu: Start Debugging and Start Without Debugging.
In the first case, you select the Debug configuration, and then you invoke the command. This will launch the application from within the IDE, with an instance of the debugger attached, and will enable the powerful debugging tools in Visual Studio that you will learn to leverage in the next chapter. In the second case, you can select the Release configuration, and the application will start without an instance of the debugger and detached from the IDE. You can certainly leave the Debug configuration selected when running the application without debugging, but the generated debug symbols will be ignored. Once you have selected the configuration, you can start the application; besides the two commands in the Run menu, the easiest way to do this is by clicking the Start button, which you can see in Figure 2-5. When you start the application, Visual Studio first performs a Build All operation if it detects some changes from the last build or if you have never built the solution before. It does not perform a Build All operation if you already called Build All or Rebuild All before starting the application. Figure 2-6 shows the sample console application running in Terminal.
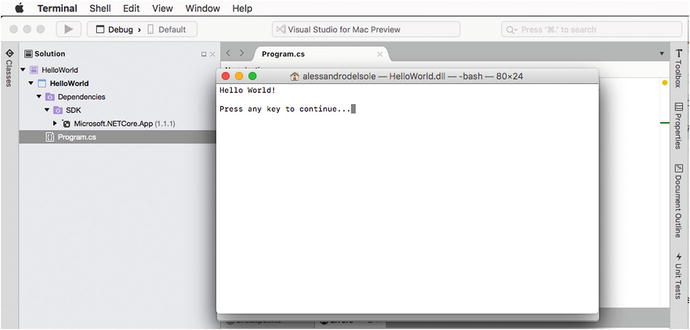
Figure 2-6. Running an application
In this case, the application has been started with the Debug configuration enabled; thus, an instance of the debugger is attached. All the steps you have seen so far apply to all the supported project types, and the only difference will be the application host, which can be a Terminal window, a web server, a device simulator, or a physical device depending on the project type.
Adding and Managing Dependencies
Any application needs core runtime platforms or libraries to work. These are known as dependencies. For example, the .NET Core SDK is a dependency for any .NET Core application. The Mono runtime is a dependency for any Xamarin project.
Regarding core dependencies, Visual Studio for Mac takes care of adding the proper references based on the type of project you create. More often than not, your applications will need to use third-party libraries, or libraries you developed, that expose APIs and objects that the core libraries do not provide out of the box. When this happens, you are introducing additional dependencies. In VS for Mac you have two main ways to add and consume dependencies in your applications: adding references to libraries on disk and downloading NuGet packages. This section walks through both scenarios.
Note
Remember that references are per project, not per solution.
Adding References to Libraries
If you need to consume a library that is on disk, either third-party or developed by you, in the Solution pad you can add a reference to the library . The way you add a reference to a project changes a bit depending on the project type.
In a .NET Core project, you right-click the Dependencies node in the Solution pad and then you select Edit References.
In Xamarin and .NET projects, you right-click the References node in the Solution pad and then you select Edit References.
Regardless of the project type, Edit References opens the Edit References dialog, where you will be able to select libraries with the help of four tabs: All, Packages, Projects, and .Net Assembly. Figure 2-7 shows an example based on a Xamarin project.
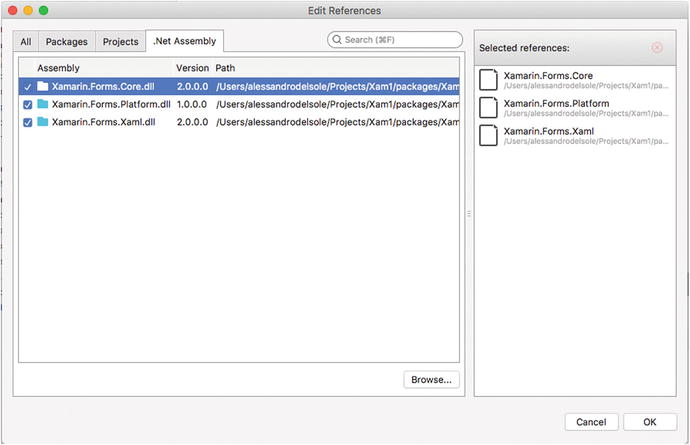
Figure 2-7. The Edit References dialog
The Packages tab lists installed libraries that Visual Studio is able to detect as available for the current project. The Projects tab allows adding a reference to other projects in the solution, which is common when you have class library projects that expose custom objects or APIs. The .Net Assembly tab shows a list of .NET assemblies that are currently referenced by the project. For instance, you could simply double-click a library listed on the Packages tab to immediately add a reference. If the library you need is not listed but available on disk, you can click Browse, locate the library, and select it to add a reference. At this point, you will be able to consume the objects exposed by the library in your code. This approach for adding dependencies has three important limitations.
It requires you to have the library on your disk .
It does not automatically resolve any additional dependencies that the library you are referencing might rely on, so this is something you must take care of manually.
It makes it difficult to manage different versions of the library and its dependencies once new versions are available. For instance, if a new version of a library is available and it also relies on an updated version of a dependency, you must take care of both manually. The same concept applies if you want to downgrade to a less recent version.
NuGet solves all these problems, and it is discussed thoroughly in the next subsection.
Working with NuGet Packages
NuGet is an integrated package manager that has been very popular among developers using Microsoft Visual Studio on Windows and Xamarin Studio since the beginning. Through a convenient, integrated user interface, the NuGet Package Manager allows you to download and reference a huge number of popular libraries, and it also automatically resolves any further dependencies that a library might need.
Not limited to this, NuGet makes it extremely easy to manage different versions of a library and of its dependencies. Libraries are bundled into so-called NuGet packages, which are files with the .nupkg extension and that contain the library, metadata that helps developers identify a library, and information about dependencies that a library needs to be consumed properly. NuGet packages are hosted on (and can be published to) an online repository available at NuGet.org. If you visit this web site, you will be able to browse the gallery outside of Visual Studio and see what’s available.
I recommend you spend some time getting familiar with NuGet because it is becoming the de facto standard for managing dependencies both in Visual Studio for Mac and in Visual Studio on Windows. As a general rule, in the Solution pad you right-click the Dependencies node for .NET Core projects and the References node for Xamarin and .NET projects and then you select Add Packages. This will open the Add Packages dialog, which you can see in Figure 2-8.
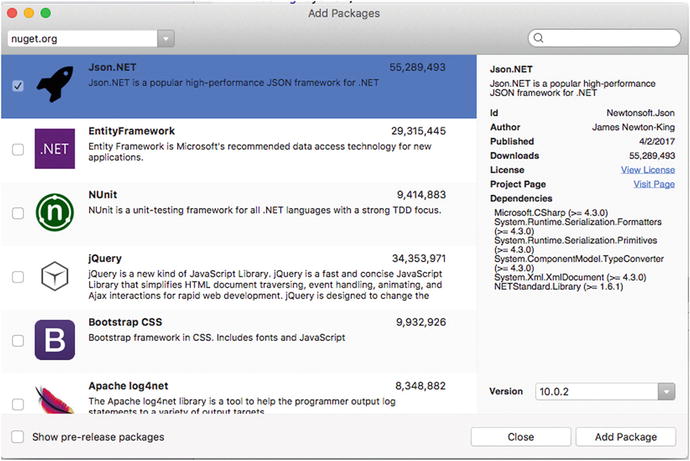
Figure 2-8. Adding NuGet packages
The Add Packages dialog shows the list of available packages from NuGet.org.
Note
Because NuGet packages contain libraries, talking about references to NuGet packages and to libraries has basically the same meaning.
You can also create custom repositories, as I will discuss in Chapter 13. As you can see in Figure 2-8, for each package you can see the description, the author, the publication date, the number of downloads, and, very important, the license agreement and the additional dependencies the package requires. By default, only stable releases are displayed, but you can select the “Show pre-release packages” check box to show also prerelease versions. In the Version drop-down box, you see the latest version available by default, but you can pick a different one. You can select multiple packages, but for now simply select the Json.NET package, the most popular library for .NET that makes it dramatically easy to serialize and deserialize to and from JSON markup. You will not actually use the library in code in this chapter; it is just the package I’ll be using for demonstration purposes. At this point, Visual Studio will show a dialog that contains a list of all the libraries that will be installed and a link to the license agreement for each. When ready, click Accept to accept the license agreement for all the libraries. While Visual Studio downloads and installs the NuGet package with its dependencies, you will see the operation progress in the status bar. When finished, you will be able to see the Json.NET library just installed in the Solution pad, but the location changes based on the project type. For .NET Core 2.0 projects, installed NuGet packages are located under the Dependencies node; for .NET Core 1.x projects, installed NuGet packages are located under the NuGet node; for Xamarin projects, installed NuGet packages are located under the Packages node. Packages can be also expanded to see the list of dependencies they rely on. Figure 2-9 shows an example based on the Json.NET library and a .NET Core 1.1 project.
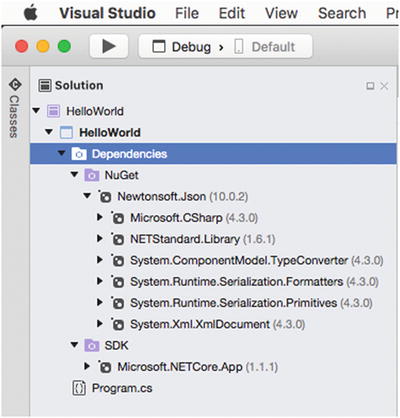
Figure 2-9. References added via NuGet and their dependencies
When a NuGet package and its dependencies are installed, Visual Studio for Mac automatically adds a reference so that you can consume libraries in your code. If you want to install a different version of an already installed package, you have two options. The first option is automatically updating NuGet packages to the latest stable release available, which you do by right-clicking the solution name in the Solution pad and then selecting Update NuGet Packages or by selecting Project ➤ Update NuGet Packages. The second option instead allows you to select a specific version of a NuGet package: simply right-click the NuGet node and then select again Add Packages. Select the package you want to upgrade (or downgrade), select the version number in the Version drop-down box, and finally click Add Package. Figure 2-10 demonstrates this.
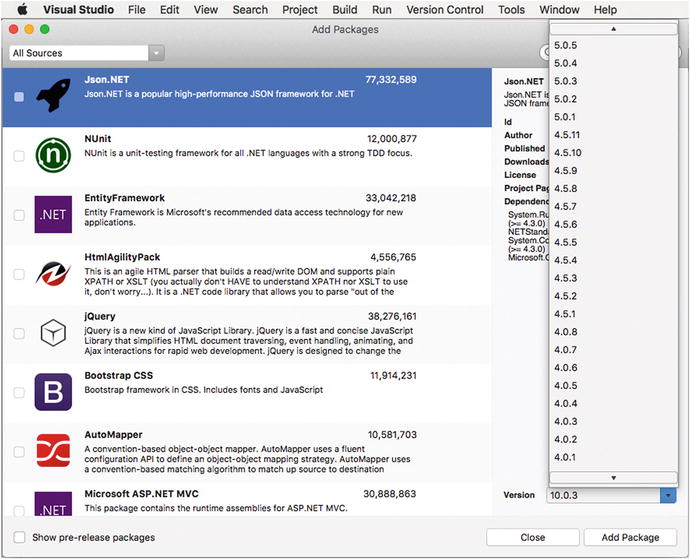
Figure 2-10. Selecting a different NuGet package’s version number
Whenever Visual Studio for Mac performs any operations related to NuGet packages, it displays the output in the Package Console pad, which you enable with View ➤ Pads ➤ Package Console. Figure 2-11 shows an example.

Figure 2-11. The Package Console pad shows output from NuGet
The Package Console pad is particularly useful when installing NuGet package fails because it provides detailed messages. A common reason for failure is selecting a NuGet package that is not compatible with the current project or a dependency of the selected NuGet package that is not compatible with the current project.
The way NuGet packages are managed is a little bit different depending on the development platform you are working on. For .NET Core, the list of required NuGet packages is stored inside the .csproj project file. Additionally, when NuGet packages are downloaded, they are stored inside a local cache for easy reuse.
For other project types, such as Xamarin and the full .NET, NuGet packages are downloaded into a project subfolder called Packages, and Visual Studio stores the list of required packages inside a file called Packages.config. In both cases, Visual Studio for Mac always knows what NuGet packages a solution needs. This is important because, if a library is missing, Visual Studio can easily restore it. For example, if a solution is under source control, it’s not uncommon that libraries are not sent to the server. So, when you download a solution from the Git source control repository of your choice for the first time, VS for Mac will check if all the NuGet packages are available locally. If not, it will perform a restore operation. Another example of when restoring NuGet packages is required is when you share a solution with other people, such as in the form of a .zip archive or on a web site. Because your solution might rely on a large number of packages, you can exclude them from the archive to save a lot of space. This is typically the case with Xamarin or full .NET projects, where you can completely delete the content of the Packages subfolder. When other people open the solution on their machine, Visual Studio checks if the required libraries are available; if not, it reads the content of Packages.config, and then it performs a restore operation. Usually, restoring NuGet packages occurs automatically when you open a solution, but you can restore packages manually by right-clicking the solution name in the Solution pad and then selecting Restore NuGet Packages or by selecting Project ➤ Restore NuGet Packages.
Note
The official NuGet repository is hosted on a web site, so you should typically have an Internet connection when working with NuGet packages. However, Visual Studio for Mac manages a local cache of all the NuGet packages that are minimally required to create new projects. This is the case with Xamarin and full .NET projects. Regarding .NET Core, a local cache is also available and is managed by the platform directly. Put succinctly, you will always be able to create any of the supported projects even when offline. Then, if you need to download or update NuGet packages, you will need an Internet connection. Luckily enough, you can even create a local NuGet repository so that you will be able to reference the NuGet packages you use the most even if an Internet connection is not available.
Configuring Project Options
Visual Studio for Mac provides you with deep control over a project. In fact, you can edit a number of project properties and options so that you can provide additional information and also influence the build process. This section describes options that are commonly available to all the supported project types in VS for Mac; the project options that are specific to .NET Core and Xamarin solutions will be detailed in the appropriate chapters.
You access the project options with Project ➤ {ProjectName} Options or by right-clicking the project name in the Solution pad and then selecting Options. The Project Options window appears at this point (see Figure 2-12).
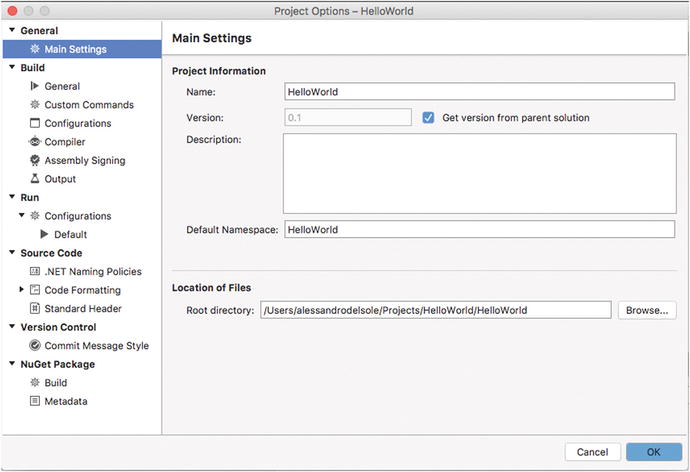
Figure 2-12. The Project Options window
In the General node, you find Main Settings, which is the same for all the supported project types. Here you can specify a different project name, a specific version number, an optional description, and the root C# namespace, and you can change the root directory where the project files are stored. By default, the project version is inherited from the solution version, but you can deselect the “Get version from parent solution” check box and provide a new version. The other settings are generated based on the information you supplied when you created the project, and unless you have specific requirements, I recommend you leave them unchanged.
Note
Some options can be configured at the solution level by right-clicking the solution name in the Solution pad and then selecting Options. Common options you might set are those that projects inherit, such as the version number, the author information, and the output folder for binaries. I recommend you work with the project options rather than with solution options because every project has its own specific settings and requirements.
Configuring Build Options
In the Build node of the Project Options dialog, the General tab allows you to change the target framework. For .NET Core projects, the target framework is by default the latest runtime version available. With Android projects, the target framework is the version of the Android APIs used for the build process. With iOS projects, the target framework represents the SDK that should be used depending on the target device (iOS or WatchOS). Figure 2-13 provides an example based on a .NET Core application.
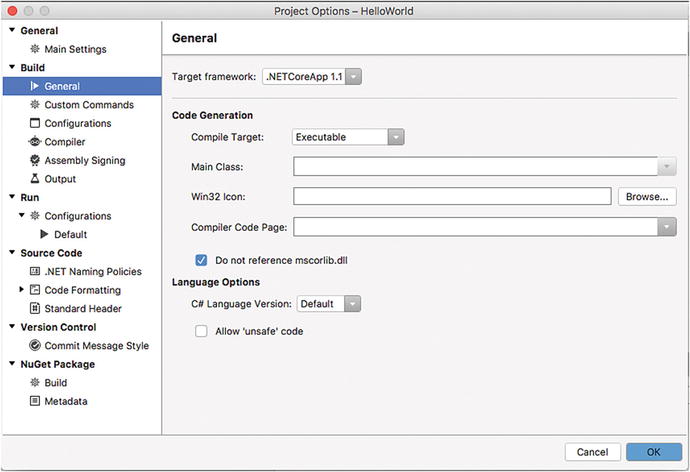
Figure 2-13. The General options
In the Code Generation group, you can change the compile target (Executable, Library, Executable with GUI, Module), the startup C# class in the Main Class box, the icon file in the Win32 Icon box, and the encoding code page for source files in the Compiler Code Page box. I recommend you not change the default options, including the “Do not reference mscorlib.dll” check box value, because the defaults are already optimized for your project. Changing these options makes sense in full .NET projects, not .NET Core.
Additionally, you can specify the C# version the compiler should use in the C# Language Version box. The Default setting ensures the compiler uses the latest version of the language available. The “Allow ‘unsafe’ code” check box should be left unselected in a .NET Core project, as you will not typically invoke native code.
The Custom Commands Tab
The Custom Commands tab allows you to specify any actions that should be executed before, during, or after a build or clean process. Actions are per configuration, so you can specify different actions for different configurations. By default, the Configuration drop-down box shows the active build configuration, but you can choose a different one and provide any actions. You specify one or more actions with the Select Project Operation drop-down box. Supported actions are Before Build, Build, After Build, Before Clean, Clean, After Clean, and Custom Command. Figure 2-14 shows an example based on the After Build action.
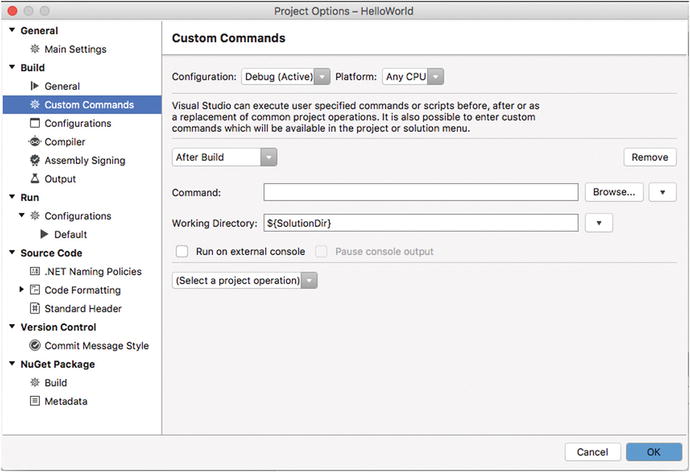
Figure 2-14. The Custom Commands options
You can specify the action that must be executed by supplying an application name in the Command text box (or you can click Browse instead of manually typing the name). Commands could need to receive parameters, for example, the solution or project name. Because VS for Mac identifies such parameters with special constants, you can select the appropriate constant by clicking the button with the arrow icon and selecting one of the self-explanatory values from the drop-down. The same applies to the Working Directory check box, where you can specify the directory in which the command should be executed. In Figure 2-14 you can see the $(SolutionDir) constant that represents the solution directory and that is listed as Solution Directory in the constants drop-down box.
The Configurations Tab
The Configurations tab allows you to manage build configurations. By default, it shows the Debug and Release configurations, as you can see in Figure 2-15.
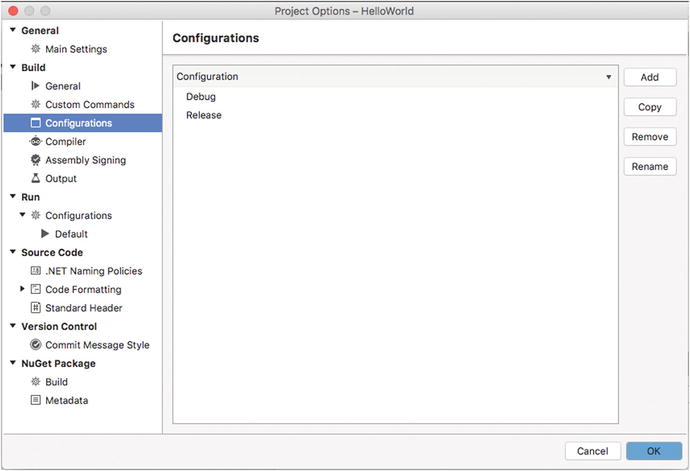
Figure 2-15. The Configurations options
Here you can manage configurations by adding, copying, removing, and renaming configurations with the appropriate buttons. The reason why creating a new configuration could be useful will be clearer when discussing the next tab, Compiler. For now, you can create a new configuration by clicking Add and then entering the configuration name in the New Configuration dialog, as shown in Figure 2-16.
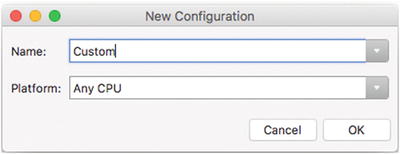
Figure 2-16. Creating a new configuration
When you click OK, the new configuration will be listed in the Configuration tab.
The Compiler Tab
The Compiler tab allows you to influence the compilation process and is very interesting. Figure 2-17 shows how it appears.
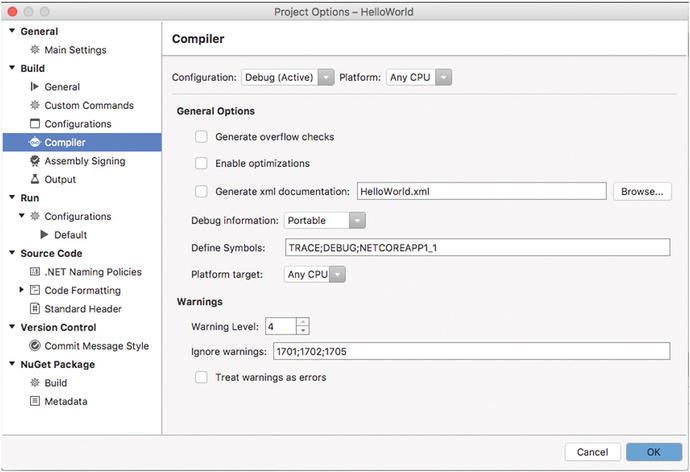
Figure 2-17. The Compiler options
Compiler options are per configuration, and the default is the active build configuration, but you can select a different configuration in the Configuration drop-down box. In this way, changes you make on this tab will be applied when you build your solution using the specified configuration. In the General Options area, the “Generate overflow checks” check box forces the compiler to check for integer calculations overflow and to throw an OverflowException at compile time if any. Enabling this option could be useful to make integer calculations faster and to avoid storing results without any errors. The “Enable optimizations” check box forces the compiler to optimize the build output so the resulting application, library, or package might be smaller, faster, and more efficient. However, because the optimization process requires rearranging the code in many ways, the debugging experience could be more difficult and less complete. For this reason, this check box is automatically enabled only for the Release configuration. The “Generate xml documentation” check box makes Visual Studio for Mac generate an XML documentation file for your objects. You can specify an output file name in the text box. Selecting this option makes sense only if you commented your source code with XML comments, which is explained in the “Introducing XML Comments” section later in this chapter.
The “Debug information” drop-down box allows specifying the level of accuracy for the debug symbols that the compiler will generate. Technically speaking, the compiler generates a program database (.pdb) file that contains all the information and symbols that a debugger needs to instrument an application. Table 2-11 summarizes all the available options and their descriptions.
Table 2-11. Possible Values for the Debug Information Box
Value | Description |
|---|---|
Full | Generates full debugging information and PDB files for a complete debugging experience. Not recommended with .NET Core. |
Symbols only | Generates PDB files that only contain symbol information. |
Portable | Generates a portable , cross-platform PDB file that is optimized for .NET Core apps and .NET Standard libraries. |
Embedded | Embeds debugging information into the build output. |
None | No debugging information is generated . |
The default value for the Debug configuration in .NET Core is Portable, while for the Release configuration it’s None. It is worth mentioning that the Portable option is quite new for the C# compiler, as it has been introduced together with .NET Core to allow for cross-platform .pdb files. When Portable is enabled, the compiler only includes .NET symbols and excludes everything that has to do with native code. This makes .pdb certainly smaller and simpler, but the debugger cannot perform operations such as Edit and Continue. Portable is definitely recommended with .NET Core projects. The Define Symbols text box allows specifying environment variables that you can use to detect whether your code is running under a specific build configuration. If you look at Figure 2-16, you can see that the TRACE, DEBUG, and NETCOREAPP1_1 symbols are defined. For example, you could write the following check if you wanted to execute some code only if the active configuration for the application is Debug:
#if DEBUG// Code inside this block will run only if the active configuration is Debug#endif
Debug symbols are treated as constant variables, and they also are available per configuration, so if you select another configuration such as Release, you will see different variables. Having an option to customize the debug symbols is one of the most important reasons you might want to create custom configurations. You can certainly extend existing build configurations with new symbols, but if you want them to be available only in some cases, a custom configuration is the proper place. “Platform target” allows you to specify the processor architecture that the compiler should target, and the default is Any CPU. Possible other values are x86, x64, and Itanium. In the Warnings group, you can control how the compiler should handle some warning messages. In C#, warnings represent potential problems that the developer should not ignore but that do not prevent the compiler from building the project. In the Warning Level box, you can specify a value from 0 to 4 (the latter is the default), whose description is available in Table 2-12.
Table 2-12. Warning Level Values
Value | Description |
|---|---|
0 | The compiler does not report any warning messages. |
1 | The compiler reports severe warning messages. |
2 | The compiler reports warnings as in level 1, plus less severe warnings (e.g., hiding class members). |
3 | The compiler reports warnings as in level 2, plus less severe warnings (e.g., expressions that always evaluate to true or to false). |
4 | The compiler reports all warnings as per level 3, plus informational warnings. |
Warning messages, as well as blocking errors, are represented by a unique identifier. In the “Ignore warnings” box, you can control which warnings must be ignored, given their identifier. Actually, in C# the full error or warning identifier is preceded by the CS literal. In VS for Mac, the default ignored warnings are related to problems that can occur with references to assemblies with the same name and can be left unchanged. Later in this chapter, in the section called “Browsing Help and Documentation,” I will explain how to find documentation about error and warning codes. If you are impatient, you can jump to that section, have a look, and then come back here. You can also prevent the compiler from building a project by selecting the “Treat warnings as errors” check box. Unless you have specific requirements, my suggestion is that you leave the default selections so that you can also distinguish well between warnings and errors. The Errors pad, described shortly, will help you get more details about warnings and errors.
The Assembly Signing Tab
The next tab is Assembly Signing, and it allows you to sign an assembly with a digital signature, also referred to as a strong name (see Figure 2-18). Supported files are .snk and .pfx files.
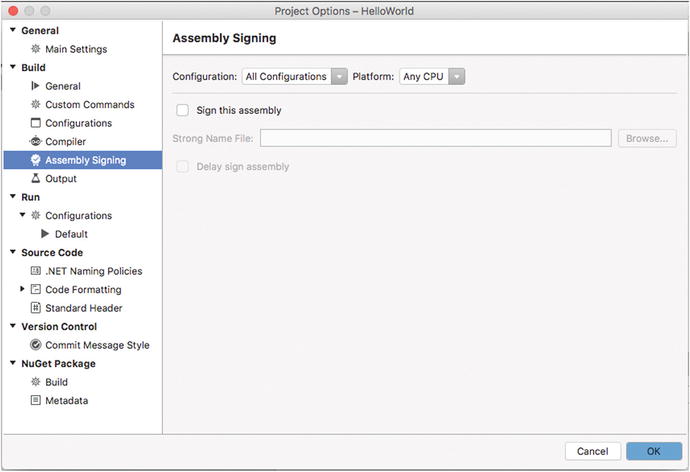
Figure 2-18. The Assembly Signing options
The .pfx format also allows for specifying a password, so it should be preferred. To specify a digital signature, enable the “Sign this assembly” check box and then click Browse to select your .snk or .pfx file from disk.
The “Delay sign assembly” check box allows you to save some space in the assembly for the digital signature, which will be provided at a later stage.
The Output Tab
The last tab in the Build node is called Output (see Figure 2-19). Here you can specify the assembly name and the directory for the build output.
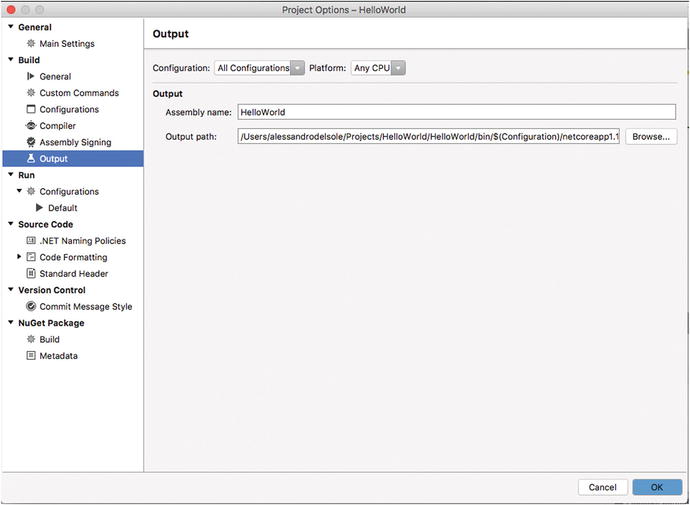
Figure 2-19. The Output options
Of course, Visual Studio for Mac provides some default values based on the information supplied when you created the project, but these can be changed if required.
For .NET Core projects, an additional subfolder representing the current runtime version is also generated, and it actually contains the build output. In the Run node, you can specify what action Visual Studio must take when starting the project with or without debugging. More specifically, in the Default node under Configurations, you can decide what Visual Studio for Mac must do when you start a project (see Figure 2-20).
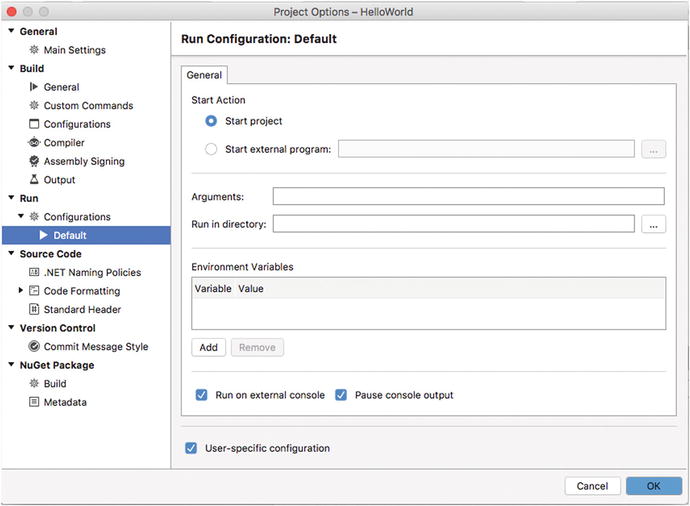
Figure 2-20. The Default options for starting a project
The default option is “Start project,” which is fine for most of the times. You can select “Start external program” if you instead want to run an external program against the current project, for example, a third-party debugger, and you can supply the arguments for the external program. You can specify the working directory and any environment variables the external program might need. In the case of console applications, the default option is that they run inside an instance of the Terminal’s console, but you can deselect the “Run on external console” check box to redirect the application’s output to the Output pad. The other options are self-explanatory. In the Project Options dialog, you can also see other nodes such as Source Code, Version Control, and NuGet Package. Though these options are also available per project, they can actually be set at the IDE level in the Visual Studio options, so I will discuss them in more detail in Chapter 13 together with other interesting features. This is also because you first need to know more about source control support, which is discussed in Chapter 12. It is now time to walk through project options for Xamarin.
Adding, Removing, and Renaming Items
More often than not, you will need to add new or existing files or folders to a project, for example, when you need additional code files or resources such as images and other assets.
Adding new and existing items to a project in VS for Mac is easy. To accomplish this, you right-click a project name (or a folder in the project) in Solution pad and then you click Add. The submenu that appears provides a number of options, but those related to adding files and folders are the following:
New File, which allows for adding a new file. This can be either a code file or any of the supported files.
Add Files, which allows for adding existing files on disk into the project.
Add Files from Folder, which allows for adding all the files in a folder into the project.
Add Existing Folder, which allows for adding all the files and subfolders in a folder recursively.
Add New Folder, which allows for creating a new empty folder in the project.
When you select Add ➤ New File, Visual Studio shows the New File window, which is represented in Figure 2-21.
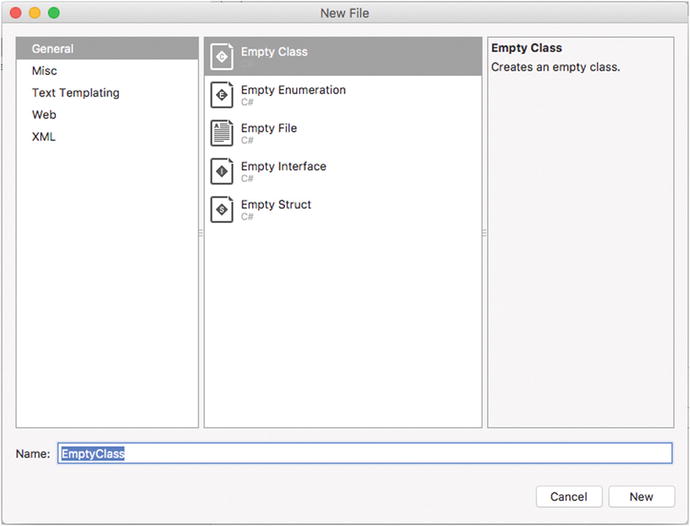
Figure 2-21. The New File dialog allows you to add new items to the project
The list of available items is divided into several categories and may vary depending on the project type you are working with. You can browse items in each category, and you can simply click an item to see a description on the right side of the dialog. When ready, simply type a name for the new item and click New.
As a best practice, it is recommended that you group files that are common to a specific area or task into subfolders. This helps you keep your code and project items well organized. For example, if you build a line-of-business application, you might want to group files such as Customer.cs, Order.cs, or Supplier.cs into a folder called Model or DataModel.
Visual Studio for Mac also allows adding items to solutions. The most common scenario is when you want to add a new or existing project to the current solution. To accomplish this, in the Solution pad right-click the solution name and then select Add ➤ Add New Project or Add ➤ Add Existing Project. You can also add individual files to a solution by selecting Add ➤ Add Files. Additionally, you can group files into folders by selecting Add Solution Folder and then adding files to the new folder. Solution folders and individual files are useful when you want to include items such as documents, text files, and images that you want to always be part of the solution but that you do not want to be included in the build output.
You can remove items from a project by right-clicking and selecting Remove. The command is instead called Delete if you want to remove a project from a solution. Make sure you remove items you really no longer need because an improper deletion might compromise the build process.
Renaming a code file can be accomplished by right-clicking the file name in the Solution pad and then selecting Rename. The cursor will appear on the selected file, and you will be able to enter a new name. If you come from Visual Studio on Windows, you might expect that renaming a file that contains a type will also rename the type. This is not supported in Visual Studio for Mac, and you will need to rename types manually, using the technique described in the “Renaming Identifiers In-line” subsection later in the chapter.
Working with Pads
Pads are floating tool windows that are responsible for various tasks. Pads in Visual Studio for Mac can be compared to tool windows in Visual Studio on Windows and to pads in Apple’s Xcode. Pads can be docked and arranged in the workspace according to your preferences so that you can customize the development environment in the best way for you.
In the previous sections, you have worked with the Solution pad, which allows you to browse and manage projects and code files in a solution. In this section, you will learn about the other most important and common pads in Visual Studio for Mac. Some other specific pads will be instead discussed where appropriate. As a general rule, pads can be enabled by selecting View ➤ Pads.
Note
This section does not discuss debugging pads, which are instead presented in the next chapter.
Docking, Hiding, and Rearranging Pads
When you open a pad, it is automatically docked and positioned in a specific place in the IDE, but you can rearrange pads as you like. You can also undock a pad and treat it as a stand-alone window. Pads can also autohide so that you can show them only when necessary and maximize the editor area, by simply clicking their label. To undock a pad, you click its title, drag it by keeping the mouse left button pressed, and then release when you see that its height is not constrained into other areas of the workspace. Figure 2-22 shows how to undock the Solution pad.
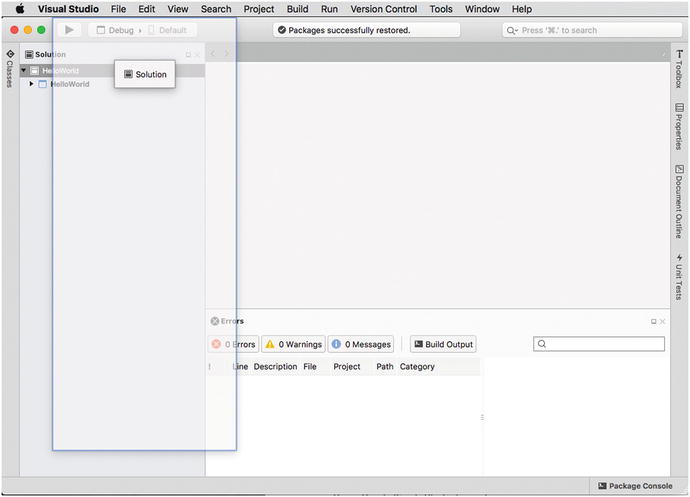
Figure 2-22. Undocking a pad
In the undocked state, a pad works like a stand-alone window; therefore, it has the classic three buttons to close, minimize, and maximize it. You can dock a floating pad by simply clicking the Dock button on its toolbar. Visual Studio will automatically dock the pad in the position it was docked previously. In the docked state, the Dock button changes to Auto-Hide, which you can click to completely hide the pad except for its label, which you can click to open the pad. Then it will be autohidden again once you click outside of it. In Figure 2-28, you can see a number of pads in a hidden state and with only their labels visible, such as Classes, Toolbox, Properties, Document Outline, and Unit Tests. You can also completely close a pad by clicking the Close button on its toolbar, but then you will need to select View ➤ Pads to open it again. To rearrange a pad in the workspace, you click the pad’s title and then move it to the desired position, as demonstrated in Figure 2-23.
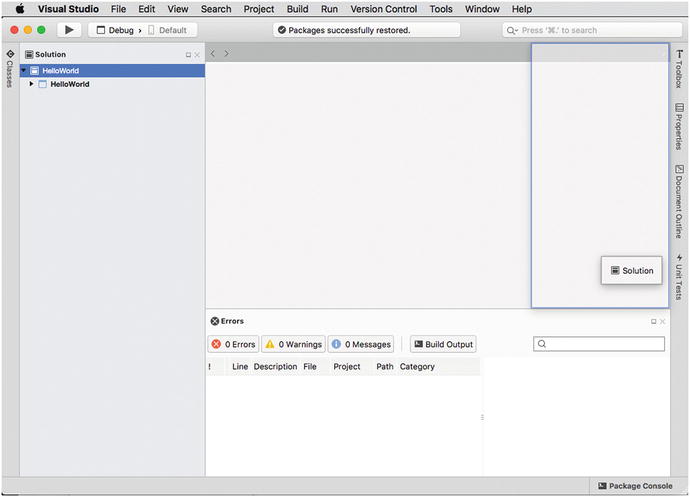
Figure 2-23. Moving a pad to a different position
When moving a pad, the IDE draws rectangles that represent a place in which it’s possible to dock the pad. When you are satisfied with the position, just release the mouse button, and the pad will be moved to the new place. Notice that the pad will still be visible in the original place until you release the mouse button. After this explanation on how to arrange pads in the workspace, it’s time to get to know the most important of them.
The Classes Pad
The Classes pad provides a hierarchical view of all the types and their members defined within the projects in a solution. For a better understanding of how it works, inside the root namespace of the Program.cs file, add the following code:
public enum Gender{Female,Male}interface IPerson{string FirstName { get; set; }string LastName { get; set; }string FullName();Gender Gender { get; set; }}class Person: IPerson{public static int PeopleCounter;public string FirstName { get; set; }public string LastName { get; set; }public Gender Gender { get; set; }public string FullName(){return $"{FirstName} {LastName}";}public Person(){PeopleCounter += 1;}}
Note
All the code has been added to the same file only to demonstrate some of the features of the Visual Studio IDE both in this section and in other sections later in the chapter, but in real-world projects you should create appropriate files for better organization and separation.
The code defines an interface called IPerson, which a class called Person implements. Among others, the code defines a Gender enum that is used as the type for the same-named property. The FullName method returns the concatenation of FirstName and LastName, while the PeopleCounter static field acts as a counter for all the instances of the Person class. At this point, the Classes pad appears like in Figure 2-24.
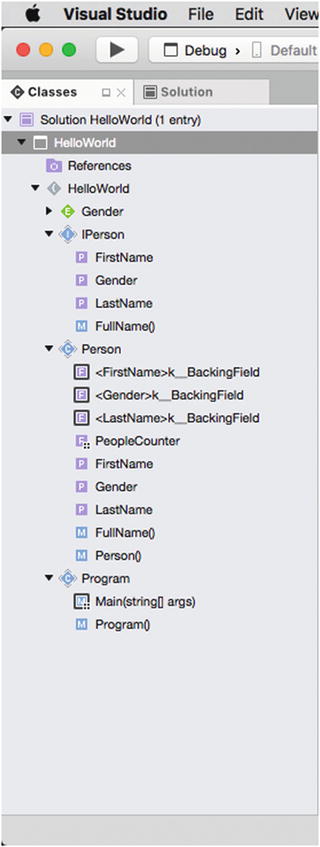
Figure 2-24. The hierarchical view of types and members in the Classes pad
As you can see, Classes shows all the types defined inside a namespace and can be expanded to show the members they define. Namespaces are represented by gray icons and an open bracket. Value types are represented by a green icon and the first letter of the type (E for enumerations and S for structures). Reference types are represented by light blue icons and the first letter of the type (C for classes, I for interfaces, and D for delegates). Type members are represented by a violet icon for fields and properties, by a light blue icon for methods, and by a red icon for constants, plus the first letter of the member type (F for fields, P for properties, M for methods, and C for constants). Notice that, in the case of C# auto-implemented properties, the Classes pad also shows the backing fields that the compiler generates behind the scenes. Icons also help with understanding a type or member’s visibility: if a type or member is public, the icon has no border; if it is private, the icon has a strong border; if it is protected, the icon has a thin border; and if it is internal, the icon has thin borders only around its corners. Notice how, for static members, an overlay icon representing four black squares is added to the object icon. If you double-click a type or member in the Classes pad, the code editor will immediately move the cursor to that type or member, and it will also highlight all the occurrences of its name in the code file. The Classes pad is extremely useful to get a visual representation of the hierarchy of objects in your solutions and is a perfect companion for the Solution pad.
The Errors Pad
The Errors pad shows all the messages that Visual Studio for Mac generates during the development of an application. Messages can be of three kinds.
Errors: These include any problems or blocking errors that the compiler encounters and that prevent your code from being successfully compiled and, consequently, that prevent your application from running. Examples of errors are attempting to use an undefined object, syntax errors, and referencing missing libraries.
Warnings: These include messages about potential problems that actually do not prevent your code from being compiled successfully but that should not be ignored. The compiler also reports warnings that help you keep your code clean, for example, with unused declared variables.
Messages: These are just informational messages and have no impact at all on the build process.
Figure 2-25 shows how the Errors pad displays error messages.
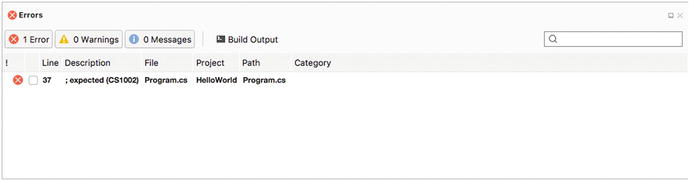
Figure 2-25. The Errors pad showing error messages
For each error, warning, or message, the Errors pad shows the line number in the code file (Line column), the error description (Description column), the code file where the problem was detected (File column), in which project (Project column), and the path (Path column). Optionally, the Errors pad might show a category based on the .NET coding rules. Messages can be filtered excluding errors, warning, and messages by simply clicking the corresponding button or by typing key words in the search box. If you double-click a message, the code editor will move the cursor to the code file and line number where the problem was detected. Additionally, you can right-click a message and select Show Error Reference to find information about the error code on the Internet.
Actually, the Errors pad is not the only way for Visual Studio to report errors and warnings. In fact, the code editor also plays a key role in this by underlining errors and warnings with the so-called squiggles, in other words, wavy lines that appear under code issues and that are red for errors and green for warnings. This topic will be discussed in the next section, but it is important to mention that the Errors pad shows errors and warnings as you type. This is possible because of the background C# compiler that performs live static code analysis. The Errors pad takes the messages sent by the compiler, displaying them in the list you saw in Figure 2-25. Not limited to errors and warnings, the Errors pad can also show messages that the compiler raises during the build process. This is extremely useful to understand where and why a build process failed and is also useful for finding possible solutions. To accomplish this, you simply click the Build Output button in the Errors pad and then build your project or solution. Figure 2-26 shows an example of output messages when a build fails.
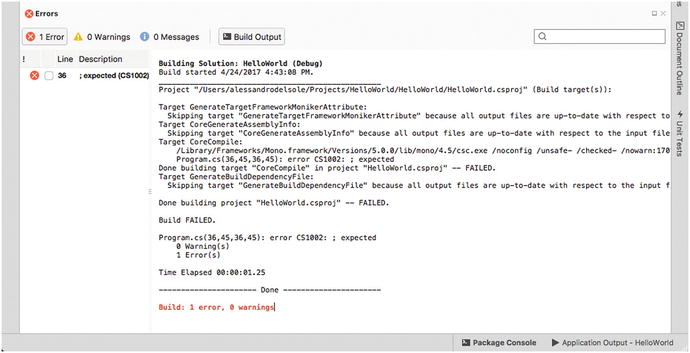
Figure 2-26. Build Output displays messages the compiler raises during the build process
As you can see, the compiler reports detailed information about the build process, and it also raises error messages that explain where and why a build failed. The Build Output tools is very useful because some errors that are not related to your code can be detected only at compile time. If the build succeeds, then in Build Output you will see a success message. Notice that the Build Output tool can be resized as if it were a column, and it can completely hide the error columns.
The Properties Pad
In Visual Studio terminology, everything has properties. A property is a characteristic of a particular item, where the item can be a file, a class, a window, a layout in a visual app, and so on. For example, the height and width are properties of a window. The filename is instead a property of a file.
Because you often need to set properties for your .NET objects, layouts, and files, Visual Studio for Mac provides a convenient tool to set properties called the Properties pad. The appearance of the Properties pad is different according to the item you need to set properties for, but it generally appears as a two-column table, in which the left column displays the property name and the right column shows or sets the property value. Figure 2-27 shows an example of the Properties pad for a C# code file.
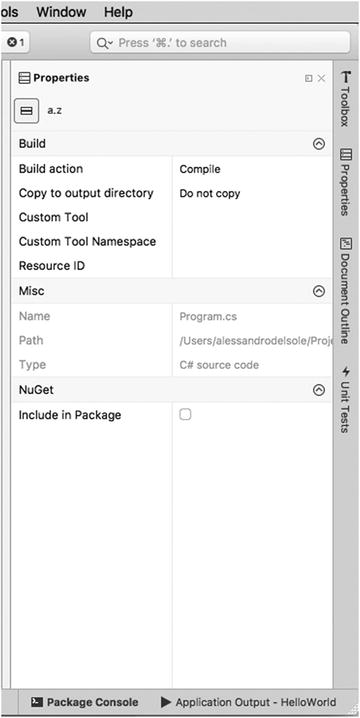
Figure 2-27. The Properties pad as it appears for a C# code file
You will use the Properties pad often in this book, so additional explanations will be provided where appropriate. The Properties pad is particularly useful when working with user interface elements in a web or Xamarin projects because it allows you to set object properties with a visual tool instead of setting all the properties manually in the code.
The Tasks Pad
Keeping the focus on your productivity, Visual Studio for Mac provides an integrated tool that allows you to create and manage task lists that can help you in the application development life cycle. This tool is the Tasks pad.
The Tasks pad can show a list of tasks based either on specific tokens you insert in your comments in the code or on user tasks. For example, consider Figure 2-28 where you can see the Tasks pad showing two items.
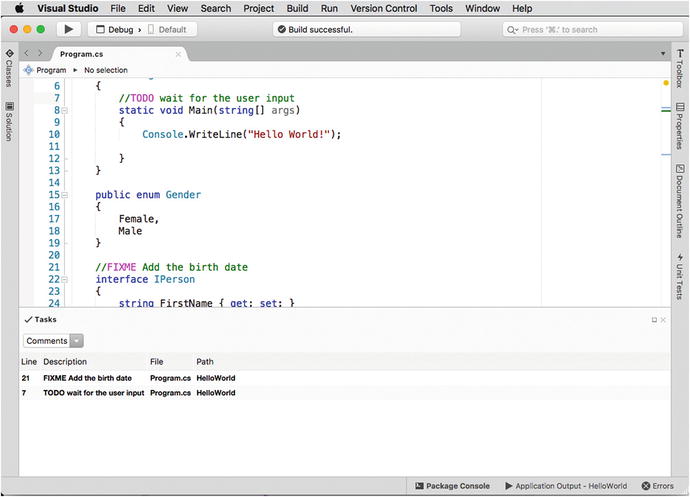
Figure 2-28. The Tasks pad showing items based on comments
Now if you take a look at the code editor, you will see two special tokens in the comments called TODO and FIXME. When Visual Studio encounters these tokens, it understands they represent tasks that must be done and displays them in the Tasks pad. As an enforcement, you can see how tokens have different colors in the code editor. Supported tokens are FIXME, TODO, HACK, and UNDONE. Double-click an item, and the code editor will move the cursor to the comment that contains the selected token. To mark a task as completed, you can either remove the comment or right-click the task and then select Delete. Additionally, you can create user-level tasks. In the Tasks drop-down box, select User Tasks. You will see that the Tasks pad’s layout will change, and you will have buttons and fields to enter your tasks, providing a description and the task’s priority (see Figure 2-29).
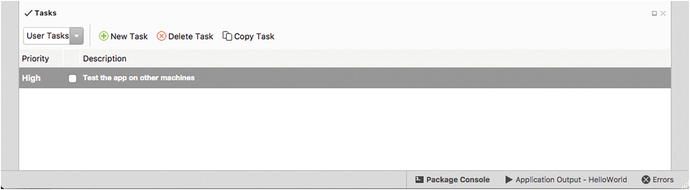
Figure 2-29. The Tasks pad showing user tasks
While tasks based on tokens in the source code comments are per project, user tasks are available to you regardless of the project you are working on. You can mark a user task as completed by simply selecting the check box at the left of the task description. You can also add custom tokens, and you can customize colors based on the task priority. To accomplish this, select Visual Studio ➤ Preferences, and in the Tasks tab (see Figure 2-30) you can add tokens, edit existing tokens, and customize the color that will be used in the Tasks pad to display items, based on their priority.
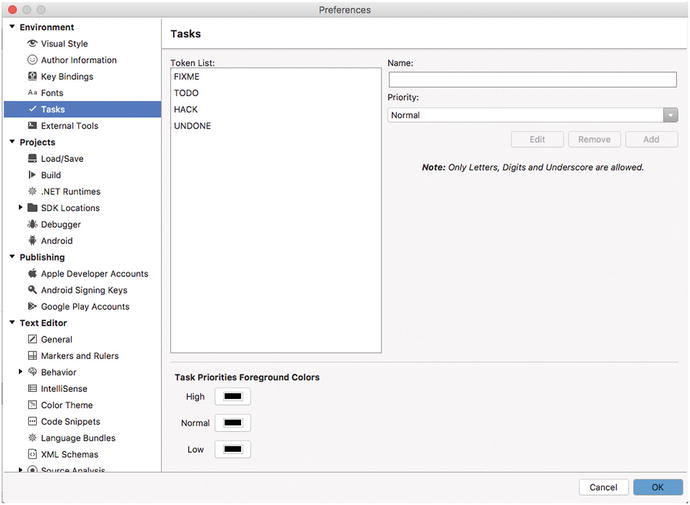
Figure 2-30. Customizing tasks
The Toolbox Pad
The Toolbox pad makes it easy to add items to your code or to elements of the user interface. Instead of manually writing code snippets or writing the code that defines a piece of user interface at design time, you can drag items from the Toolbox pad onto the code editor or the designer surface.
The Toolbox pad will be used many times in the next chapters, but for now you can take a look at Figure 2-31, which shows the Toolbox as it is available over a C# code file, presenting a list of available code snippets.
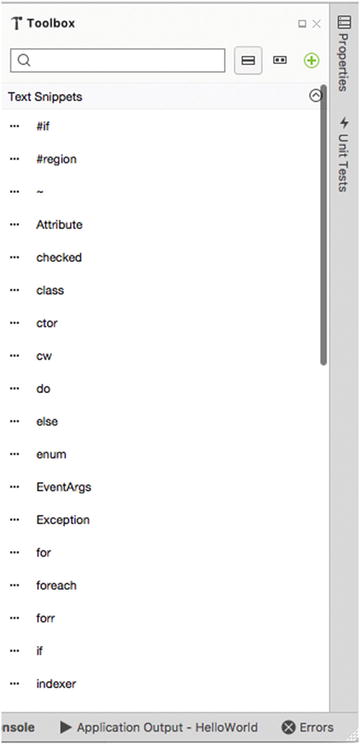
Figure 2-31. The Toolbox pad for a C# code file
In this case, the Toolbox pad contains a list of code snippets that you can drag onto the code editor to insert a ready-to-use code block.
The Package Console Pad
The Package Console pad displays the output from the NuGet Package Manager. It is useful to understand the process of downloading, installing, and restoring NuGet packages. You already saw this pad in action in the “Working with NuGet Packages” subsection earlier, and Figure 2-11 shows an example.
Working with the Code Editor
The code editor in Visual Studio for Mac is the place where you will spend most of the time in your developer life, and therefore it deserves a thorough explanation. In this section, you will learn how to get the most out of the features that empower the code editor in order to boost your productivity, and you will see how most of the tools work directly in the active editor window so that you will never lose the focus on your code.
As a general rule, Visual Studio will open a new editor window every time you double-click a code file in the Solution pad. Each code file lives in a separate editor window that is represented by a tab. Visual Studio can handle infinite editor windows (and tabs). By default, the code editor shows the full view of a code file, but you can split a single editor window into two columns with View ➤ Editor Columns ➤ Two Columns. This is useful when you need to work on different places in the same code file concurrently. Use View ➤ Editor Columns ➤ One Column to restore the original view.
Using Syntax Colorization
As you would expect, Visual Studio for Mac’s code editor provides syntax colorization for all of the supported code file types, such as C#, F#, XML, XAML, HTML, JavaScript, JSON, and Visual Basic. In all the other cases, the code editor will treat files as plain-text documents.
Using the Edit Menu
The Edit menu offers common commands for editing source text, such as Copy, Paste, Cut, Undo, Redo, and Select All. It also provides the Format submenu, which includes commands to fix spaces such as Format Document, Indent, and Unindent.
You can also quickly convert a line, string, or identifier to uppercase and lowercase with the same-named commands. With Join Lines, you can bring a number of selected lines of code to a single line. With Toggle Line Comments, you can quickly comment or uncomment one or more lines.
For each command, the Edit menu also shows the proper keyboard shortcuts. The most common are certainly Command+C (Copy), Command+V (Paste), Command+X (Cut), and Command+Z (Undo).
Zooming the Code Editor
You can zoom the content of the active editor by pressing Option and then moving the mouse wheel up (zoom out) and down (zoom in).
Fast Coding with IntelliSense
IntelliSense has always been one of the biggest points of strength in Microsoft Visual Studio on Windows, and now this technology is also available in VS for Mac. IntelliSense is an advanced word completion engine, which provides suggestions based on the context, and it offers help and tips on how to use a type or member.
IntelliSense shows up when you start typing in the code editor. Figure 2-32 shows a first example in which the developer starts writing a type name.
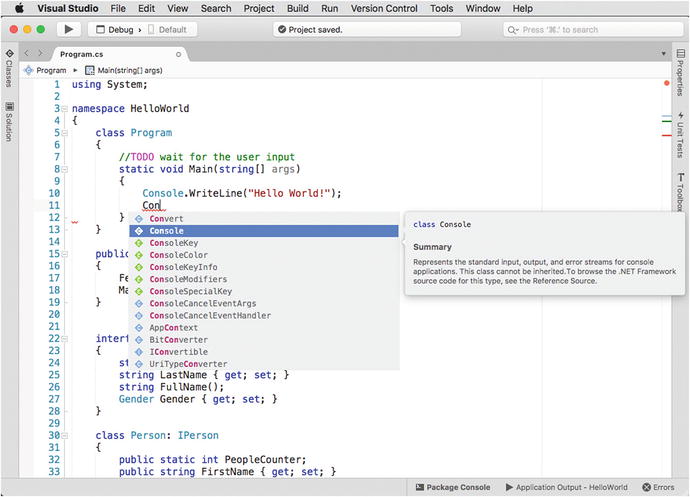
Figure 2-32. IntelliSense showing the list of words matching what you type
IntelliSense automatically filters the list of available words for completion as you type. When you scroll the list and select an item, a tooltip appears and shows documentation about that item.
Note
IntelliSense is able to show documentation only if this has been provided via XML comments, which is certainly the case with .NET libraries, but it is something you must remember if you want IntelliSense to work the same way against types and members you code.
You can press the spacebar or Tab to insert the selected word. Notice how items in the list have the same icons with the same colors you saw previously with the Classes pad. It is worth mentioning that IntelliSense here is showing only what it thinks it is suitable in the current context, so it does not show reserved words or other objects that should not be in a method body. If you insert a word and then press the dot, IntelliSense will show objects available for the inserted item. Figure 2-33 shows an example based on a method.
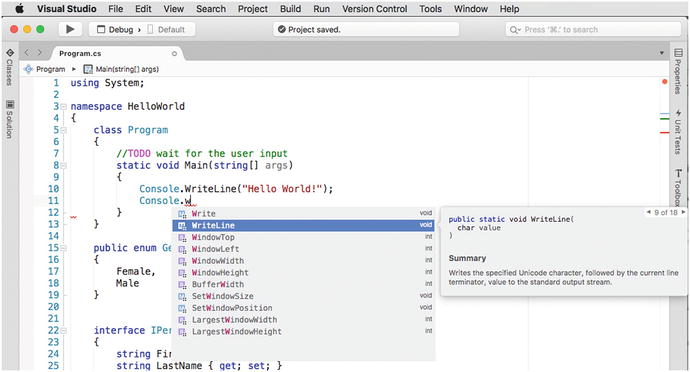
Figure 2-33. IntelliSense showing the list of members of a type
Notice how the icons and their colors match the Classes pad. Also, when you scroll the list of members, you will see a tooltip with the member signature and the documentation. In the case of methods, if you press the left and right cursor keys, you will be able to scroll the list of method overloads. Additionally, when you insert methods, IntelliSense will show contextualized documentation for method parameters when you open the left parenthesis, as shown in Figure 2-34.
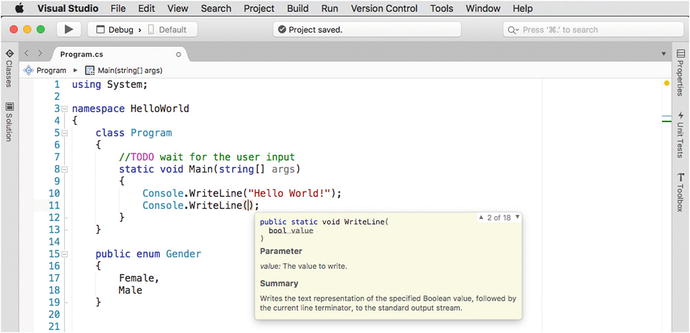
Figure 2-34. IntelliSense showing detailed documentation for method parameters
Another demonstration of how IntelliSense provides contextualized suggestions is outside of namespace declarations. In this case, only a few reserved words are supported, and thus IntelliSense properly suggests only the words that the compiler accepts to be outside a namespace declaration, such as the using, unchecked, and namespace reserved words.
Note
You can customize the IntelliSense behavior in Visual Studio ➤ Preferences ➤ Text Editor ➤ IntelliSense.
Inserting Code Snippets
IntelliSense also makes it easier to insert ready-to-use code snippets via the so-called templates. When you encounter the (…) icon, you can press Tab to insert a code snippet for the given template. For instance, you can select the (…) interface item to quickly insert an interface stub.
The code editor will then highlight all the autogenerated identifiers that you might want to rename or that need your attention.
Introducing XML Comments
At the beginning of this section, you saw how IntelliSense displays tooltips containing summary information about types and members and details about parameters (see Figures 2-40, 2-41, and 2-42). This kind of documentation is available for all types and members that have been commented with the so-called XML comments.
Most of .NET and Mono built-in types include these comments, but you can add XML comments to your code as well so that IntelliSense will display informational tooltips for your types and members. XML comments can be added by typing three / symbols like in the following code and then specifying the required information:
/// <summary>/// The main entry point of your application/// </summary>/// <param name="args">The command-line arguments.</param>static void Main(string[] args){}
The full documentation for XML comments is available at https://msdn.microsoft.com/en-us/library/b2s063f7.aspx . Remember that you must select the Generate XML Comments option in the Compiler tab of the project options, as explained in the “The Compiler Tab” subsection earlier in this chapter (shown in Figure 2-17).
Detecting and Fixing Code Issues As You Type
The code editor in Visual Studio for Mac performs live static code analysis as you type. This means that, at every key stroke, Visual Studio invokes the C# compiler and receives back any code issues such as errors and warnings.
When code issues are detected , the code editor underlines the code that has issues with red squiggles for errors and with green squiggles for warnings. Not limited to this, the code editor places an in-line message, which contains the error description, near the code issue. Figure 2-35 shows an example based on a class that should implement the IDisposable interface but that actually does not.
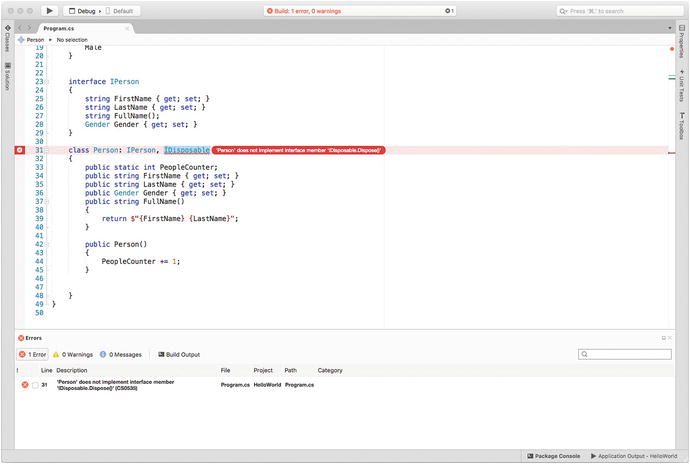
Figure 2-35. The code editor highlights code issues
Note
You can control inline messages with View ➤ Inline messages. The default setting is Errors and Warnings. Other available options are None and Errors.
With most of errors and warnings raised by the compiler, Visual Studio is also able to offer a proper fix. For example, if you right-click a code issue and then select Quick Fix, the code editor will offer one or more possible code fixes for that context, with a live preview of how the code will look after the fix. In the current example, the code editor offers four alternatives to implement the IDisposable interface , with a live preview for each (see Figure 2-36). As an alternative, you can click the word that is underlined with a squiggle and wait for a little overlay line that appears over the word, which you can click to enable the quick fix actions. Also, you can press Option+Enter to bring up the quick fix list at any time so that you do not have to move your fingers from the keyboard.
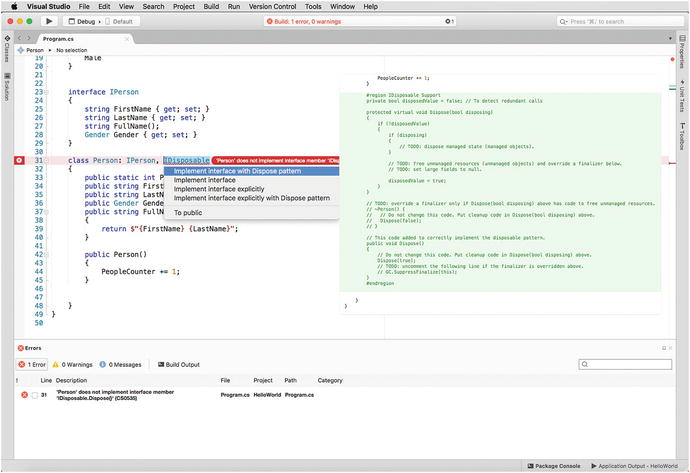
Figure 2-36. The code editor provides proper fixes based on the current context
The preview shows new lines of code in green, and it will highlight in red any lines of code that will be removed by applying the fix. Listing and describing all the available code fixes for all the errors and warnings the compiler can detect is not possible here, but just keep in mind that one or more fix is available for code issues that occur when using the C# language and libraries from Microsoft.
Live analysis and code fixes dramatically improve your coding experience, as they provide a convenient way to fix code issues within the active editor window, always keeping your focus on the code.
Note
As a tip, you can see the list of available analysis rules and of quick fix actions in the Visual Studio preferences. To accomplish this, select Visual Studio ➤ Preferences ➤ Text Editor ➤ Source Analysis ➤ C#. The dialog will be divided in two tabs, one containing the list of code issues and one containing the list of actions. You can also disable and enable both via the corresponding check boxes.
Quickly Adding Using Directives
It is common for developers to write a type name that is not recognized because the namespace that defines that type has not been imported with a proper using directive or because the type name is not fully qualified (that is, does not include the namespace); therefore, the type name is underlined with a red squiggle, and an error message says that the type or namespace could not be found.
In this situation, instead of manually adding the using directive (which also implies you remember the namespace name), you can right-click the type name, select Quick Fix, and then the pop-up menu will offer to add the proper using directive or to fully qualify the type name by including the containing namespace.
Behind the Scenes of Code Issues and Quick Fixes: Roslyn
The .NET Compiler Platform, also known as Project Roslyn ( http://github.com/dotnet/roslyn ), is the engine behind the live static analysis, code issue detection, quick fixes, and refactorings. Roslyn provides open source, cross-platform C# and Visual Basic compilers with rich code analysis APIs.
Put succinctly, before Roslyn , an IDE had to implement its own code analysis rules to detect issues in the source code. This is what Microsoft had always offered with Visual Studio up to version 2013. With Roslyn, compilers expose APIs that any tool can invoke. With these APIs, you can invoke a snapshot of the compiler, analyze source code, retrieve any code issues, and, most important, plug in your custom analysis rules. What you get with Visual Studio for Mac is a number of analysis rules coded at Microsoft, but these can be extended with your analysis rules and with custom refactorings. For instance, if you produce and sell libraries, you could also offer code analyzers that detect an improper usage of your types. Of course, discussing Roslyn in more detail and extending the coding experience with your own rules (as well as other topics such as code generation) is out of the scope of this book, but it is important that you know that the analysis engine comes from the compiler and is independent from any IDE. More information can be found at http://github.com/dotnet/Roslyn and, if you also work with Visual Studio on Windows, in my e-book Roslyn Succinctly, which is available for free at https://www.syncfusion.com/resources/techportal/details/ebooks/roslyn .
Refactoring Your Code
Refactoring is the process of rewriting a piece of code in a better way, without changing its original behavior. By leveraging the C# compiler’s APIs, the code editor in Visual Studio for Mac offers a large number of built-in code refactorings. In this section, you will learn about the most common code refactorings.
As a general rule, you can select a piece of code, right-click, and then select either Refactor or Quick Fix to see whether a code refactoring is available. Additionally, Visual Studio automatically detects the availability of a code refactoring for a specific code block, so it underlines a keyword or block with an overlay icon that you can recognize by three small dots and that you can click to discover potential refactorings. Keep these options in mind because only the most common refactorings will be discussed here. You can select a single identifier or type name, you can select a line of code, and you can even select a code block, as refactorings are available at different levels.
Note
As for quick fix, a live preview of the code is also available for the Refactor command.
Detecting and Removing Redundant Code
After spending a lot of time writing code, it is not uncommon to have redundant code such as unused variables and unnecessary using directives. Redundant code does not block your builds, but it makes your code unnecessarily more complex. Visual Studio for Mac automatically detects redundant code, which you can recognize by a lighter color.
For example, names of unused variables or namespaces are colored in gray instead of black, and keywords referring to redundant code are colored in light blue. When you see redundant code, you can hover over with the mouse, and the code editor will show a descriptive tooltip of the full message; then you can right-click the redundant code, select Quick Fix, and choose the proper fix. Figure 2-37 shows an example based on redundant using directives, where you can also see a live preview in which red code represents the lines that will be removed.
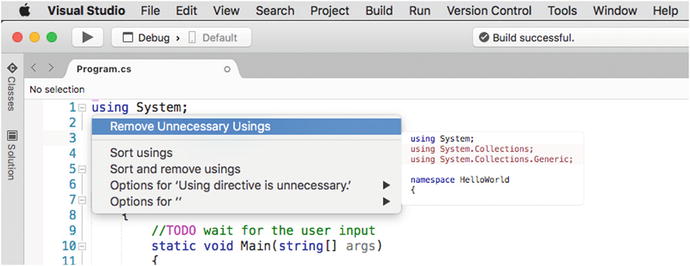
Figure 2-37. Removing redundant code
With specific regard to using directives, you can always right-click them, select Quick Fix, and decide to sort directives or to both sort and remove unnecessary directives.
Extracting Code Blocks
Another common refactoring technique is dividing long code blocks into smaller code blocks . For example, you can create a method from a set of lines of code inside another method.
To accomplish this, select the code block you want to extract, right-click and select Quick Fix, and then select Extract Method. Once the method has been created, you will be provided with an option to enter a new method name. Another useful refactoring allows extracting an interface from a class. To accomplish this, right-click a class name, select Quick Fix, and then select Extract Interface.
Renaming Identifiers In-line
The code editor in VS for Mac allows you to easily rename identifiers directly in-line, without modal dialogs. For example, you can right-click a variable name and then select Refactor ➤ Rename.
At this point, the identifier will be highlighted (see Figure 2-38). Just type the new name, and you will see how all the occurrences of the identifier will be renamed as you type. Also, the code editor highlights the line numbers for lines where an occurrence of the identifier is being renamed.
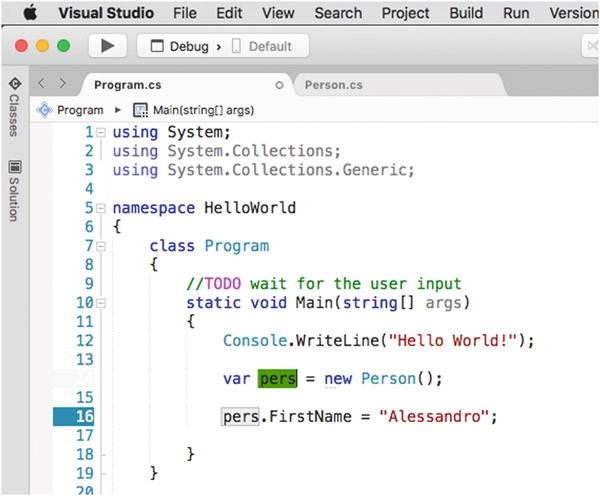
Figure 2-38. In-line renaming identifiers
Moving Type Definitions to Files
In some cases, such as in the example of the Person class I provided when I discussed the Classes pad, you might have multiple type definitions inside the same code file. This is not best practice, and Visual Studio for Mac has a solution for that.
In fact, you can right-click a type name (such as a class name or structure name), select Quick Fix, and then select Move To (followed by an autogenerated file name). Visual Studio for Mac will create a new C# code file and will move the type definition into the new file that you will see in the Solution pad.
Improving Object Initialization Expressions
A common programming task is declaring an instance of an object and assigning object properties like in the following snippet:
Person person = new Person();person.FirstName = "Alessandro";person.LastName = "Del Sole";
In Visual Studio for Mac, you can easily refactor this kind of assignment by leveraging the C# language feature known as object initializers, which allows for assigning and initializing properties in-line, thus rewriting the previous code as follows:
Person person = new Person(){FirstName = "Alessandro",LastName = "Del Sole"};
As you can see, this way of declaring and populating an object is cleaner. The C# compiler offers a specific refactoring for this that you can enable by right-clicking the new keyword and then selecting Quick Fix ➤ Object Initialization Can Be Simplified.
Refactorings for Access Modifiers
Access modifiers represent the visibility of types and members and are represented by the public, private, internal, protected, and protected internal keywords. Most code blocks share refactorings that allow you to quickly change the access modifier, such as To public, To private, and so on.
Refactorings for Methods and Method Parameters
The C# compiler provides some interesting code refactorings for methods and method parameters. Table 2-13 provides a quick summary.
Table 2-13. Refactorings for Methods and Method Parameters
Name | Scope | Description |
|---|---|---|
Change signature | Method | Allows you to quickly change the signature of a method |
To… | Method | Allows you to quickly change the access modifier of a method |
Create Overload Without parameter | Method | Offers to create a method overload without parameters, if one does not already exist |
Add null check for parameter | Parameter | Introduces a code snippet that checks whether a parameter value is null (only with reference types) |
Add contract requiring parameter must not be null | Parameter | Introduces a code snippet based on the Code Contracts library that ensures the parameter value is not null |
Don’t forget the tip to right-click an object in the code editor and then to select either Quick Fix or Refactor to see what code refactorings are available.
Suppressing Warning Messages
Sometimes the compiler might report warnings that you are aware of or that you cannot simply avoid because of how your code is architected. In such situations, you might want to suppress warning messages for one or more analysis rules.
To accomplish this, you can write a #pragma warning disable directive manually, or you can simply leverage a specific code refactoring that does the work for you. In the code editor, right-click the code that raises a warning, then right-click, select Quick Fix ➤ Options for {warning name}, and select Suppress {rule code}, where {warning name} is the name of the warning as raised by the compiler at that point in the code and {rule code} is the identifier for the analysis rule. Figure 2-39 shows an example.
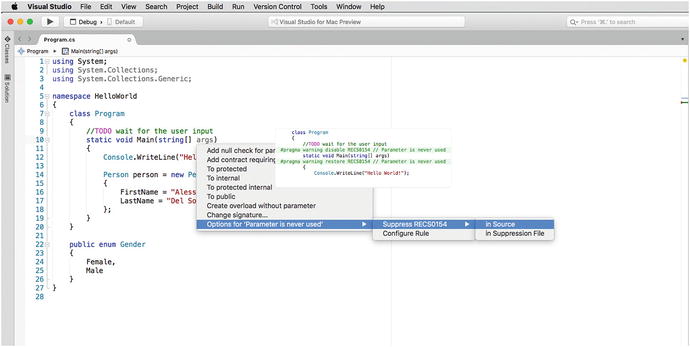
Figure 2-39. Suppressing warnings
If you choose “in Source” as the option, the code editor will surround your code with the #pragma warning disable and #pragma warning restore directives. If you instead choose the “in Suppression File” option, the IDE will generate a file called GlobalSuppression.cs where it will store a directive that disables the warning for all the projects.
Navigating Your Code
Visual Studio for Mac offers a number of features to browse your source code quickly and to move between files, types, and members easily. This section explains these features, and you will learn how to additionally increase your productivity in the editing experience.
For a better understanding of the available features, I will use the sample code provided in the section “The Classes Pad” earlier in this chapter. A useful edit that can be done to the code is using the Move To refactoring described in the “Moving Type Definitions to Files” subsection to move the Person class definition to a separate Person.cs code file.
Navigating Between Files
Instead of moving to a different file using the Solution pad, you can press Control+Tab. Visual Studio will show a pop-up containing the list of files that can be opened with an editor window; then you can simply keep pressing Control and press Tab to select a different file. Just release both keys when you have made your choice.
As an alternative, you can open the Window menu and select the file you want to open in the editor, or you can select Window ➤ Next Document and Window ➤ Previous Document to quickly move in the sequence of open files.
The Scroll Bar
In Visual Studio for Mac, the editor’s scroll bar does not simply allow you to quickly move inside a source code file. Instead, it is an advanced tool that gives you a visual, immediate representation of any relevant information in the code.
For a better understanding, consider Figure 2-40, where you can see a C# code file that contains an intentional error at line 12 (a missing ;), plus a TODO comment and warnings on the args parameter of the Main method, which is never used and therefore considered redundant.
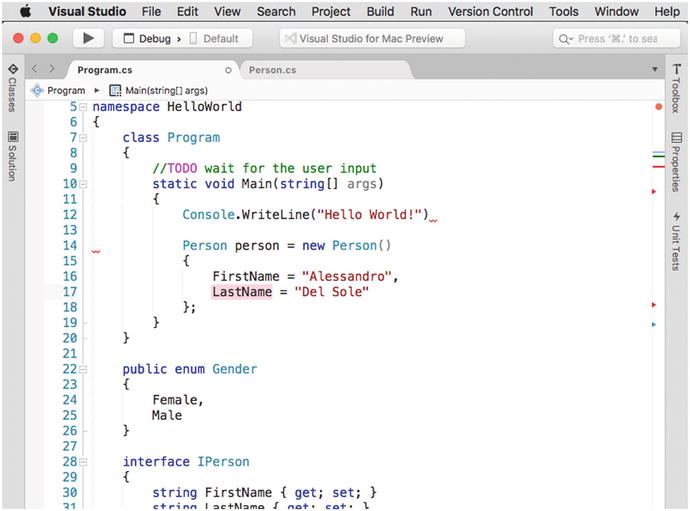
Figure 2-40. The scroll bar showing information about the code
As you can see, the scroll bar shows a number of symbols that make it easier for you to understand where errors, warnings, comments, and the cursor are. Generally speaking, you can hover over a symbol and see a tooltip that describes the related message; then you can click the symbol, and the code editor will move the cursor to the line that is affected by the information. More specifically:
Errors are represented with a red line, whereas warnings are represented with a blue line.
Tasks within comments are represented with a green line.
The current position of the cursor is represented with a light blue glyph. If the cursor is currently on an identifier, the scroll bar will show a red glyph for each occurrence of the identifier in the code.
If the code contains any errors or warnings, the scroll bar will show a small colored circle at the top. This circle will be yellow if the code contains only warnings or red if it contains at least one error. You can hover over the circle to see a detailed message, and you can click it to quickly go to the next error or warning.
The Minimap Mode
You can right-click the scroll bar and select Show Minimap to enable a small code preview on the scrollbar, as shown in Figure 2-41. You can scroll the map or click the code map to quickly move to a different portion in your code file.
You can disable minimap mode by right-clicking the scroll bar and then selecting Show tasks.
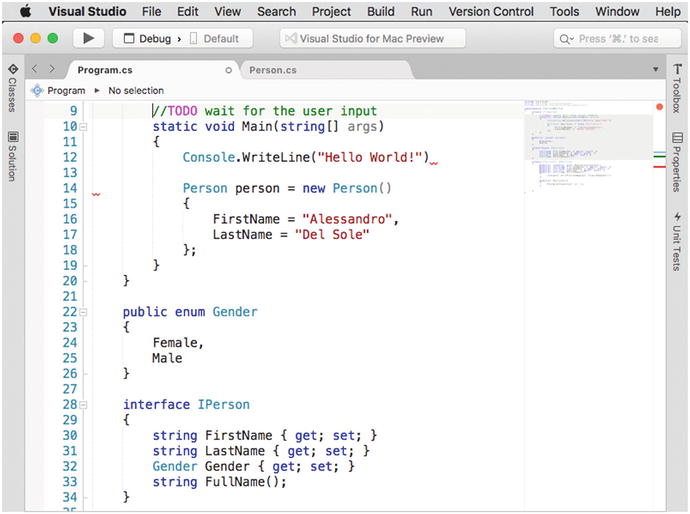
Figure 2-41. The scroll bar showing the code map
The code map is useful with long code files and continues to show icons and glyphs on its right side.
Block Delimiter Selection
With complex, long, and nested code snippets, it might be difficult to understand the enclosing blocks. When you click the opening or closing tag for a given code block, VS for Mac automatically highlights both enclosing tags, such as brackets or parentheses, as shown in Figure 2-42.
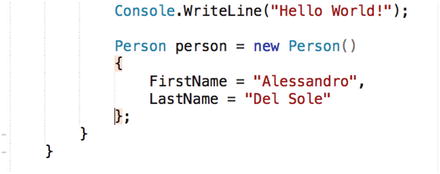
Figure 2-42. Enclosing brackets are automatically highlighted for code blocks
You can also press Option+Shift+Up arrow to select everything in the current scope; then if you press it again, the selection will expand to the next level of scope and so on. The Option+Shift+Down arrow shortcut reverses this.
Find All References
Find All References is a tool that allows you to quickly see how many times and where an object has been used across the entire solution. To use this tool, right-click the name of an object and then select Find All References. Figure 2-43 shows an example based on finding all the references for the FirstName property of the Person class.
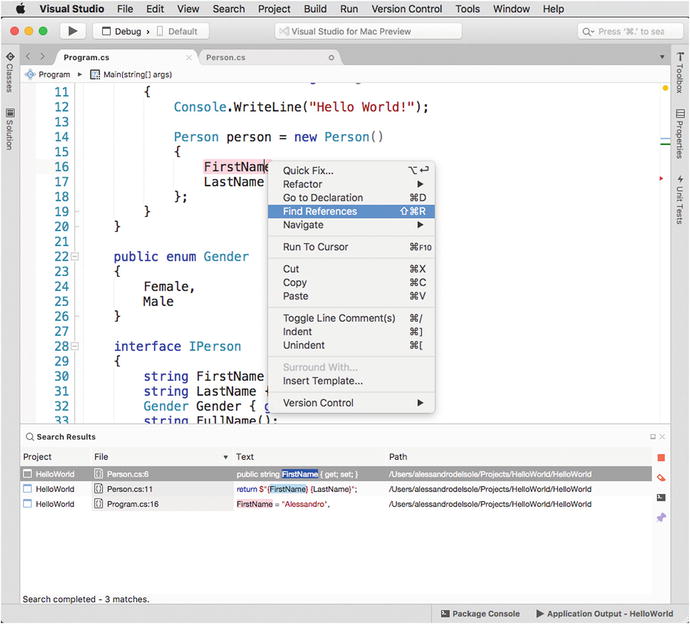
Figure 2-43. Finding all references of a type or member
The list of references appears in the Search Results pad. At the bottom of the pad you see the number of results. The Project column shows the name of the project in which the reference was found. The File column contains both the name and the line of the code file in which the reference was found. The Text column is useful because it shows a preview of the code that contains the reference with syntax colorization. The Path column shows the folder path for the code file. You can double-click a reference to move to the related code in the editor, and Visual Studio will open a new editor window on the file if it is not the same of the active editor window. The reference will be automatically highlighted in the code.
The Navigate Tool
The Navigate tool works similarly to Find All References, but it provides more advanced capabilities for specific scenarios. Navigate can be enabled by right-clicking an item in your code and then selecting Navigate. The submenu that appears offers the navigation commands summarized in Table 2-14 and whose results are shown in the Search Results pad like for Find All References.
Table 2-14. Available Commands in the Navigate Tools
Name | Description |
|---|---|
Find References of All Overloads | Finds all references of all the overloads of a method that have been used in the solution. |
Base Symbols | Shows the list of base types and interfaces that the type on which you invoked Navigate inherits from or implements. If you invoked Navigate on a method, it shows the list of methods that the current one is overriding. |
Derived Symbols | Shows the list of types that inherit from the type on which you invoked Navigate. If you invoked Navigate on a method, it shows the list of methods that are overriding the current one. |
Extension Methods | Shows the list of extension methods for the selected type that are defined in the current solution. |
Member Overloads | Shows the list of overload definitions for the type member on which you invoked Navigate. |
Implementing Members | Shows the list of types or members that are implementing an abstract type or member or an interface or its members. |
For example, if you had a class Employee that inherits from Person and then you wanted to see the list of types that derive from Person, you could right-click the Person type name and then select Navigate and then Derived Symbols. This would produce the result shown in Figure 2-44.
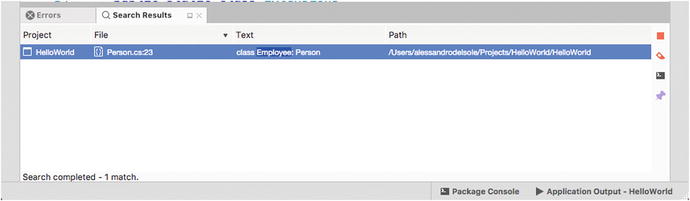
Figure 2-44. Finding the list of derived symbols
Browsing Objects Within a Code File
Visual Studio for Mac provides a visual way to quickly browse types and members within a code file. Each code editor window has tabs that you can click to show the list of types defined in the active code file. When you select a type, then you will be able to see the list of its members.
Figure 2-45 shows an example. If you click a member name, then the code editor will move the cursor to that member’s definition.
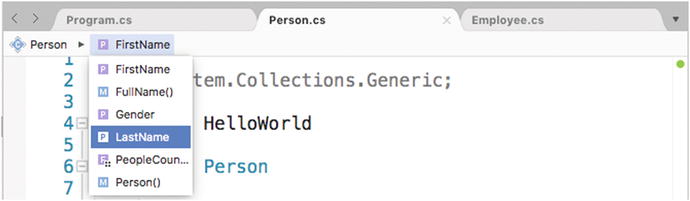
Figure 2-45. Browsing types and members within a code file
You fill find this feature useful, especially with long code files.
Folding Code Blocks
Code blocks can be collapsed by clicking the – symbol near the border of the code editor, and they can be expanded by clicking +. Collapsing and expanding code blocks, in Visual Studio, is called folding. The View menu offers a Folding submenu with the following commands:
Disable Folding: With this command, code blocks can no longer be folded. You can then select Enable Folding to reenable this feature.
Toggle Fold: With this command, you can collapse or expand an individual code block.
Toggle All Folds: With this command, you can collapse or expand all the code blocks in your code file.
Toggle Definition: This command is useful to fold all the code blocks that are nested inside a type or member definition.
Folding code blocks can be useful when you have long files and you need to focus only on a specific part of the code.
Generating Types on the Fly
As a developer, you will often realize that you need to create new types while coding. Visual Studio for Mac makes it easier to generate new types on the fly with a special kind of code refactoring. For example, suppose you declare a new variable of type Employee but that this type does not exist in your solution yet.
Employee empl1 = new Employee();As you would expect, the editor underlines the type with a red squiggle and reports an error saying that it could not find the type. Now, if you right-click the type name and select Quick Fix, you will get a number of options that allow you to generate the new type, as shown in Figure 2-46.
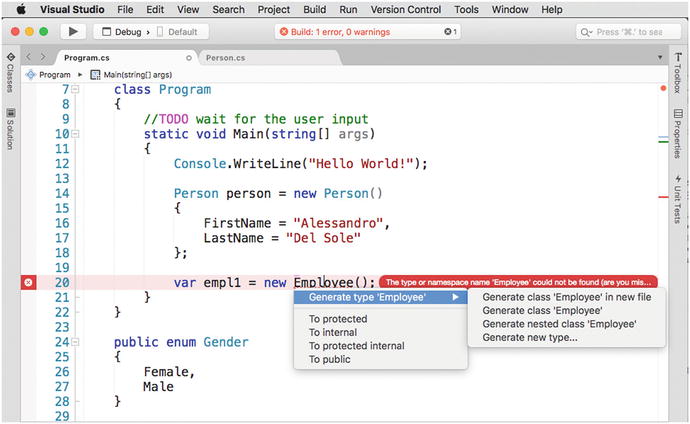
Figure 2-46. Generating new types on the fly
The following options are available:
Generate class in new file: This option creates a new code file whose name is based on the type name and adds an empty class definition with the internal access modifier.
Generate class: This option generates a new class inside the active code file, with the internal access modifier.
Generate nested class: This option generates a new class, nested in the current type, with the private access modifier .
Generate new type: This option shows a dialog that allows you to customize the type generation, by specifying what type you want to create (class, interface, enumeration), the access modifier, and the destination.
This quick fix is useful and allows you to keep your focus on the code while writing.
Enabling Multicursors
You can enable multiple cursors by keeping Command+Option pressed while clicking and dragging the pointer over an area or multiple lines. To understand how this can be useful, think of a class that exposes a number of internal properties that you want to change to public in batch.
You can press Command+Option while clicking and dragging to select all the internal keywords only (see Figure 2-47). Then you can start typing public, and the original text will be replaced on all the selected lines.
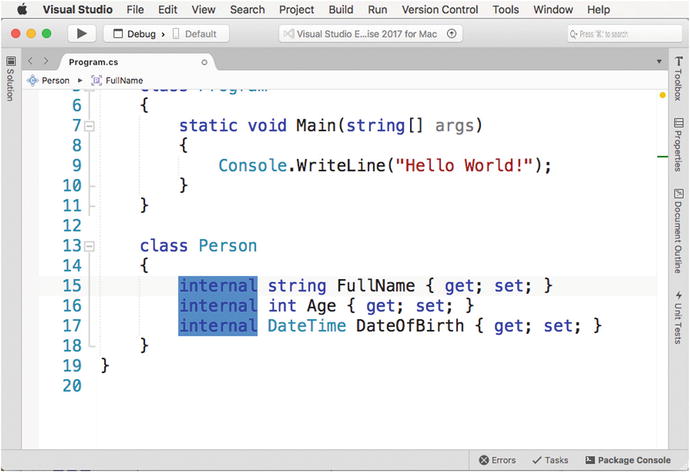
Figure 2-47. Text selection with multicursors
Applying Themes
You can customize the appearance of the Visual Studio IDE with themes. When you start Visual Studio for the first time, the IDE is styled with the default theme. To change the theme, select Visual Studio ➤ Preferences ➤ Visual Style.
Select one of the available themes from the User Interface Theme drop-down box. At this writing, VS for Mac offers the Light theme, which I have been using so far and which I will use across the book, and the Dark theme. Figure 2-48 shows how the IDE looks with the Dark theme.
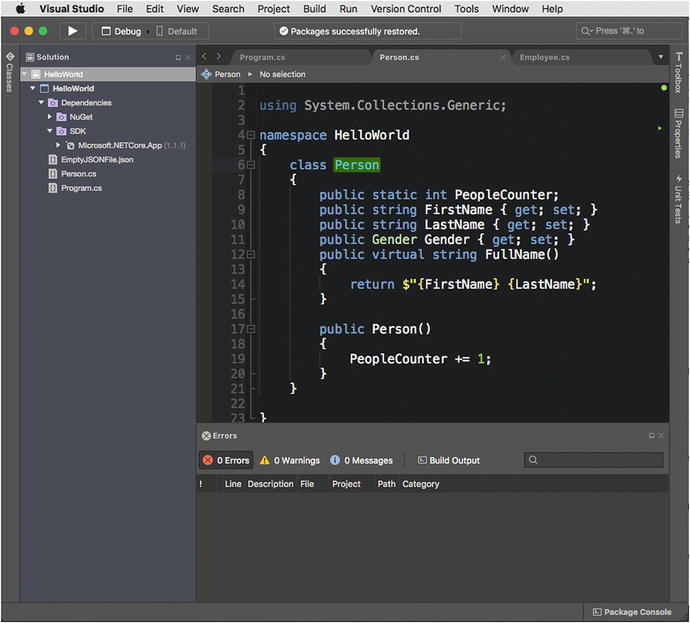
Figure 2-48. Visual Studio for Mac with the Dark theme
Changing the theme affects the IDE user interface, the code editor, and how syntax highlighting for source code appears.
Note
You could also apply a different theme only to the code editor, leaving the user interface unchanged. To accomplish this, select Visual Studio ➤ Preferences ➤ Text Editor ➤ Color Theme and either select one of the available built-in themes or provide a custom theme based on the supported formats listed in the dialog.
Using the Navigate To Tool
Sometimes you need to invoke a tool or command in Visual Studio but you do not remember the exact name or you do not remember from which menu it can be invoked. In other situations, you might have a solution with thousands of files and you do not exactly remember where a file you need is.
Visual Studio for Mac makes your life easier by providing a search box called Navigate To, located at the upper-right corner of the IDE, where you can type the name, or just part of it, of the tool or file you need. Visual Studio will show a contextual list of matching results, as shown in Figure 2-49. If you come from Visual Studio on Windows, this is the counterpart of the Quick Launch tool.
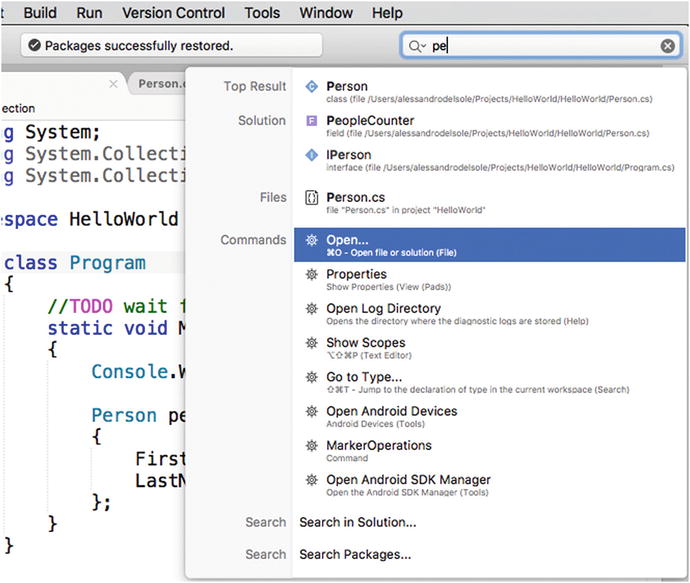
Figure 2-49. The Navigate To tool showing results for commands, files, and types
The list is filtered as you type and shows names of types, code files, and commands that match the search criterion. Not limited to this, if you click Search Packages, Visual Studio will open the Add Package dialog and search for any NuGet packages that match your search criterion. You can also click the arrow near the magnifier icon in the search box to filter search results by file, type, and member.
Browsing Help and Documentation
Visual Studio for Mac ships with rich documentation that covers a lot of topics and most of the needs that you might have as a developer. The documentation is available through different tools that are explained in this section.
The Help Pad
You can select View ➤ Pads ➤ Help to display the Help pad. At this writing, the Help pad shows the full reference for the Mono framework only, and therefore it is specific to Xamarin; however, it also includes topics that cover the C# programming language and the .NET base class library. Figure 2-50 shows the Help pad in action.

Figure 2-50. The Help pad shows the documentation for the Mono framework
Each node can be expanded so that you can see the list of topics and articles. For example, the C# Compiler Error Reference node can be expanded to see documentation about warning and error codes and messages that the C# compiler reports.
The Help Menu
The Help menu is the other place where you can find all the shortcuts and links to the documentation you need about Visual Studio, Xamarin, .NET, and the C# language.
The Search text box allows you to search for help topics and commands. In the case of commands, it automatically shows where they are located, displaying an arrow for easy identification, as shown in Figure 2-51. Search results include commands in the IDE and topics from the Apple documentation for macOS.
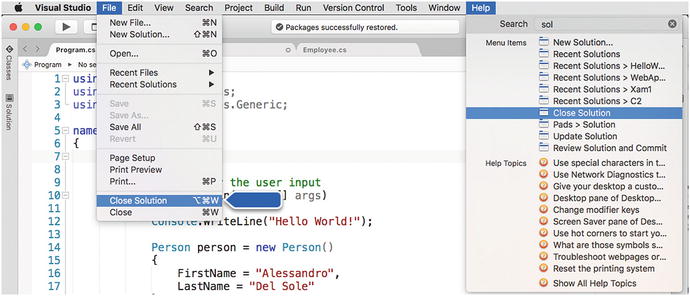
Figure 2-51. Searching for commands and help topics with the Help menu
The API Documentation command opens an instance of the MonoDoc application, which basically shows the same documentation available in the Help pad. Then you have four shortcuts: Microsoft Developer Network, .NET Documentation, Xamarin Developer Center, and Xamarin University. These shortcuts will open the web browser pointing to the corresponding documentation portals. Report a Problem and Provide a Suggestion allow you to report a problem and send suggestions about Visual Studio for Mac, and both match the same-named shortcuts you saw in the welcome page. In the first case, you will report a problem via the Developer Community web site; in the second case, you will be redirected to the User Voice web site ( http://visualstudio.uservoice.com ). The Open Log Directory command will open an instance of the Finder application, pointing to the directory where Visual Studio collects log information from Android and iOS apps while debugging. The Release Notes submenu will display the release notes in the web browser for each of the listed products. The Diagnostics submenu contains diagnostic tools that will not be covered in this chapter.
Summary
Visual Studio for Mac, as an integrated development environment, is the place where you spend most of the time in your developer life. This rich chapter has provided guidance about many topics that you need to be familiar with to be productive with the development environment.
You saw how the welcome page provides shortcuts to common tasks such as creating and opening solutions. Then you saw how to work with projects and solutions, walking through the available project types, especially for Xamarin and .NET Core, and you saw how to build, run, and configure projects, including adding references to external libraries such as NuGet packages. You then discovered pads and how they allow you to perform a number of tasks though keeping your workspace well organized. In the second part of the chapter, you were introduced to the code editor and to the many productivity features it offers, such as IntelliSense, live code issue detection and code fixes for errors and warnings, code refactorings, and code navigation. In the last part of the chapter, you saw how to customize the appearance of the IDE with themes and how to search for help topics with the Help pad and the Help menu. In the next chapter, you will discover additional, important, and powerful features in Visual Studio for Mac, specific for debugging any kind of application.