Version control is a way to record changes to one or more files over time. It basically creates a history for each file so that you can recall specific versions later. Version control is not limited to source code files, but this is probably the most common use of it. Using a version control engine is important for many reasons. First, it allows for team collaboration over the same solution; team members can work on different tasks for a solution or project, involving different source code files, or they can make edits to the same code file incrementally, such as in the case of reviewing the work of peers. Second, it allows you to maintain a history of the source code, which is also useful to individual developers; therefore, it is (for example) possible to restore a previous state in the source code.
Many version control systems are available, and the most popular are Git, Team Foundation Server, and Subversion. Team Foundation Server (TFS) is the proprietary, and extremely powerful, version control system from Microsoft that in the last years has been made available through its cloud-based counterpart, Visual Studio Team Services. Visual Studio for Mac supports both Git and Subversion as version control systems, but without a doubt, Git is the most popular version control system in the world. This chapter explains how to work with the Git version control system in Visual Studio for Mac, how to manage changes in your source code, and how to collaborate with peers on the same solution. Apart from a few differences, most of the concepts you will learn in this chapter also apply to Subversion, at least from an IDE point of view.
Note
You will often hear about source control instead of version control. They both refer to the same concept and can be used interchangeably. This chapter uses the version control terminology for consistency with Visual Studio for Mac and its tools and commands.
What Is Git?
Git ( http://git-scm.com ) is an open source, cross-platform, distributed version control system that makes collaboration easier for small and large projects and perfectly integrates with Agile methodologies. Git relies on the concept of repository, which is a container of source code files referring to the same project or solution. Git is based on local and remote repositories. You basically publish your solution to a remote online repository, and then you make a local copy (or the opposite, and then you work on your local repository). When finished your work, you publish your changes to the remote repository so that the version control engine keeps track of your changes with a new version of the file (or files) you changed.
Other people in the team can download the repository locally, work on that, and then submit their changes so that everyone can work on the project concurrently and always have the latest version (or a specific version) of the solution, project, or code. To interact with local and remote repositories, Git provides a command-line interface that integrates with the operating systems, and developers can type a number of commands that allow them to perform all the supported operations against repositories and files. A command-line interface is perfect for cross-platform tools, but dealing with Git commands can be complex. Luckily, Visual Studio for Mac provides convenient dialogs and integrated tools that allow you to interact with Git repositories visually, rather than from the command line. This is also the reason why I will not discuss Git commands in this chapter, which instead highlights the power of Visual Studio. Just remember that the Git engine must be installed on your system before you try to work with repositories. The Visual Studio for Mac installer takes care of installing Git on your system, but in case you have problems, you can download it manually from http://git-scm.com/download/mac .
Git has specific terminology that you will learn as you go through this chapter. To create a remote repository, Git requires a host site. The most popular online host for Git repositories is GitHub ( http://github.com ). GitHub has become popular over the years as a place for open source projects. However, in the last couple of years, another powerful host for Git repositories has grown in importance: Visual Studio Team Services ( www.visualstudio.com/team-services ). Visual Studio Team Services (also VSTS for brevity) supports both the TFS and Git version control engines, and it includes a number of incredibly useful tools for teams and for supporting Agile methodologies. For example, it provides continuous integration, test automation, build automation, continuous deployment, a powerful Kanban board for task/bug management, and tools for Agile project management and much more. As well as via GitHub, Visual Studio Team Services is available online, as you would expect from a remote host for solutions and projects, and a benefit of Git is that you can work on local repositories even without a network connection and submit your work once you are back online. Visual Studio for Mac supports any Git repositories, regardless of the remote host. The official documentation for Visual Studio for Mac provides an example based on GitHub as a remote host ( http://docs.microsoft.com/en-us/visualstudio/mac/set-up-git-repository ). Therefore, in this chapter, you will see how to set up a remote repository on Visual Studio Team Services instead. This requires a Microsoft account, which you certainly have, and it is free for teams up to five members. Therefore, you can try it at no cost. Remember that, from the point of view of the tooling, all the steps you will learn in this chapter apply to any Git repository and remote host.
Preparing an Example
To demonstrate how Visual Studio for Mac integrates with Git, a sample application is necessary. For the sake of simplicity, I will reuse the NewsReader sample app created in Chapters 7 and 8. With the help of the Finder system app, you can create a copy of the project folder and leave unchanged the original project.
Note
In this chapter, I will use an existing application, and therefore I will show how to enable version control for this scenario. However, remember that Git version control can also be enabled directly when creating a new solution. In that case, a local repository will be created first.
Creating a Remote Repository
Unlike other development environments, where you are free to decide whether you should set up a local or remote repository first, in Visual Studio for Mac you first need a remote repository that will be later registered for local usage. As I mentioned previously, in this chapter I will explain how to set up a remote repository on Visual Studio Team Services.
Having that said, you need to register on the Visual Studio Team Services portal with your Microsoft account by clicking the “Get started for free” hyperlink on the portal home page ( www.visualstudio.com/team-services ). Remember that your subscription is free for up to five team members, and of course you can use it for an individual application management life cycle. Once logged in, follow the instructions to set up your workspace and provide a meaningful third-level domain name (for example, mine is alessandrodelsole.visualstudio.com). Completing the registration will provide you with all the management tools you need to create and manage projects, features, and users in the team. You can look at the documentation at any time ( www.visualstudio.com/en-us/docs/overview ) for additional help and for features that are not covered in this chapter. When in the welcome page, click New Project. In the “Project name” text box, enter the name for the new repository, for example NewsReader, and optionally provide a description. Make sure Git is selected as the version control engine (see Figure 12-1). Leave Agile selected in the “Work item process” box. In this chapter, the process template has no particular importance, but remember that if you use Visual Studio Team Services for a full application life cycle and project management and not only version control, it is important to select the process template that better represents the management methodology, such as Agile, Scrum, or CMMI, because the management tools that VSTS offers vary depending on this selection.

Figure 12-1. Creating a Git repository on Visual Studio Team Services
Click Create and wait for the repository to be created. When finished, VSTS shows a summary that includes the remote URL of your repository, as shown in Figure 12-2. Take note of this URL since it will be used in a few moments with Visual Studio for Mac.
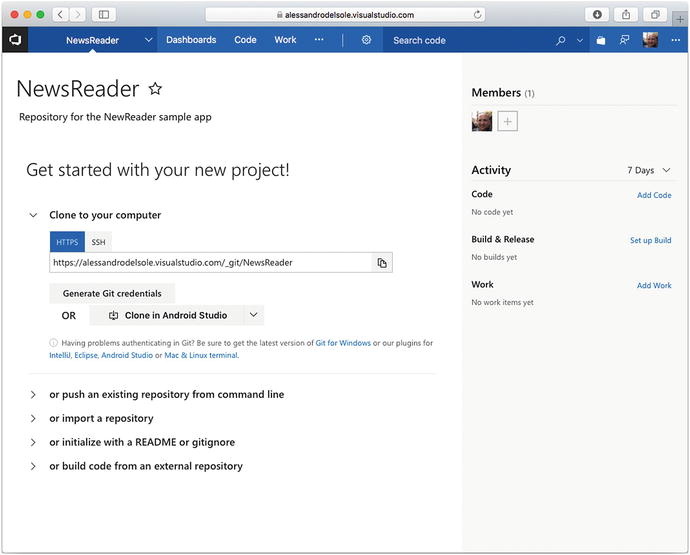
Figure 12-2. Getting the URL of the remote repository
Visual Studio for Mac supports the HTTP, HTTPS, and SSH protocols, but you will use the HTTPS one in this chapter. You also have an option to generate Git credentials so that an IDE such as VS for Mac or Visual Studio Code can connect to your repository, but in this case it is not necessary since Visual Studio for Mac can use your Microsoft account. However, in some cases, you might need to generate an access token, and here is where you can do that in the VSTS portal. As you can see, the web page also shows a number of things you can do against the newly created repository, such as adding code and work items or configuring builds. No additional step is required at this point since you will upload the code from Visual Studio for Mac, which is explained in the next section.
Note
If you have used some version control systems in the past, you might be familiar with the concept of branches. When you create a remote Git repository, a branch called master is automatically created. Then you will be able to manage branches from both the portal and Visual Studio. If you are not familiar with the concept of branches, no worries; it will be explained later in this chapter.
Initializing a Local Repository
Now that you have a remote repository, you need to initialize a local repository for your solution. To accomplish this, follow these steps:
Select the solution in the Solution pad.
Select Version Control ➤ Publish to Version Control or right-click the solution name and select Version Control ➤ Publish to Version Control.
In the Select Repository dialog, click the Registered Repositories tab.
Click Add to display the Repository Configuration dialog (see Figure 12-3).
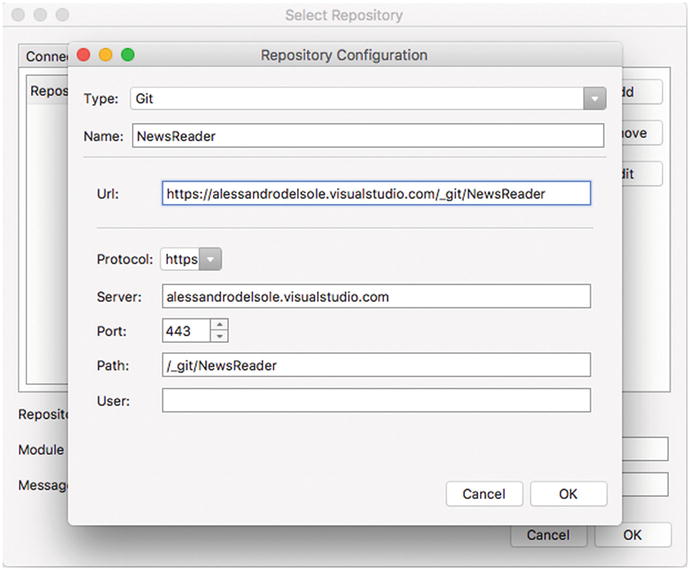
Figure 12-3. Configuring the local repository
Select Git as the engine, and specify both a repository name and the remote repository URL. Visual Studio will automatically populate the other boxes based on the URL.
In the User box, enter the e-mail address you used to log in to the VSTS portal.
When you click OK, you will see the new registered repository in the list, as shown in Figure 12-4. You will be able to add new local repositories or to edit properties for the registered repositories.
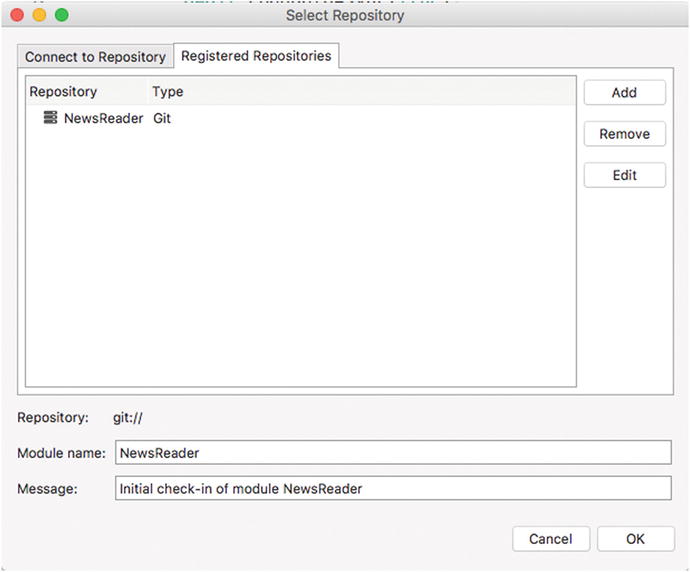
Figure 12-4. The list of registered local repositories
When you click OK, Visual Studio will set up a local repository for your solution and will ask your permission to publish the content of the local repository to the remote repository. If you agree, Visual Studio will first ask you to specify a username that will identify yourself in file changes and the e-mail address. It will then ask you to enter the e-mail address and password you use with Git, which are the same you used to register to VSTS in this case. If you do not want to publish your code to the remote repository at this time, you can do it later. Assuming you agree, Visual Studio performs the following tasks:
It creates a new version of the repository based on the files that have been changed since the last time. Because this is the first time you are updating the repository and therefore this is the first version under control, all the files in the solution become part of it. This operation is referred to as commit.
It marks all the committed files as unchanged.
It updates the remote repository with all the committed files (in this case all files in the solution), uploading them to your VSTS project. This operation is referred to as push.
Generally speaking, with Git you first commit changes to the local repository, and then you push changes to the remote repository. You can easily check whether the source solution has been uploaded to VSTS by clicking Code, as shown in Figure 12-5.
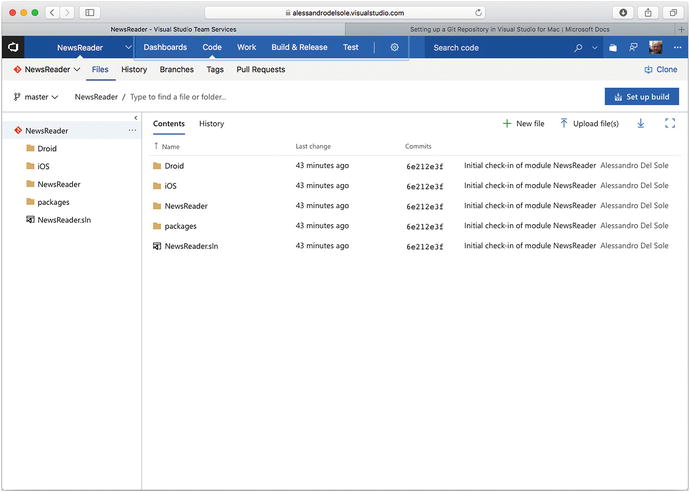
Figure 12-5. The first commit has been pushed to the remote repository
Notice that each commit can include a message that can be helpful to identify what changes you made to a specific version. In this case, I left the default message proposed by Visual Studio (see Figure 12-4) for the initial commit. Later you will learn how to include custom comments on new commits. Other options available at this point in Visual Studio Team Services and that are not strictly related to version control are left to your studies and will not be discussed here. Now you have everything you need to start versioning your code and to involve your team in collaborating on a solution.
Note
Every time Visual Studio for Mac calls the Git command-line interface to perform operations against repositories, it will show the output in the Version Control pad. You should be able to automatically see this pad in the IDE, but you can recall it via View ➤ Pads ➤ Version Control.
Cloning Repositories
Other developers in the team will be able to work on the solution by first downloading a remote repository locally. Git will then automatically enable change detection over files. Technically speaking, this is called cloning a repository and is the first step to team collaboration.
There is also other good news: because Git is a cross-platform engine that runs on Windows, macOS, and Linux, a repository can be cloned by developers working on different systems. For example, a repository containing a .NET Core solution could be cloned with Visual Studio for Mac on macOS, with Visual Studio 2017 on Windows and with Visual Studio Code on Linux, and developers can work with the development environment of their choice and share their work to the remote repository. As another example, which is also the current case, a repository containing a Xamarin solution could be cloned on Windows with Visual Studio 2017 and on macOS with Visual Studio for Mac, and developers in the team can collaborate on the project regardless of the system and IDE they use. Now imagine you are on a different machine and you want to start working on a solution that is under version control. To accomplish this in Visual Studio for Mac, with no solution open, select Version Control ➤ Checkout. In the Select Repository dialog, select Git as the version control type and enter the URL of the repository you want to clone, as shown in Figure 12-6.
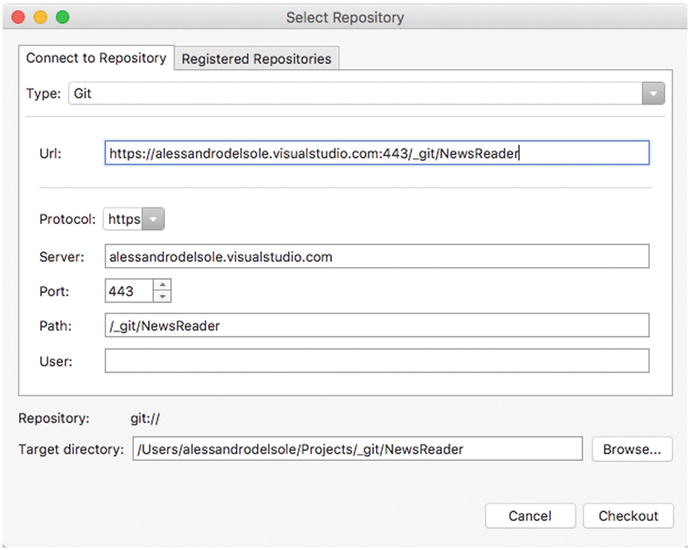
Figure 12-6. Cloning a remote repository
Visual Studio will automatically populate the Protocol, Server, Port, and Path fields, which you must check. Notice that Visual Studio for Mac also proposes a target folder name, which you can see in the “Target directory” text box and that you can change by clicking Browse. When ready, simply click Checkout. Visual Studio for Mac might ask you to enter your credentials like when pushing the repository . When cloning completes, you will get your local copy of the repository in the specified target folder, and version control will be enabled locally. You can then simply open the solution and work on it as you would do normally, also taking advantage of the file change management tools described in the next section. In the section called “Managing Commits,” you will learn how to update your local repository with changes made by other developers.
Note
Obviously, Visual Studio for Mac will only be able to clone the latest version available of the remote repository. Any uncommitted local changes will not be available for cloning.
Managing File Changes
When a solution is under version control, every time you open a source file in the code editor you will see five buttons at the bottom, called Source, Changes, Blame, Log, and Merge. These buttons provide shortcuts to tools that allow you to manage file changes . To understand how they work, let’s first make a couple of edits to the source code.
For example, open the ItemService.cs file, locate the QueryRssAsync method , and replace the following comment:
// Query the RSS feed with LINQ and return an IEnumerable of Itemwith the following XML comment that allows IntelliSense to show information about the method:
/// <summary>/// Query the RSS feed and return a list of news/// </summary>/// <returns><seealso cref="Item"/></returns>/// <param name="forceReload">If set to <c>true</c> force reload.</param>
Do not forget to save your changes. Now click the Changes tab at the bottom. As you can see in Figure 12-7, the code editor switches to the Diff view, which shows the differences between the latest version on the remote repository (on the left) and the local repository (on the right). This tool is extremely useful to get a quick visual representation of changes in a file.
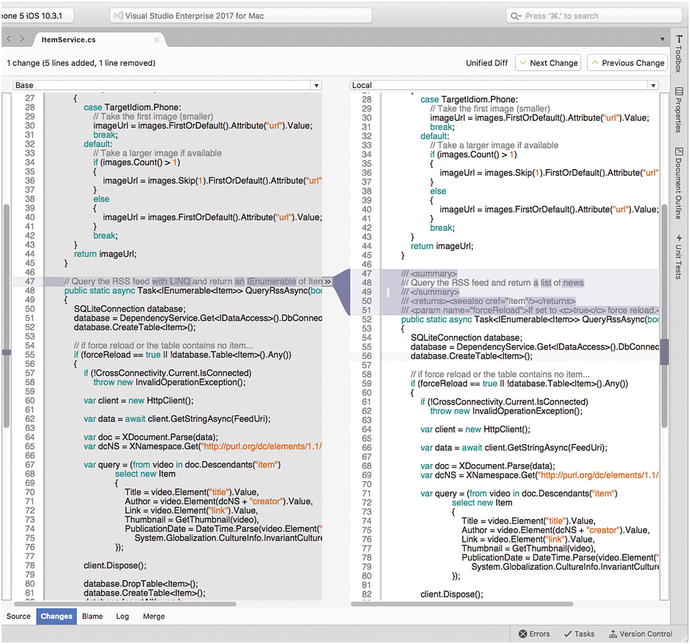
Figure 12-7. The Diff tool shows differences between remote and local versions of code files
At the top, you can see summary information such as the number of changes and the number of lines of code added and removed. You can also use the two combo boxes to switch the view between remote (base) and local files, and you can also select a specific version of the file that you can compare to another version. The arrow icon that highlights a difference can be clicked to quickly revert changes. The Blame tool allows you to see who did what in a code file. As you can see in Figure 12-8, Visual Studio shows the name of the developer who made edits to a code block in the last commit, and it also highlights changes that have not been committed yet.
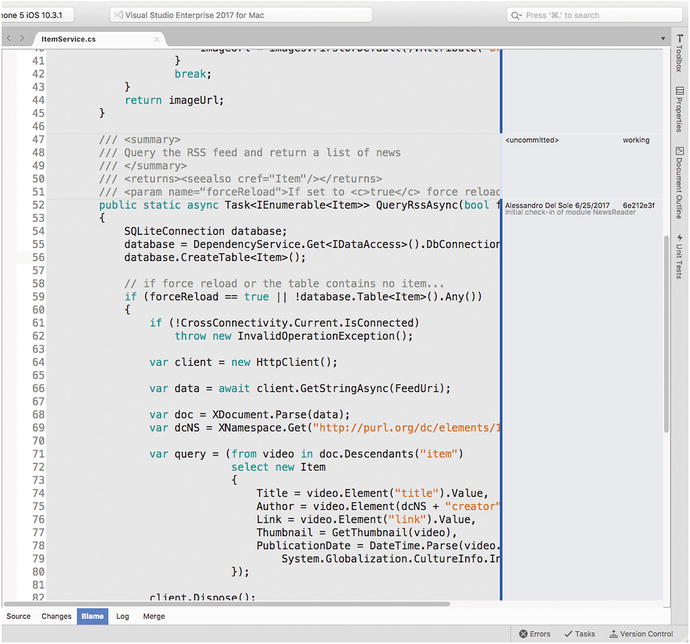
Figure 12-8. The Blame tool shows information about the authors of changes
This tool can be useful to project managers who need to see whether the source code was modified as required by the developers who were assigned a task and to other developers in the team who might need to know who implemented a specific part for further clarifications. The Log tool shows a list of the latest operations made against the repository in the last commit; for example, in this case, it shows a list of files that were submitted to version control, as demonstrated in Figure 12-9.
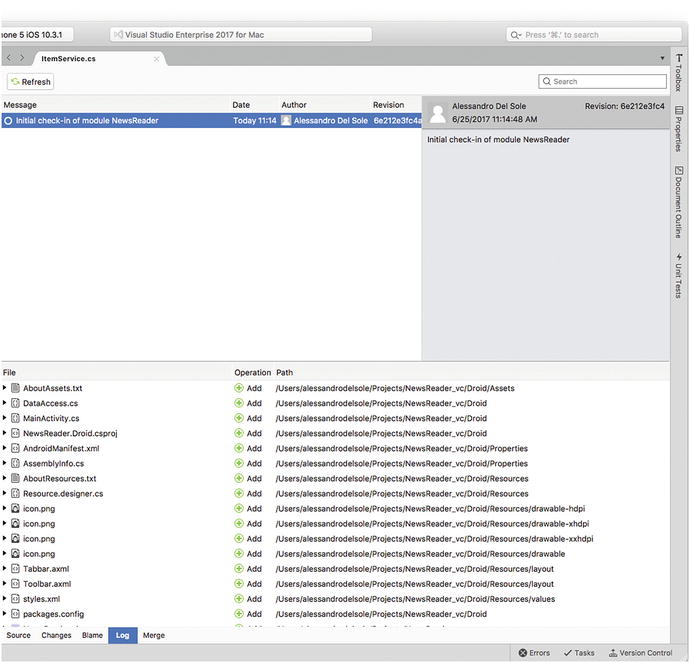
Figure 12-9. The Log tool shows the list of operations made with the last commit
The last tool, Merge, is useful if you have a merge conflict on a file when committing your work. It shows the difference between changes made by you and another developer, allowing you to combine both sections of code cleanly.
Managing Commits
Once you have finished working on your changes, you will want to commit the latest version of your code to the repository. With Git, you first commit changes locally, and then you update the remote repository (though Visual Studio for Mac provides a shortcut that allows you to do both things with a single command).
For example, suppose you want to commit changes you made to the ItemService.cs file. You have three options: committing changes for the whole solution, committing changes for a single project, or committing changes for an individual code file. Choose the last option only if you made edits to one file or if you do not want to push all the changes you made, for example, because you did not finish your work on all files but other developers might need the latest version of one of them. For the current sample app, I will demonstrate how to commit changes for the whole solution, which is probably the most common scenario. The command and shortcuts you use are then called in the same way. To commit your changes, in the Solution pad right-click the solution name and select Version Control ➤ Review and Commit. As you can see in Figure 12-10, Visual Studio for Mac will show the list of files that will be committed, and you will be able to expand each file to get a visual representation of the edits. In the text box at the bottom, you will be able to provide a comment for this commit. This is optional but strongly recommended because it helps other developers understand what edits you made to a specific version of the solution.
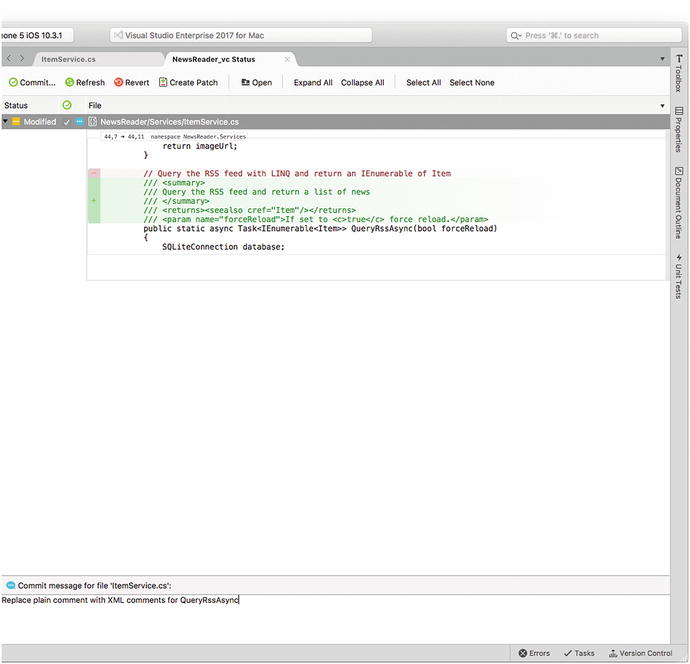
Figure 12-10. A summary of changes
The toolbar at the top provides a number of useful commands, summarized in Table 12-1.
Table 12-1. Commands Available to Manage a Commit
Command | Description |
|---|---|
Commit | Commits your changes locally |
Refresh | Refreshes the list of changes in case you made other edits while this window is open |
Revert | Reverts changes in the selected file (or files) |
Create Patch | Creates a Git patch that allows you to export a commit to file |
Open | Opens the selected file in the editor |
Expand All | Expands all the files to show changes |
Collapse All | Collapses all expanded files |
Select All | Selects all items in the list |
Select None | Deselects all items in the list |
When ready, click Commit. Visual Studio for Mac will show the Commit Files dialog that contains a summary about the commit (see Figure 12-11).
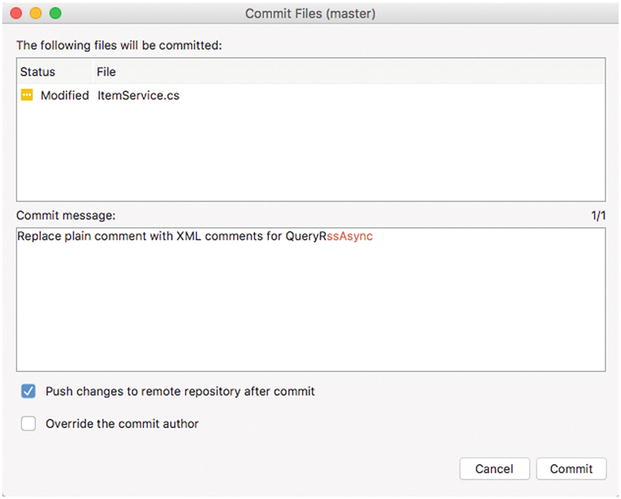
Figure 12-11. A summary before committing changes
If you select the “Push changes to remote repository after commit” option, Visual Studio for Mac will also push your changes to the remote repository after the local commit. Click Commit when ready and, in case you opted for remote push, you will see the Push to Repository dialog where you will simply click Push Changes. If you did not select this option, you will be able to manually push your changes to the remote repository with Version Control ➤ Push Changes. Visual Studio for Mac will call the Git command line to create a new version of the code that other developers will be able to use. Once the commit operation has been completed, you will see that Visual Studio for Mac clears the list of changes.
At this point, if other developers want to get the latest version of the repository that contains your changes or if you want to get the latest version of changes made by others, Visual Studio for Mac needs to perform an operation called pull. To accomplish this, open the solution and then select Version Control ➤ Update Solution. This operation will update your local repository with the remote changes and will overwrite files that you are currently working on.
Note
Visual Studio for Mac allows you to customize some options about version control tools and interaction with Git. You can select Visual Studio ➤ Preferences ➤ Version Control and use the Commit Message Style options to format the style of commit messages, the Git tab to influence stashes and branches, and the General tab to globally disable version control.
Hints About Stashes
Visual Studio for Mac also supports stashes. With stashes, Git allows you to save your edited files on a stack of unfinished changes that you can reapply at any time. This can be useful when you have not finished your work and you want to have a remote copy of your changes without affecting the repository with a commit. If you have experience with TFS, this is similar to the Shelve operation. Stashes will not be discussed in this chapter, but Visual Studio for Mac provides the Stashes, Pop Stash, and Manage Stashes commands in the Version Control menu that help you work with this feature.
Managing Branches
Branches are one of the most important features in any version control system. If you are not familiar with branches, an example will help you understand what they are. Suppose you have a project that, at a certain point, goes to production and you have an updated and tested repository for it.
You need to continue the development of your project, but you do not want to do it over the code you have written so far, keeping your project safe. You can create two separate histories of your project using a branch. When you create a repository, Git automatically creates a default branch called master. For example, the master branch could contain the code that has gone to production, and you could create a new branch called development, based on master but different from it, where you can continue the development of your project. Visual Studio for Mac includes a number of tools that simplify working with branches. Let’s start by creating a new branch. At this writing, Visual Studio for Mac does not allow you to create a remote branch in the IDE, so one must be first created in the Git host you choose, VSTS in this case, but it could be GitHub or Bitbucket. To accomplish this, in the dashboard of Visual Studio Team Services, click Branches and then “New branch.” As demonstrated in Figure 12-12, enter the branch name and select the branch on which the new one is based, such as master in this case.

Figure 12-12. Creating a new remote branch
Click “Create branch.” After a few seconds, this will be available in your repository. The next step is creating a local branch in Visual Studio for Mac and associating this to the remote branch. To accomplish this, select Version Control ➤ Manage Branches and Remotes. The Git Repository Configuration dialog appears and shows the list of branches for the current repository; in this case, only the master branch is available. Click New and in the Branch Properties dialog enter the branch name; then enable the “Track a branch” option and select the origin/development branch (see Figure 12-13).
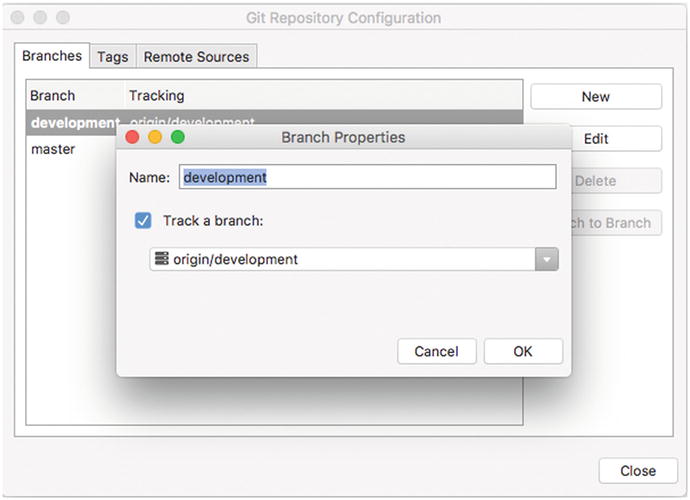
Figure 12-13. Creating a local branch
When you click OK, a new local branch will be created and associated to the remote branch so that every time you will make changes, these will be pushed to the new branch. Actually, you must explicitly set the new branch as the target for your changes. This can be easily done by selecting Version Control ➤ Switch to Branch and then selecting the target branch. Once you have switched to the desired branch, you will be able to manage your commits as you learned previously.
Merging Branches
When the development of your project reaches another safe and tested milestone, it is common practice to merge the secondary branch into the main branch. This helps keep branches consistent with the state of the project and helps keep your code organized. In the current example, suppose the NewsReader project reaches another development milestone and therefore you want to merge the content of the development branch into the master branch. Make sure you have pushed any pending changes to the development branch.
First, you have to switch back to the master branch (or to the branch that will receive the content of the secondary branch). You still use Version Control ➤ Switch to Branch. At this point, select Version Control ➤ Merge Branch. Visual Studio will ask you to specify which branch will be merged into master, as demonstrated in Figure 12-14.

Figure 12-14. Selecting the branch that will be merged into master
Make sure you select a branch under the origin node in order to merge a remote branch; otherwise, the merge will be performed using a local branch. When ready, click Merge. Merging a branch may take up to a few minutes depending on the number of changes between the two. Remember that you will need again to switch to a different branch for development to keep the master branch clean.
Branching Strategies
You can basically have infinite branches, and the branching strategy is totally dependent on your company’s way of working. In my experience, these are the most common branching strategies:
All the people in the team work on the same development branch, and when the project reaches a milestone, the development branch is merged into the master branch.
A branch is created for each feature you need to implement in your application and then merged into master when completed. In terms of the Scrum and Agile methodologies, a branch is created for each user story in the sprint backlog. When a story is closed, the branch is merged into the master branch. This model is also known as the GitFlow workflow ( http://nvie.com/posts/a-successful-git-branching-model ).
Every team member works on a dedicated branch, and this is merged into a master branch according to the development state of the project.
There is not a perfect branching strategy . For example, the second strategy is okay with a small number of user stories in the sprint backlog; otherwise, managing a large number of branches can be painful. The first option is instead okay if each team member works on specific, separated tasks and source files so that they will seldom have conflicts. Especially when you have many branches that you then merge into a master branch, it is best practice to remove branches you no longer use to keep your repository clean and well organized.
As I said before, the branching strategy is something specific to your way of working, but Visual Studio for Mac has the proper tools to handle all the possible scenarios.
Summary
More often than not, developers work in teams, and they need tools that allow them to work on the same solutions from different workstations and to share their work with other developers. Team collaboration on source code is possible through different version control systems, and Visual Studio for Mac supports Git and Subversion. In this chapter, you learned how to configure Visual Studio to work with Git, as it is the most popular version control engine in the world.
You learned how to configure a remote and local repository, how to clone repositories for team collaboration, and how to take advantage of all the integrated tools that allow for displaying changes over files. You saw how to share your work with commits, and you saw how to work with branches for managing different milestones in the application life cycle. At the end, you saw how to merge branches, and you got hints about possible branching strategies. The Visual Studio for Mac IDE demonstrates, once again, all of its power through a huge number of integrated tools that make your developer life easier. But there is more: in the next and last chapter, you will be guided through a number of additional, integrated tools that will make you even more productive.