As a first-class citizen, Visual Studio for Mac includes many integrated tools for productivity and can be customized in many ways so that you can get the most out of the development environment and organize the workspace in the best way for your needs.
This chapter is totally oriented to the integrated development environment (IDE) and unleashes a large number of useful tools, some related to customizations and others related to productivity. By completing this chapter, you will have in your hands all the incredible power of Visual Studio for Mac, and you will get many tips that will be useful as you start using the IDE on your own.
Customizing Visual Studio
Visual Studio for Mac is a flexible IDE and allows you to customize the appearance, the shortcuts, and the text editor. This section walks through all the available customizations that you will be able to leverage in order to make Visual Studio the perfect workspace for you. Most of these customizations are available in the Preferences dialog, which you open with the Preferences command in the Visual Studio menu.
Customizing Key Bindings
Key bindings are predefined keyboard shortcuts that you can use to invoke commands and tools instead of locating and selecting commands within menus and with the mouse. Key bindings can definitely speed up your activities especially when writing code.
Default key bindings can be overridden with custom shortcuts. To accomplish this, select the Key Bindings tab in the Preferences dialog. In the dialog, you will see a list of commands grouped by category, with their key bindings (if assigned), as shown in Figure 13-1.
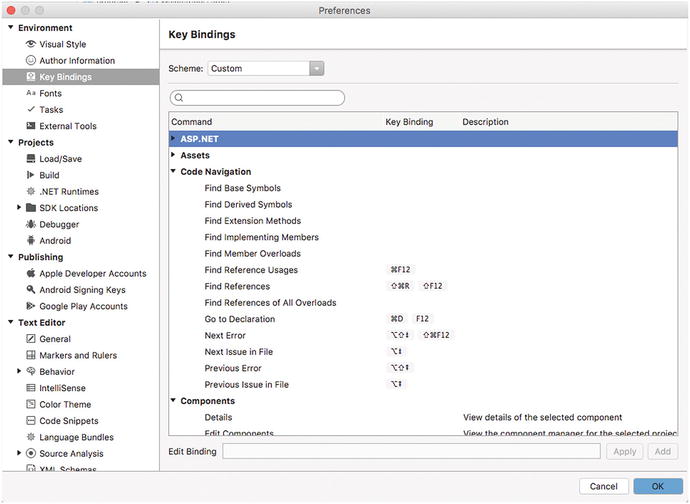
Figure 13-1. Customizing key bindings
If you want to customize a key binding, select the command in the list, type the new shortcut in the Edit Binding text box, and then click OK. You can also select a scheme that recalls key bindings available in other development environments, by expanding the Scheme combo box. For example, you can select Xcode, Visual Studio Code, Visual Studio (Windows), Resharper, and a mix of Visual Studio for Mac and Visual Studio on Windows so that you can reuse key bindings that you are already familiar with. The default is Custom, a scheme created for Visual Studio for Mac.
Customizing Fonts
You can change the default fonts in Visual Studio for Mac using the Fonts tab in the Preferences dialog. You can select a different font for the code editor, for all the pads in general, and for the Output pad. Figure 13-2 shows how you can select a font with the font picker.

Figure 13-2. Customizing fonts
Before you click OK, remember to click Set To Default if you want the selected font to be the new default.
Customizing the Code Editor
Being the place where you spend most of your developer life, the code editor supports a large number of customizations, all available on the Text Editor tab of the Preferences dialog. Table 13-1 summarizes the available tabs and their options.
Table 13-1. Code Editor Customizations
Tab Name | Description |
|---|---|
General | Provides options that control line ending and code folding. |
Markers and Rulers | Provides options that control how to display line numbers, code references, rulers, markers, tabs, and indentation. |
Behavior | Provides option for automatic actions that the code editor must take for specific keystrokes, such as braces, semicolons, and backspace. More specific actions are also available for the XML, CSS, HTML, and JSON markup languages. |
IntelliSense | Provides options that determine how IntelliSense shows the completion list. |
Color Theme | Provides a list of available color themes for the user interface of the code editor. This option was discussed in Chapter 2 together with visual styles, which apply to the whole IDE instead. |
Code Snippets | Provides a way to manage IntelliSense code snippets. This feature is discussed in more detail in the section called “Improving the Code Editing Experience.” |
Language Bundles | Allows you to extend Visual Studio to support additional languages based on the TextMate and Sublime 3 grammar packages. |
Source Analysis | Provides a list of code issue notifications and their severity levels that you can change, for example, from warning to error. |
XML Schemas | Enables you to register XML schemas so that IntelliSense can display a more detailed completion list. |
Most options on the tabs are really self-explanatory and easy to use and understand. For instructional purposes, some of them are more easily recognizable with a color theme different than Light. You are totally free to leave the theme of your choice, but I will now use the Dark theme that better highlights some code editor features in screenshots. By following what you learned in Chapter 2, apply the Dark theme to Visual Studio in the Visual Style tab of the Preferences dialog. Then, in the General tab under Text Editor, select Enable Code Folding, and in the Markers and Rulers tab enable the “Highlight current line” and “Show indentation guides” options. As you can see in Figure 13-3, with code folding enabled, you can now collapse and expand code blocks with a single mouse click and see a preview of the code block in a tooltip; also, you can see the current line highlighted and the so-called indentation guides, which are vertical lines that make it easier to identify the curly braces that delimit a specific code block.

Figure 13-3. Code editor customizations: code folding, current line highlighting, and indentation guides
Of course, these are just a few examples of code editor customizations you can set in Visual Studio for Mac, and all the other customizations available are extremely easy to use and set. However, a couple of them deserve more attention and are on the Language Bundles and Source Analysis tabs.
Adding Language Bundles
One of the most amazing features in customizing Visual Studio for Mac is that you can add support for languages that are not included out of the box. In fact, Visual Studio for Mac supports language grammars based on the TextMate and Sublime Text 3 standards.
Both TextMate and Sublime Text 3 are popular cross-platform, enhanced code editors that can work with an infinite number of languages. For each language, they both support language packages, which are archives that include language grammar, syntax colorization, and code snippets. Language packages are also referred to as language bundles. Visual Studio for Mac can only work with packages and not with individual files, such as the language grammar definition, so you need an easy way to find the packages you need. For a better understanding of how this feature can enhance your development experience in Visual Studio for Mac, suppose you want to use this IDE to edit Swift code files. Because you are on a Mac, needing to edit Swift source code files is not uncommon. Having that said, I will now provide an example based on Sublime Text 3 because this provides the easiest and fastest way to retrieve language packages. Download the editor at http://sublimetext.com , and of course install it and launch it. When ready, follow these steps:
Select Tools ➤ Command Palette.
Type Install Package Control. This will install a package manager that will make it easier to find, download, and install language packages.
Open again the Command palette and type Install Package; then press Enter. Sublime will show the list of available packages.
Pick the Swift package from the list and press Enter.
After a few seconds, the Swift language pack will be installed and available to Sublime. The next step is to export the package so that you can add it to Visual Studio. To accomplish this, in Sublime open the Command palette and type List Packages; then press Enter. When the list of installed packages appears, click the Swift package installed previously. This will open a new Finder window pointing to the folder where Sublime stores packages. Copy Swift.sublime-package to a reachable directory, such as Desktop, Documents, or Download. Now in Visual Studio, in the Preferences dialog, select the Language Bundles tab under Text Editor. Click Add and locate and select the language package, and this will appear in the list of installed packages (see Figure 13-4).
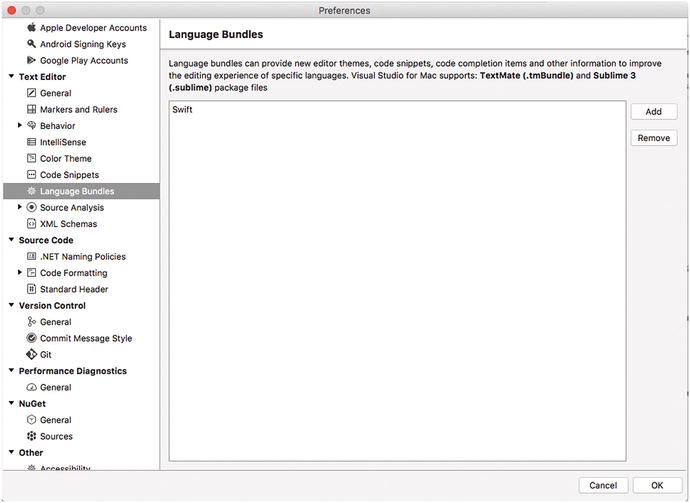
Figure 13-4. Adding a new language bundle to Visual Studio for Mac
Now if you open or create a .swift file with Visual Studio, you will not only take advantage of syntax colorization but also of other editor features such as code folding, indentation guides, block delimiters, and much more (see Figure 13-5).
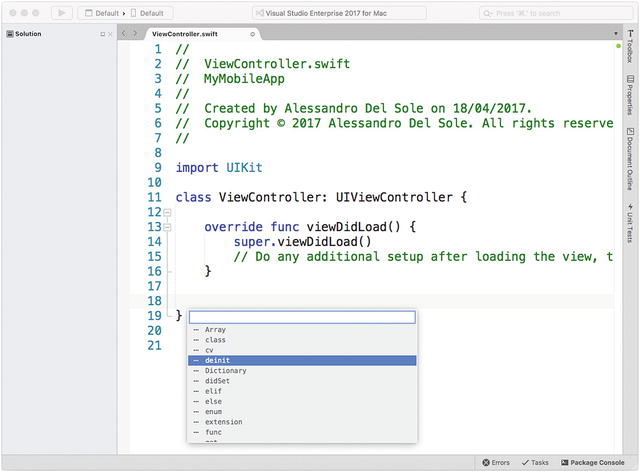
Figure 13-5. Syntax colorization and other editor features against a language bundle
Not limited to this, you can add code snippets by right-clicking the code editor and then selecting Insert Template. From the pop-up that appears, you will be able to choose preconfigured code snippets. For languages supported out of the box, such as C#, code snippets are much more powerful, as you will learn later in this chapter.
Setting Options for Source Code Analysis
As you learned in Chapter 2, the code editor in Visual Studio invokes the C# compiler to perform live code analysis and detect code issues as you type, and it also shows error and warning messages at build time in the Errors pad. With live code analysis, the code editor also provides the so-called quick fixes, which are possible solutions to code issues that you can apply while keeping your focus on the code.
In Visual Studio for Mac, you have an opportunity to control how code issues and quick fixes are presented in the code editor. In the Preferences dialog, you can select the Source Analysis tab under Text Editor and enable or disable code analysis, and in the C# tab you can control both code rule violations and fixes. If you take a look at Figure 13-6, you can see the Code Rules tab where a list of code rules appears, organized into categories.
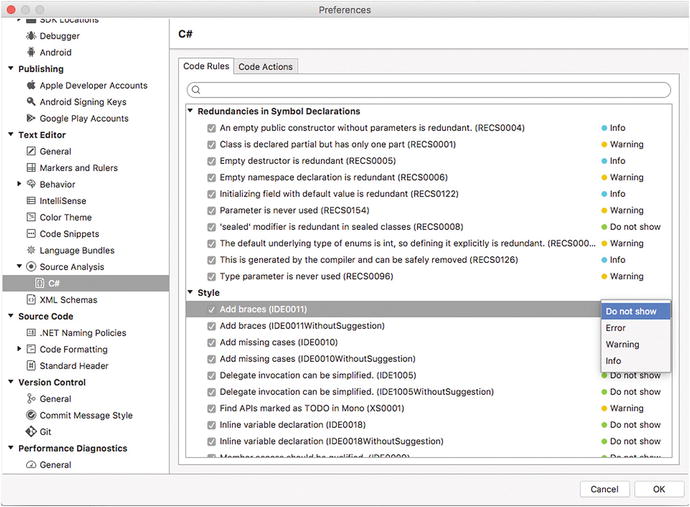
Figure 13-6. Controlling code rules on source analysis
You can enable or disable each code rule, and you can specify the severity level among Error, Warning, Info, and Do Not Show by clicking the current severity level. This will present a combo box for selection. This can be useful if you often use some programming patterns that might raise warnings that you want to ignore. It is worth recalling that changing the severity level of a code rule from Warning to Error will cause a build to fail if a violation of that rule is detected; conversely, changing the severity level from Error to Warning will not break a build but might cause runtime errors. The compiler is optimized to raise the most appropriate severity levels, but you need to know that you can change that behavior.
On the Code Actions tab, you can instead enable or disable the most common quick fixes that the code editor provides. Remember that both code rules and code actions are not specific to Visual Studio; instead, they are exposed by the C# compiler’s APIs (see Project Roslyn for more details: http://github.com/dotnet/Roslyn ).
Customizing Options for Projects and Solutions
Visual Studio allows you to customize a number of options related to projects and solutions, available in the Preferences dialog under Projects. I will now provide some information about the available tabs and options.
The Load/Save Tab
The Load/Save tab provides options about the default project location and about loading solutions. Figure 13-7 shows how the tab looks.
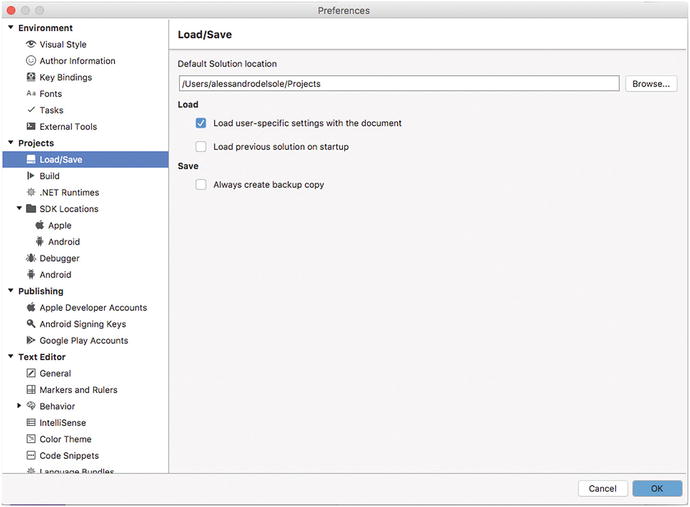
Figure 13-7. Setting options for projects and solutions
First, you can change the default folder for new projects. Then you can enable or disable an option that allows Visual Studio to load user-specific preferences when loading a solution. This is enabled by default and can be left unchanged. The “Load previous solution on startup” option will cause Visual Studio to automatically reload the last solution you were working on the last time you closed it. The “Always create backup copy” option will cause Visual Studio to create a backup copy of the solution every time you save it.
The Build Tab
The Build tab contains two tabs, General and Assembly Folders. General includes options that are generally available to all the project types, such as building the project before running, running the build if completed with warnings, saving documents before building, and other self-explanatory options. In Chapter 2, you already saw how to customize options that are specific to .NET Core and Xamarin solutions, so take a look back there for specific customizations.
The Assembly Folders tab allows you to specify additional folders where Visual Studio will look for assemblies.
The .NET Runtimes Tab
By default, Visual Studio 2017 for Mac works with the latest version of the Mono runtime when building and running Xamarin and regular .NET projects. With the .NET Runtimes tab, you can specify additional versions of the Mono framework that you can use to build and run projects. Usually this is not necessary, but it might be useful for backward compatibility with some projects.
Saving and Restoring Layouts
More often than not, the way you organize the layout of your workspace varies depending on the project type you are working on or on the task you are performing. For example, with Xamarin solutions you might need to open and arrange some pads, while in ASP.NET Core projects you might need other pads. Or, when debugging an application, you might need the Debug pads and then, when finished, other pads.
To make things easier, Visual Studio for Mac has the concept of layouts. You already saw an example with predefined layouts in Chapters 2 and 3, but now you will learn how to create custom layouts. For example, the View menu provides some built-in layouts called Code, Design, Debug, and Test, and each layout is configured to show appropriate pads according to the current task, such as writing code, designing the user interface, debugging, and testing code. You can quickly switch from one layout to another by simply clicking its name in the View menu. You can also create custom layouts, which allow you to arrange the pads you need and in the way you want and to store the layout for later reuse. To accomplish this, you select View ➤ Save Current Layout. In the dialog that appears, simply specify a custom name for your layout and click Create Layout. At this point, your new layout will be available in the View menu together with built-in layouts, and you will apply it by simply clicking its name. Visual Studio for Mac will also show a Delete command for your custom layouts.
Extending Visual Studio
Being the premiere integrated development environment from Microsoft, Visual Studio (on both Mac and Windows) provides an incredibly large number of productivity tools that help you improve the quality of your work. Not limited to this, Visual Studio exposes some extensibility points; therefore, you can download and install extensions that add new features and tools to this rich IDE.
Extensions are typically of two major types: extensions that improve the development experience and extensions that add new tools to the IDE. A number of integrated tools in Visual Studio are extensions themselves. To extend Visual Studio for Mac and to manage installed extensions, you use the Extension Manager window, which you can open by selecting Visual Studio ➤ Extensions. Figure 13-8 provides a sample view.
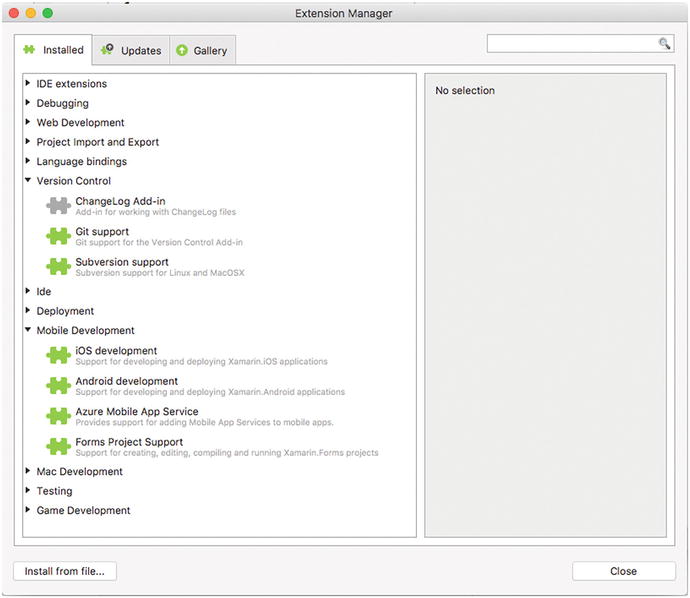
Figure 13-8. The Extension Manager shows the installed extensions
On the Installed tab, you can see the full list of installed extensions . If this is the first time you open this dialog and you have never installed other extensions before, I strongly recommend you do not make any changes because all the installed extensions are needed by Visual Studio to offer some of its most important tools. However, you can expand extension categories and select an extension to see its description and to get an option to disable or uninstall the extension. On the Updates tab, you will see a list of available updates (if any) for the installed extensions. When an update is available, you will simply select the extension and click the Update button. Now let’s move to the Gallery tab, which allows for downloading extensions from the Internet. As you can see in Figure 13-9, you can browse extension categories and select an extension to see its description.

Figure 13-9. Browsing extensions and getting a description
When you have decided to install an extension, simply click Install. For example, in Figure 13-9 you can see the MvvmCross Template Pack extension, which adds new project templates to Visual Studio based on Xamarin and the popular MvvmCross library for Model-View-ViewModel support. If you click Install and close the Extension Manager when finished, you will get new project templates in the Miscellaneous tab of the New Project dialog, as demonstrated in Figure 13-10.
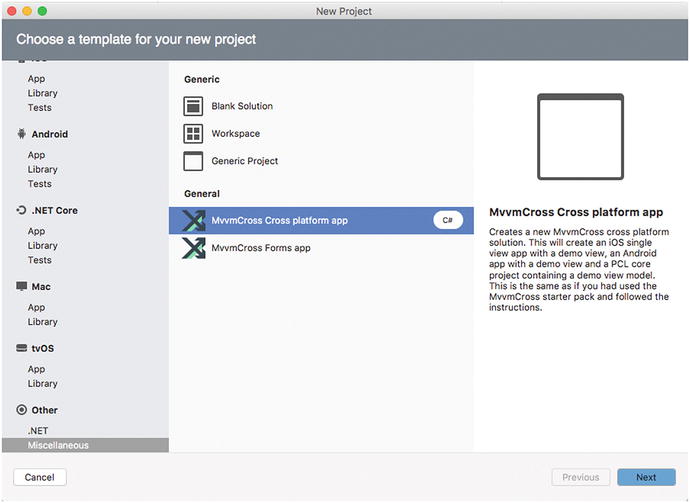
Figure 13-10. New project templates available after installing the MvvmCross Template Pack extension
At this point, your extension will be listed on the Installed tab of the Extension Manager, and there you will be able to disable or uninstall it when no longer needed. Notice that, by default, Visual Studio for Mac lists available extensions from both a stable channel and a beta channel. You can change the default by clicking the Repository combo box. Also, from there you will be able to click the Manage Repositories item, which will allow you to select the channels from which the Extension Manager must include available extensions, as shown in Figure 13-11.

Figure 13-11. Managing extension repositories
As you can see, there is also an alpha channel disabled by default. My recommendation is to only install extensions from the stable channel if you are running Visual Studio for Mac stable to avoid any problems. If you are instead working with Visual Studio for Mac Preview, you can try the latest extensions from the Beta and Alpha channels without particular risks.
Note
Extension updates will be installed along with regular Visual Studio and Xamarin updates.
Hints About Extension Authoring
As you can easily imagine, developers can build extensions for Visual Studio for Mac as they already could do for Visual Studio on Windows. Building extensions for Visual Studio is beyond the scope of this chapter, so it will not be covered. Just as a hint, to build an extension for Visual Studio for Mac, you first need some knowledge of its extension points and APIs, and then you need to install an extension called Add-in Maker.
This extension will add specific project templates tailored for extension authoring . The good news is that you still use C# to develop extensions and XML if the extension has some user interface. Microsoft provides official documentation about extension development in VS for Mac at http://docs.microsoft.com/en-us/visualstudio/mac/extending-visual-studio-mac .
Improving the Code Editing Experience
In Chapter 2, you got a deep explanation about the code editor in Visual Studio for Mac and all of its powerful features. In this chapter, you also saw how to customize the code editor and take advantage of other interesting features available as customizations.
By the way, there is more. Visual Studio for Mac makes it simpler to reuse code snippets you use frequently with the help of IntelliSense and can help you write better code based on conventions and styles. In this section, you will learn about IntelliSense code snippets and code-style customization.
Working with Code Snippets
Code snippets are small, reusable pieces of code. Visual Studio for Mac ships with an extensible library of reusable code snippets that you can use to write code faster, with the help of IntelliSense. This is why you will often hear about them as IntelliSense code snippets. This will not be new to you if you have experience with Visual Studio on Windows. In fact, IntelliSense code snippets were first introduced in Visual Studio 2005 and have been enhanced over the years to support more languages.
Note
In this chapter I will explain how to use code snippets with C#, but it is worth mentioning that they are available to a broader set of supported languages, such as F#, HTML, CSS, and XML. The way you use them is the same regardless of the language.
Working with code snippets in Visual Studio for Mac is really straightforward. To see how this feature works, create a new .NET Core console project. You have different options to enable IntelliSense code snippets. In the code editor, right-click and then select Insert Template. This will show a list of keyboard shortcuts, each mapped to a code snippet (see Figure 13-12). You can filter the list by typing in the search box. Adding a code snippet can be done by double-clicking the desired item or by typing its shortcut and then pressing Tab.
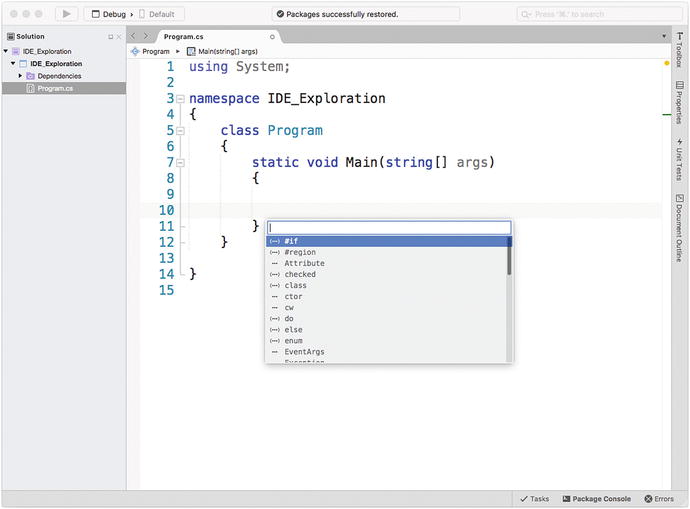
Figure 13-12. Selecting code snippets
Shortcuts for code snippets can be recognized by the (…) and … icons. The first icon represents snippets for container code blocks (such as classes, structures), whereas the second icon represents object members, such as properties and methods, or statements. When you hover over a shortcut, a tooltip will provide a description for the code snippet. For example, if you select the cw shortcut, a tooltip will describe it as a code snippet for the Console.WriteLine statement and will add the following line:
Console.WriteLine();Actually, using the Insert Template command is useful if you want to see a list of code snippets and if you want to be able to filter the list, but code snippet shortcuts automatically appear in the IntelliSense completion list, as demonstrated in Figure 13-13.
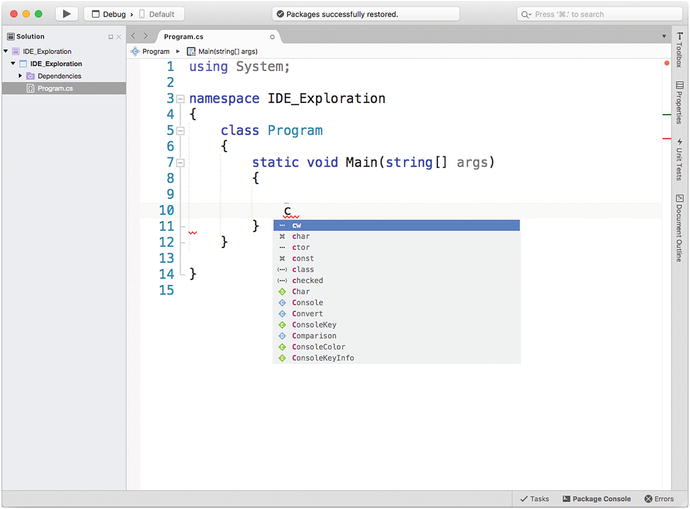
Figure 13-13. Code snippet shortcuts appear in IntelliSense
Also, you can simply type the name of the shortcut and then press Tab twice to automatically insert the code snippet. IntelliSense code snippets are more than this; for example, they highlight type names and identifiers that you should replace. After all, a code snippet is a stub, not a ready-to-use code block. To understand how this works, place the cursor before the closing curly brace of the namespace and then type class and press Tab twice to insert a class definition code snippet. As you will see, the code snippet will supply MyClass as the class name, and the editor will highlight this because it is a name you will want to replace with a different one. As another example, within the class definition, type prop and press Tab twice. This will add a property definition and will highlight both the type name and the property name, as shown in Figure 13-14.
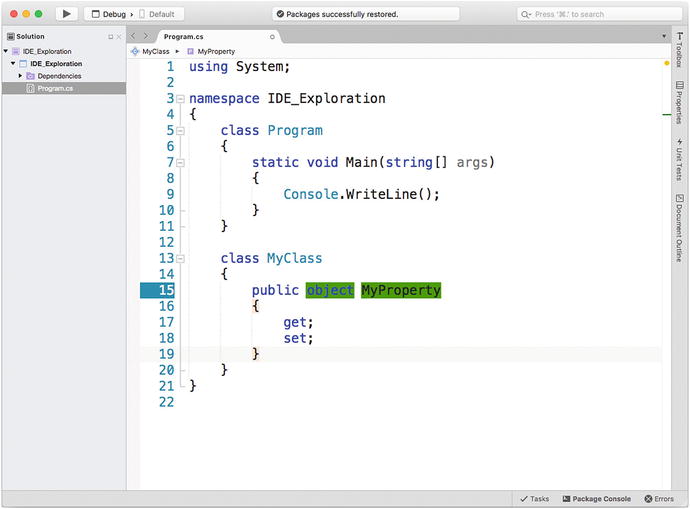
Figure 13-14. Type names and identifiers are highlighted for replacement
Another interesting feature of code snippets is that they can help enclose a code block into another one, without writing the code manually. For example, consider the Console.WriteLine statement you added previously. Now imagine you want to enclose that statement inside a try..catch block for error handling. Instead of writing this block manually and then moving the statement inside it, you can select a code block, right-click, and then click the Surround With item. This command will show a list of code snippets suitable of surrounding the code block you selected, such as if conditional blocks, try..catch blocks, loops, and more. Figure 13-15 demonstrates this.

Figure 13-15. Surrounding a code block with a snippet
Surrounding the Console.WriteLine statement with a try snippet will produce the following result:
try{Console.WriteLine();}catch (Exception ex){}
As you can see, this approach based on code snippets saved you some time and allowed you to write code more quickly.
Managing Code Snippets
You can manage the code snippet library through the Preferences dialog, using the Code Snippets tab under Text Editor. Here you will see the complete list of code snippets, grouped by language (see Figure 13-16). You can click an item and see its preview in the box below. Notice that the $ symbols enclose identifiers that are marked for replacement; in practice, this is how the code editor knows how to highlight names and identifiers that should be replaced.
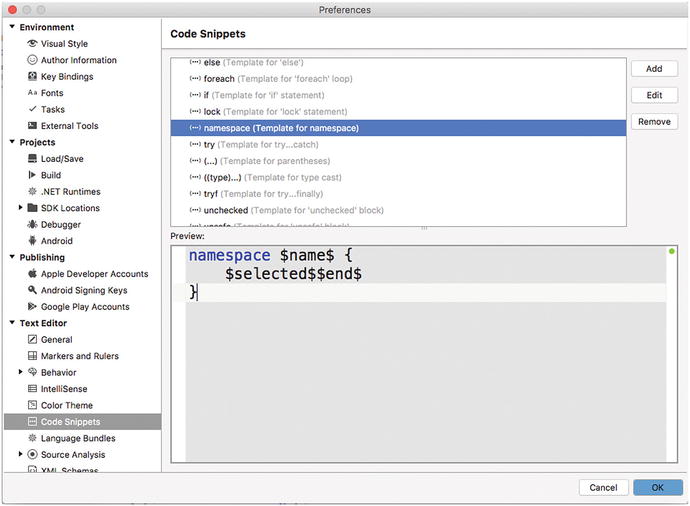
Figure 13-16. Managing code snippets in Visual Studio
Notice the $selected$$end$ expression, which delimits the content of the current snippet. You can delete snippets, and you can edit their contents, but the biggest benefit here is that you can create your own code snippets, as explained in the next subsection.
Creating Code Snippets
Visual Studio for Mac allows you to create your own code snippets directly within the IDE. To accomplish this, click Add. Now suppose you want to create a code snippet for an asynchronous method stub. The new template dialog provides some fields that you need to fill in (see Figure 13-17): Shortcut needs you to specify the keyboard shortcut for the snippet (for example, you can enter asf, which stands for asynchronous function); Group allows you to specify the language that the snippet is intended for, so select C#; Description allows you to specify a snippet description, such as Asynchronous method; Mime represents the MIME type for the selected language (in this case, it is text/x-csharp, and additional values can be found in the combo box).

Figure 13-17. Creating a new code snippet
If the code snippet contains nested code, you can mark it as “Is expandable template.” If the code snippet can act as a container of other blocks, you can mark it with “Is surround with template” and use it as you saw previously. In the text box at the bottom, you simply write the code for the snippet. Notice that you can add the $ symbols to mark the method name for replacement. When you do this, you will be able to select the method identifier in the combo box at the upper-right corner and supply some properties such as the tooltip and the Default property. The latter maps all the occurrences of the identifier that you might have in your snippet to the same replacement. As an implication, the code editor will highlight all the occurrences of the identifier, and the developer using your snippet will simply type a new name to get them all renamed.
Note
You can hover over each property and see a description inside a tooltip.
When ready, click OK. You will now see your new code snippet in the library. Click OK again to close the window. If you now go to the code editor, right-click, and then Insert Template, you will see your code snippet in the list, as demonstrated in Figure 13-18. When you add the snippet, the method identifier will be highlighted for replacement. In this particular case, the compiler will raise an error if the using System.Threading.Tasks directive is missing because it is required by the method return type (Task).
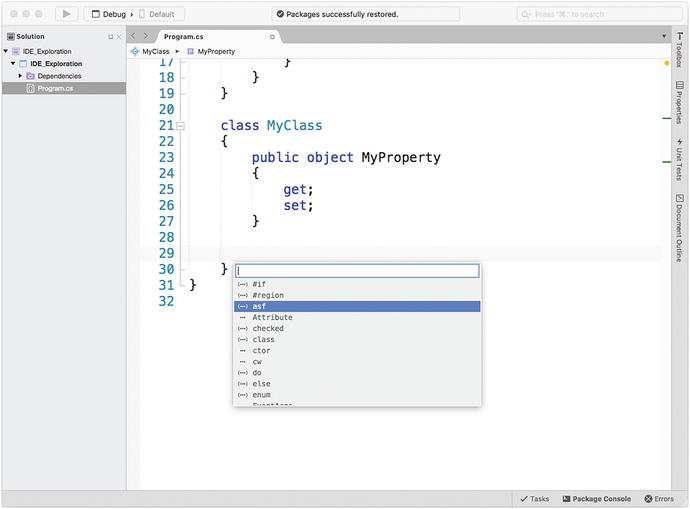
Figure 13-18. Using the new code snippet
Code snippets provide a convenient way to create your code library; they definitely help code reuse, and they can take advantage of all the power in Visual Studio’s code editor.
Customizing Source Code Styles
The Preferences dialog in Visual Studio also allows you to edit the default styles for source code. If you select the Source Code tab, you will first encounter the .NET Naming Policies node. Here you will be able to edit some options such as associating namespaces with folder names and using the default namespace as root. Figure 13-19 shows the Preferences dialog at this point.
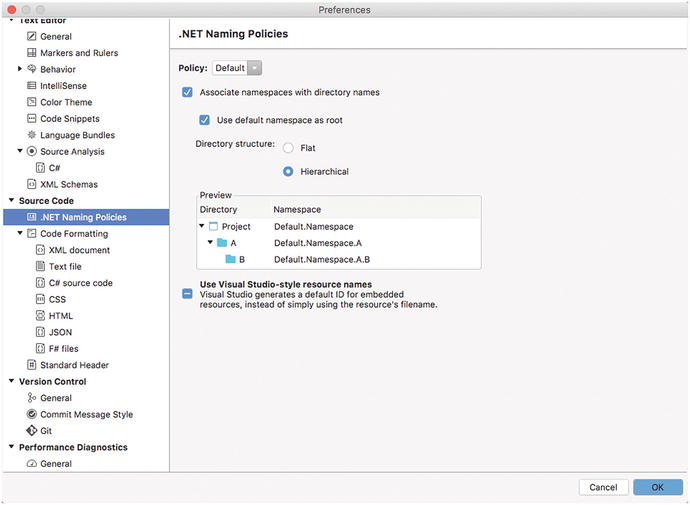
Figure 13-19. Editing .NET naming policies
For example, when you add a folder to a C# project and then you add a code file to that folder, the new file is under a namespace whose name is made of the default namespace plus the folder namespace. You can change this behavior by disabling the “Associate namespaces with directory names” option. Additionally, because the default namespace that is defined when you create a new project is also the root namespace by default, if you disable the “Use default namespace as root” option, you will be able to override this default and use a different root namespace. You can also change the directory structure for projects and solutions, and a visual representation will help you understand what changes. Notice that all these options will be applied only to new projects. In the Code Formatting node, you can edit some text options such as spacing, column width, tab spaces, and indentation. These options are per language, and in the case of C# (which you are working with) are inherited from the Text File options, but they can be certainly changed. As you can see in Figure 13-20, on the Text Style tab you can adjust spacing and indentation.

Figure 13-20. Editing spaces and indentation styles
In Figure 13-21, you can see a preview of how these settings are applied. Notice that settings are based on the so-called policies. A policy can be thought of as a set of style settings. You will see the Default selection, which is based on the Microsoft Visual Studio policy, but you will be able to choose a different policy and see how the spacing changes, such as when you select the Mono policy.
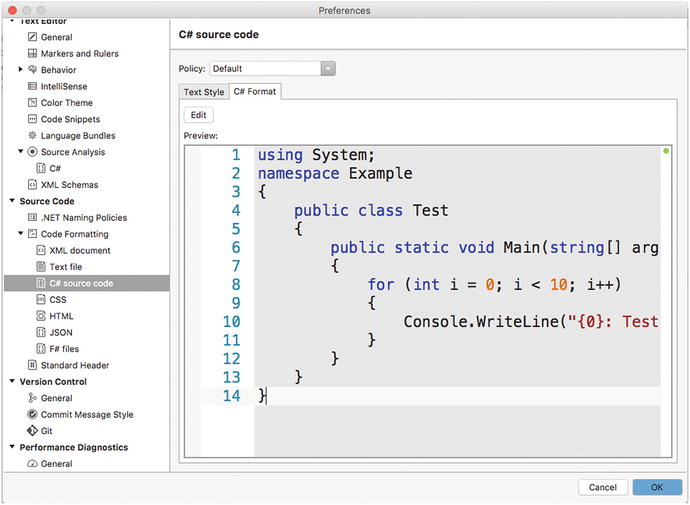
Figure 13-21. Previewing spacing and indentation policies
In addition, you can edit default settings for a policy by clicking Edit. This will open the Edit Profile dialog, where you will be able to override the default settings for different categories and see a preview, as shown in Figure 13-22.

Figure 13-22. Editing policies
Code styles can be customized for all the supported languages in Visual Studio for Mac, not just C#, in the same way. The Standard Header tab allows you to view and edit constants that represent items in the solution and that you can use in your text files; you can see how they are applied by selecting templates from the Policy combo box.
Note
Policies can be set at the global preferences level, at the solution level, or on an individual project. Depending on the level, settings are inherited in that order.
Getting into Advanced NuGet Management
As you have seen through all the previous chapters, NuGet is an important part of development because it is the preferred way to add libraries and their dependencies to projects and solutions. NuGet provides some options that allow for a few customizations and that you will learn about in this section.
Customizing NuGet
The NuGet tab in the Preferences dialog provides the General item, where you can enable and disable automatic package restore and do an update check every time a solution is opened (see Figure 13-23).
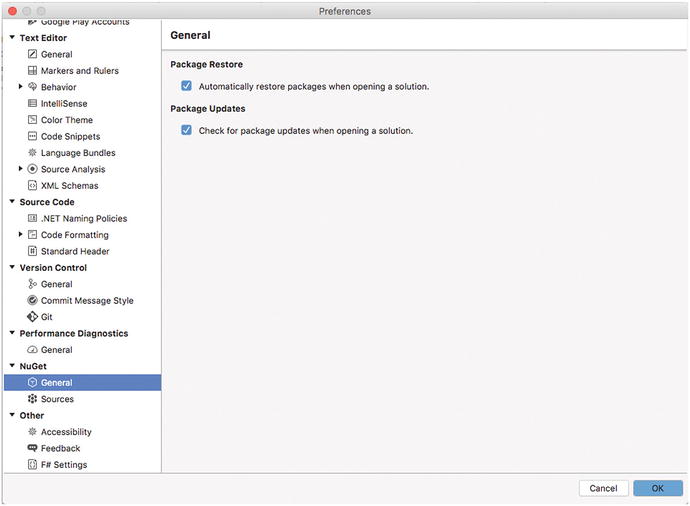
Figure 13-23. Options to automate NuGet package restore and update check
I recommend you leave these options unchanged so that you can be sure the required packages are available and updated. In addition, the Sources item allows you to customize the sources where Visual Studio for Mac searches for NuGet packages. In the NuGet terminology, a source is also referred to as a feed, and each feed has its own URL that IDEs such as Visual Studio can consume to list the available packages.
Adding and Creating Repositories
One important thing about NuGet is that the NuGet.org web site is not the only source for packages. There are third-party package hosts, and you can create your custom private and public repositories. A popular web site that allows you to create public and private NuGet feeds is MyGet ( http://myget.org ), which also offers a free plan for personal use.
Not limited to online feeds, NuGet allows you to create local repositories, which means you can store NuGet packages on your local hard drive and have them always available even when an Internet connection is not available. For example, suppose you want to add both an online and a local feed. You can browse the MyGet gallery ( http://myget.org/Gallery ) for interesting repositories; for the current example, I will use the repository called ApplicationInsightsSdk. I will not really use libraries from this repository, so it is just a sample feed. When you select a repository in MyGet, you can click “Connect to feed” to retrieve its URL. Make sure you select the NuGet V3 version and copy it to the clipboard. In the Preferences dialog, select NuGet ➤ Sources, and in the Sources view click Add. You will be then asked to enter the repository location and a friendly name, as demonstrated in Figure 13-24.
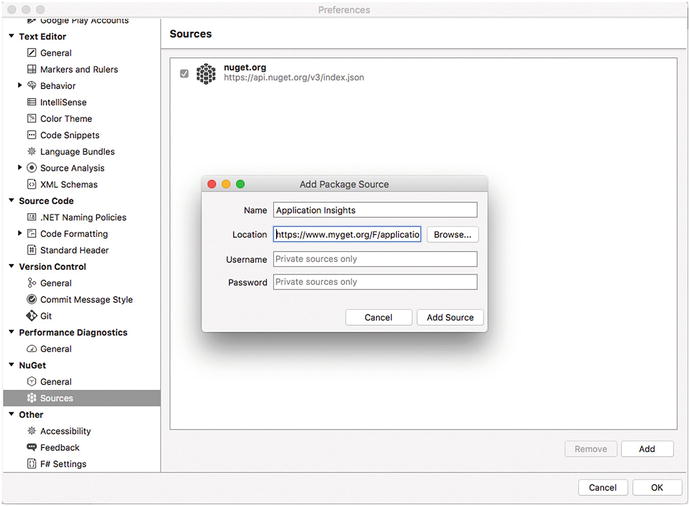
Figure 13-24. Adding a custom NuGet feed
As you can see, in the Location text box you can paste the feed URL. Notice that private repositories might require authentication, so you have an option to provide user credentials. When ready, click Add Source. You will see the new feed in the list, but I will come back to this shortly. Now suppose you also want to create a local NuGet repository on your machine or in a shared folder on a server within your network. For example, using Finder, open the Library (or another reachable folder) and add a new folder called NuGetPackages (macOS might require your password to write into certain folders). Then in your browser, visit NuGet.org and search for the Json.NET library; when you are on the library’s home page, click Download on the left. Once the download has been completed, use the Finder to copy (or move) the downloaded package to the NuGetPackages folder created previously. Now go back in Visual Studio for Mac and repeat the steps you took to add a new NuGet feed, but this time in the Location box enter the local folder path or click Browse to select the folder more easily. In the Name text box, enter Local. At completion, the new local feed will be added to the list, as you can see in Figure 13-25. Notice that you will be also able to enable and disable sources with a simple click on the check box.

Figure 13-25. Custom NuGet feeds added to the list of sources
If you now try to add a NuGet package to any project, you will be able to select the two different feeds as sources in the Add Package dialog, as demonstrated in Figure 13-26 where you can see the Json.NET library available in the Local feed. Simply use the combo box at the upper-left corner to choose a different source.

Figure 13-26. Listing NuGet packages from custom sources
At this point, you can select and install a NuGet package exactly as you have always done before. In the case of local repositories, packages will be available even with no Internet connection.
Using Other Integrated Tools
This section describes other useful and interesting tools that the IDE offers: the Assembly Browser and the Regular Expressions Toolkit.
Using the Assembly Browser
The Assembly Browser is a convenient tool that displays all the namespaces, types, base types, and members within one or more libraries and that will make it easier to understand how types and members are defined, especially if you do not have the source code available. For each item, the Assembly Browser shows the object’s hierarchy and the source code that defines the type or member (thus not the full code). The Assembly Browser can be enabled with the Assembly Browser command in the Tools menu. Figure 13-27 shows the tool in action.
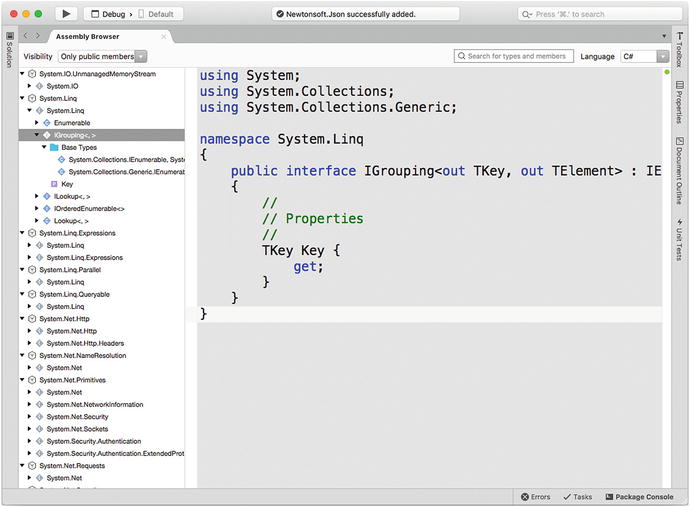
Figure 13-27. Expanding the object hierarchy and viewing the type definition with the Assembly Browser
With the combo box at the upper-right corner of the window, you can switch from C# to the Intermediate Language (IL) view. An F# view is not available.
Using the Regular Expressions Toolkit
The Regular Expressions Toolkit is a tool that allows you to test regular expressions against some strings and immediately evaluate the result. Regular expressions can be complex, so for this demonstration I will use a simple regular expression taken from the popular RegExLib.com web site. More specifically, the regular expression used here searches for matches of five-digit ZIP codes within strings and is available at http://regexlib.com/REDetails.aspx?regexp_id=2 .
The Regular Expressions Toolkit can be enabled with Tools ➤ Regular Expressions Toolkit. As you can see in Figure 13-28, you write the regular expression at the top and the input strings in the Input text box. Matches are highlighted and grouped in the box below.

Figure 13-28. Testing regular expressions
On the right side of the tool, you also have options that you can use to control the evaluation of an expression, such as ignoring case.
Adding Custom Tools
Visual Studio for Mac allows you to add commands to invoke external tools from within the IDE. For example, you might have analysis tools, compilers, and editors that you want to use against a solution, a project, the build output, or individual files.
To explain how this feature works, I will demonstrate how to add a command that allows you to open a source code file with Visual Studio Code, the popular cross-platform, open source, code-focused development tool from Microsoft available at http://code.visualstudio.com . If you have never tried Visual Studio Code before, this is a good time to do it; you will be impressed by its power and flexibility. Once you have installed and started VS Code for the first time, it is necessary to register its path to the PATH environment variable so that it can be launched from the command line or by other tools regardless of the current directory.
To accomplish this, select View ➤ Command Palette and type the install code command in the PATH environment variable. Now you can close Visual Studio Code and go back to Visual Studio for Mac. Select Tools ➤ Edit Custom Tools, and the Preferences dialog will appear showing the External Tools tab. Here you can specify the name and description of the custom tool you want to invoke and the target of the action. The target can be the solution file, a project file, an individual file, a build output, a directory, or just a part of them.
If you take a look at Figure 13-29, you can see that in the Title text box there is the text for the new command that will be added to Visual Studio, whereas in the Command text box there is the name of the application that the command will launch; in this case, the command starts Visual Studio Code.
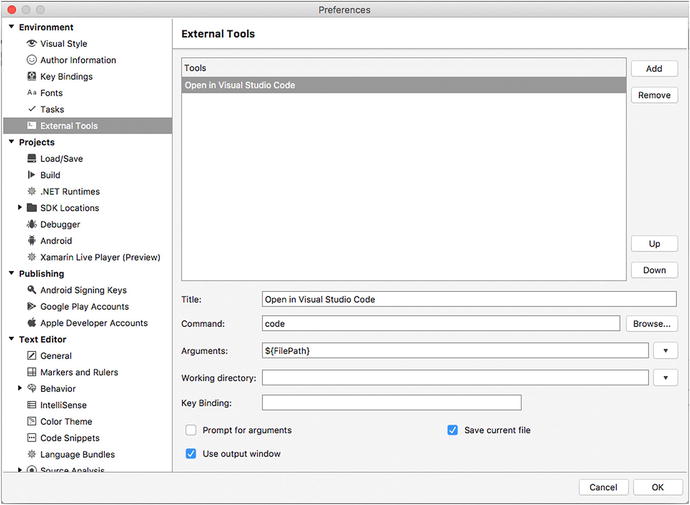
Figure 13-29. Adding a custom tool
What you see in the Arguments text box is a constant that represents the full path of the file that is currently opened in the editor. You do not need to learn all the possible constants; you just simply select the target of the action from the combo box at the right, based on the friendly description. Visual Studio will then add the proper constant for you. You can also specify a working directory for the command, and you can specify a key binding. Notice how you have an option to save the file before executing the command and how you can set Visual Studio to ask for other arguments before executing the command. The option “Use output window” is very useful: it will redirect the output of the external tool into the Output pad. When ready, click OK. If you now open the Tools menu, you will find the new command called Open with Visual Studio Code. Open a file in the editor and then select Tools ➤ Open with Visual Studio Code. At this point, VS Code will start, showing the selected file.
Note
If Visual Studio Code (or another external tool you add) does not start, try to close and restart Visual Studio for Mac. This might be required especially when you make edits to the PATH environment variable.
As you can understand, custom tools provide an easy way to increase your productivity in Visual Studio for Mac.
Consuming Connected Services
Visual Studio for Mac makes it extremely simple for your apps to consume connected services. These are services exposed through a network, typically hosted on the cloud, that provide the infrastructure for specific requirements such as for data access, authentication, and analytics.
Note
Connected services that are currently available in Visual Studio for Mac require a Microsoft Azure subscription.
Connected services are currently available to Xamarin solutions, so for a better understanding, open an existing solution or create a new Xamarin project. When the solution is available in the Solution pad, expand the PCL project, and you will see a node called Connected Services.
If you right-click this node and select Open Service Gallery, you will see a list of available connected services (see Figure 13-30).

Figure 13-30. The list of available connected services in Visual Studio for Mac
At the time of this writing, only the connected service called Mobile backend with Azure App Service is available, but the list might grow in the future. Azure App Service ( http://azure.microsoft.com/en-us/services/app-service ) offers a powerful back end for the iOS, Android, and Windows mobile apps you code with both Xamarin and native technologies and includes data storage with tables and authentication based on several providers. If you click the only service in the list, you will then see a more detailed description, the supported platforms, and a list of dependencies, which includes some NuGet packages that will be downloaded on the client side and some initialization code. Regardless of the service type, you normally install the NuGet packages to the solution following the instructions in Visual Studio; then you can consume the APIs that the service exposes. For Azure App Service, the documentation about both the platform and the APIs is available at http://docs.microsoft.com/en-us/azure/app-service .
Summary
In this last chapter, you met a number of interesting features in the Visual Studio for Mac IDE that allow you to have deep control over the workspace. You started with easy customizations, such as key bindings and fonts, and then you moved to more complex customizations in the code editor, with particular attention paid to adding new language bundles and setting options for source analysis. You also saw how to use layouts to save the state of your workspace for quickly restoring your favorite pads.
The discussion moved on to extending Visual Studio for Mac with extensions, both from Microsoft and from a third party. Because you spend a large amount of time in the code editor, you saw how to leverage code snippets, both from the built-in library and from custom ones to write code faster and to have better code reuse.
Visual Studio for Mac also includes tools that allow you to customize NuGet; for example, you can use additional feeds and even create local repositories. In the final part of the chapter, you saw how to take advantage of the Assembly Browser to investigate type and member definitions within libraries; how to use the Regular Expressions Toolkit to evaluate regular expressions; and how to add custom tools that you can execute against a solution, project, folder, individual file, or the build output.
This chapter marks the end of this book. Now you have all the knowledge you need to get the most out of Visual Studio for Mac, and with the help of the official programming reference, you are ready to start building amazing cross-platform mobile and web applications for macOS, Linux, and Windows. Do not forget to frequently visit the Visual Studio blog ( http://blogs.msdn.microsoft.com/visualstudio ) to stay up-to-date on the latest news about Visual Studio for Mac.