Android is one of the most popular operating systems for mobile devices such as smartphones, tablets, smart watches, and smart TVs. There are many reasons for its success, but two are probably the most relevant: it runs on an incredibly large variety of hardware configurations, which allows users to choose between high-level and cheaper devices, and it is highly customizable.
Android natively relies on the Java runtime and libraries, but with Xamarin and its Xamarin.Android flavor you can build apps for Android using C# and Visual Studio, thus reusing many of your existing .NET skills. The Xamarin tools then take care of building the Android app package, leveraging the Google and Java SDKs on your behalf. This chapter provides a high-level overview of Android app development with Visual Studio for Mac, putting the IDE and its tool at the center.
Note
As you can imagine, full guidance on the Android platform, Xamarin.Android, and the Java libraries cannot be provided here because it would require an entire book. The focus of this chapter is explaining what the Visual Studio for Mac IDE offers for Android development with Xamarin, based on some code examples. By the way, here you will learn some important basic concepts about Android that will be also useful in Chapter 7. For further studies and advanced techniques, I recommend you visit the Xamarin developer resources for Android at https://developer.xamarin.com/guides/#android .
Preparing a Device for Development
With Visual Studio for Mac, as well as with other development environments that target the Android system, you can debug and test your apps on both emulators and on physical devices by simply connecting your device to an USB port on your machine. If you want to test your apps on a physical device, such as a smartphone or a tablet, you first need to enable developer mode.
To accomplish this, you open the Settings, then tap the system information item, and finally tap the operating system’s build number seven times. This action will enable developer mode, and it will unlock a number of settings that are specific to development and debugging. It also will allow Visual Studio to immediately recognize your device as a target.
Creating an Android App with Xamarin
In this chapter, you will learn what the Visual Studio IDE offers for Android development with Xamarin. You will first create a sample solution, and then you will learn how to take advantage of all the powerful tools that Visual Studio provides to create Android apps.
The sample solution demonstrates how to capture a photo with the device camera and how to send it as an e-mail attachment. This is certainly a simple example, but it allows you to focus on the IDE rather than on complex code.
Note
The sample solution combines two examples from the official GitHub repository. The first example is about capturing a photo ( https://github.com/xamarin/recipes/tree/master/android/other_ux/camera_intent/take_a_picture_and_save_using_camera_app ), whereas the second example is about sending e-mails ( https://github.com/xamarin/recipes/tree/master/android/networking/email/send_an_email ).
To create a Xamarin.Android project, you select either New Project in the welcome page or File ➤ New Solution. In the New Project dialog (see Figure 5-1), you can select one of the available project templates under the Android group.
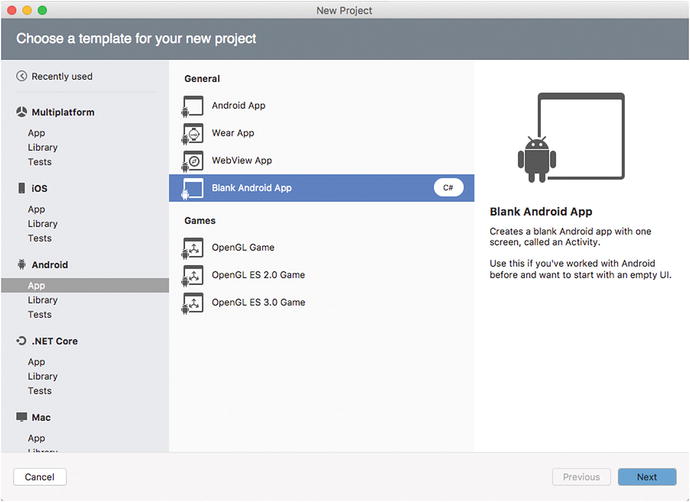
Figure 5-1. Creating a Xamarin.Android project
All the available project templates in the App, Library, and Test nodes were described in Chapter 2, so I will not cover them again here. In this chapter, I will use the Blank Android App project template. It differs from the Android App template in that it does not include any UI elements. Click Next when ready. On the next screen (“Configure your Android app”), you will need to specify some fundamental information about your app, such as the name, the organization identifier, the target platforms, and the theme. Figure 5-2 shows an example based on my name.
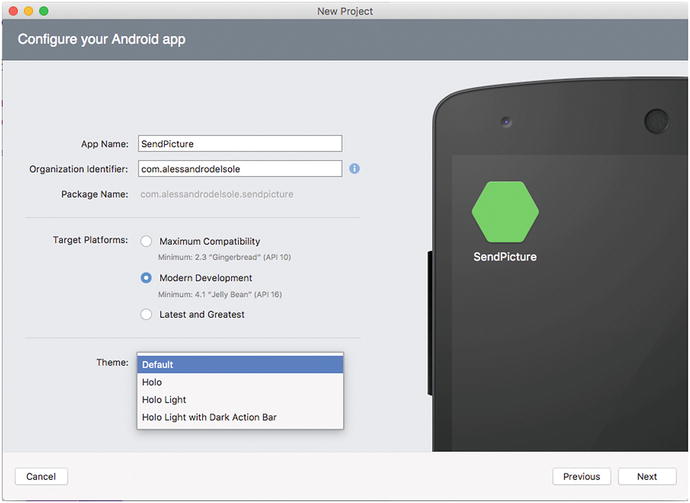
Figure 5-2. Providing information about a new app
In the App Name text box, enter the name for your app. This can contain blank spaces. In the Organization Identifier text box, you must supply either the organization or your identifier; this must include the com prefix, which is also required in the package name. If you are new to Android development, it is important that you remember that the app name and the package name are two different concepts, and the package name identifies the app package on Google Play. Visual Studio for Mac automatically generates the package name (see the Package Name box), so you do not need additional steps. In the Target Platforms group box, you can specify the minimum system that your app will run on. You have the following options:
Maximum Compatibility: This option will make your app compatible with Android 2.3 and higher; as a consequence, your app will be able to leverage only APIs available to that Android version.
Modern Development: This option will make your app compatible with Android 4.1 and higher and allows for leveraging a larger number of APIs.
Latest and Greatest: This option allows you to leverage the most recent APIs, but your app will run only on the latest version of Android that the SDKs installed on your machine can target.
For the current example, select Modern Development. In the “Managing Emulators and SDKs” section, you will learn how to install additional API targets.
Note
In Android development, you will often hear about API levels. An API level represents a specific version of the operating system and of the API it provides and is identified by a number. For example, API Level 23 identifies Android 6.0 Marshmallow, API Level 22 identifies Lollipop 5.1, API Level 21 identifies Lollipop 5.0, and so on. The best way to understand what API levels refer to is using the SDK Manager described later in this chapter.
In the Theme combo box, you can select a specific graphic theme for your app. Unless you have specific requirements, I recommend you leave the Default theme selected. When ready, click Next. On the next screen, called “Configure your new Blank Android App” (see Figure 5-3), you will need to specify a project name, a solution name, and a location on disk. You can leave unchanged the names and location proposed by Visual Studio. You can optionally enable Git version control and Xamarin Test Cloud services, but these will not be covered here (Git support will be discussed in Chapter 12).
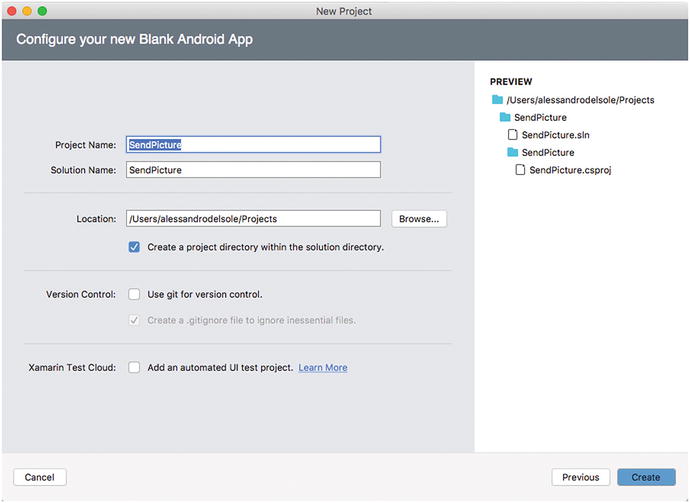
Figure 5-3. Configuring project information
When ready, click Create. After a few seconds, your new solution will be ready, and Visual Studio for Mac will show a Getting Started page that contains shortcuts to common tasks, such as opening the designer, adding an Azure back end, and adding a unit test project. Before writing code, it is important for you to get knowledge about the structure of Xamarin.Android solutions.
Understanding Fundamental Concepts About Xamarin.Android Solutions
The structure of a Xamarin.Android solution reflects the structure of Android projects you can create with native environments such as Android Studio and Eclipse, but of course the core difference is that you write C# code. The project system is based on MSBuild solutions (.sln files) and C# projects (.csproj files). This is important because it means you can open a solution with both Visual Studio for Mac and Visual Studio 2017 on Windows.
If you take a look at the Solution pad, you will see a number of files and folders, summarized in Table 5-1.
Table 5-1. The Structure of a Xamarin.Android Solution
Element | Type | Description |
|---|---|---|
Assets | Folder | The place where you can add files that you want to include with your app (except for images). |
Properties | Folder | The folder that contains the Android manifest and the AssemblyInfo.cs file for project properties. The manifest will be discussed later in this chapter. |
Resources | Folder | The folder that contains images, string resources, localization constants, and colors. |
Resourcesdrawable | Folder | The folder that contains images and icons at a default resolution. Files with higher resolution can be added into the folders whose name starts with mipmap. |
Resourceslayout | Folder | The folder that contains .axml files. These contain markup code that defines pages and UI elements. |
Resourcesvalues | Folder | This folder contains a file called strings.xml that defines a number of string resources. String resources will be discussed shortly. |
MainActivity.cs | File | A C# file that defines the class that represents the main entry point of an Android app. |
As you can see, Visual Studio generates a class that is also the main entry point for the application, called MainActivity. The concept of an activity is important in Android, so it deserves a few lines of explanation.
The Concepts of Activity and Intent
In Android, an activity represents an object that allows users to interact with the device via some user interface. An activity can be thought of as a page that contains a number of visual elements, whose combination allows you to execute a task. In fact, generally speaking, Android does not rely on pages; rather, it relies on activities.
Xamarin.Android exposes the Activity class from the Android.App namespace, and it is actually a wrapper for the same-named class in Java. There is also another reason for the importance of activities: the application life cycle depends on activities’ life cycles. Related to activities is the concept of intent. This represents a single operation, such as sending an e-mail or making a phone call. Xamarin.Android offers the Android.Content.Intent class that you use to define intents and that you typically assign with two pieces of information: the action that must be executed and its data. For example, an action is sending an e-mail, and its information includes recipients and attachments. In the sample code, you will get an example of both activities and intents.
Understanding References and NuGet Packages
You can add and consume libraries in a Xamarin.Android solution by following the lessons learned in Chapter 2. The References node in the Solution pad holds a list of references to system or local libraries. If you want to consume external libraries, you can download and install NuGet packages by right-clicking the Packages node and then selecting Add Packages in the pop-up menu.
Using Components
There is actually another way to add and consume libraries in Xamarin: components. Components are not specific to Xamarin.Android and are available to all Xamarin flavors, including iOS, Mac, and Forms. Components can be libraries, user controls, themes, or SDKs, and they can be downloaded from the Xamarin’s Component Store.
In the Component Store, you can find free, trial, and paid products. Therefore, if you plan to build reusable components for Xamarin, the Component Store provides you with a complete infrastructure for selling your products easily. To find and download components, you can double-click the Components node or right-click and select Edit Components to see a basic list of available components within a new tab. If you instead right-click the Components node in the Solution pad and then select Get More Components, you will access the complete component catalog. You will be required to enter your Xamarin account (if you do not have one, register for free at Xamarin.com), and then you will see the list of available components (see Figure 5-4).
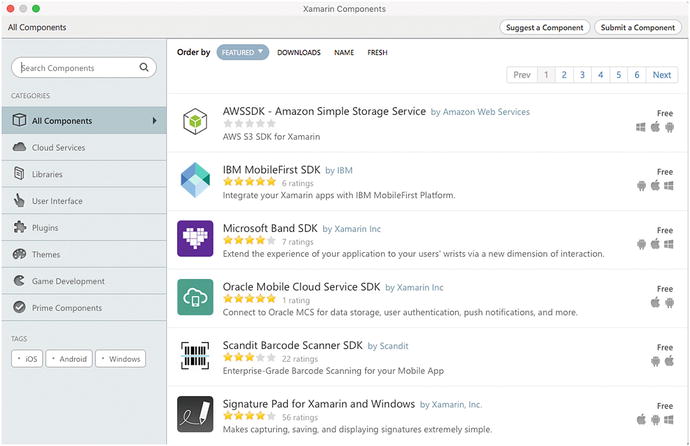
Figure 5-4. Browsing components in the Component Store
On the left side of the dialog, you can filter the list based on the component type. For each component, one or more icons highlight what operating system it is available for. Simply click a component name to access its details, such as full description, license information, and pricing. You will then have an option to click Add to App to download and install the selected component. Installed components will be listed under the Components node in the Solution pad. Additionally, the Components node will show any available updates so that you will be able to download a new version of a library, control, or SDK with just one click.
Designing the User Interface
In Xamarin.Android, you have two options to design the user interface: editing .axml files manually or through the Visual Studio designer. Unless you are familiar with the .axml markup, using the designer is certainly the preferred way. The designer for Android in Visual Studio for Mac is a powerful tool: it allows you to drag controls from the Toolbox onto the designer surface, and then you can arrange and resize controls and set properties in the Properties pad.
Note
In Android terminology, controls are referred to as widgets. From now on, I will talk about widgets rather than controls.
To start working with the designer, you double-click an .axml file in the solution. In the current example, at the moment you have only one file, called Main.axml and located under Resourceslayout. When you double-click this file, Visual Studio will show the designer, the Toolbox, and the Properties and Document Outline pads. Figure 5-5 shows an example based on the result you will obtain when completing the example.
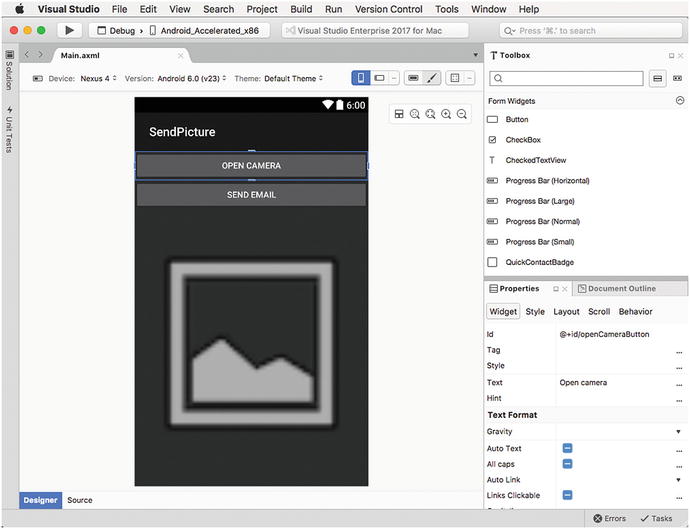
Figure 5-5. The Android design tools in Visual Studio for Mac
Widgets are organized into containers called layouts. The combination of widgets and layouts produces a view. In Figure 5-5, you can see two Button widgets and an ImageView widget, organized into a LinearLayout container. The goal of this chapter is explaining the tools available in Visual Studio for Mac to design your UI, so take a look at the official documentation ( http://developer.xamarin.com/guides/android/user_interface ) for full details about the available widgets and layouts. Having that said, from the Toolbox drag two Button widgets and an ImageView widget onto the designer surface and resize the ImageView to fill the available space. You can change widget properties with the Properties pad. Properties might include text, size, styles, and behaviors, and they vary depending on the widget type. For example, select the first button you dragged onto the designer. In the Properties pad, make sure the Widget tab is selected. Here you can assign the core properties for the widget. In the Text property, you can specify the button text such as “Open camera.” In the Id property, you can specify the widget ID, which is particularly useful when you need to interact with a widget in C# code. The widget ID can be compared to the control name in other platforms such as Xamarin.Forms, Universal Windows Platform, and Windows Presentation Foundation, but in Android it has a fixed form. You must in fact specify the @+id/ prefix, followed by a meaningful ID for your widget, such as openCameraButton in the current example (see Figure 5-5). Every widget has an Id property, so specify @+id/sendEmailButton for the second button and @+id/photoView for the ImageView widget. For property values that represent colors, such as Foreground Tint and Background Tint, the Properties pad allows selecting colors with a picker. If you scroll the Properties pad, you will find several properties with two icons, a square with alternate filled subsquares, and a palette icon. If you click the square, you will see a color picker like in Figure 5-6, where you can also see the two icons.
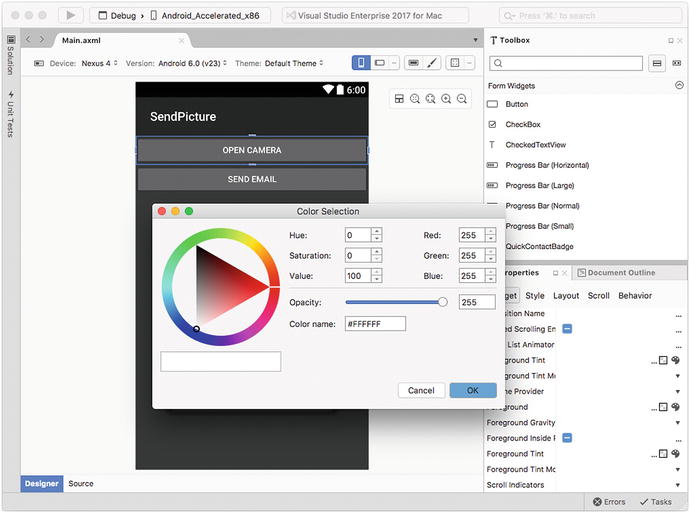
Figure 5-6. Selecting colors with a picker
If you instead click the palette icon, you will be able to select among possible shades for a given color based on the Material Design colors, as shown in Figure 5-7.
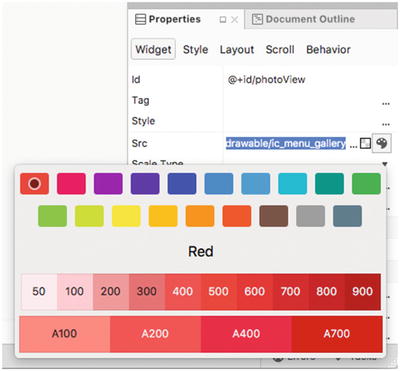
Figure 5-7. Selecting Material Design color shades
Another useful tool is the Document Outline pad. This provides a hierarchical view of layouts and widgets and is extremely useful when the user interface becomes more complex and you want to have a representation of the hierarchy in your views. Figure 5-8 shows the Document Outline pad as it appears at this point of the development of the sample app.
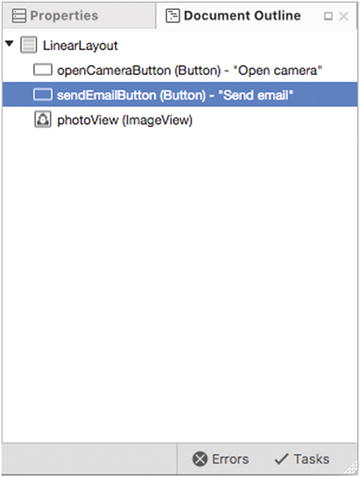
Figure 5-8. The Document Outline pad
You can quickly select a visual element in the designer, such as layouts and widgets, by simply clicking an item in the hierarchy. You can also right-click an item to access shortcuts such as Copy, Cut, Delete, and Properties. The latter will open the Properties pad for the selected item. There are other interesting tools in the designer that you can see in Figure 5-5. First, you can see a small toolbar with four buttons for zooming the designer in and out, to fit the window, and to highlight layout containers. In the Device combo box, you can select one of the available devices, and the designer will adapt to the form factor of the selected device so that you have a better idea of how your user interface will look. You can also select special form factors, such as wearable and smart TV devices. In the Version combo box, you will be able to select the Android version that the designer must use, and this is based on the choice you made about compatibility when creating the project. In the Theme combo box, you have an option to select a different theme so that you can see how the user interface appears with multiple themes. You can click the box, then click More Themes, and finally select a theme in the Theme Selector dialog that appears. When you select a theme, the designer will restyle the user interface based on that theme. The Portrait and Landscape buttons allow you to change the designer orientation; then with the Resource Qualifier Options button (with three dots), you can choose a different language for the UI and a different mode for the UI, such as normal, television, wearable, night mode, car dock, and many others. With the Action Bar Settings button, you can control buttons that appear in the Android’s action bar, and with the Theme Editor button, you can customize a theme with pickers and system resources. The Material Design Grid buttons shows an overlay grid on the designer surface that will help you respect the Material Design guidelines ( http://material.io/guidelines ).
Declarative User Interface Definition
When you design the user interface, Xamarin.Android translates the designer’s content into markup code that is stored inside .axml files. This is a tremendous benefit because the markup that Xamarin.Android generates is the same markup that Android Studio generates, so if you have existing code written with Android Studio, you could simply copy and paste the markup code into a Xamarin solution, and vice versa.
Additionally, if you are familiar with this markup, there are situations in which you might want to write the markup manually. In Visual Studio for Mac, you can access the markup code of a view just by selecting the Source tab at the bottom of the design window. This will open the .axml editor, as shown in Figure 5-9.
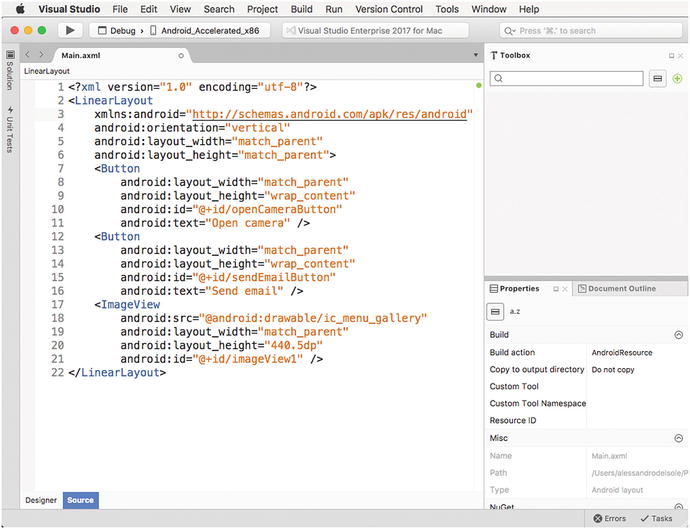
Figure 5-9. The markup code for a view
The markup code is based on XML and represents the visual elements of a view in a hierarchical way. This concept is not new to you if you have worked with the Extensible Application Markup Language (XAML) markup language. Put succinctly, an XML element represents a layout or widget, whereas XML attributes represent properties, and the name of each usually starts with the android: prefix. Every time you add or edit markup code, the designer in Visual Studio will automatically reflect your changes. The .axml code editor also has IntelliSense, which means you have the well-known, powerful code completion tool available. It is worth mentioning that when the Source view is enabled, the Document Outline pad shows a hierarchical representation of the XML nodes that compose the .axml file. Simply click Designer to return to the design view. After this high-level overview of the tools you have to design an Android user interface, it is time to make the UI alive by writing some C# code that accesses the Android APIs.
Accessing the Android APIs in C#
In Xamarin.Android, the user interface is defined with .axml files, whereas the imperative C# code is defined inside one or more Activity classes . For example, if you consider the current sample application, the user interface has been defined in the Main.xaml file, and the imperative code will be written in the MainActivity.cs file. For your convenience, the code will be split into multiple parts, and I will provide the proper considerations.
First, add a code file called App.cs to the project. To accomplish this, right-click the project name in the Solution pad and then select Add ➤ New File. In the New File dialog, leave unchanged the proposed selection about the Empty Class item template, provide the App.cs file name, and click New. The App class will serve as a place where to store information such as the captured image, its file name, and the camera roll folder name. The code for this class is as follows:
public static class App{public static File _file;public static File _dir;public static Bitmap bitmap;}
At this point, double-click the MainActivity.cs file so that it’s open in the code editor. This class will be the place where you will add the code that takes a photo and that shares it as an e-mail attachment. Let’s start with the definition of the MainActivity class and with adding some using directives that import the namespaces required to work with graphics and e-mail attachments, as shown here:
using System;using System.Collections.Generic;using System.Linq;using Android;using Android.App;using Android.Content;using Android.Content.PM;using Android.Graphics;using Android.OS;using Android.Provider;using Android.Widget;using Java.IO;using Environment = Android.OS.Environment;using Uri = Android.Net.Uri;namespace SendPicture{[Activity(Label = "Send Email With Attachment", MainLauncher = true,Icon = "@drawable/icon")]public class MainActivity : Activity{private ImageView _imageView;Uri fileName;
Every Android app must have a startup activity, and the app must specify which is the startup activity. A startup activity is decorated with the Activity attribute with its MainLauncher property set as true. The Icon property allows you to specify the icon that will be displayed in the Android’s main page (the so-called launcher), whereas Label indicates the activity’s title. In the code there are also two fields: _imageView of type ImageView and fileName of type Uri. These will be used shortly to store a reference to the image and to its name. An activity’s main entry point is a method called OnCreate, which sets the specified view as the current content view by invoking the SetContentView method . Then it executes any required initialization code. For the current example, OnCreate must verify the availability of apps that allow for taking photos and must create a subfolder where photos will be stored. Both checks are performed by invoking two separate methods, as shown here:
protected override void OnCreate(Bundle bundle){base.OnCreate(bundle);// Set the main layoutSetContentView(Resource.Layout.Main);// Check if the app has permission to write on diskif (CheckSelfPermission(Manifest.Permission.WriteExternalStorage) ==Permission.Granted){// Check in an app for taking pictures is availableif (IsThereAnAppToTakePictures()){// Create a folder to store picturesCreateDirectoryForPictures();// Get a reference to widgetsButton captureButton = FindViewById<Button>(Resource.Id.openCameraButton);Button sendButton = FindViewById<Button>(Resource.Id.sendEmailButton);_imageView = FindViewById<ImageView>(Resource.Id.photoView);// Set event handlerscaptureButton.Click += CaptureButton_Click;sendButton.Click += SendButton_Click;}}}
It is worth noting how you get a reference to the widgets in the user interface, with the FindViewById generic method. The type parameter is the type of widget, and the name is represented by an integer constant that is mapped into the Resource.Id class. You can open Resource.designer.cs to discover how both the Resource and Id classes are defined. Also, notice how Click event handlers have been assigned to widgets using the well-known C# syntax. The following is instead the code of the IsThereAnAppToTakePictures and CreateDirectoryForPictures methods :
private void CreateDirectoryForPictures(){App._dir = new File(Environment.GetExternalStoragePublicDirectory(Environment.DirectoryPictures), "CameraAppDemo");if (!App._dir.Exists()){App._dir.Mkdirs();}}private bool IsThereAnAppToTakePictures(){Intent intent = new Intent(MediaStore.ActionImageCapture);IList<ResolveInfo> availableActivities =PackageManager.QueryIntentActivities(intent, PackageInfoFlags.MatchDefaultOnly);return availableActivities != null && availableActivities.Count > 0;}
The first method is simple: it gets a reference to the public folder for photos (Environment.DirectoryPictures) via the EnvironmentGetExternalStoragePublicDirectory method, and it creates a subfolder (Mkdirs) with the specified name. Notice that, in Xamarin.Android, file and folder management is based on the Java.IO.File class. The second method creates an instance of the ActionImageCapture intent. Then the PackageManager.QueryIntentActivities method checks how many activities are available on the system (PackageInfoFlags.MatchDefaultOnly) to execute the requested operation and returns a Boolean value to the caller. Now that OnCreate and the methods it calls are completed, it’s time to access the camera.
Using Device Features (Camera)
To enable the built-in camera, you need to write a Click event handler for the first button. The camera is activated with an intent of type ActionImageCapture, which this time is actually launched. Notice that accessing some device features, such as the camera, requires the proper permissions, which will be set in the app manifest shortly. The following is the code for the event handler:
private void CaptureButton_Click(object sender, EventArgs eventArgs){Intent intent = new Intent(MediaStore.ActionImageCapture);App._file = new File(App._dir, "SampleImg.jpg");this.fileName = Uri.FromFile(App._file);intent.PutExtra(MediaStore.ExtraOutput, this.fileName);StartActivityForResult(intent, 0);}
As a general rule, an intent receives all the information it needs through the PutExtra method . In this case, the intent receives the file name that will be used to save an image. With this approach, an intent will receive the same information regardless of the app that the user will decide to use to take a photo. The file is represented by an object of type Android.Net.Uri, and its path is constructed by invoking the Uri.FromFile method. The intent is actually launched by the user interface of an app, that is, an activity. This means that such an activity must be started, which is accomplished by invoking the StartActivityForResult method that receives the instance of the intent that must be executed. In this particular case, the method also receives an integer that represents the result returned by the intent if the operation succeeds. Once the activity has completed, the runtime calls the OnActivityResult method, which is the place where you, as a developer, can manage and evaluate the activity result. In the current example, an intent is used to understand where the captured file should be saved (ActionMediaScannerScanFile), and then the image is displayed in the ImageView widget. The following is the code for OnActivityResult:
protected override void OnActivityResult(int requestCode, Result resultCode, Intent data){base.OnActivityResult(requestCode, resultCode, data);if (requestCode == 0 && resultCode == Result.Ok){// Make it available in the galleryIntent mediaScanIntent = new Intent(Intent.ActionMediaScannerScanFile);Uri contentUri = Uri.FromFile(App._file);mediaScanIntent.SetData(contentUri);SendBroadcast(mediaScanIntent);// Display in ImageView. We will resize the bitmap to fit the display// Loading the full sized image will consume to much memory// and cause the application to crash.int height = Resources.DisplayMetrics.HeightPixels;int width = _imageView.Height;App.bitmap = App._file.Path.LoadAndResizeBitmap(width, height);if (App.bitmap != null){_imageView.SetImageBitmap(App.bitmap);App.bitmap = null;// Dispose of the Java side bitmap.GC.Collect();}}}
The previous code needs further considerations: it detects the display height using the DisplayMetrics.HeightPixels object, which is required to resize the picture; the code then invokes an extension method called LoadAndResizeBitmap, which will resize the captured image for a better view, and its definition will be provided shortly; and garbage collection is explicitly invoked (GC.Collect) to free up some memory on the Java side. The reason is that an image object represented in C# can occupy a few kilobytes, but the corresponding Java object can occupy several megabytes. LoadAndResizeBitmap is defined inside a separate class called BitmapHelpers, which you should add as a new code file to the project. When ready, write the following code (see the comments inside for a deeper understanding):
using Android.Graphics;namespace SendPicture{public static class BitmapHelpers{public static Bitmap LoadAndResizeBitmap(this string fileName, int width, int height){// First we get the the dimensions of the file on diskBitmapFactory.Options options = new BitmapFactory.Options{ InJustDecodeBounds = true };BitmapFactory.DecodeFile(fileName, options);// Next we calculate the ratio that we need to resize the image by// in order to fit the requested dimensions.int outHeight = options.OutHeight;int outWidth = options.OutWidth;int inSampleSize = 1;if (outHeight > height || outWidth > width){inSampleSize = outWidth > outHeight? outHeight / height: outWidth / width;}// Now we will load the image and have BitmapFactory resize it for us.options.InSampleSize = inSampleSize;options.InJustDecodeBounds = false;Bitmap resizedBitmap = BitmapFactory.DecodeFile(fileName, options);return resizedBitmap;}}}
The code you have seen so far is what you need to launch an intent to take a picture, elaborate its result, and display the resulting image in the user interface.
Network APIs: Sending E-mails
The next step is sending the captured photo as an e-mail attachment, which involves some network APIs. Also, as you can imagine, this involves a specific intent that will be instantiated and launched in the Click event handler of the sendEmailButton widget.
The intent you use is called ActionSend, and its general purpose is initiating communications. Then you can specify that you need an e-mail by setting the ExtraEmail property and setting an array of recipients. You can also specify the e-mail subject with the ExtraSubject property and attachment with the ExtraStream property. The following code demonstrates how to send an e-mail with attachments:
private void SendButton_Click(object sender, EventArgs e){if (this.fileName != null){var email = new Intent(Intent.ActionSend);// Check if at least one activity exists for the specified intentif (PackageManager.QueryIntentActivities(email,PackageInfoFlags.MatchAll).Any()){email.PutExtra(Intent.ExtraEmail, new[] { "[email protected]" });email.PutExtra(Intent.ExtraSubject, "Sample email with attachment");email.PutExtra(Intent.ExtraStream, fileName);email.SetType("message/rfc822");StartActivity(Intent.CreateChooser(email, "Email"));}}}
For e-mails , it is important to set the message/rfc822 MIME type with SetType. Notice how the code starts an activity that will ask the user to select the preferred app to start the intent, but only if any apps exist that support sending e-mails, and this checked (again) using the PackageManager.QueryIntentActivities method.
Setting App Properties with the Android Manifest
Before testing the application, you need to know how to set properties and permissions in the manifest. In Visual Studio for Mac, you can double-click the AndroidManifest.xml file in the Properties folder in the Solution pad. As an alternative, you can right-click the project name and select Options ➤ Android Application. This will open the manifest designer, which looks similar to Figure 5-10.
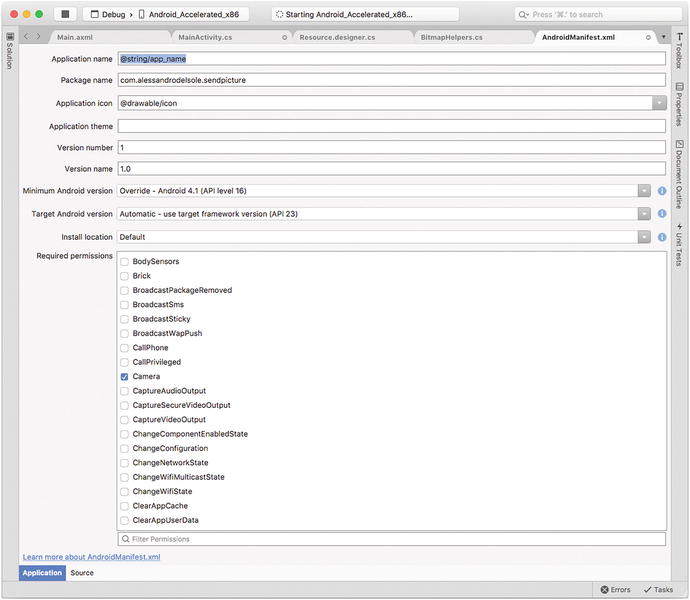
Figure 5-10. The Android manifest
The Android manifest reflects many choices you made when creating the project. The application name and package name should be left unchanged. The application icon must instead be provided. To accomplish this, add a file called icon.png to the drawable folder (you can certainly choose a different file name, but remember to change the file name also in the Activity attribute applied to the MainActivity class). After you add an icon to the project, you will be able to pick it up in the Application Icon combo box. You can select a different theme and change the version number and name (you will do this when archiving an app for publishing). You also have an option to select different operating system targets and to change the install location. About the latter, I recommend you leave Default as the choice because the latest Android versions no longer allow you to install an app for removable memory cards. More important is the “Required permissions” box. Here you will need to specify what permissions your app requires. For the current example, the app needs the Camera, Internet, ReadExternalStorage, and WriteExternalStorage permissions. Once you have supplied the required information, simply save your changes. Now you are ready to build and test the sample app.
Building and Debugging Apps
You can run, debug, and test Xamarin.Android solutions with either emulators or physical devices, and you can leverage all the powerful debugging tools described in Chapter 3, such as breakpoints, data visualization tooltips, and debug pads.
If you choose to test your app on a physical device, make sure you connect your device to an USB port of your Mac. In the Visual Studio toolbar, select the Debug configuration and then select one of the available target devices from the combo box. Visual Studio for Mac ships with two Google emulator images that you can use to test your apps even without a physical device. I recommend you use a physical device to test the sample app (and all your apps) because it has full capabilities. For the purposes of this book, figures are obviously taken from an emulator. The Android_accelerated_x86 emulator is faster than the Android_ARMv7a image, so you should prefer the first one when not working with physical devices. When ready, simply start debugging as you learned in Chapter 3. The IDE will start an instance of the emulator, it will build the project, and it will deploy the app to the emulator (or physical device, of course). The first time an app is deployed, the process will take some more time. Figure 5-11 shows the sample app running in the emulator .
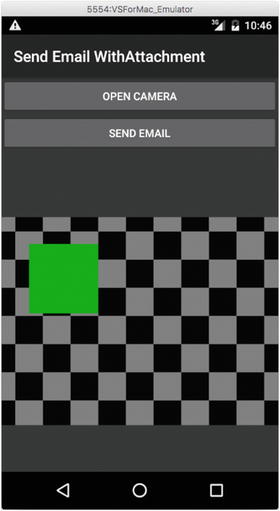
Figure 5-11. The sample app running in the emulator
If you tap “Open camera” on the emulator, the camera will be emulated with an animation. In a few moments I will explain how to manage emulator settings, where you will be also able to change this behavior. Once you have taken a picture, you will be able to share it with an e-mail by tapping “Send e-mail,” and of course you will see a preview of the image in the user interface. Figure 5-12 shows instead how you can leverage a number of debugging tools , including breakpoints and pads.
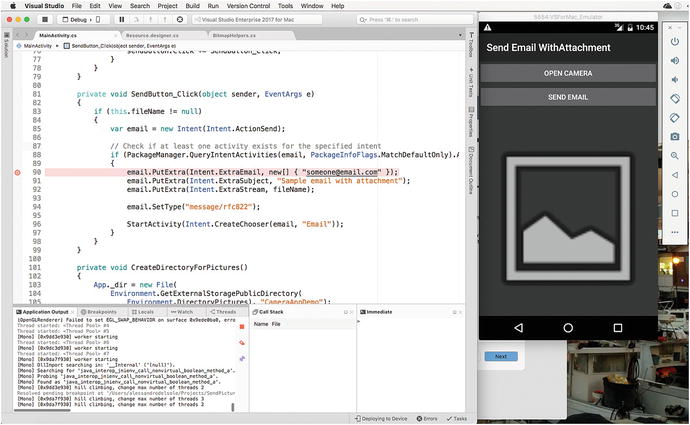
Figure 5-12. Debugging a Xamarin.Android project
In some cases, you will need to fine-tune the build process configuration, which is discussed in the next subsection.
Debugging with the Xamarin Live Player
You have an additional way to test and debug an Android app on a physical device, which is the Xamarin Live Player application. This app, available for both Android and iOS, can be installed from Google Play ( https://play.google.com/store/apps/details?id=com.xamarin.live&hl=en ) and is documented at http://xamarin.com/live .
With this app, you can pair your device to Visual Studio via a Quick Response code (QR), and then you can select the app itself as a device target when you start debugging. Debugging an app with the Xamarin Live Player makes particular sense when you are working with Visual Studio on Windows and you do not have a Mac machine in your network (though a Mac is still required for advanced development including signing iOS apps). Because with VS for Mac you are already working on a Mac and because you have fully functional Android emulators if you do not have a physical device, using the Xamarin Live Player will not be discussed further, but it is certainly an option that you must be informed about.
Configuring Project Options and the Build Process
In Chapter 2, you saw how to access project options that are commonly available to all the supported project types in VS for Mac. For Android projects, some additional, specific tabs and settings are available in the Project Options dialog that you can access by right-clicking the project name in the Solution pad and then selecting Options.
The Main Settings tab is identical to what you already saw in Chapter 2 and will not be covered again. The General tab presents a drop-down box called “Target framework” where you can select the version for the Android SDK that will be used to compile your app package (see Figure 5-13).
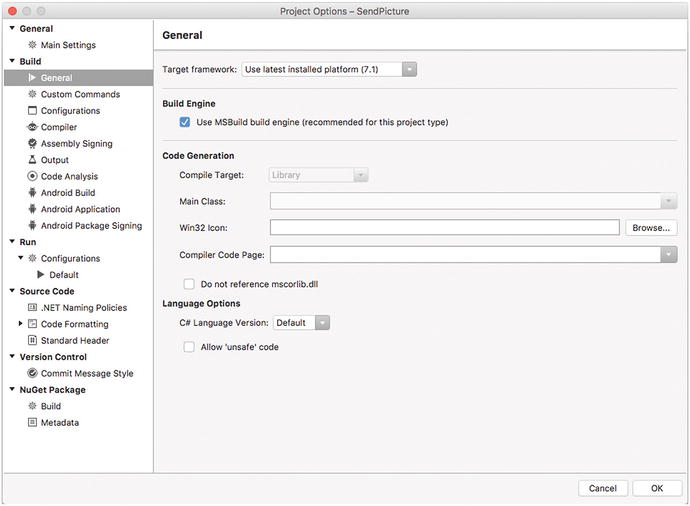
Figure 5-13. The General tab for an Android project in Xamarin
By default, Visual Studio lets you use the latest version of the SDK that has been detected on your system. You can select a different SDK version from the drop-down box. The next tab that you need to know about is called Android Build, where you can fine-tune the compilation process and optimize the resulting app package.
Remember that these are not Visual Studio settings; they are instead settings that are related to the Android and Google development tools required for compilation. If you right-click the project name in Solution pad and then select Options, the Android Build tab will look like Figure 5-14 (notice that you will need to stop debugging in order for the changes you make in Android Build to take effect).
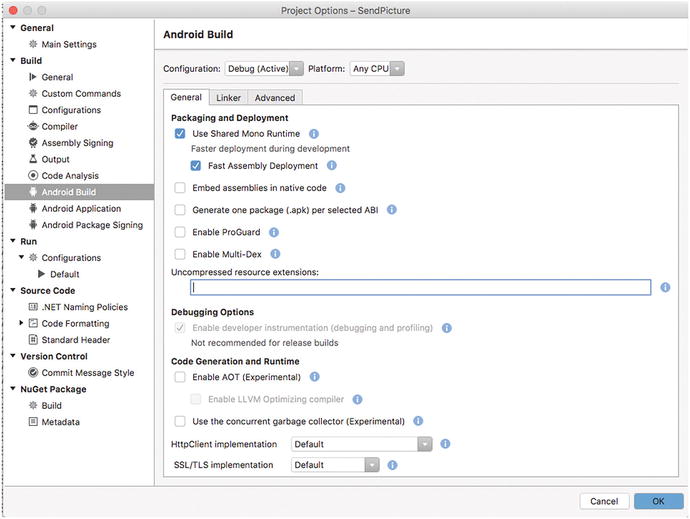
Figure 5-14. The Android Build options
Generally speaking, if you click the information icon, you will see a tooltip that explains what an option is about. However, I will now explain the most common options that you might need to fine-tune. Remember that options in the Android Build dialog are per configuration, which means that Debug and Release have different settings. The Use Shared Mono Runtime and Fast Assembly Deployment options are intended to be enabled only when the active configuration is Debug. The first option creates a dependency on the shared Mono runtime, which allows for faster deployment and debugging. The second option basically only updates files that have changes from the previous deployment. It can be disabled if you experience problems such as apps not starting. An interesting option is Enable ProGuard, which is recommended for the Release configuration and which allows for code obfuscation. With the Release configuration, you can also try the Enable AOT (Experimental) option, which enables Ahead of Time compilation to reduce the just-in-time (JIT) compiler overhead and therefore makes the app start up faster. This is currently an experimental feature. If you then select the Linker tab, you will see an option called Linker Behaviour. With the Debug configuration, this option is set as “Don’t link,” whereas with the Release configuration it is set as “Link SDK assemblies only.” With this option, you can decide to remove unused code, such as types and their members, from the build output to reduce the package size. It is recommended that you leave the default settings for each configuration, especially for the Debug configuration where “Don’t link” means no code will be removed from the build output, which allows for a more complete debugging experience. In the Internationalization group box, you can specify one or more optional codesets so that the linker can include the appropriate resources in the build output. On the Advanced tab, you can specify the supported Application Binary Interfaces (ABIs), which represent processor architectures. By default, the Debug configuration supports all ABIs, whereas the Release configuration is set to support the armeabi-v7a architecture, but you can certainly include multiple ABIs such as x86. In the Additional Options group, an important option is “Java heap size.” In fact, it might happen that your app runs out of memory if it consumes resources such as images, so increasing the “Java heap size” setting might help fix this issue (and must be set in both Debug and Release configurations).
The Android Application tab allows you to specify information that identifies your app package, such as the app name and version, but also the required permissions that the user must grant in the “Required permissions” group (see Figure 5-15).
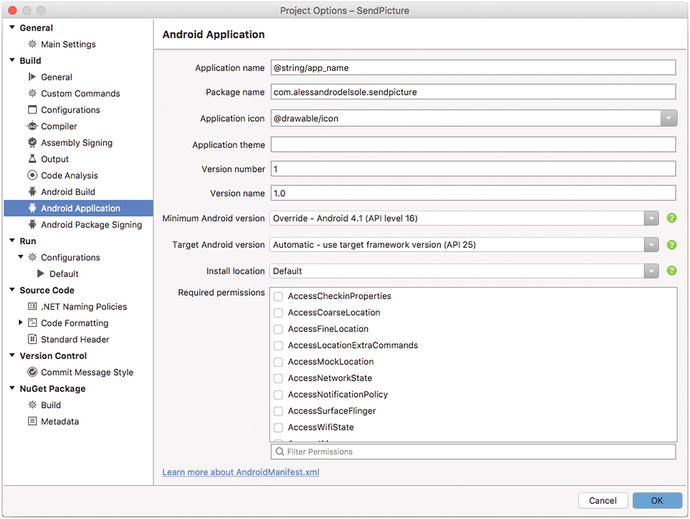
Figure 5-15. The Android Application options
Additionally, here you can specify the minimum Android version that your app supports. This is important because the lower the version, the fewer APIs you can use. The “Install location” option allows you to specify whether your app can also be installed on a memory card (which is no longer possible with Android 6.0 and newer). The last Android-specific tab is called Android Package Signing (see Figure 5-16), and this is where you will sign the .apk app package with a digital signature.

Figure 5-16. The Android Package Signing options
The Default tab under Run ➤ Configurations (see Figure 5-17) allows you to fine-tune an activity’s behavior in the Explicit Intent and Implicit Intent options, and you can run the application as the current user or a specific user. The Intent Flags and Intent Extras tabs provide additional options that you can set to control an activity.
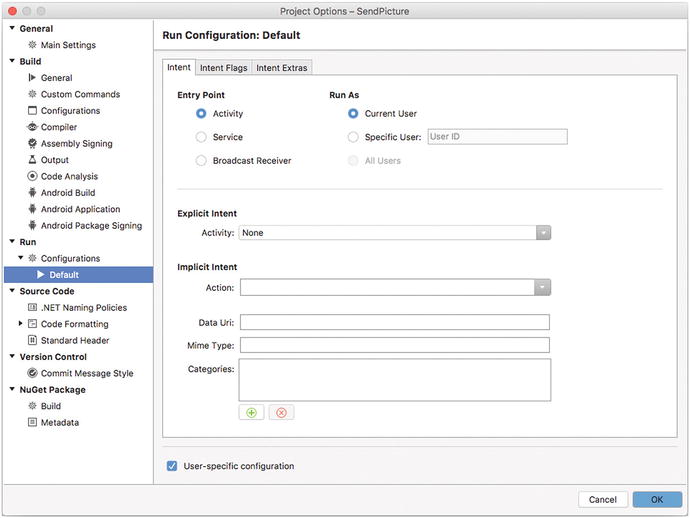
Figure 5-17. The default settings for the startup activity
Managing Emulators and SDKs
Visual Studio for Mac relies on the Java and Google SDKs, development tools, and emulators. As on any other platforms, including Linux and Windows, Java and Google SDKs are independent from the development environment of your choice and provide tools that make it easier for you to manage emulators and SDKs.
As a first-class development environment, Visual Studio for Mac includes shortcuts to the Google Emulator Manager and to the SDK Manager for your convenience. They are both located in the Tools menu. The Google Emulator Manager shows a list of installed emulator images and allows for editing existing emulator images and creating new ones. Figure 5-18 shows its dialog.
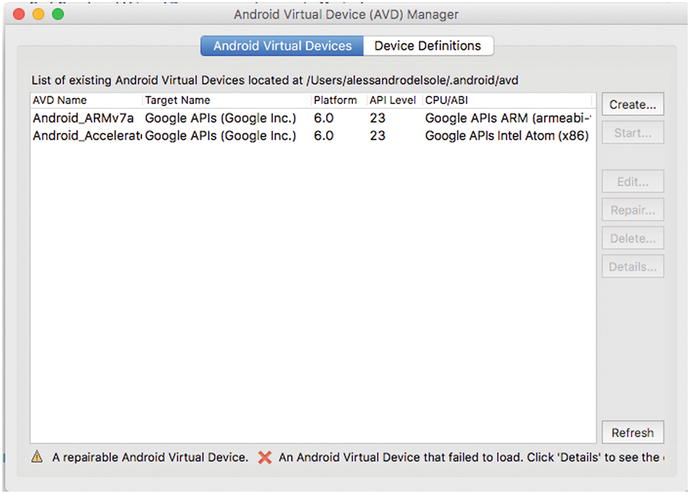
Figure 5-18. The Android Virtual Device (AVD) Manager dialog
You can select an existing emulator image and then click Details to see more detailed information about the emulator, such as the hardware it’s emulating and the OS version. You can click Edit to change its configuration, which is something you’ll need to do, for example, if the emulator’s camera is not working. You will find the option called “Configure camera facing back” that must be assigned with the “emulated” value. You can also add new hardware capabilities or change existing ones. If you instead click Create, a dialog will allow you to create a custom emulator definition. Figure 5-19 shows an example based on the Nexus 5 device.
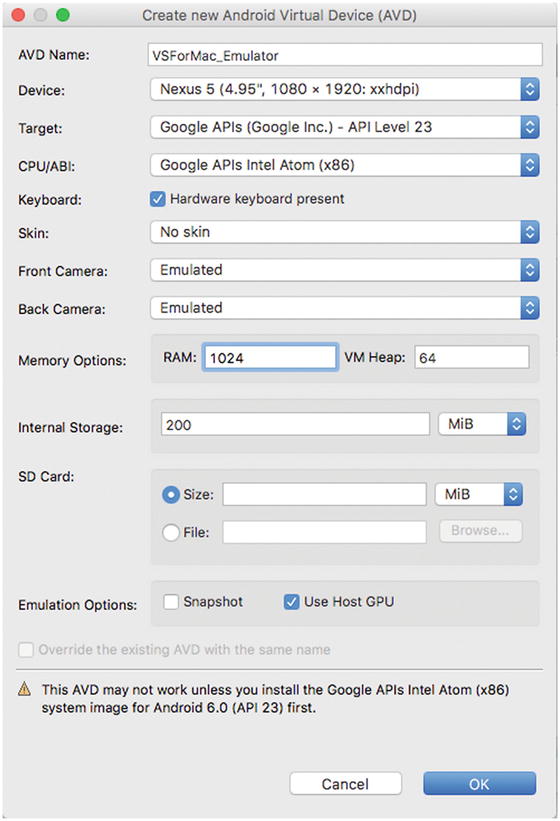
Figure 5-19. Creating a new emulator definition
When you click OK, details of your new image will be displayed. Then, you will find the new emulator definition in the list of target devices you can use for debugging. You can also use the SDK Manager (Tools ➤ SDK Manager) to manage and install platform tools and SDKs. This tool is extremely useful when you want to install additional SDKs to support multiple versions of the Android system. Figure 5-20 shows the Android SDKs and Tools dialog.
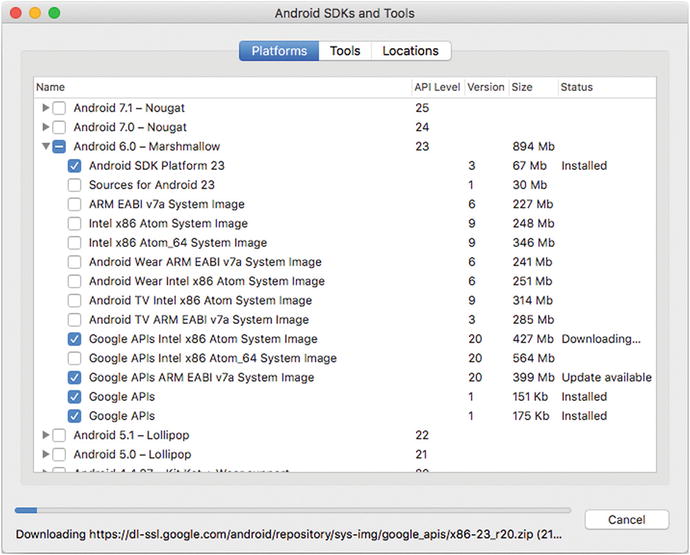
Figure 5-20. The Android SDKs and Tools dialog allows you to manage installed tools
It is worth noting that this is not a third-party tool; instead, it is a Visual Studio dialog. It automatically detects available updates for the installed tools and allows to download and install updates. Figure 5-20 shows the progress of an update operation. For each version of the SDK, you can select specific emulator images, such as for wearable devices and TVs. The Tools tab is specific to managing SDKs versions, whereas the Location tab allows for specifying the installation folder for the SDKs and tools. You will use this dialog to install the SDKs that target Android versions you want to support when specifying the target in the New Project dialog or in the project properties, as well as in the designer. This is not a modal dialog, which means you can use Visual Studio while an installation or update is in progress.
Preparing Apps for Publishing
Once you have finished developing an app, you typically build the app package using the Release configuration. However, additional steps are required before you can publish an app to the Google Play store, such as digitally signing your app package. Visual Studio for Mac includes all the tools you need to prepare an app for publishing and simplifies all the necessary steps.
To prepare an app for publishing, you first select the Release configuration in the toolbar, and then you right-click the project name in the Solution pad and select Archive for Publishing. At this point, Visual Studio will build the solution and, if no errors occur, show the Archives window, which contains the new archive and the list of existing archives. Figure 5-21 shows an example.
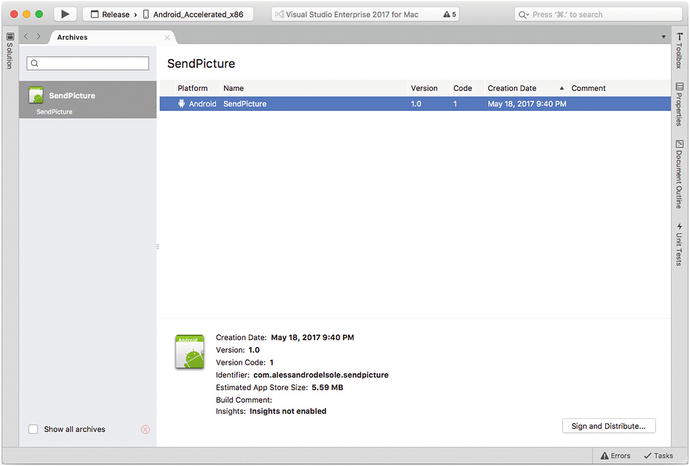
Figure 5-21. Creating an app archive
The version and version code identify the app package. In particular, the version code must be an incremental value with no dots, such as 1, 2, 3, and so on. Both the version number and the version code can be set in the app manifest. Notice that a malformed version number or version code is a common reason for an archive generation failure. Another common reason is that you forget to switch from the Debug to Release configuration or that the package name is not in the form of com.companyname.appname. Once you have an app archive, you need to digitally sign it. To accomplish this, click the Sign and Distribute button. At this point, the Sign and Distribute dialog appears, and the first choice is deciding how you want to distribute the app. Possible options are the Ad Hoc distribution and the Google Play distribution. The first option allows you to generate an .apk package that is saved to the local disk and that you will be able to upload to the Google Play store manually. The second option allows you to publish an .apk directly to the Google Play and assumes you have requested your paid account. The second option assumes you already have configured some settings in the Google Developer Console, and the first option is instead useful especially within organizations that want to upload an .apk package manually on test devices. For these reasons, only the first option is covered here, but it will not be difficult to use direct publishing if you follow the link with the instructions to make the proper configurations in Google Play. That said, select Ad Hoc and click Next. In the next screen, you can see a list of available certificates, but if this is the first time you are using VS for Mac, you will need to create one by clicking Create a New Key. In the Create New Certificate dialog, you will need to enter a friendly name for the certificate, a password, the number of years for validity, and at least one among the possible values, for example, your first name and last name or your country of residence. Figure 5-22 shows an example based on my personal data.
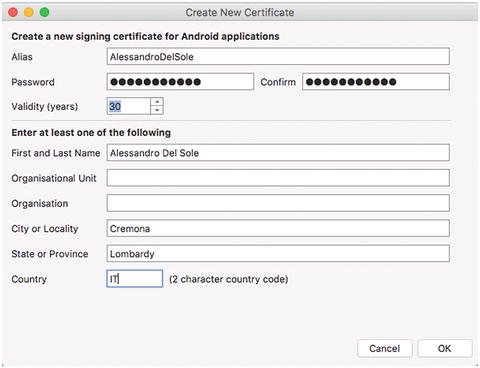
Figure 5-22. Creating a digital certificate
When ready, click OK. After a few seconds, your certificate will be ready and visible in the dialog. Select the certificate and then click Next. At this point, the Sign and Distribute dialog will show a summary of the collected information, and if everything is okay, you will be able to click the Publish button. You will be asked to specify the destination folder for the .apk package and the certificate password. When the app package has been generated, the Sign and Distribute dialog will offer to reveal the app package in the Finder tool. Simply click Close. Now that you have your package, you can publish your app to Google Play. Every time you update your app, remember to increment the version number and version code before you generate a new archive.
Note
Describing how to publish an Android app to the Google Play store is beyond the scope of this IDE-centric book, especially because you might just want to evaluate Android development with emulators or on your physical device before purchasing a developer account on Google Play. For this reason, publishing is not covered in this book. Once you are ready to publish your app, you can read the official Xamarin documentation that provides everything you need to know for publishing ( http://bit.ly/2lqKEqf ).
Summary
Building Android apps with Xamarin in C# is one of the most important development scenarios with Visual Studio for Mac, so this chapter provided an overview of what the IDE offers on this topic. First, you saw how to create and configure a Xamarin.Android project with Visual Studio. You saw how a Xamarin.Android solution is made, you learned how you can add NuGet packages and consume components, and you reviewed the concepts of activity and intent.
You also saw how Visual Studio for Mac provides powerful design tools that make it easy to create and arrange the user interface instead of editing the .axml layout files manually (though this is still possible). To demonstrate a number of other features, you saw how to write some simple C# code that uses the camera and the network APIs to share a photo via e-mail. Both tasks require the proper permissions, so you learned how to configure the Android app manifest for permissions and with the app metadata. The discussion then moved to building, testing, and debugging the app with an emulator and configuring the build process to optimize your app package. Then you saw how easy it is to configure and create emulator images, and you saw how to prepare an app package for publishing with archives and digital certificates. Visual Studio for Mac provides the best development experience on the Mac, which will be confirmed in the next chapter where you will get started with the IDE tooling for Xamarin.iOS and Xamarin.Mac.