
For several years, the ASP.NET Web API has been the framework from Microsoft that developers could use to create RESTful services that a broad range of clients, such as browsers, desktop applications, and mobile apps, can consume via HTTP and HTTPS requests based on the most common verbs such as GET, POST, PUT, PATCH, and DELETE. REST stands for REpresentational State Transfer and allows for communication interoperability between clients and servers through standard protocols and data formats, where the service does not retain the exchanged information (so it is stateless).
Interoperability of communication between server and client means that the two can communicate via standard protocols regardless of the platform they run on and the programming language they have been written with, and data is typically exchanged in the form of JSON or XML. In the case of the ASP.NET Web API, this framework allows for creating RESTful services in C# with Visual Studio.
Web API services’ infrastructure is similar to MVC applications because they also rely on a data model and on controllers that expose methods that can receive HTTP verb requests, but they do not provide a user interface. So, many concepts described in the next sections about models and controllers will already be familiar since they have been discussed in the previous chapter.
Like MVC, .NET Core introduces a cross-platform framework for creating RESTful services called the ASP.NET Core Web API and that you can use to build and publish services to macOS, Linux, and Windows machines writing C#. Because this framework is included in .NET Core, you can certainly use Visual Studio for Mac to create ASP.NET Core Web API services. This chapter provides a high-level overview of the ASP.NET Core Web API, explaining how to create a sample service that can be consumed by any client. Remember that the ASP.NET Core Web API is part of the ASP.NET Core framework, so it has the same base infrastructure as MVC projects described in the previous chapter.
Note
For all the topics that are not covered by this chapter, you can reference the documentation at http://docs.microsoft.com/en-us/aspnet/core/ .
Creating ASP.NET Core Web API Services
Visual Studio for Mac makes it really easy to create an ASP.NET Core Web API service since it provides a convenient user interface that invokes the dotnet command-line tool on your behalf. In this chapter, you will create a sample service that allows you to access a remote SQLite database that stores a list of orders. The sample service will expose methods to read, add, and delete items in the list via HTTP. Then you will see how to consume the service from a Xamarin.Forms project. The reason why the example will be offered using SQLite instead of SQL Server is the same as explained in the previous chapter.
To create a service, in Visual Studio for Mac, select File ➤ New Solution. In the New Project dialog, select the ASP.NET Core Web API template under .NET Core ➤ App, as shown in Figure 11-1.

Figure 11-1. Creating an ASP.NET Core Web API project
Click Next at this point. Exactly as you did in the previous chapter about a web application, select the .NET Core version (both 1.1 and 2.0 are fine for the current example) if requested, then click Next and specify a project name, and finally click Create. After a few seconds, the new solution will appear in the Solution pad. As you will easily understand, the structure of an ASP.NET Core Web API solution is similar to the MVC projects you saw in the previous chapter, except for the lack of pages, so I will not cover it again. As I mentioned, the sample service will allow clients to call methods that read and write data into a remote SQLite database through HTTP, and JSON will be the data format used to exchange information. The steps are described in the next subsections.
Creating a Model
The first thing you need to add is a data model that represents a single, simplified order. By following the lessons learned in the previous chapter, add a new folder called Models to the project and then add a new code file called Order.cs into the newly created folder. The code for this class models a simplified order entity and looks like this:
using System;namespace OrderService.Models{public class Order{public int Id { get; set; }public DateTime OrderDate { get; set; }public string OrderDescription { get; set; }public string CustomerName { get; set; }}}
The code for this class is simple. It is worth noting the Id property that Entity Framework will use as the primary key.
Adding Entity Framework Core
The next step is to download the Entity Framework Core packages from NuGet and define the DbContext class. Based on what you learned in Chapter 10, download and install the Microsoft.EntityFrameworkCore.SQLite and Microsoft.EntityFrameworkCore.Design NuGet packages.
Once you have downloaded and installed the packages, add a new class file called OrderContext.cs and write the following code:
using Microsoft.EntityFrameworkCore;namespace OrderService.Models{public class OrderContext: DbContext{public DbSet<Order> Orders { get; set; }protected override void OnConfiguring(DbContextOptionsBuilder optionsBuilder){optionsBuilder.UseSqlite("Data Source=Orders.db");}}}
The code you see in this class is essentially the same as you saw in Chapter 10; the only difference is that this time the code works against the Order entity. Because you still need to enable code migrations at the command line, you also need to edit the .csproject file with the following XML node that includes the tools for Entity Framework Core:
<ItemGroup><DotNetCliToolReference Include="Microsoft.EntityFrameworkCore.Tools.DotNet"Version="1.0.1" /></ItemGroup>
As you might remember from the previous chapter, you now need to open a Terminal at the project folder and type the following command lines to enable code migrations and to generate the database for the first time:
> dotnet ef migrations add FirstMigration> dotnet ef database update
Before writing the controller , it is important to make another consideration: the Web API project includes an Inversion of Control container service that avoids the need to create an instance of the OrderContext class in the controller, leaving the job to .NET Core, which will inject an instance via dependency injection. To accomplish this, open the Startup.cs file, locate the ConfigureServices method, and rewrite it as follows:
public void ConfigureServices(IServiceCollection services){// Add framework services.services.AddEntityFrameworkSqlite().AddDbContext<OrderContext>(options =>options.UseSqlite(Configuration["Data:DefaultConnection:ConnectionString"]));services.AddMvc();}
This method is called by .NET and configures the required services. In this case, the code specifies that Entity Framework Core is required against a SQLite database (AddEntityFrameworkSqlite) and that an instance of the OrderContext class must be injected (AddDbContext) using the SQLite connection string (UseSqlite) stored in the default location, which is the constructor of the OrderContext class in this case. Now that you have all you need to work with data, you can write a controller.
Implementing Controllers
ASP.NET Core Web API projects already include a folder called Controllers and a controller stub called ValueController.cs. Delete this file from the project and then add a new code file to the Controllers folder, called OrderController.cs. Let’s start with the first piece of code in the controller, which includes some using directives and a constructor as follows:
using System.Collections.Generic;using System.Linq;using Microsoft.AspNetCore.Mvc;using OrderService.Models;namespace OrderService.Controllers{[Route("api/[controller]")]public class OrderController : Controller{private OrderContext dataContext;public OrderController(OrderContext context){this.dataContext = context;this.dataContext.Database.Migrate();}
Notice the following:
The OrderController class inherits from the base Controller, which implements a controller’s infrastructure.
The Route attribute defines the so-called routing strategy, which establishes how a controller can be invoked via HTTP. In this case, the controller will be reachable at http://servername/api/order, where servername is the host server, api is a prefix, and order is the name of the controller without the controller literal.
The constructor of the controller receives an instance of the OrderContext class that is assigned to the dataContext local variable that is used internally by the controller. Such an instance is injected by the .NET Core runtime when instantiating the controller.
The Database.Migrate method is invoked to ensure migrations are applied. This is particularly useful when publishing your app for the first time, in case migrations are not applied at publish time.
The next step is to implement methods that allow you to work against data via HTTP. By convention, methods have the same name of the HTTP verb they represent (therefore Get, Post, Put, and Delete). You can certainly define multiple actions that respond to those HTTP verbs, such as multiple POST methods, but this is beyond the scope of this section. You can find additional information about multiple actions at www.asp.net/web-api/overview/web-api-routing-and-actions . Let’s start with the Get method, which receives HTTP GET requests and which is used to read data from the database . Here are the following two overloads:
// GET: api/order[HttpGet]public IEnumerable<Order> Get(){return this.dataContext.Orders;}// GET api/order/5[HttpGet("{id}")]public Order Get(int id){return this.dataContext.Orders.Where(o => o.Id == id).FirstOrDefault();}
Notice how method overloads are decorated with the HttpGet attribute, which marks them to receive HTTP GET requests. The first method overload returns the full list of orders in the Orders collection as an IEnumerable<Order>. You could also write a LINQ query or use the Where extension method to return only a subset of orders in the collection. The second overload returns a specific Order whose id is passed as a method argument. Notice how comments include the relative URL that the client will need to use, but this will be clearer with a client application later. The next step is to declare methods that accept the POST, PUT, and DELETE verbs and that allow for adding, updating, and deleting an order, respectively. Here’s the code, followed by some comments and considerations:
// POST api/order[HttpPost]public async void Post([FromBody]Order order){if(order!=null){this.dataContext.Orders.Add(order);await this.dataContext.SaveChangesAsync();}}// PUT api/order/5[HttpPut("{id}")]public async void Put(int id, [FromBody]Order order){if(id!=0){var oldOrder = this.dataContext.Orders.Where(o => o.Id == id).FirstOrDefault();if(oldOrder!=null){oldOrder.OrderDate = order.OrderDate;oldOrder.OrderDescription = order.OrderDescription;oldOrder.CustomerName = order.CustomerName;await this.dataContext.SaveChangesAsync();}}}// DELETE api/order/5[HttpDelete("{id}")]public async void Delete(int id){var order = this.dataContext.Orders.Where(o => o.Id == id).FirstOrDefault();if(order!=null){this.dataContext.Orders.Remove(order);}await this.dataContext.SaveChangesAsync();}}}
Like MVC, the ASP.NET Core Web API includes model binding, which also allows for mapping parameters passed to the HTTP request to a .NET object, such as the Order type. In other words, if the HTTP request contains JSON or other supported contents that include property values for Id, OrderDate, OrderDescription, and CustomerName, model binding will generate an instance of the type specified as the method parameter, populating properties based on the key-value pairs in JSON. To accomplish this, the Post and Put method signatures require you to supply the [FromBody] attribute before the parameter. Post simply adds the Order instance to the Orders collection if the order is not null; Put retrieves the specified order based on the id and updates property values, if an order with that id is found; and Delete retrieves the specified order based on the id and removes it from the Orders collection . All methods invoke the SaveChangesAsync asynchronous method to save changes to the database. Now you have all you need to expose the service actions through HTTP so that any desktop, web, and mobile client will be able to work against the same data store.
Hints About Identity
Real-world services should be secured to grant data access only to authenticated and authorized users. ASP.NET Core includes an identity service called ASP.NET Core Identity , which is basically a membership system that allows you to add login functionality to an application or service. Users can set up a username and password, or they can use an external login provider such as Facebook or Twitter.
The Web API on the .NET Framework relies on Windows Identity Foundation and simplifies the way you implement identity, but in ASP.NET Core Identity there is no dependency on the operating system. This is an improvement because it allows you to be free to choose your authentication libraries; however, it makes things more difficult to implement. ASP.NET Core Identity stores user information in a SQL Server database, so if you use Visual Studio 2017 on Windows, the IDE will be able to scaffold all the necessary identity objects and to provide the proper debugging support through SQL Server LocalDb or another edition of SQL Server. With Visual Studio for Mac, this is not possible because SQL Server is not available for macOS, and therefore the IDE does not include tools to scaffold all the necessary objects. You could alternatively use an Azure Table Storage service to persist user information, but this would require a thorough discussion about multiple Azure services, and it would be completely out of the scope of this chapter.
However, ASP.NET Core Identity is built in a way that you can use different libraries to implement authentication that can be used in conjunction with its membership system, such as OpenIddict and IdentityServer 4 (other than Azure Active Directory, Facebook, and Twitter). I recommend you read the following articles that were published on the .NET Web Development and Tools Blog: “ASP.NET Core Authentication with IdentityServer 4” ( http://blogs.msdn.microsoft.com/webdev/2017/01/23/asp-net-core-authentication-with-identityserver4 ) and “Bearer Token Authentication in ASP.NET Core” ( http://blogs.msdn.microsoft.com/webdev/2016/10/27/bearer-token-authentication-in-asp-net-core ). Both articles will help you get started implementing authentication, and the official documentation shows examples based on Visual Studio 2017 on Windows ( http://docs.microsoft.com/en-us/aspnet/core/security/authentication/identity ).
Debugging and Testing Web API Services
As you would expect, in Visual Studio for Mac you can debug a Web API service by leveraging all the powerful tools offered by the IDE, such as breakpoints, tooltips, and debug pads.
Like an MVC application, a Web API service needs a host web server to run, such as Internet Information Services. For debugging purposes, Visual Studio for Mac invokes the Kestrel development server described in Chapter 10. This means you can simply click Run ➤ Start Debugging and an instance of Kestrel will start to host the service. Additionally, the Safari browser will be launched, even if there is nothing to display. By the way, it is useful to see the full URL with the port number in the browser’s address bar. To test the controller, you need a client that is capable of sending HTTP requests that include data. A popular, free, and simple-to-use client tool that many developers use for debugging HTTP requests is Postman ( www.getpostman.com ). Download and install this tool; then, when ready, type the service URL plus the controller name (on my machine the URL is http://localhost:50096/api/order/). Specify an HTTP verb you want to use, such as GET, and then click Send. Figure 11-2 shows the result of Postman calling the HTTP GET method in the running service.
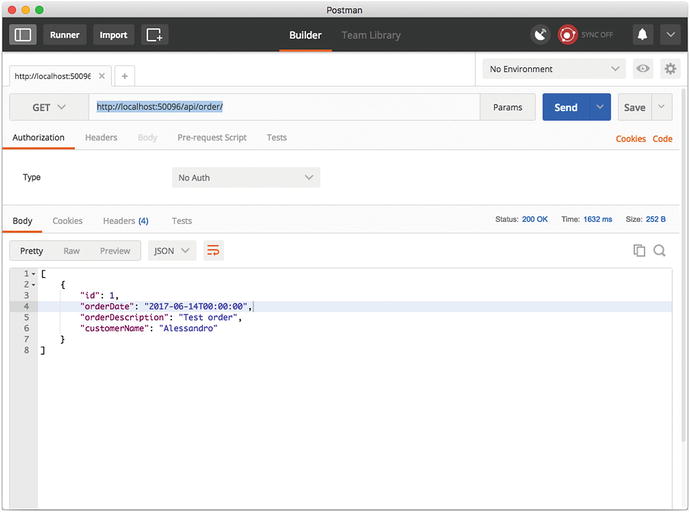
Figure 11-2. Reading data from the Web API service at debugging time
As you can see, the service returns a JSON response if at least an order is available in the database. In Figure 11-3 you can instead see how to send a POST request that writes a new order. Make sure you select the POST verb from the combo box at the left side of the service URL and that you select raw as the data form and JSON (application/json) from the combo box that appears showing Text as the default. Type some JSON code that represents a new order, as shown in Figure 11-2, and then click Send.
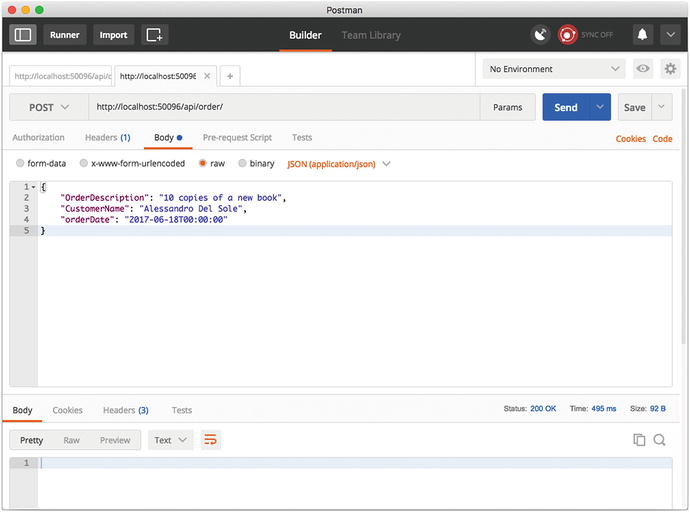
Figure 11-3. Adding a new order with a POST request at debugging time
Notice how Postman (as well as other clients) shows a “200 OK” status code, which means that the operation was completed successfully. In a similar way, you could update an order, but this time you should pass the order ID to the PUT request, adding it to the URL like this: http://localhost:50096/api/order/1. Then provide the key-value pairs for the Order’s properties as you did with the POST request. Now that you have made sure that the service is working as expected, you can deploy it to a host and consume it from real client applications.
Note
The .NET Debugger listens for requests from external clients and is able to intercept such requests and to send messages to any application that is using the debugger. This means that Visual Studio for Mac can receive messages from the debugger listening to HTTP requests and can break the service execution, show breakpoints, and use all the other useful tools it offers even with external clients. Also, Visual Studio for Mac shows messages from the debugger in the Application Output pad, including information about requests sent by clients.
Publishing ASP.NET Core Web API Services
Note
This section assumes you have an active Microsoft Azure subscription. If you already activated one to complete Chapter 10, you can still use it in this chapter.
Similarly to what you saw with ASP.NET Core MVC applications, Web API services can be easily published to Windows, Linux, and macOS server hosts. Visual Studio for Mac does not include tooling that allows you to publish directly to those hosts out of the box, so you need to use the dotnet publish command line and deploy the service manually. Instead, Visual Studio for Mac has built-in tools that make it dramatically simple to publish a Web API service to Microsoft Azure, in the same way you saw for MVC applications in the previous chapter.
To accomplish this, in the Solution pad, right-click the project name and then select Publish ➤ Publish to Azure. When the Publish to Azure App Services dialog appears, click New. At this point, the New App Service dialog that you already met in Chapter 10 appears and looks like Figure 11-4.
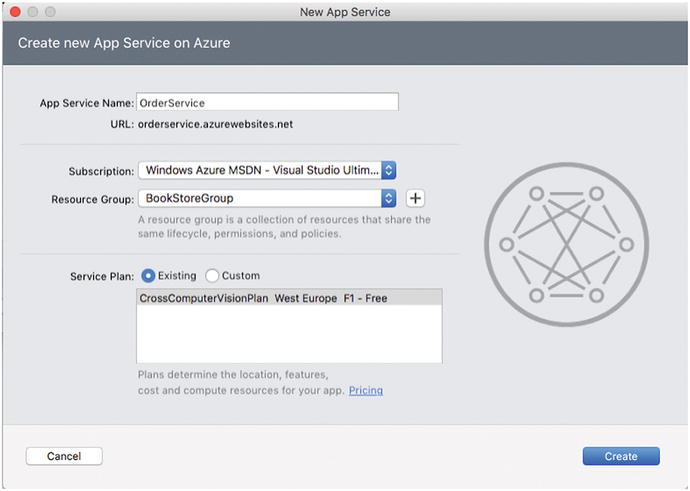
Figure 11-4. Creating a new Azure App service
Enter the service name in the App Service Name box, for example, OrderService. Select the subscription and the resource group; you should be able to reuse the same resource group you used in Chapter 10. The same consideration applies to the Service Plan box, where you can select the existing service plan created in the previous chapter. When ready, click Create. Visual Studio for Mac will start publishing your ASP.NET Core Web API service to Azure, and you will be able to work with the IDE while the operation is running. You can see the progress in the status bar at the top of the IDE’s window and in the Publish pad. Publishing the service to Azure can take a few minutes. When finished, Visual Studio will open Safari at the service URL, and you will be able to send your requests against the online service instead of Kestrel (see Figure 11-5).

Figure 11-5. Sending requests against the Web API service published on Azure
Now that your service is up and running on Azure as the host, it is time to see how you can consume it from a client application. This is the perfect opportunity to see how to combine ASP.NET Core with Xamarin.
Consuming Services: A Xamarin.Forms Client
One of the biggest benefits of Web API projects is that they allow you to generate RESTful services that can be consumed by any client application that can send HTTP requests and receive HTTP responses regardless of the development platform and programming language used to build the application. This implies that you can consume an ASP.NET Core Web API service from a Xamarin project.
The next example is therefore based on creating a Xamarin.Forms client that displays a list of orders and allows for adding, updating, and deleting orders through the service created before. For the sake of convenience and because you cannot open multiple instances of Visual Studio for Mac, you will not create a separate Xamarin.Forms solution. Rather, you will add a Xamarin.Forms project to the current solution. To accomplish this, in the Solution pad, right-click the solution name and then select Add ➤ Add New Project. In the New Project dialog, select the Blank Forms App project template located under Multiplatform ➤ App (and that you already used in Chapter 7). Select the PCL as the code sharing strategy and then go ahead and assign OrderClient as the project name. Then complete the steps and wait for the projects to be added.
Note
If you remember the available project templates for Xamarin, most of them allow you to include a mobile back end when you create a new solution. In the chapters about Xamarin, you did not include a back end, but if you did, it would simply be an ASP.NET Core Web API service like the one you created in this chapter. So, you are free either to include a back-end project in the solution or to create a back-end project separately. Including a back-end project generated by Visual Studio contains some sample code that you do not have when creating one separately. The client mobile app will consume the service in the same way, regardless of how you create it. You also have an option to create a mobile back end with Azure App Service, discussed in Chapter 13.
I will reuse many techniques and concepts that I already explained in Chapter 7, so I will not cover them again. Just look to Chapter 7 as a reference in case you have any doubts. The first thing you need is a client-side representation of the data you will exchange with the service, which is an implementation of the Order class. This class requires you to implement the INotifyPropertyChanged interface in order to raise a change notification when the value of a property is modified in some way. In the PCL project, add a new folder called Model and then add a new code file called Orders.cs, whose code is as follows (see comments):
using System;using System.ComponentModel;using System.Runtime.CompilerServices;namespace OrderClient.Model{public class Order: INotifyPropertyChanged{int id;public int Id{get{return id;}set{id = value;OnPropertyChanged();}}DateTime orderDate;public DateTime OrderDate{get{return orderDate;}set{orderDate = value;OnPropertyChanged();}}string orderDescription;public string OrderDescription{get{return orderDescription;}set{orderDescription = value;OnPropertyChanged();}}string customerName;public string CustomerName{get{return customerName;}set{customerName = value;OnPropertyChanged();}}public Order(){this.OrderDate = DateTime.Now;}public event PropertyChangedEventHandler PropertyChanged;// CallerMemberName supplies the name of the caller member and// simplifies the invocation to OnPropertyChangedprivate void OnPropertyChanged([CallerMemberName]string PropertyName=""){// Use the null conditional operator to execute Invoke only// if PropertyChanged is not nullthis.PropertyChanged?.Invoke(this,new PropertyChangedEventArgs(PropertyName));}}}
The next step is to add a service class that is responsible for sending HTTP requests to the Web API service. Generally speaking, .NET allows you to easily send HTTP requests and receive responses via the System.Net.Http.HttpClient class . This class exposes methods that represent the most popular HTTP verbs, such as GET, POST, PUT, and DELETE, and it is perfect for Xamarin projects.
Note
The HttpClient class is offered through a NuGet package called System.Net.Http. This is already included with Xamarin.Forms projects, but you might need to install it manually with other project types.
Having that said, add a new folder called Services to the PCL project and then add a new file called OrderService.cs, whose code looks like the following:
using System;using System.Collections.Generic;using System.Net.Http;using System.Text;using System.Threading.Tasks;using Newtonsoft.Json;using OrderClient.Model;namespace OrderClient.Services{public class OrderService{public async Task<List<Order>> GetOrdersAsync(){using(var client = new HttpClient()){client.BaseAddress = new Uri(ServiceUrl);string jsonResult = await client.GetStringAsync("/api/order");var orders = JsonConvert.DeserializeObject<List<Order>>(jsonResult);return orders;}}public async Task CreateOrderAsync(Order newOrder){using(var client = new HttpClient()){client.BaseAddress = new Uri(ServiceUrl);var content = new StringContent(JsonConvert.SerializeObject(newOrder),Encoding.UTF8, "application/json");await client.PostAsync("/api/order", content);}}public async Task UpdateOrderAsync(Order order){using (var client = new HttpClient()){client.BaseAddress = new Uri(ServiceUrl);string stringData = JsonConvert.SerializeObject(order);var content = new StringContent(stringData,Encoding.UTF8, "application/json");await client.PutAsync($"/api/order/{order.Id}", content);}}public async Task DeleteOrderAsync(Order order){using (var client = new HttpClient()){client.BaseAddress = new Uri(ServiceUrl);await client.DeleteAsync($"/api/order/{order.Id}");}}public OrderService(string serviceUrl){this.ServiceUrl = serviceUrl;}public string ServiceUrl { get; }}}
Notice the following:
The constructor receives the service URL from the caller and stores this into a field.
The class exposes methods that map the Get, Post, Put, and Delete methods in the Web API controller. All these methods create an instance of the HttpClient class to send requests to the REST service.
Because the client and service exchange data as JSON, which is a string, the GetOrdersAsync method invokes HttpClient.GetStringAsync, which directly returns a string and which is deserialized as a List<Order>.
The other methods invoke PostAsync, UpdateAsync, and DeleteAsync methods from the HttpClient class. PostAsync and PutAsync first serialize an Order into JSON and enclose the resulting string into an encoded object of type StringContent, which is sent to the service. PutAsync also needs the object’s ID in the URL, whereas DeleteAsync only needs the object’s ID and does not need to perform any JSON serialization.
The next step is implementing a ViewModel class that loads, saves, and deletes orders through the service class and that exposes the list of orders in a way that is suitable for data binding in XAML. Create a new folder called ViewModel in the PCL project and add the following code:
using System.Collections.ObjectModel;using System.Threading.Tasks;using OrderClient.Model;using OrderClient.Services;namespace OrderClient.ViewModel{public class OrderViewModel{private OrderService service;public OrderViewModel(){this.Orders = new ObservableCollection<Order>();this.service = new OrderService("http://orderservice.azurewebsites.net");}public ObservableCollection<Order> Orders { get; set; }public async Task InitAsync(){var orders = await service.GetOrdersAsync();if (orders != null)this.Orders = new ObservableCollection<Order>(orders);}public async Task SaveOrderAsync(Order order){if (order.Id == 0)await service.CreateOrderAsync(order);elseawait service.UpdateOrderAsync(order);}public async Task DeleteOrderAsync(Order order){if (order.Id == 0)this.Orders.Remove(order);elseawait service.DeleteOrderAsync(order);}}}
Notice how SaveOrderAsync and DeleteOrderAsync check the value of the Id property: if it is zero, it means the order is not in the database yet, so in the case of saving data the service call will be dispatched to CreateOrderAsync, or to UpdateOrderAsync if the order already exists in the database (which means Id is not zero). Similarly, DeleteOrderAsync just removes the order from the in-memory collection if Id is zero; otherwise, it makes a service call to DeleteOrderAsync to completely remove the order from the database.
The last step in the client app is to design the user interface, which will be actually simple: it will show a list of orders and three buttons that allow adding, saving, and deleting orders. The following is the XAML code for the main page:
<?xml version="1.0" encoding="utf-8"?><ContentPage xmlns="http://xamarin.com/schemas/2014/forms"xmlns:x="http://schemas.microsoft.com/winfx/2009/xaml"xmlns:local="clr-namespace:OrderClient"x:Class="OrderClient.OrderClientPage"><StackLayout><ListView x:Name="OrdersListView" ItemsSource="{Binding}"ItemSelected="OrdersListView_ItemSelected"><ListView.HasUnevenRows><OnPlatform iOS="false" Android="true"x:TypeArguments="x:Boolean"/></ListView.HasUnevenRows><ListView.RowHeight><OnPlatform iOS="120" x:TypeArguments="x:Int32"/></ListView.RowHeight><ListView.ItemTemplate><DataTemplate><ViewCell><ViewCell.View><StackLayout Margin="5"><Entry Text="{Binding OrderDescription, Mode=TwoWay}"Placeholder="Enter description"/><DatePicker Date="{Binding OrderDate, Mode=TwoWay}"/><Entry Text="{Binding CustomerName, Mode=TwoWay}"Placeholder="Enter customer"/></StackLayout></ViewCell.View></ViewCell></DataTemplate></ListView.ItemTemplate></ListView><StackLayout Orientation="Horizontal"><Button x:Name="AddButton" Clicked="AddButton_Clicked" Text="Add order"/><Button x:Name="SaveButton" Clicked="SaveButton_Clicked" Text="Save"/><Button x:Name="DeleteButton" Clicked="DeleteButton_Clicked" Text="Delete"/></StackLayout></StackLayout><ContentPage.Padding><OnPlatform iOS="0,20,0,0" x:TypeArguments="Thickness"/></ContentPage.Padding></ContentPage>
The following are a few considerations about the XAML:
The ListView control has the ItemsSource property assigned with {Binding} because it will receive a collection of Order objects as the data source. It also specifies an event handler for the ItemSelected event, where in the code-behind the selected order will be referenced by a variable that will be used by some of the buttons.
The ViewCell used as the ListView’s data template contains Entry and DatePicker controls that allow users to edit an order directly in-line in order to simplify the user interface.
There are three buttons that allow for adding, saving, and deleting orders through the proper event handlers.
The C# code-behind for the page has a number of things to do such as loading and binding data through an instance of the view model, adding a new order, deleting the selected order in the list, and saving orders. For the sake of simplicity, saving (that is, creating or updating) is performed against all the items in the collection. The following is the code for the code-behind, which includes comments for better reading:
using OrderClient.Model;using OrderClient.ViewModel;using Xamarin.Forms;namespace OrderClient{public partial class OrderClientPage : ContentPage{private Order currentOrder;private OrderViewModel viewModel;public OrderClientPage(){InitializeComponent();// Create an instance of the ViewModelthis.viewModel = new OrderViewModel();}// Load and bind the collection of ordersprotected async override void OnAppearing(){this.IsBusy = true;await this.viewModel.InitAsync();this.OrdersListView.ItemsSource = this.viewModel.Orders;this.IsBusy = false;}// Add a new order to the data-bound collectionprivate void AddButton_Clicked(object sender, System.EventArgs e){this.viewModel.Orders.Add(new Order());}// Save all items in the collection. The SaveOrderAsync in// the ViewModel knows where to create or update an itemprivate async void SaveButton_Clicked(object sender, System.EventArgs e){this.IsBusy = true;foreach(Order order in this.viewModel.Orders){await this.viewModel.SaveOrderAsync(order);}this.IsBusy = false;}// Remove the current order (if not null)private async void DeleteButton_Clicked(object sender, System.EventArgs e){this.IsBusy = true;if (this.currentOrder != null)await this.viewModel.DeleteOrderAsync(this.currentOrder);this.IsBusy = false;}// Take note of the selected orderprivate void OrdersListView_ItemSelected(object sender, SelectedItemChangedEventArgs e){var order = e.SelectedItem as Order;if (order != null) this.currentOrder = order;}}}
Now you can start debugging and testing the client application to consume your ASP.NET Core Web API service. Figure 11-6 shows an example based on the iOS app, but a similar result will be available on Android.
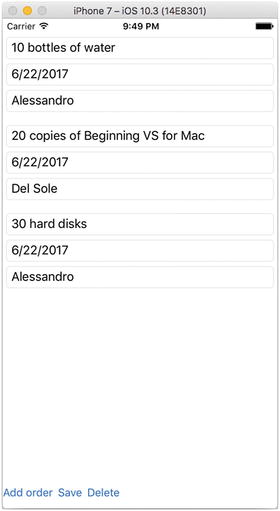
Figure 11-6. Consuming an ASP.NET Core Web API service from a client app written with Xamarin.Forms
Of course, you are not limited to Xamarin clients; any kind of client application that supports HTTP requests can consume your RESTful service.
Debugging Multiple Projects
In the previous section, you have been testing your client app against an instance of the Web API service hosted on Azure. However, more often than not, you will need to debug both the client and the service projects concurrently to discover errors and to analyze the flow of requests from the client to the service.
For instance, you might want to use breakpoints in the service controllers to see how requests come from the client. You can also debug multiple projects concurrently by right-clicking the name of a project in the Solution pad and then selecting Start Debugging Item. In this case, you might want to first start debugging the service project and then the client project. If you use this option, remember to change the service URL in the constructor of the OrderViewModel class, passing the localhost URL instead of the service URL on Azure. Finally, you could also consider creating a custom Run configuration in the Configuration Manager tool to set up multiple projects to run in the debugger when you click Start.
Summary
In this chapter, you saw how Visual Studio for Mac is the perfect place to create RESTful services that can be consumed by any client applications and that run on Windows, macOS, and Linux. These services can be therefore published to an incredibly large number of hosts. In the first part, you saw how to create a project and how to implement a data model and a controller to store items in a SQLite remote database.
Then you saw how Visual Studio for Mac has built-in tools to publish a service to Microsoft Azure in a couple of steps. Finally, you saw how to consume a Web API service from a Xamarin.Forms project, using C#. This chapter completes the overview of the applications you can build with Visual Studio for Mac. In the next chapter, you will start learning how to leverage all the powerful tools the IDE has to offer for team collaboration.