Visual Studio 2017 for Mac is a full-stack and mobile-first, cloud-first integrated development environment (IDE) that allows you to build a variety of mobile and web applications using the most powerful technologies from Microsoft, such as Xamarin for iOS and Android development and .NET Core for web development, using C# and F# as the programming languages.
To fully leverage all the powerful features that Visual Studio 2017 for Mac offers, you first need to enable some Apple services, and you need to install and configure Apple’s software development kits (SDKs) on the development machine. In this chapter, you will learn how to configure your Mac development machine from start to end. If you already have experience in building applications with the Apple developer tools on a Mac, the first part of this chapter is just a recap. If you instead come from the Microsoft Windows world, the entire chapter provides guidance to properly set up your Mac for the first time, explaining a number of concepts that you might not be familiar with. By completing this chapter, you will be ready to start building mobile and web apps with Visual Studio for Mac. Going forward, I will refer to Visual Studio 2017 for Mac also as Visual Studio for Mac, Visual Studio, or VS for Mac interchangeably.
Getting an Apple ID
An Apple ID is a valid e-mail address that is linked to a number of Apple’s services and is required to set up a developer account. If you own an iPhone or an iPad, you probably already have one because it is required to download apps from the Apple Store, to access iTunes, and to set up your profile.
An Apple ID can be any valid e-mail address with any e-mail provider, so it is not necessary to create a new alias for development. Instead, you can easily associate an existing e-mail address as an Apple ID. Whether you create a new e-mail address or use an existing e-mail address, you can create your Apple ID at http://appleid.apple.com/account .
Note
When you buy a Mac computer and you turn it on for the first time, during the first configuration macOS will ask you to enter your Apple ID. Though this is not mandatory, it is strongly recommended that you supply your Apple ID at this point so that the operating system can set up your user profile. For this reason, it is important that you get your Apple ID before you do anything else on your Mac.
The Apple ID’s management page will ask you to enter your basic personal information, including your e-mail address, and ask you to specify your security questions and the list of news you want to receive in your inbox (optional). As you will see, this is a simple step.
Upgrading macOS
The Apple SDKs and developer tools typically require the latest version of the operating system. At this writing, the most recent version of macOS is 10.12.3 (also known as Sierra). Having that said, open the App Store, select Updates, and make sure you install any updates available for macOS before going on.
Creating a Developer Account
With macOS, you can build applications using Xcode, the proprietary development environment from Apple, or with third-party development tools such as Microsoft Visual Studio.
When compiling an application for iOS or macOS, third-party development tools will invoke Xcode and the Apple SDKs behind the scenes to produce the binaries. Regardless of the tool you use, Xcode needs to know and recognize who is going to build applications on the Mac. For this reason, every developer needs a so-called developer account. A developer account is required to set up the proper development certificates on the Mac and to test and debug an application on a physical device. Actually, a developer account is also required to publish apps to the Apple Store. Apple provides the following options to get a developer account:
Free developer account: This is the most basic account and can be easily enabled with your Apple ID.
Apple Developer Program: This is a paid account and provides everything developers need to build, test, debug, and publish apps to the App Store. This account includes cloud-based analytics and allows for distributing private builds to testers.
Apple Developer Enterprise Program: This is a paid account and provides specific options for signing and distributing in-house apps within the organization.
MFi program: This is a special program that allows developers to get all the components, tools, and documentation required to build electronic accessories that connect to the iPhone, the iPad, and the iPod.
In this book, I will use the free developer account for your convenience. However, the free account has the following limitations that you should keep in mind once you get more experienced in building apps for iOS with Visual Studio and Xamarin:
You can deploy apps to only one physical device. This must be your own device.
You cannot publish apps to the App Store.
You cannot distribute an app to testers with the Test Flight service, and you cannot compile your code using the ad hoc or in-house configurations.
You cannot leverage tools and services such as iCloud, push notifications, in-app purchases, the Game Center, and the wallet.
Your Apple ID must not be already associated to other Apple Developer programs.
You can find more information about the aforementioned account options and pricing at http://developer.apple.com/programs . In the next sections, I will explain how to set up the free developer account in Xcode.
Installing and Configuring Xcode
The Apple SDKs and development tools are the foundation for building apps on a Mac machine. Actually, you do not need Xcode if you only want to build .NET Core applications with Visual Studio for Mac, but because this book also explains how to create iOS apps with Xamarin, Xcode is a requirement. This section explains how to install and configure Xcode before moving on to installing Visual Studio for Mac.
Installing Xcode
Xcode is the integrated development environment from Apple. You use Xcode to build native apps for macOS, iOS, and tvOS.
Of course, this is not the topic of this book, but Visual Studio for Mac invokes Xcode to compile your Xamarin projects for iOS and macOS, so you need to install it before you do anything else. Open the App Store and search for Xcode. If you click the Xcode icon, you will see all the information about the latest available release. Figure 1-1 shows how Xcode appears in the App Store.
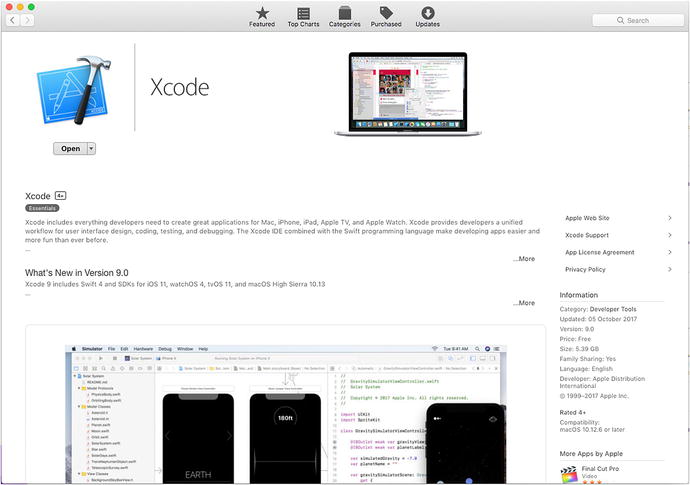
Figure 1-1. Installing Xcode from the App Store
On your machine, you will see Install instead of Open. The current version of Xcode is 9.0 and requires at least version 10.12.6 of macOS. The download size of Xcode is 5.39GB, so it will take some time to download and install. The App Store takes care of installing Xcode the proper way, so you just need to wait. The installation also includes all the necessary Apple SDKs and the iOS simulator, which will be useful when testing and debugging apps for the iPhone and the iPad.
Configuring the Developer Profile
After the installation has completed, the next step is configuring the developer profile inside Xcode. This involves creating a blank project and configuring the developer account so that Xcode can generate signing identities and team provisioning profiles.
Note
Signing identities and team provisioning profiles are required by Apple to sign and distribute your applications for iOS devices. A team provisioning profile contains an app identifier, one or more certificates that identify the developer (or developers), and a list of registered devices. A device such as an iPad or iPhone is registered when you connect it to the Mac; this is required by Xcode to generate the provisioning profile when building apps for iOS. If you are building applications for macOS, Xcode registers the current Mac machine.
To accomplish this, start Xcode and select “Create new Xcode project.” You can select any of the available project templates, but for the sake of simplicity, select Single View Application (see Figure 1-2) and then click Next.
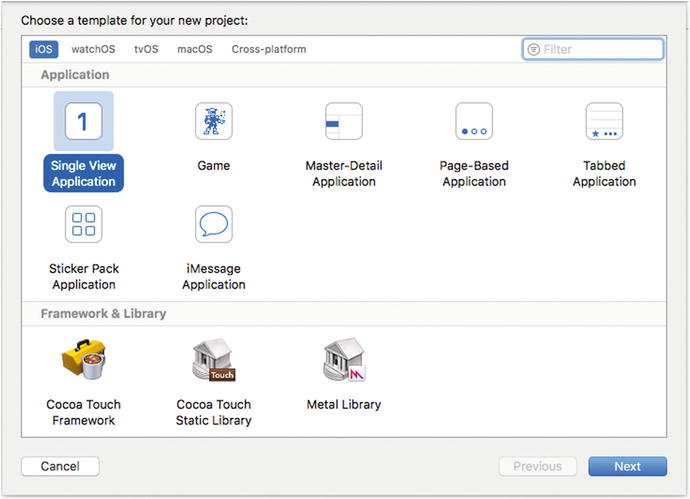
Figure 1-2. Selecting a project template
The next screen is of crucial importance. In fact, here you must specify some settings that will be used later in Visual Studio for Mac. Because you will not actually need to write code, it makes no difference at all what programming language (Swift or Objective C) or supported devices you specify here. The fields you must fill in are the following:
Product Name, which defines the application name. The product name you supply here will also be used in Visual Studio for Mac because of the association between the tools and your developer profile.
Team, which allows you to associate one or more developer accounts to the application. Click Add Account, enter your Apple ID, and then click “Sign in.” From the drop-down box, you will be able to select your Apple ID that will be recognized as Personal Team.
Organization Name, which contains your name or your organization’s name.
Organization Identifier, which represents a unique identifier for your organization. By convention, the organization identifier includes the com. prefix.
Bundle Identifier, which is actually a read-only, autogenerated field, but it is of particular importance. The bundle identifier uniquely identifies an application against the App Store and the Apple services. Xcode concatenates the organization identifier with the product name to generate the bundle identifier. Take note of the bundle identifier, as it will be used in Visual Studio for Mac when building apps for iOS with Xamarin.
Figure 1-3 provides an example that you can use as a reference.
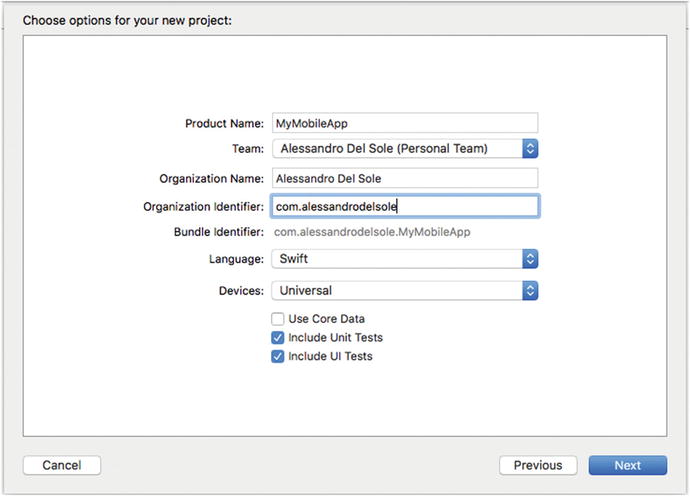
Figure 1-3. Configuring the project properties
When you click Next, Xcode will ask you to specify a target folder for the new project. Select any location, for example, the Desktop. After a few seconds, Xcode completes generating the certificates and provisioning profiles for the current developer account, and it shows the project properties. Figure 1-4 shows the Identity and Signing tabs, where you can see the application information and the provisioning profile information, respectively.

Figure 1-4. Identity and signing information for the current project
Now that the developer account has been configured and the provisioning profile has been generated, it is time to enable the developer mode for the current Mac machine. To accomplish this, select one of the available configurations for the iOS simulator (if you use Figure 1-4 as a reference, you can click where you see iPhone 7 Plus) and then start the sample app by pressing Command+R. Xcode will show a pop-up requesting your permission to enable the developer mode. Click Enable and wait for the application to be started in the simulator. You do not really need to work with the app at this point, so you can just break the application and quit the simulator.
Installing and Configuring Visual Studio for Mac
The final step in configuring your Mac is installing Microsoft Visual Studio for Mac. You can download the tool from http://visualstudio.com/vs/visual-studio-mac . When the download is completed, you will find the proper .dmg installer in the Downloads folder, so just click it to start the installation.
When the installer starts, you will need to click the Install Visual Studio for Mac button. You will then be prompted with the license agreement, which you must accept to proceed. After accepting the license, the installer will show the list of available components, as shown in Figure 1-5.
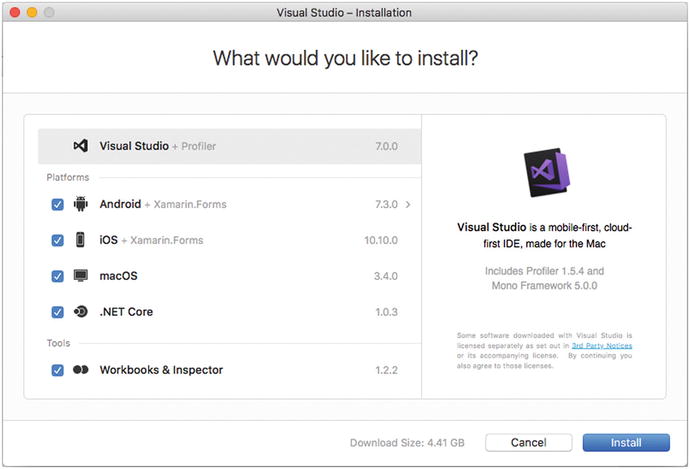
Figure 1-5. Selecting components to be installed
As you can see, you can only select both Xamarin and .NET Core components. For the sake of consistency with this book, make sure that all the components are selected and click Continue. Components’ names are really self-explanatory: Android is required to build Android apps; iOS and macOS are required to build apps for iOS and macOS, respectively; and Workbooks & Inspector provides instrumentation for Xamarin to analyze an application’s behavior. On the next screen, you will be invited to read and accept individual license agreements for the various SDKs that will be installed on your machine. Once you have accepted the license agreements, the installer will start downloading the required components, as shown in Figure 1-6 where you can see the operation in progress.
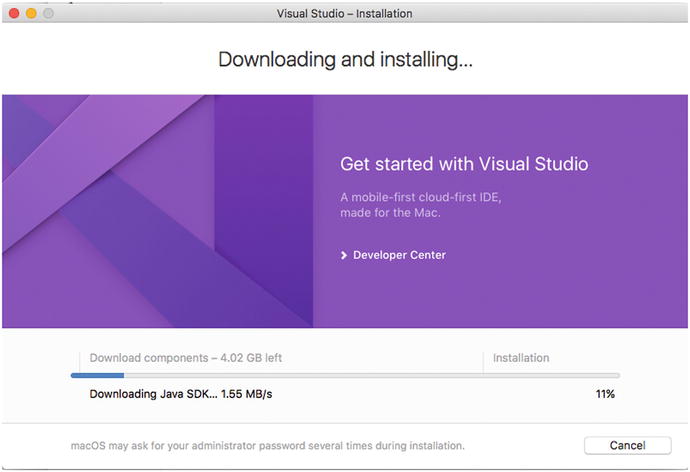
Figure 1-6. The installation progress
The installation process can take some time, because the download size can be up to 4.5GB depending on the selected components. At the end, you will find the Visual Studio icon in the Applications folder that you can easily open with the Finder tool. Double-click the icon to launch Visual Studio. When first started, the IDE will look similar to Figure 1-7 (your news items will vary).
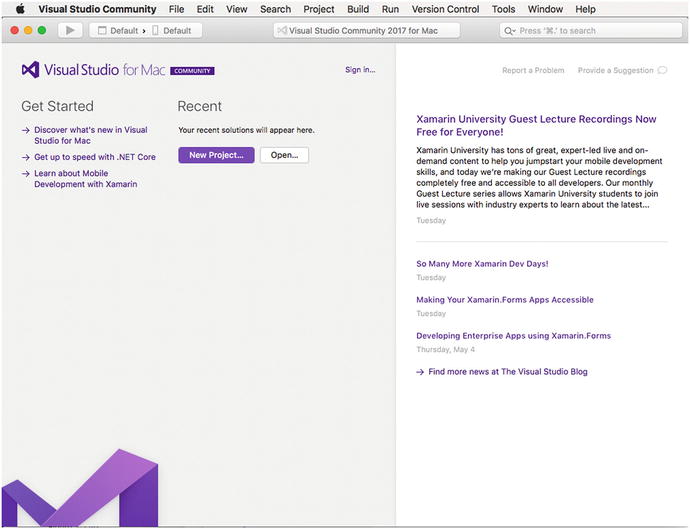
Figure 1-7. Visual Studio for Mac running for the first time
By default, when you install Visual Studio, you get the Community license. To unlock all the available features and services or in order to enable a different license if you downloaded Visual Studio from an MSDN subscription, it is strongly recommended that you log into Visual Studio for Mac with a Microsoft account, which is normally an e-mail address based on an Outlook, Hotmail, or Live provider. To accomplish this, simply click Sign In. A dialog will ask you to enter your credentials and will offer a shortcut to a web page where you can create a Microsoft account if you do not already have one. Once you have successfully signed in, you will see your username appearing instead of the Sign In shortcut. In the sign-in dialog, you will also be able to add multiple Microsoft accounts. This can be useful if you have different accounts for work and home or for development and testing. At this point, you have completed all the necessary steps to get your Mac computer ready for development with Visual Studio for Mac. Starting in the next chapter, you will learn how to use this powerful environment to build the next generation of applications based on the Microsoft stack.
Summary
To build applications with Visual Studio for Mac, you first need to configure the Mac for development. You need an Apple ID that is associated to the Apple services and that can be used as a developer account.
You can opt for a free developer account, which is perfect for development and debugging, or for a paid subscription. Whatever developer account you get, you need to install and configure Xcode and the Apple SDKs. Xcode is Apple’s proprietary development environment that ships with the Apple SDKs that Visual Studio for Mac invokes behind the scenes to compile Xamarin projects for iOS. The last step in configuring the development machine is, of course, installing Visual Studio for Mac, which you can install through a simple step-by-step installer. In the next chapter, you will start working with Visual Studio for Mac, and you will learn everything you need to know to be productive with the integrated development environment.