In Chapters 5 and 6, you saw how to create native apps for Android and iOS using the Xamarin.Android and Xamarin.iOS flavors with C# and Visual Studio for Mac. In both cases, you create solutions that rely on platform-specific ways to design the user interface and that provide full access to the operating system’s APIs through their libraries, which are certainly different from one another.
Though both Xamarin.Android and Xamarin.iOS are powerful, there are situations where your apps do not leverage platform-specific APIs (or at least very few), so you might want to write code once and create an app for both systems. The biggest limitation of that is that you need to create two different solutions with C# code that uses different libraries, and, most important, you need to redesign the user interface. Xamarin.Forms wants to solve a number of problems, providing Microsoft’s solution to cross-platform development by sharing the user interface and maximizing code reuse. In other words, with Xamarin.Forms, you code once, and your app runs on all the supported platforms. For the sake of completeness, it is worth mentioning that Xamarin.Foms also supports the Universal Windows Platform (UWP), but this is available only on Windows PCs. In fact, if you open a Xamarin.Forms solution created with Visual Studio on Windows, you will see that Visual Studio for Mac disables the UWP project.
Note
As for Xamarin.Android and Xamarin.iOS, this chapter cannot fully explain the Xamarin.Forms platform. For a complete reference, make sure you visit the official documentation at www.xamarin.com/forms . Additionally, though this chapter does not require you to be familiar with Xamarin.Forms, I assume you are familiar with some programming concepts such as data binding and asynchronous programming.
Introducing Xamarin.Forms
As you saw in previous chapters, Xamarin.Android and Xamarin.iOS generate solutions in which the user interface is designed using platform-specific objects and tools. Then you access native APIs in C#. With Xamarin.Forms, the development experience takes several steps forward by providing a layer that unifies the way you define the user interface for all platforms using a special flavor of the XAML markup, explained shortly.
The user interface you define in Xamarin.Forms is shared across Android and iOS (and UWP if you work with Visual Studio 2017 on Windows). To accomplish this, Xamarin.Forms maps native controls into a layer made of classes that are responsible for rendering the appropriate visual element depending on the operating system the app is running on. This way, a Xamarin.Forms solution can contain shared code, a Xamarin.Android project and a Xamarin.iOS project. Going in depth, Xamarin.Forms exposes a shared codebase for the user interface and data binding, plus a dependency service that allows invoking native, platform-specific code (as you will see in the next chapter). The code that is shared across platforms, including the user interface, is contained either in a portable class library (PCL) or in a shared project. I already provided explanations about PCLs and shared projects in Chapter 2, but I will review the most important concepts where appropriate in this chapter for your convenience, and I will also show how to use .NET Standard libraries at the end of the chapter. The biggest benefit of Xamarin.Forms is that, whether you choose a PCL or a shared project, the code you write here once will certainly run on all the supported platforms. So, with Xamarin.Forms, you can finally create cross-platform apps by simply sharing code. However, there are two particular situations you must be careful about.
Xamarin.Forms only maps visual elements that are available to all platforms. For example, both iOS and Android have labels and text boxes, so Xamarin.Forms exposes the Label and Entry controls that certainly will be available on both systems and rendered using the native controls. As a consequence, in Xamarin.Forms, a control exposes only those properties that are available on all platforms.
Xamarin.Forms is continuously evolving. As an implication, not all the features that we might expect from a XAML-based platform might be available today, but new and updated features become available in every major release.
The full list of controls available in Xamarin.Forms, together with their documentation, can be found at http://developer.xamarin.com/guides/xamarin-forms/controls . Xamarin.Forms actually consists of a NuGet package that Visual Studio for Mac automatically downloads and installs into the shared project. At this writing, the current version of Xamarin.Forms is 2.3.4.247. The best way to get familiar with a development platform is through an example, and the application you will build in this chapter is a simple news reader for Microsoft’s Channel9 web site ( http://channel9.msdn.com ), which will be useful to demonstrate a number of features both in the IDE and in Xamarin.Forms.
Note
Xamarin.Forms is nothing but a library that you can consume in C#. This library exposes a root namespace called Xamarin.Forms. In this chapter, you will often see type names that are not fully qualified, which assumes they are exposed by the Xamarin.Forms namespace. I will expressly specify if a type is exposed by a different namespace.
Creating and Understanding Xamarin.Forms Solutions
Visual Studio for Mac makes it really easy to create cross-platform apps with Xamarin.Forms via the specific project templates described in Chapter 2. More specifically, when you click New Project on the welcome page or select File ➤ New Solution, in the New Project dialog you will find the Forms App and Blank Forms App project templates under the Multiplatform node.
The Forms App project template generates a Xamarin.Forms solution that also includes an ASP.NET Core back end, whereas the Blank Forms App project template generates an empty Xamarin.Forms solution. Because ASP.NET Core has not been discussed yet, select the Blank Forms App and click Next. Once you discover how to work with ASP.NET Core in Chapters 10 and 11, it will be easy to connect a Xamarin.Forms project to a back end. On the next screen, you have to specify the app name and the organization identifier (see Figure 7-1). Enter News Reader as the app name, which must not be confused with the project name.

Figure 7-1. Specifying the app name, organization identifier, target platforms, and code sharing strategy
When you enter the organization identifier, Visual Studio generates the package identifier for both Android and iOS (for the latter, it is actually the bundle identifier). You can also specify the target platforms: Android and iOS are both selected by default, but you could use Xamarin.Forms just to target one. You might have many reasons to do this instead of using Xamarin.Android and Xamarin.iOS, for example, if you have existing experience with XAML and the PCL project type. In the Shared Code group, you can choose the project type you want to use for shared code between the portable class library and the shared library (that is, a shared project). As you might recall from Chapter 2, a shared library can be thought of as a loose assortment of files, such as code files, images, and XAML files. It does not produce a DLL library, and it can be just referenced from the projects in the solution it belongs to. It allows you to use preprocessor C# directives to invoke platform-specific code easily. For instance, in a shared library, you could write something like the following:
#if __ANDROID__// Write code invoking the Android APIs#elseif __IOS__// Write code invoking the iOS APIs#else//Write code invoking the Windows APIs#endif
A PCL is a special kind of library that will run on all the specified platforms and operating systems; thus, it offers a common set of APIs that varies and is restricted based on the supported platform. It does generate a compiled library that can be reused in other solutions and that can be distributed to other developers. It does not allow using preprocessor C# directives to invoke platform-specific code, so in Xamarin.Forms you have to use different patterns like the dependency service pattern.
Currently, it is not possible to select the .NET Standard Library for code sharing in the New Project dialog, but later in this chapter I will explain how to switch from a PCL to .NET Standard in the project options. .NET Standard provides a set of specifications for APIs that all the .NET development platforms, such as .NET Framework, .NET Core, and Mono, must implement. This allows for unifying .NET platforms and avoids future fragmentation. With regard to Xamarin.Forms, in this book I will always use the PCL for code sharing because it allows for better separation between shared code and platform-specific code, and it is also the most commonly used project type for code sharing in Xamarin.Forms. Finally, make sure the “Use XAML for user interface files” check box is selected. When you click Next, you will then have an option to specify the project name and the location, as shown in Figure 7-2.
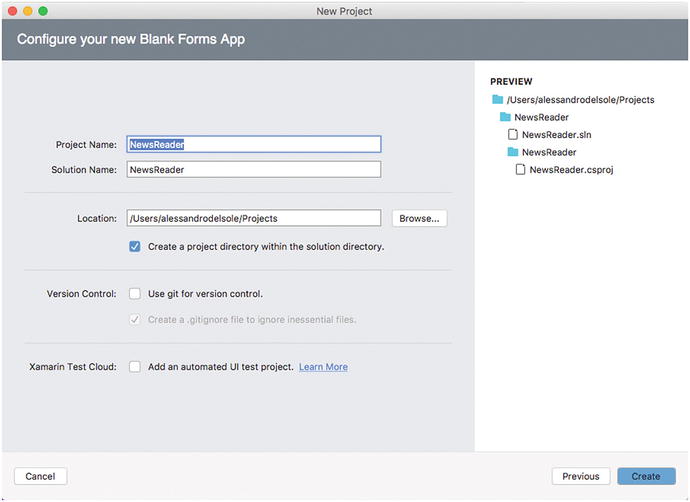
Figure 7-2. Specifying the project name and location
You can even enable version control and Xamarin Test Cloud, but these will not be covered in this chapter, so click Create when ready. After a few seconds, the new solution will be ready, and you will be able to browse its structure in the Solution pad.
Understanding the Structure of Xamarin.Forms Solutions
A blank Xamarin.Forms solution that you create with Visual Studio for Mac contains three projects: a project that contains shared code (in this case a PCL), a Xamarin.Android project, and a Xamarin.iOS project. If you were on Windows, the solution would also contain a Universal Windows Platform project. Both the Android and iOS projects have a dependency on the shared project.
All the projects in the solution have their own dependencies on libraries and NuGet packages; the shared project has a dependency on the Xamarin.Forms NuGet package, plus it depends on the so-called .NET Portable Subset (for PCLs), a subset of .NET that fits into the platforms that Xamarin.Forms supports. The Android and iOS projects have exactly the same structure you saw in the previous chapters because they are 100 percent Xamarin.Android and Xamarin.iOS projects. The difference is that with Xamarin.Forms you do not write code in these projects, except when you need to invoke platform-specific code; rather, you write all the code in the PCL project for code sharing. The PCL project can therefore contain XAML files for the user interface, C# files, assets, and resources. By default, the PCL project contains the App.xaml file for resources at the app level, a .xaml file that defines the user interface for the main page of your app, and a packages.config file that contains the list of required NuGet packages. You can also install NuGet packages into your PCL project as you would do with any other project types. In Xamarin.Forms, you must take care of installing NuGet packages at the solution level if the package has libraries that must be consumed by the Android and iOS projects as well as by the PCL. If you need NuGet packages that contain libraries that are only required in your shared code, you can restrict the installation to the PCL project only. In Xamarin.Forms, the most important project is therefore the shared project because here you will write the user interface and the related imperative code. You will then be able to set Android and iOS project properties exactly as you learned in the previous chapters, for example, about icons, compilation options, target devices, and digital signatures for publishing. Before you start designing the user interface and writing the code that reads Channel9’s feeds, it is important for you to know how the sample application will be architected; I will discuss designing the user interface before writing models and view models, both for the sake of consistency with previous chapters and to highlight the IDE features first.
Understanding the Architecture of the Sample Application
The sample application created in this chapter will be a news reader that downloads the content of Channel9’s RSS feed and displays a list of news. Such a list includes thumbnails for each item and provides an option of browsing the original web page for each item. RSS feeds consist of XML contents and are based on the RSS XML schema. If you are not familiar with RSS feeds, here is a lecture that might help: https://www.w3schools.com/xml/xml:rss.asp .
At a higher level, the architecture of the sample application consists of the following:
A model class called Item that represents a single item in the RSS feed
A service class called ItemService that is responsible for downloading the content of the RSS feed, returning strongly typed objects
A view model class called ItemViewModel, whose purpose is exposing data to the user interface in a way that is suitable for data binding
A main page that displays the list of news exposed by the view model
A secondary page that allows viewing the original web page for the selected item in the main page
As you will see in a few paragraphs , the Item class exposes the Title, Author, PublicationDate, and Thumbnail properties; the ItemViewModel class exposes a collection of Item instances called Items, which will be data bound to the user interface leveraging the built-in data-binding engine in Xamarin.Forms. With this information in mind, it will be easier to understand the XAML markup you will write in moments.
Managing the Application Life Cycle
The PCL project contains a file called App.xaml and its code-behind file, App.xaml.cs. The latter defines a singleton instance of the App class, which represents the running instance of the application. In the constructor of the App class, you can write initialization code, but it is important to underline how this file provides a common place to handle application life cycle events.
If you take a look at the code, you will in fact see the following methods:
public App(){InitializeComponent();MainPage = new NewsReaderPage();}protected override void OnStart(){// Handle when your app starts}protected override void OnSleep(){// Handle when your app sleeps}protected override void OnResume(){// Handle when your app resumes}
The constructor first invokes an infrastructure method called InitializeComponent that initializes required components. It then assigns the MainPage property with an instance of the root page for the app, in this case the page that was automatically generated when creating the project, NewsReaderPage. If you want to change the root page, you can simply change this assignment. Regardless of the operating system, the OnStart, OnSleep, and OnResume methods allow you to write code that the app should execute when it starts, when it goes in background, and when it resumes, respectively. This way, you do not have to deal with platform-specific life cycle events, and you can handle the application behavior in one place. For example, you can store the app’s state when the runtime invokes OnSleep, and you can restore the app state when the runtime invokes OnResume.
Designing the User Interface with XAML
Extensible Application Markup Language (XAML) is a markup language derived from XML that was specifically created to write a user interface with a declarative approach.
XAML was created many years ago as a way you could design the user interface in Windows Presentation Foundation (WPF) and then in Silverlight. Microsoft invested so much in XAML that it was adopted to design the user interface in Windows Phone/Windows Store apps, in the Universal Windows Platform (UWP) , and in Xamarin.Forms. At this writing, there are several XAML dialects between platforms, which means you have different visual element names in WPF/UWP and Xamarin.Forms. By the way, XAML has an identical structure and common behavior as to WPF and UWP, so if you are familiar with XAML in WPF, UWP, or Silverlight, you will certainly feel at home with Xamarin.Forms’ XAML.
Note
XAML in Xamarin.Forms adheres to Microsoft’s XAML 2009 specifications. At this writing, Microsoft is working on the so-called XAML Standard, a specification whose goal is to unify the various XAML dialects into one standard vocabulary. More details are available at http://blogs.windows.com/buildingapps/2017/05/19/introducing-xaml-standard-net-standard-2-0 .
With XAML, an XML node normally represents a layout or control, and XML attributes represent properties. With its hierarchical structure, XAML is a great way to create a complex user interface in a declarative mode. For example, the following XAML markup declares a page with a layout and two controls :
<ContentPage><StackLayout><Label Text="Enter your name here..."/><Entry x:Name="NameBox" PlaceHolder="Enter your name..." /></StackLayout></ContentPage>
It is worth mentioning that anything you can do in XAML, you can do in C#, which means that you could completely design the user interface of an application in C#, but using XAML provides many advantages such as the following:
Separation: The logic is clearly separated from the user interface.
Patterns: Because of separation, using XAML makes it easier to implement and use architectural patterns such as Model-View-ViewModel.
Designers can work on the user interface without interfering with the imperative C# code .
It is worth mentioning that, in the Xamarin.Forms terminology, controls are referred to as views. In a typical Xamarin.Forms project, the user interface is made of pages that contain layouts. Layouts allow for organizing and arranging visual elements dynamically and act as containers of views. Put succinctly, the hierarchy consists of pages containing layouts containing views. Pages and layouts deserve a more thorough discussion.
Understanding Pages and Layouts
Real-world apps are made of multiple pages. Think of the Facebook app: you see the news feed in the main page; then when you tap a friend’s name, a new page is opened and shows the friend’s profile. Xamarin.Forms provides a number of pages that satisfy the most common needs of a mobile app, and of course these pages are cross-platform, meaning they are available on Android and iOS (and on the Universal Windows Platform if you work with Visual Studio on Windows).
Every page has a specific layout and purpose and is represented by a class that inherits from a base class called Page. Table 7-1 summarizes the available page types in Xamarin.Forms.
Table 7-1. Available Page Types in Xamarin.Forms
Page | Description |
|---|---|
ContentPage | Single page that displays a root layout with nested visual elements. |
TabbedPage | A page that allows organizing visual elements into tabs. It is assigned with a collection of ContentPage pages, and each ContentPage is placed into a tab. |
MasterDetailPage | A page with a flyout on the left side (master) and a detail area. The flyout contains a menu that is represented by the so-called hamburger icon. |
CarouselPage | Similar to the TabbedPage as it is assigned with a collection of ContentPage objects, but it can be scrolled horizontally. |
NavigationPage | A special page that serves as the support for navigation between pages. It keeps track of the stack of the navigation. |
TemplatedPage | An object that you can use to create custom pages. |
In this chapter, you will see an example of navigation between two ContentPage objects. Within pages, the user interface is organized through the so-called layouts. The concept of a layout is not new since many other development platforms allow organizing the UI with layouts, such as Android and WPF and UWP. Layouts, also known as panels or containers, can be considered as containers of views, and their purpose is creating dynamic user interfaces by automatically changing the position and size of the views they contain according to conditions such as the device orientation or the screen size factor. In Xamarin.Forms, there are different kinds of layouts that satisfy the most common requirements for dynamic user interfaces, as summarized in Table 7-2.
Table 7-2. Available Layouts in Xamarin.Forms
Layout | Description |
|---|---|
Grid | A layout that can be divided into rows and columns |
StackLayout | A layout that allows placing controls near one another, horizontally or vertically |
AbsoluteLayout | A layout that will be placed at the specified coordinates and that will not change its position |
RelativeLayout | A layout whose position depends on some constraints |
ScrollView | A container that allows scrolling its content |
Frame | A container that draws a colored border around the visual element it contains |
ContentView | Allows aggregating layouts and views into a single view that can be reused as if it were a custom control |
A page can contain only one visual element, which is normally a layout that contains a hierarchy of nested layouts and views. The code snippet shown at the beginning of the “Designing the User Interface with XAML” section shows the definition of a ContentPage that contains a root StackLayout and two views. Now you will start designing the user interface of the sample application. As you can imagine, the focus here is on understanding how the Visual Studio for Mac IDE provides powerful tools for Xamarin.Forms. I will provide a description for the views that will be used, but for a full reference do not forget to visit the official documentation at https://developer.xamarin.com/guides/xamarin-forms/user-interface/controls/ .
Designing the User Interface
Differently from Xamarin.iOS and Xamarin.Android, where you have a real designer and a Toolbox, in Xamarin.Forms you need to design the user interface by writing the XAML markup manually. This is certainly a big difference if you have experience with the other Xamarin platforms or with technologies such as WPF and UWP on Windows, where you have instead a full designer. However, Visual Studio for Mac provides full IntelliSense completion for XAML code and a UI previewer, as you will see shortly.
In the Solution pad, double-click the NewsReaderPage.xaml file, which is also the main page for the application. When the XAML code editor is ready, write the following code, whose only purpose is to demonstrate IntelliSense and other editor features, inside the body of the ContentPage definition :
<StackLayout><Label Text="Enter some text:"TextColor="Red" FontAttributes="Bold"/><Entry Placeholder="Enter text here..."x:Name="Entry1"/></StackLayout>
While you type, you will immediately notice some amazing features in the code editor. First, you have full IntelliSense. Figure 7-3 shows IntelliSense in action, suggesting the available views in the given layout context.
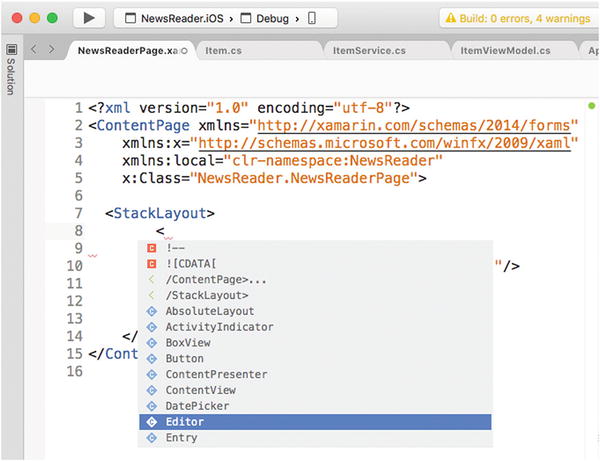
Figure 7-3. IntelliSense suggests visual elements that can fit into a specific context
As you get more familiar with XAML in Xamarin.Forms, you will see how IntelliSense only suggests visual elements that can fit into a specific context. For example, if you want to add a child element for a view, IntelliSense will only show visual elements that can be used as a child element for a view. When you scroll the list, a tooltip describes the view or layout. When you assign a property, in some specific cases IntelliSense can provide a preview based on the property type, such as for colors. Figure 7-4 demonstrates this.
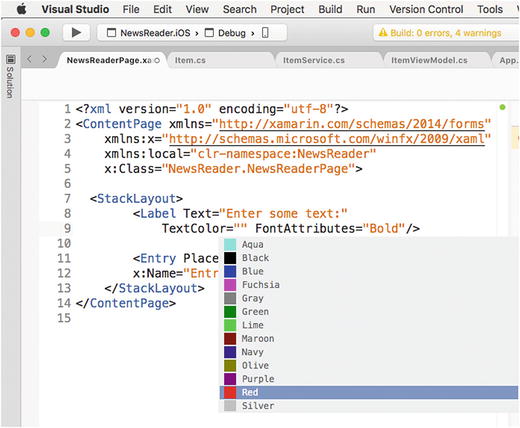
Figure 7-4. IntelliSense shows a specialized preview based on the property type
As I mentioned previously, though Visual Studio for Mac does not offer a real design tool, it provides the so-called previewer, which renders visual elements as you type in a preview, as shown in Figure 7-5.
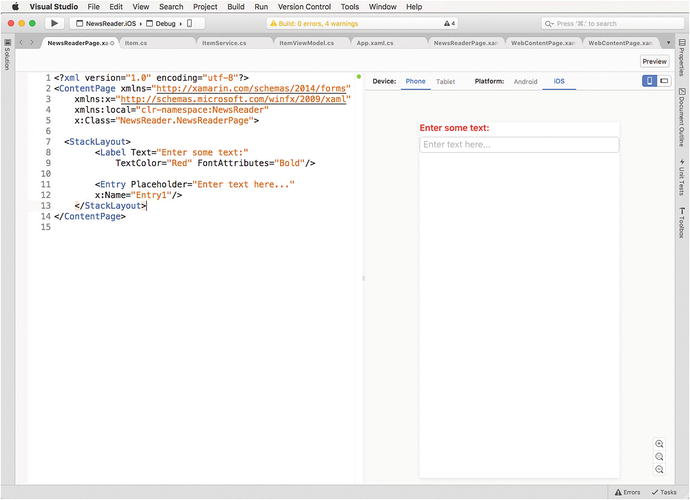
Figure 7-5. The Xamarin.Forms previewer renders the XAML as you type
The previewer should be enabled by default, but if you do not see it, click the Preview button at the upper-right corner of the editor window. You can select the platform for the preview (Android or iOS) and the device form factor (Phone and Tablet). You will first need to rebuild the project in order for the preview to render the XAML, and this must be done for both platforms. You can also rotate the preview to simulate a landscape or portrait view. Notice that the previewer will not render the user interface if the XAML contains data-binding expressions; this is why I’m showing how to work with the previewer with a code snippet that will not be part of the sample application, which heavily relies on data binding instead.
Note
If you create pages with a constructor that takes a parameter, you must also supply a parameterless constructor; otherwise, the previewer will not be able to render your XAML. Of course, this is not mandatory, but it is required if you want to use the previewer on such a page. An example will be provided shortly.
As the user interface becomes more complex, having a visual representation of the hierarchy of visual elements might be important. If you open the Document Outline pad, you will see a visual representation of the hierarchy in the user interface definition, and Figure 7-6 shows an example based on the current XAML markup.
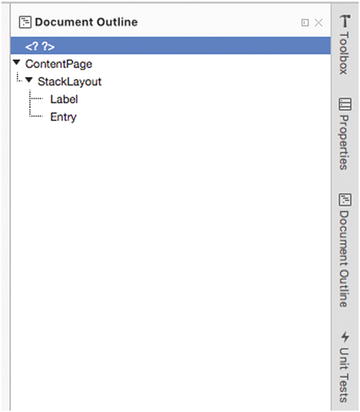
Figure 7-6. The hierarchical view of the user interface in the Document Outline pad
Now that you have seen the most important tools for Xamarin.Forms in Visual Studio for Mac, you can write down the markup of the user interface, so delete the StackLayout element and its content. For this example, the user interface is not really complex. The root layout is a StackLayout that contains a ListView. As with other platforms, in Xamarin.Forms a ListView allows you to present a list of data. Each item in the list is actually an instance of the Item class. For each instance, you must specify how the ListView should display its information. The Item class will be defined shortly, but you already know its property names, so you can prepare a so-called data template that defines how the information will be displayed for each Item instance. Let’s start with a first, simplified version of the XAML markup for the main page, which looks like the following:
<?xml version="1.0" encoding="utf-8"?><ContentPage xmlns="http://xamarin.com/schemas/2014/forms"xmlns:x="http://schemas.microsoft.com/winfx/2009/xaml" xmlns:local="clr-namespace:NewsReader"x:Class="NewsReader.NewsReaderPage" Title="Channel9 Reader"><StackLayout><ActivityIndicator x:Name="NewsActivity" IsVisible="false" IsRunning="false"/><ListView x:Name="RssView" ItemsSource="{Binding Items}"IsPullToRefreshEnabled="true" IsRefreshing="{Binding IsBusy}"Refreshing="Handle_Refreshing"ItemTapped="RssView_ItemTapped" HasUnevenRows="true"><ListView.ItemTemplate><DataTemplate><ViewCell><StackLayout Padding="2" Orientation="Vertical"><Image Source="{Binding Thumbnail}" HorizontalOptions="Start" /><Label Text="{Binding Title}" FontAttributes="Bold"/><Label Text="{Binding Author}"/><Label Text="{Binding PublicationDate}" /></StackLayout></ViewCell></DataTemplate></ListView.ItemTemplate></ListView></StackLayout></ContentPage>
The ContentPage root element represents a single-view page. Every page definition normally includes a number of so-called XML namespaces, which you can recognize by the xmlns literal. An XML namespace can be considered as the way XAML can reference .NET namespaces. This allows for using objects, such as views, exposed by .NET types also in XAML markup. This requires specifying an identifier for XML namespaces after the xmlns literal. By default, Xamarin.Forms includes the xmlns:local and xmlns:x namespaces, where local points to the current assembly and x refers to the root system namespace. With the same syntax you can include references to other .NET types, such as third-party views. Notice how you can assign a value for the Title property; this will be displayed when the page is in the navigation stack, as demonstrated shortly. ActivityIndicator is a view that is used to display an indicator while an operation is in progress. In this case, the IsVisible and IsRunning propertie are set to false because the indicator will be actually enabled in C# when the application is downloading content. The ListView receives the list of data through the ItemsSource property and via data binding. Data binding is a programming technique that allows for connecting two objects, keeping them in sync. If you are not familiar with data binding, make sure you read the official documentation at http://developer.xamarin.com/guides/xamarin-forms/xaml/xaml-basics/data_binding_basics . ItemsSource is data bound to a collection called Items that will be exposed by the view model. The data-binding syntax requires the {Binding} expression, followed by the name of the object you want to bind. The extended form is {Binding Path = objectName}, but Path is optional. Notice how an event handler is specified for the ItemTapped event, which is raised when the user taps an item in the list. The HasUnevenRows property allows for generating rows whose height is not fixed. Both iOS and Android offer the pull-to-refresh gesture, which allows users to pull and release a list with a finger to update the list content. Xamarin.Forms has support for this gesture through the IsPullRefreshEnabled property, set as true; the IsRefreshing property, which represents the state of the refresh operation and which is data bound to a Boolean property from the view model called IsBusy; and the Refreshing event, whose handler is responsible for refreshing the content. The data template is defined inside the DataTemplate node. When you define a data template in Xamarin.Forms, you actually need to define a cell. There are several cells available: EntryCell (label plus text box), TextCell (primary text plus secondary text), SwitchCell (label plus a Switch view), and ImageCell (label plus an image). These are limited to very specific situations, so you can use a ViewCell, a special cell that allows you to write custom data templates. In this case, the ViewCell is made of a StackLayout whose content is aligned vertically and in which the distance between the contained views is set with the Padding property. Padding is different from Margin, because the latter is used to set the distance between a view and other views in the parent layout. In this layout, you see four views. One is the Image view that will display a thumbnail for each item and that is bound to the Thumbnail property of the Item class (it has also the HorizontalOptions property assigned with Start, which aligns an image from left to right; other values are StartToExpand, End, EndToExpand). The others are three Label views that are data bound to corresponding string properties in the Item class. You can specify different appearance settings for each view, such as specifying a different font weight with the FontAttributes property.
Assigning Platform-Specific Property Values
Xamarin.Forms allows you to share the user interface on both Android and iOS, but there is a problem: the two systems manage the user interface differently, so the user interface you designed might be rendered differently on the two systems. To make sure the user interface is consistent, Xamarin.Forms allows you to specify platform-specific properties in both XAML and in C#. In XAML, you can use the OnPlatform tag that allows you to assign properties with specific values depending on the target system. For example, the following markup allows you to distantiate visual elements on iOS. Supplying the proper distance is important, otherwise your page could overlap the iOS tray bar:
<ContentPage.Padding><OnPlatform x:TypeArguments="Thickness" iOS="0,20,0,0" Android="0,0,0,0" /></ContentPage.Padding>
OnPlatform requires the data type of the property you are setting, which is System.Thickness for Padding, and the value for each platform. Notice that it is not required to specify platforms for which you are not going to change the default property value, so specifying Android in the previous code is actually redundant but is there to show you the syntax for the full expression. Another example is with the ListView because in iOS it is best practice that you make the item separator transparent.
<ListView.SeparatorColor><OnPlatform x:TypeArguments="Color" iOS="Transparent"/></ListView.SeparatorColor>
The second problem you have with the ListView is the difference in how Android and iOS manage their native counterpart views. In simpler words, Android allows for a dynamic row height, whereas iOS requires you to specify a fixed row height; otherwise, your contents will not be displayed as expected. Consequently, HasUnevenRows can be true on Android and should be false on iOS. With OnPlatform, you can easily satisfy both requirements as follows:
<ListView.RowHeight><OnPlatform x:TypeArguments="x:Int32" iOS="200"/></ListView.RowHeight><ListView.HasUnevenRows><OnPlatform x:TypeArguments="x:Boolean" iOS="false" Android="true"/></ListView.HasUnevenRows>
In both cases, the type argument is a primitive .NET type (Int32 and Boolean). In such situations, the name of the .NET type must be preceded by the x: prefix, which represents the System namespace in XAML.
Note
You are not limited to setting platform-specific property values in XAML with OnPlatform. You can certainly do this in C# code as well, and there are situations in which you will prefer setting property values in imperative code. In C#, you can use the RuntimePlatform property from the Device class that can be compared for equality to the iOS and Android string constants. An expression such as if(Device.RuntimePlatform == Device.iOS) is evaluated as true if your app is running on iOS.
For your convenience, the full XAML markup of the root content page is provided here after the modifications shown earlier:
<?xml version="1.0" encoding="utf-8"?><ContentPage xmlns="http://xamarin.com/schemas/2014/forms"xmlns:x="http://schemas.microsoft.com/winfx/2009/xaml"xmlns:local="clr-namespace:NewsReader" x:Class="NewsReader.NewsReaderPage"><StackLayout><ActivityIndicator x:Name="NewsActivity" IsVisible="false" IsRunning="false"/><ListView x:Name="RssView" ItemsSource="{Binding Items}"IsPullToRefreshEnabled="True" IsRefreshing="{Binding IsBusy}"Refreshing="Handle_Refreshing"ItemTapped="RssView_ItemTapped"><ListView.SeparatorColor><OnPlatform x:TypeArguments="Color" iOS="Transparent"/></ListView.SeparatorColor><ListView.RowHeight><OnPlatform x:TypeArguments="x:Int32" iOS="200"/></ListView.RowHeight><ListView.HasUnevenRows><OnPlatform x:TypeArguments="x:Boolean" iOS="false" Android="true"/></ListView.HasUnevenRows><ListView.ItemTemplate><DataTemplate><ViewCell><StackLayout Padding="2" Orientation="Vertical"><Image Source="{Binding Thumbnail}" HorizontalOptions="Start" /><Label Text="{Binding Title}" FontAttributes="Bold"/><Label Text="{Binding Author}"/><Label Text="{Binding PublicationDate}" /></StackLayout></ViewCell></DataTemplate></ListView.ItemTemplate></ListView></StackLayout><ContentPage.Padding><OnPlatform x:TypeArguments="Thickness" iOS="0,20,0,0" /></ContentPage.Padding></ContentPage>
The user interface for the first page is ready. Actually, you did not write the C# code that handles the page and its views yet because this requires you to first write the model, the service class, and the view model, which is explained in the next section.
Accessing Shared APIs in C#
Sharing code among platforms is at the core of Xamarin.Forms. In the previous section, you saw how to share the user interface; now in this section you will see how to share C# code that will run on all the supported platforms. Generally speaking, you write your C# code in the PCL project (or shared library if you selected that as the code sharing strategy), and the APIs you will be able to leverage are those summarized in the official documentation ( http://bit.ly/2qpwLMC ).
APIs that are not included in the portable subset cannot be used from the shared code and therefore require you to write platform-specific code in the iOS and Android projects, as demonstrated in the next chapter. Let’s leave this off for now, and let’s focus on writing the code required for the model, the service class, and the view model, which will give you a good idea of how you can both access shared APIs and share your code across platforms.
Implementing the Model
In most programming patterns, the model consists of one or more classes that map in code the structure of the data you need to represent. In the case of the sample application that downloads and displays the content of the RSS news feed from the Channel9 web site, you have just one model class that represents a single item in the news feed. RSS feeds consist of XML nodes and elements, so you need a class that represents an XML element in a .NET way.
To accomplish this, in the Solution pad right-click the PCL project name and then select Add ➤ New Folder. A new folder is added to the project, so enter Model as the new folder name. Organizing code in folders helps you keep your code well organized. Next, right-click the new folder name and then select Add ➤ New File. When the New File dialog appears (see Figure 7-7), make sure the Empty Class item template is selected, then enter Item as the new class name, and finally click New.
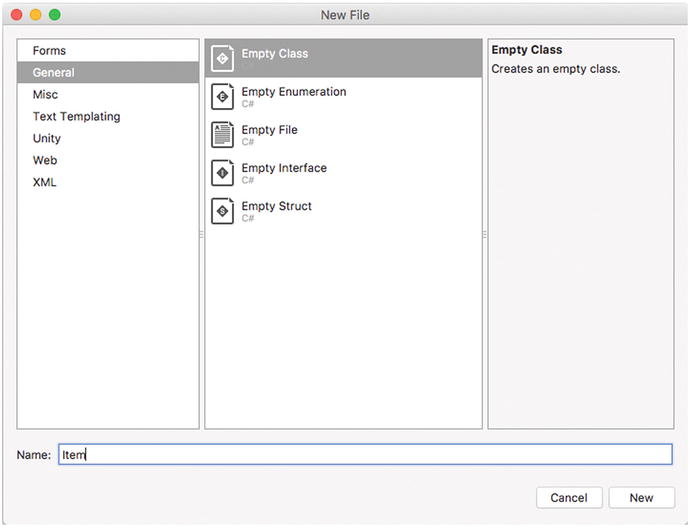
Figure 7-7. Adding a new empty class
Visual Studio generates a new C# file called Item.cs. The Item class must expose a number of properties that map XML attributes. In Xamarin.Forms, as well as in other XAML-based platforms such as WPF and UWP, views that are data bound to an object’s properties can automatically refresh their content if the bound object raises a change notification. In .NET (and Mono), objects can raise change notifications if they implement the INotifyPropertyChanged interface. With these considerations in mind, write the following code in the Item.cs file:
using System;using System.ComponentModel;using System.Runtime.CompilerServices;namespace NewsReader.Model{public class Item : INotifyPropertyChanged{public event PropertyChangedEventHandler PropertyChanged;public void OnPropertyChanged([CallerMemberName]string name = "") =>PropertyChanged?.Invoke(this, new PropertyChangedEventArgs(name));private string title;public string Title{get{return title;}set{title = value;OnPropertyChanged();}}private string link;public string Link{get{return link;}set{link = value;OnPropertyChanged();}}private string author;public string Author{get{return author;}set{author = value;OnPropertyChanged();}}private DateTime publicationDate;public DateTime PublicationDate{get{return publicationDate;}set{publicationDate = value;OnPropertyChanged();}}private string thumbnail;public string Thumbnail{get { return thumbnail; }set{thumbnail = value;OnPropertyChanged();}}}}
Notice how each property setter calls the OnPropertyChanged method to raise a change notification. The method takes advantage of the CallerMemberName attribute, which avoids the need of passing the property name as a parameter because the runtime automatically resolves the name of the caller property.
Accessing the Network with a Service Class
The next step is adding a service class. Its purpose is to download the content of the RSS news feed from the desired web site and generate a collection of Item objects, each per item in the news feed. Generally speaking, in Xamarin.Forms you can work with information on a network through the HttpClient class, from the System.Net.Http namespace. With this class, not only can you download contents, but you can also send HTTP requests through verbs such as GET, POST, PUT, and DELETE, which is the case of invoking web API services.
HttpClient exposes a number of asynchronous methods, which allow the caller client to stay responsive while the operation is in progress. By following the instructions in the previous subsection, add a folder called Services to the project, and add a new empty class file called ItemService.cs to this folder. The first part of the class definition contains using directives and two strings, one that contains the URL of the RSS feed and one that represents the XML namespaces used to specify media files in the feed.
using System;using System.Collections.Generic;using System.Linq;using System.Net.Http;using System.Threading;using System.Threading.Tasks;using System.Xml.Linq;using NewsReader.Model;using Xamarin.Forms;namespace NewsReader.Services{public static class ItemService{public static string FeedUri ="https://s.ch9.ms/Feeds/RSS";private static XNamespace mediaNS = XNamespace.Get("http://search.yahoo.com/mrss/");
The next part consists of a method called QueryRssAsync that uses the HttpClient class and its GetStringAsync method to download the content at the specified URL as a string. A LINQ query then generates a new Item object for each XML element called item and populates its properties with the corresponding XML attribute values.
// Query the RSS feed with LINQ and return an IEnumerable of Itempublic static async Task<IEnumerable<Item>> QueryRssAsync(){var client = new HttpClient();var data = await client.GetStringAsync(FeedUri);var doc = XDocument.Parse(data);var dcNS = XNamespace.Get("http://purl.org/dc/elements/1.1/");var query = (from video in doc.Descendants("item")select new Item{Title = video.Element("title").Value,Author = video.Element(dcNS + "creator").Value,Link = video.Element("link").Value,Thumbnail = GetThumbnail(video),PublicationDate = DateTime.Parse(video.Element("pubDate").Value,System.Globalization.CultureInfo.InvariantCulture)});client.Dispose();return query;}
The method returns an IEnumerable<Item> that the view model class will then be able to process in a way that is suitable for data binding. Two additional considerations are that the Channel9 RSS feed also includes links to thumbnail images (.jpg or .png), and the LINQ query invokes a method called GetThumbnail to retrieve the appropriate thumbnail link based on the device factor (the code is provided shortly); the DateTime.Parse method invoked to parse the publication date in the XML uses the invariant culture to avoid errors that might occur if the date format is not supported on the local device culture. The GetThumbnail method analyzes the url attribute of an XML item element and determines how many thumbnails are available, but it takes a step forward. Channel9’s RSS feed includes one or more thumbnails with different sizes, from the smaller to bigger, so GetThumbnail returns the smaller thumbnail if the device is a phone. Otherwise, it takes the first thumbnail available with the bigger size. This is the code, which includes closing brackets for the class:
private static string GetThumbnail(XElement node){var images = node.Descendants(mediaNS + "thumbnail");string imageUrl;switch (Device.Idiom){case TargetIdiom.Phone:imageUrl = images.FirstOrDefault().Attribute("url").Value;break;default:if (images.Count() > 1){imageUrl = images.Skip(1).FirstOrDefault().Attribute("url").Value;}else{imageUrl = images.FirstOrDefault().Attribute("url").Value;}break;}return imageUrl;}}}
The interesting piece here is the Device.Idiom property , of type TargetIdiom. The latter is an enumeration that allows you to understand if the app is running on a phone, a tablet, or a desktop machine (supported only on Windows 10). Possible values are Phone, Tablet, and Desktop. With this property, you can provide additional UI adjustments based on the device type.
Exposing Data with a View Model
A view model can be considered the place where you write the business logic of your app. It acts like a bridge between the model and the user interface and is responsible for exposing data in a way that XAML knows how to consume.
What the view model in the sample application needs to do is call the QueryRssAsync method from the service class, populate and expose a collection of Item instances that is suitable for data binding, and expose a property called IsBusy that will tell the UI if the view model is busy loading data. With this in mind, add a new folder called ViewModel to the PCL project and add a new file called ItemViewModel.cs to the folder. The code for the class is simple and looks like the following:
using System;using System.Collections.ObjectModel;using System.ComponentModel;using System.Runtime.CompilerServices;using System.Threading.Tasks;using NewsReader.Model;using NewsReader.Services;namespace NewsReader.ViewModel{public class ItemViewModel : INotifyPropertyChanged{public event PropertyChangedEventHandler PropertyChanged;public void OnPropertyChanged([CallerMemberName]string name = "") =>PropertyChanged?.Invoke(this, new PropertyChangedEventArgs(name));private bool isBusy;public bool IsBusy{get{return isBusy;}set{isBusy = value;OnPropertyChanged();}}private ObservableCollection<Item> items;public ObservableCollection<Item> Items{get{return items;}set{items = value;OnPropertyChanged();}}public ItemViewModel(){this.Items = new ObservableCollection<Item>();}public async Task InitializeAsync(){if (IsBusy)return;IsBusy = true;try{var result = await ItemService.QueryRssAsync();if (result != null){this.Items = null;this.Items = new ObservableCollection<Item>(result);}}catch (Exception){this.Items = null;}Finally{IsBusy = false;}}}}
The class implements the INotifyPropertyChanged interface to raise a notification that the user interface can catch to refresh its content, and this will be useful when you see how to implement pull-to-refresh in the UI to reload data. The InitializeAsync method invokes the ItemService.QueryRssAsync method and generates a new ObservableCollection of Item objects . This kind of collection should be always preferred in data-binding scenarios with XAML-based platforms. Notice how the code sets the value of IsBusy before and after invoking the service method. Now that you have model, service, and view model classes, you are almost ready to write the C# code for the main page. Before we dive into this, it is important to introduce another fundamental concept in Xamarin.Forms projects: navigation between pages.
Navigating Between Pages
More often than not, your apps will be made of multiple pages. Xamarin.Forms provides a built-in mechanism that allows you to navigate between pages easily. Every Page object exposes a property called Navigation, which represents the context-aware interface for navigating between pages and which is of type INavigation. The mechanism of navigation is essentially based on a stack: when the app opens a page, this is pushed to the stack, and when the app navigates back to a previous page, the other page is removed from the stack.
The order in which pages are managed on the stack is platform-specific and is not of interest at this point. The Navigation property exposes a number of methods you can call to manage navigation, as summarized in Table 7-3. All methods are asynchronous so that the user interface is always responsive while navigating.
Table 7-3. Available Methods for Navigation
Layout | Description |
|---|---|
PushAsync | Navigates to a new page |
PopAsync | Removes a page from the stack and returns to the previous page |
PushModalAsync | Navigates to a new modal page |
PopModalAsync | Removes a modal page from the stack and returns to the previous page |
PopToRootAsync | Returns to the root page of the app, removing all other pages from the stack |
InsertPageBefore | Inserts a page between two existing pages in the stack |
RemovePage | Removes a specific page from the stack without navigating back to the previous page |
Methods you will use more frequently are PushAsync and PopAsync. The benefit of using these methods is that Xamarin.Forms enables platform-specific navigation features such as the back button that both iOS and Android draw on the upper-left corner of a page and can understand if the user presses the hardware back button on Android. If you instead want deeper control over navigation, you might want to use PushModalAsync and PopModalAsync, but implementing the back and forward logic is then up to you.
To use navigation and invoke the aforementioned methods, the root page must be wrapped into a NavigationPage object. This means that, inside the App.xaml.cs file, you need to replace the assignment of the MainPage property as follows:
MainPage = new NavigationPage(new NewsReaderPage());When you want to navigate to a different page, you pass an instance of the new page to PushAsync as follows:
await Navigation.PushAsync(new CustomPage());If you want to pass data to the target page, you can use a parameterized constructor (an example is coming shortly). If you want to remove the page manually from the stack, you can call PopAsync as follows:
await Navigation.PopAsync();This must be invoked manually only if you have custom navigation logic; otherwise, the runtime will automatically remove the page from the stack when you press either the hardware back button on Android or the software back button on both iOS and Android. Now that you have basic knowledge of how navigation works, it is time to write C# code for the root page. Further information about navigation in Xamarin.Forms is available at http://developer.xamarin.com/guides/xamarin-forms/application-fundamentals/navigation/hierarchical .
Writing C# Code for a Page
The user interface in a page can be controlled through the C# code-behind file, which has a .xaml.cs extension. In the code-behind you can handle events, you can interact with visual elements, and you can write any code that is needed to make your user interface work. If you take a look back at the XAML code for the root NewsReaderPage page, you will see that there are two events that need to be handled: an item in the ListView is tapped, and a ListView must refresh its content when pull-to-refresh is invoked.
In addition to this, the page must create an instance of the view model class to load the data it needs to display. Let’s start from this last point. In the NewsReaderPage.xaml.cs file , add the following using directives first:
using NewsReader.Model;using NewsReader.Pages;using NewsReader.ViewModel;
Notice that the NewsReader.Pages namespace does not exist yet because a secondary page will be created in the next subsection, so the code will not compile at the moment, but ignore any errors for now. In the body of the class, add the following code:
private ItemViewModel viewModel;public NewsReaderPage(){InitializeComponent();this.viewModel = new ItemViewModel();}private async Task LoadDataAsync(){this.NewsActivity.IsVisible = true;this.NewsActivity.IsRunning = true;await this.viewModel.InitializeAsync();this.RssView.ItemsSource = this.viewModel.Items;this.NewsActivity.IsVisible = false;this.NewsActivity.IsRunning = false;}protected override async void OnAppearing(){base.OnAppearing();await LoadDataAsync();}
The constructor creates an instance of the view model class, which is represented by a variable of type ItemViewModel. Once you have this instance, you have to invoke the InitializeAsync method that populates the collection of Item objects. This is accomplished in a specific method called LoadDataAsync, which not only loads the data and performs data binding but also sets the visibility for the activity indicator view. Because you cannot call an asynchronous method from the constructor, you can take advantage of the OnAppearing event, which is raised right after a page has been rendered on the screen. This is also the right place to put code that you want to be executed every time a page is displayed, and in this case the code is data binding the collection of Item instances to the ItemsSource property of the ListView. Obviously, in this sample code the data will be downloaded and reloaded every time the page is displayed, but in a real-world app you should implement logic that actually reloads data only when necessary. The next step is handling pull-to-refresh. In the XAML code, the name for the Refreshing event handler is Handle_Refreshing, and the following is the code:
private async void Handle_Refreshing(object sender, System.EventArgs e){await LoadDataAsync();}
There is nothing really difficult in this code: when the event is raised, the collection is simply reloaded and data bound again by calling the LoadDataAsync method defined previously. The next step is handling the selection of an item in the ListView so that a secondary page is opened to display the original web page. This is accomplished by writing a handler for the ItemTapped event, which looks like the following:
private async void RssView_ItemTapped(object sender, ItemTappedEventArgs e){var selected = e.Item as Item;if (selected != null){WebContentPage webPage = new WebContentPage(selected);await Navigation.PushAsync(webPage);}}
The ItemTappedEventArgs object has a property called Item, of type Object, that represents the selected item in the list. A cast to the Item type is required because this will be passed to the constructor of a secondary page called WebContentPage. Then, with navigation, the code opens the secondary page. This secondary page is defined in the next paragraph.
Adding Secondary Pages
Visual Studio for Mac allows you to quickly add pages to a Xamarin.Forms project via the New File dialog. In the Solution pad, add a new folder called Pages to the PCL project and then right-click the folder name and select Add ➤ New File. When the New File dialog appears, locate the Forms template folder on the left. As you can see in Figure 7-8, you can select from among a number of item templates that are tailored for Xamarin.Forms, such as Forms ContentPage items and Forms ContentView items.
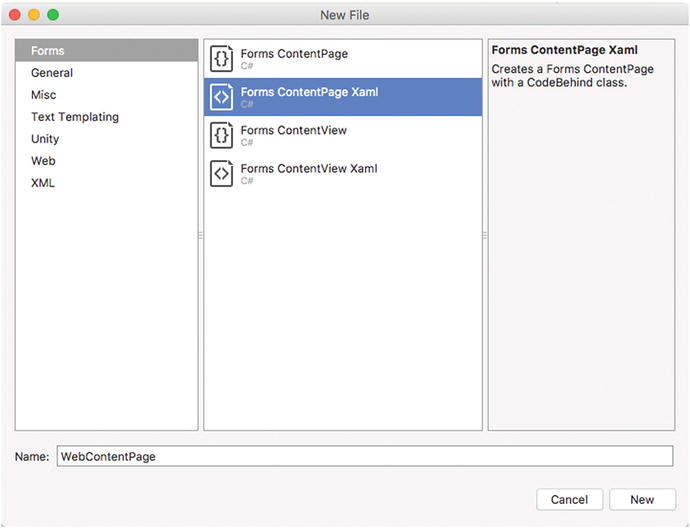
Figure 7-8. Adding a new XAML page
When you add a page or content view, make sure you select items whose name ends with Xaml if you want to take advantage of XAML markup to design the UI of a page or content view. In fact, other items are not based on XAML and require you to write the whole UI in C#. In this particular case, select the Forms ContentPage Xaml item and enter WebContentPage as the new page name.
After a few seconds, the new page will be visible in the Solution pad. Double-click WebContentPage.xaml so that the XAML editor and the previewer are enabled. As you can see, there is a ContentPage empty definition, whose content for this example will simply be a WebView control that allows for displaying HTML contents. So, the XAML looks like this:
<?xml version="1.0" encoding="UTF-8"?><ContentPage xmlns="http://xamarin.com/schemas/2014/forms"xmlns:x="http://schemas.microsoft.com/winfx/2009/xaml"x:Class="NewsReader.Pages.WebContentPage"><ContentPage.Content><WebView x:Name="ArticleWebView"/></ContentPage.Content></ContentPage>
Notice the importance of adding a name for the WebView so that you can interact with it in C#. In the code-behind file, you must add code that receives the instance of the Item selected in the previous page. The following is the C# code for the page:
public partial class WebContentPage : ContentPage{string link;public WebContentPage(Item feedItem){InitializeComponent();this.link = feedItem.Link;this.Title = feedItem.Title;}public WebContentPage(){InitializeComponent();}protected override void OnAppearing(){base.OnAppearing();ArticleWebView.Source = link;}}
As you can see, the constructor takes a parameter of type Item. The value of the Link property will be used to provide a source for the WebView control , and the Title property will be assigned to the Title property of the ContentPage so that it displays the title of the feed item.
A parameterless constructor would not be mandatory, but it is required if you want the previewer to be able to render the page. If you do not supply one, the previewer will show an error. Then you can simply assign the WebView.Source property with the URL of the web content. This property, of type WebViewSource, is very versatile because it is able to resolve contents starting from a URL and even from pure HTML passed as a string. After all this work, the sample project is ready for the first build and for debugging.
Building and Debugging Applications
As you saw earlier in this chapter, a Xamarin.Forms solution consists of three projects (in Visual Studio for Mac): a project for sharing code, which can be either a PCL or a shared library; a Xamarin.Android project; and a Xamarin.iOS project.
Both platform-specific projects reference the shared project, but this is not the startup project. Actually you build, debug, and test an app written with Xamarin.Forms exactly as you would do with Xamarin.Android and Xamarin.iOS. The only difference is that you explicitly need to set the startup project, which you can accomplish by right-clicking the Android or iOS project in the Solution pad and then selecting Set As Startup Project. A shortcut is to select the startup project in the Visual Studio’s toolbar, in the combo box at the left of the configuration name. Depending on the startup project, you will see the list of available configurations, which are the same as those you already saw in the previous chapters for Xamarin.Android and Xamarin.iOS. Also the same is the way you choose a target device or emulator once you have selected the startup project and configuration.
You can build a project individually by selecting Build ➤ Build ProjectName (where ProjectName is the name of your real project) or the whole solution by selecting Build ➤ Build All. Not surprisingly, all the concepts explained in the previous chapter about configuring Android and iOS app packages certainly apply to a Xamarin.Forms solution: in fact, you still need to edit the Android manifest in the Xamarin.Android project and the Info.plist file in iOS, and you will still configure the build output, including provisioning profiles and signing identities exactly as you already learned. Additionally, creating app archives for publishing has the same behavior, but this time you do not have two separate solutions with separate platform-specific projects. Rather, you have a single solution with both platform-specific projects in one place.
With regard to the sample application, you need to set the Internet permission in the Android manifest (Project ➤ Options ➤ Android Application). You can then supply custom icons and metadata, but this is left to you as an exercise. Once you have configured your build options, manifests, and settings, I recommend you use the Build ➤ Build All command the first time you build your solution. When ready, you can start debugging the sample app on both iOS and Android, and obviously, you will be able to leverage all the debugging tools described in Chapter 3. Figure 7-9 shows the sample app running on both iOS and Android.
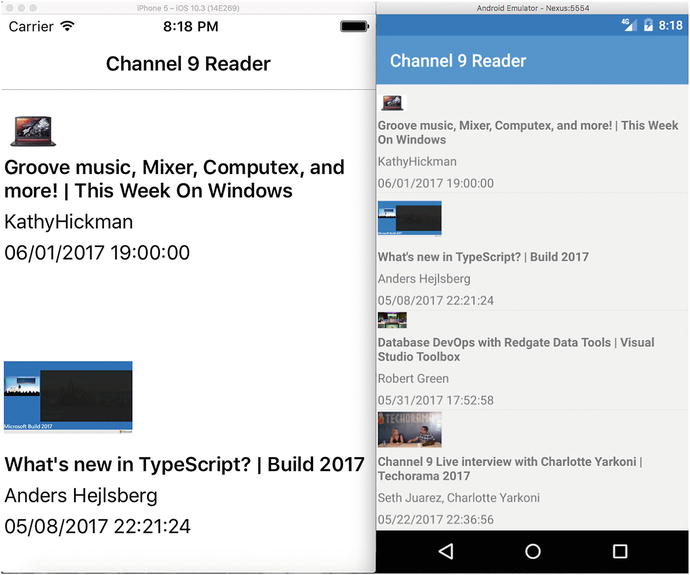
Figure 7-9. The sample app running on both Android and iOS
You can also certainly use the Xamarin Live Player app to test your app instead of using an emulator. As I mentioned previously, you can use the same techniques described in Chapters 5 and 6 to publish an app to the Google Play and Apple Store, respectively. With specific regard to iOS, do not forget to follow all the steps required to enable provisioning profiles, signing identities, and certificates.
Note
There is a known issue in Xamarin.Forms that might cause a TypeLoadException on Android with the WebView control ( https://bugzilla.xamarin.com/show_bug.cgi?id=37499 ). If you experience this error, open the Android project options and, in the “Target framework” box on the General tab, make sure that the “Use latest installed platform” option is selected; then rebuild the solution.
XAML Compilation
In Xamarin.Forms, you can optimize the build process with the so-called XAML compilation, or XAMLC. Without XAML compilation, XAML files are included in the app package, and then the runtime compiles them at app startup. With XAML compilation, XAML files are compiled into the app package at build time. This not only improves the resulting package but also allows you to discover at compile time errors in XAML that otherwise would be detected only at runtime.
XAML compilation is disabled by default to preserve backward compatibility, but it can be enabled using the Xamarin.Forms.Xaml.XamlCompilation attribute. This attribute can decorate both namespace definitions and type definitions. In the first case, all types belonging to that namespaces are subject to XAML compilation. The following is how you decorate a namespace and a class with the XamlCompilation attribute:
// Applying XAMLC at the namespace level[assembly:Xamarin.Forms.Xaml.XamlCompilation(Xamarin.Forms.Xaml.XamlCompilationOptions.Compile)]// Applying XAMLC at the class level[Xamarin.Forms.Xaml.XamlCompilation(Xamarin.Forms.Xaml.XamlCompilationOptions.Compile)]
If you experience the error MT 2001 (“Could not link assemblies. Reason: value cannot be null”) at build time, the reason might be that XAMLC is enabled. Should this happen, remove the XamlCompilation attribute and retry.
Configuring PCL Project Options
You can customize and configure the project options for a PCL project. To accomplish this, right-click the PCL project in the Solution pad and select Options. The Main Settings tab is identical to what you saw for other project types, such as .NET Core, Xamarin.Android, and Xamarin.iOS. Under Build, the General tab appears different (see Figure 2-20).
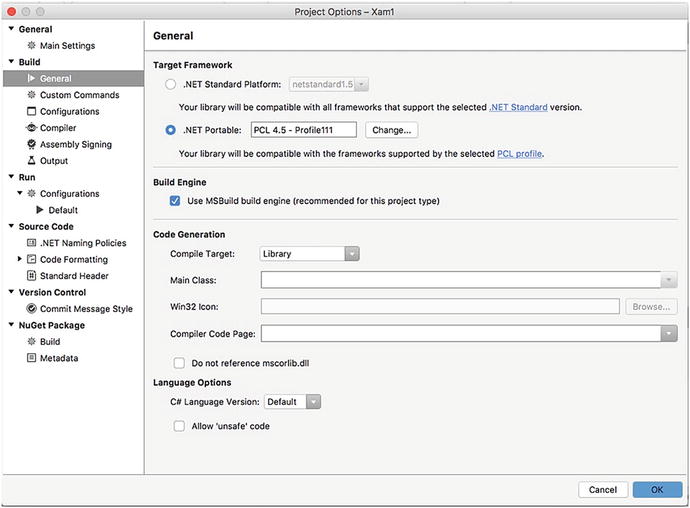
Figure 2-20. The General tab for a PCL
Note
These settings are not restricted to the PCL project in Xamarin.Forms. Instead, they are available in any PCL project. Normally, you will not change the PCL profile in Xamarin.Forms, but it is not uncommon in PCL projects outside Xamarin.
In the Target Framework group, you can specify the project target. By default, this is .NET Portable, and the value is PCL 4.5 – Profile111. PCL profiles represent the combination of platforms that the library must target. A full list of available profiles is available at https://portablelibraryprofiles.stephencleary.com . In Xamarin.Forms, it is not recommended at all to change the target. In PCL projects outside a Xamarin.Forms solution, you can click Change, and then you will be able to pick a different profile from a list or to individually select platforms you intend to target. Additionally, you can switch from a PCL to a .NET Standard library by selecting the corresponding item (see the next subsection). At this writing, Visual Studio for Mac only supports up to .NET Standard 1.5 for Xamarin, and this version of the specification does not fully support all the .NET frameworks. For this reason, leave the current selection unchanged. The Build Engine check box is enabled by default and allows Visual Studio to run the MSBuild engine to build the solution, which is certainly the recommended choice. The other options are the same as you already saw previously with regard to .NET Core and Xamarin native projects.
Moving from PCLs to .NET Standard Libraries
I already introduced .NET Standard in this book, but it is worth mentioning that Visual Studio for Mac quickly allows you to move from PCL projects to .NET Standard libraries through the project options. For the sake of consistency, I suggest you follow the discussion for now and make the changes discussed here only after you complete reading this chapter.
In the Solution pad, right-click the PCL project name and then select Options. On the General tab of the Project Options window, you will see a group called Target Framework, and you will see that the current target framework is .NET Portable. Here you have an option to change the selection to .NET Standard Platform and to select the .NET Standard version (see Figure 7-10).
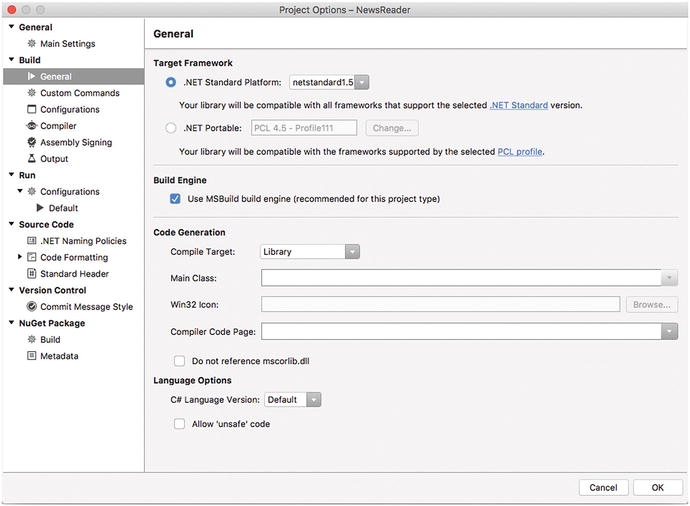
Figure 7-10. Changing the target framework to .NET Standard Platform
My recommendation is that you leave the version number proposed by Visual Studio. When you select the .NET Standard Platform target, you will be able to share across platforms all the APIs discussed in the official documentation at http://docs.microsoft.com/en-us/dotnet/standard/library . When ready, click OK and rebuild the solution. There is nothing else you have to do at this point.
Note
In the near future, .NET Standard will be the preferred way to share code across platforms, and this is true not only for Xamarin but also for other development technologies. In addition, the .NET Core runtime already works only with .NET Standard libraries. For these reasons, I suggest you spend some time getting more familiar with .NET Standard and reading the documentation.
Analyzing Applications with Instrumentation
Xamarin ships with some interesting and useful tools that are the perfect companions for the debugger and that allow you to analyze an app to investigate performance issues and to analyze the behavior of the user interface. In this section, you will get started with the Xamarin Profiler and the Xamarin Inspector tools. Notice that their usage is not restricted to Xamarin.Forms, but discussing them in this chapter is a better option now that you have basic knowledge of both XAML and platform-specific UI frameworks.
UI Debugging with the Xamarin Inspector
The Xamarin Inspector is a tool that allows you to analyze the behavior of the user interface while the application is running. Among the others, the Inspector allows you to even see the XAML view definitions and their property values. To start the Inspector, first start your app for debugging, and then in the debug toolbar click the last button on the right. After a few seconds the Xamarin Inspector will start in a separate window.
When it starts, it is in the so-called REPL mode, which allows you to use the tool as an interactive read-eval-print-loop console. This is not what you need, so click the rightmost button at the upper-right corner, which enables Inspector mode. At this point, the Inspector will show the hierarchy of the controls in the user interface, the property values for the selected control, and a live preview of the UI that you can rotate with the mouse in order to see the UI layers. Figure 7-11 demonstrates this.
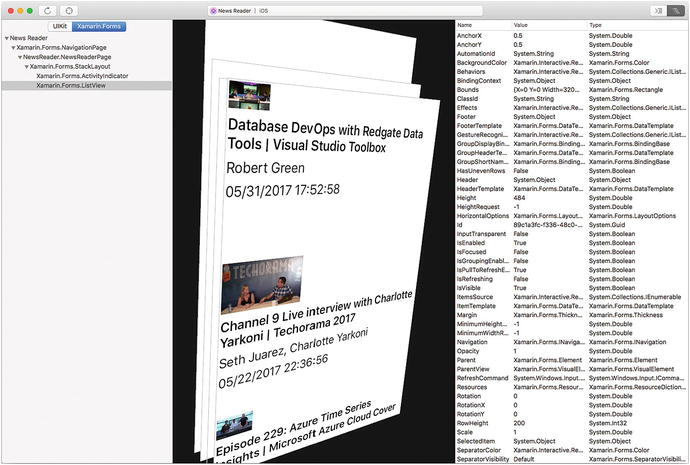
Figure 7-11. Analyzing the UI behavior with the Xamarin Inspector
When you select a view in the running app, the Inspector will highlight that view, and it will show its property values. As you can see, the tool shows the property name, its current value, and its .NET type. Not limited to this, you can change a property value in the Value column where allowed, and the new value will be immediately reflected in the running app so that you can have the immediate perception of how the user interface elements appear with different values. The Xamarin Inspector is even more powerful: you can switch to the native view of UI elements by clicking the appropriate button at the upper-left corner, where Xamarin.Forms is the default selection. In Figure 7-11, which is based on the iOS version of the app, you can see the UIKit button. If you switch to the native view, you will not only see the hierarchy of views changing to display native control names, but you will also see the corresponding property names and values on the right. Also, the native view provides more granularity of control over the single UI elements that you will be able to select and highlight directly in the preview and then investigate or change their property values.
Profiling Apps with the Xamarin Profiler
The Xamarin Profiler is a tool that allows you to analyze an app for performance issues, which might involve memory and CPU usage or where the application spends most of its time. The Xamarin Profiler can be launched as a stand-alone application against different kinds of targets, but the simplest way to use it is by selecting Run ➤ Start Profiling in Visual Studio.
When the Profiler starts, it will prompt you with a list of possible investigations you can perform against the app, summarized in Table 7-4.
Table 7-4. Analysis Tools in the Xamarin Profiler
Tool | Description |
|---|---|
All Instruments | Allows you to execute all the available analysis tools |
Allocations | Analyzes memory usage by tracking object allocations |
Cycles | Analyzes and detects reference cycles |
Memory | Analyzes memory to find problems |
Performance | Analyze memory and CPU usage for performance issues |
Time Profiler | Profiles a running app at regular intervals |
Figure 7-12 shows an example based on the All Instrument tool.
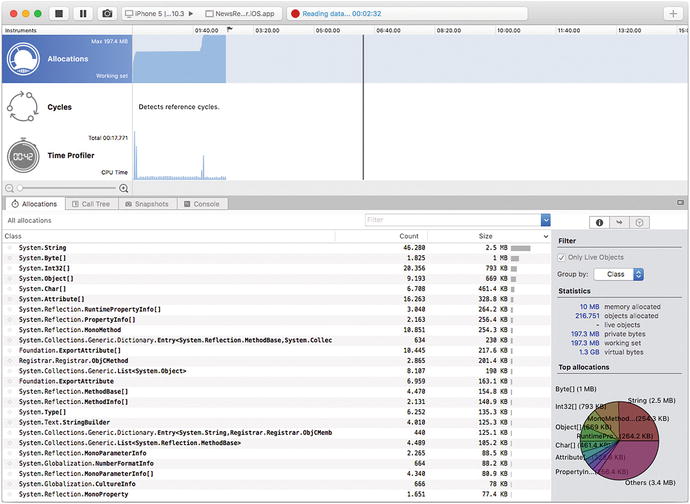
Figure 7-12. Investigating performance issues with the Xamarin Profiler
As you can see, the Allocations tool displays the list of object instances and their numbers and size in memory, which can be useful to analyze if the number of instances of an object is reasonable or if there might be a memory leak. The Cycles tool has detected no reference cycles in the sample app, and the Time Profiler tool is showing where and when the app is consuming more CPU resources. In the current example, you can see a peak at the app startup, which is reasonable. On the right side of the window, you can see statistics and a pie chart with top allocations. In the example, only 10MB of memory are allocated by the app, which is pretty good. You can click the Call Tree tab to see the hierarchy of method calls, and a very interesting tool is Snapshots. With this tool, you can take a picture of the memory at a certain point in time, storing the list and number of allocated objects and their types. If you take multiple snapshots, you can then open the Snapshots tab and compare the number of allocate objects between snapshots, as demonstrated in Figure 7-13.
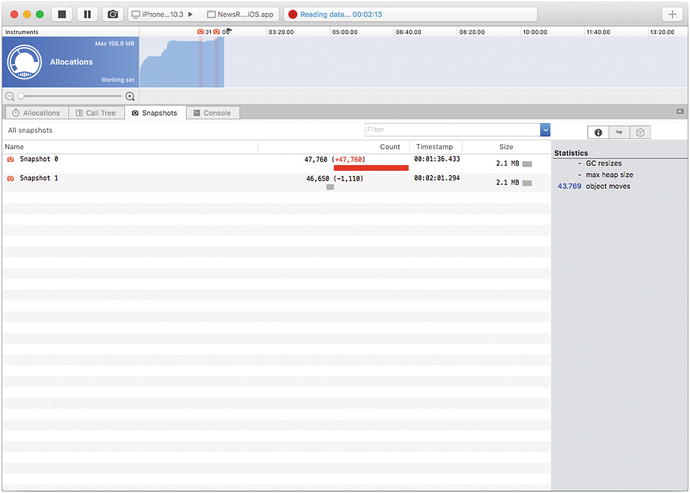
Figure 7-13. Comparing memory snapshots
In summary, the Xamarin Profiler is a useful tool when you need to investigate different types of performance issues. You can find more detailed information about this tool at http://developer.xamarin.com/guides/cross-platform/profiler/ .
Summary
In this chapter, you got started with Xamarin.Forms, Xamarin’s framework that allows you to share the user interface and non-platform-specific code across multiple platforms. With Xamarin.Forms, you can create cross-platform solutions by focusing on code sharing and by designing the user interface leveraging XAML, the markup that Microsoft created for declarative user interface definitions.
With Xamarin.Forms, you can share code using a PCL project or a shared library, and in this shared project you can write all the cross-platform code. In the sample application described in this chapter, you saw how you can design a shared user interface and how to tailor it for different platforms and devices, you saw how to access APIs included in the .NET Portable Subset, and you saw how to navigate between pages. Finally, you saw how to build and debug a Xamarin.Forms solution, and you also got started with two interesting Xamarin tools: the Profiler for analyzing performance issues and the Inspector for analyzing the behavior of the user interface. Xamarin.Forms is actually much more powerful than you might think, and therefore it deserves another chapter for further details. In Chapter 8, I will explain how to write and consume platform-specific code in different ways, and, again, you will see how Visual Studio for Mac simplifies the job.