With .NET Core, you can create cross-platform ASP.NET web applications based on the Model-View-Controller (MVC) pattern that run on Windows, macOS, and Linux. For the first time, with .NET Core you can create web applications that span platforms using your favorite programming language: C#. Among others, one of the reasons that make this possible is the open source, cross-platform C# compiler offered by the .NET Compiler Platform (also known as Project Roslyn).
This is a tremendous benefit because you are no longer limited to publishing your .NET web apps to Windows hosts (including Azure), and you can easily deploy web applications to Mac and Linux servers reusing your existing C# skills. In this chapter, you will learn how to create an ASP.NET Core web application and how to publish it to Microsoft Azure as the host, directly from Visual Studio for Mac. You will see how the IDE simplifies the whole application life cycle, from development to deployment. For a better understanding, I will provide an example based on a web application that consumes Microsoft Cognitive Services to analyze the content of a picture and that stores the analysis result into a SQLite database, using Entity Framework Core for data access. To complete all the steps described in this chapter, you need a Microsoft Azure subscription. If you do not already have one, you can get a free trial at http://azure.microsoft.com/en-us/free . Make sure you enable the spending limit on your subscription so that you will not be charged if your credit threshold is reached. Being familiar with HTML and concepts such as lambda expressions in C# will be helpful.
Note
As you can imagine, it is not possible to explain all the APIs in the ASP.NET Core framework, and going into the details of MVC is beyond the scope of this chapter, where the focus is on the Visual Studio for Mac tooling. So, this chapter assumes you are somewhat familiar with the ASP.NET technology and with the MVC framework. I will now provide a brief overview of MVC; I recommend you add the official documentation link to your bookmarks. It is available at http://docs.microsoft.com/en-us/aspnet/core/ .
What Is ASP.NET Core?
ASP.NET Core is an open source and cross-platform framework for building modern, cloud-based, connected applications, such as web applications, IoT apps, and mobile back ends. ASP.NET Core provides an optimized development framework for applications that are deployed to the cloud or run on-premises and that consists of modular components. The source code for ASP.NET Core is available on GitHub at http://github.com/aspnet/Home , and Microsoft is accepting contributions from the developer community. At this writing, ASP.NET Core supports the C# and F# programming languages, and support for Visual Basic is planned.
Like .NET Core, ASP.NET Core ships entirely as NuGet packages for improved modularity, and both applications and services can be hosted on Internet Information Services or self-hosted in your own process. As you will see later in this chapter, ASP.NET Core inherits from ASP.NET the so-called model binding , a runtime feature that can map parameters passed with HTTP requests to properties of .NET objects. Put succinctly, ASP.NET Core will be the framework of choice if you want to build web apps and services that run cross-platform, are fully testable, and can be deployed easily regardless of a cloud-based or on-premises host. In a layered architecture, ASP.NET Core is a layer upon the .NET Core architecture described in Chapter 9, so it relies on the CoreCLR, the core libraries and NuGet packages, the C# compiler built upon Roslyn, and .NET Standard.
What Is MVC?
Model-View-Controller (MVC) is the name of a programming pattern built on top of the following elements:
Model: The business objects that represent the data an application needs to work with
Controller: An intermediate object that exposes and manages the model based on the business logic rules
View: The user interface of an application that invokes actions in a controller based on the user input and that displays the result
In ASP.NET and ASP.NET Core, the model is made of C# classes that represent your data. For example, a C# class that maps a table in a database is part of the model; controllers are C# classes that provide methods that execute operations against the model, such as queries or create, read, update, delete (CRUD) operations ; and the view is the full user interface made of HTML pages that invoke operations in controllers, such as when the user clicks a button to load or insert data. If you build an application for order management, an Order class might be the model that represents the Orders table in the database; an OrderController could expose methods that allow querying, adding, and updating orders; and an HTML page displays the list of active orders and controls that allow you to add or update orders based on the user input. Notice that model and controllers are not limited to working against databases. In fact, you can map anything you need with a business object, and you can even execute operations from controllers without having a model, such as when you call a web service. Additionally, the ASP.NET Core MVC framework supports identity management and automatically provides plumbing code that configures an app startup. More considerations about MVC will be provided when discussing the sample application in the next sections.
Creating an ASP.NET Core Web Application
You will now build a sample ASP.NET Core web application that allows users to upload an image to the server and that invokes Microsoft Cognitive Services to perform image analysis and recognition. The result of the analysis on each image will be stored in a SQLite database. Microsoft Cognitive Services is part of the artificial intelligence services that Microsoft is offering. Among the available services, which you can discover at http://azure.microsoft.com/en-us/services/cognitive-services , the service you will use is called Computer Vision, and it is extremely powerful in that it can provide a high-fidelity, natural-language description of the content of a picture, and it can also recognize celebrities. Microsoft Cognitive Services supports HTTP requests with HTTP verbs, headers, and contents and returns the result of the analysis in the form of JSON objects. You will see in a few moments how to send HTTP requests to Cognitive Services in C# and how to parse the JSON response.
Cognitive Services is now part of the Microsoft Azure platform, so the first thing you need to do is enable it in the Azure Management Portal. Assuming you already have activated a trial or paid Azure subscription, log into the Azure Management Portal ( http://portal.azure.com ). Once logged in, click New ➤ AI + Cognitive Services ➤ Computer Vision API. You will be asked to enter some basic information about the new service you are going to create (see Figure 10-1):
Service name: This identifies your app service. For consistency with the figures in this chapter, call the service MyComputerVision.
Subscription: This is Azure subscription that will host the service (if you have more than one subscription).
Location: This represents the data center where your service will be provisioned, so make sure you select the location that is nearest to you (for example, my choice is West Europe because I live in Italy).
Pricing tier: Make sure you select the cheapest option possible (a free option should be available), and also make sure you read the pricing details to avoid any doubts.
Resource group: This allows you to easily and logically group Azure resources you create. You can choose to create a new resource group or select an existing one. For example, create a new resource group called MyResourceGroup.

Figure 10-1. Adding a new Computer Vision service
Accept the agreement and click Create. After the service has been created, you will be able to access its details from the home page. Figure 10-2 shows the new service details, where you should pay attention to two items: the Computer Vision service’s endpoint and the “Show access keys” hyperlink.

Figure 10-2. Details of the Computer Vision service
The endpoint is the service URL you will send HTTP requests to, whereas the “Show access keys” hyperlink allows you to view two secret keys that were generated for you and that you will need to include in your code when sending pictures to the service for analysis. Copy one of the two access keys onto the clipboard or to a text file since it will be used shortly. As you can see, the Azure Portal displays rich monitoring information about the service usage. Now that you have a service enabled, it is time to create a new ASP.NET Core application. In Visual Studio 2017 for Mac, select File ➤ New Solution, and in the New Project dialog, select the ASP.NET Core Web App project template in the .NET Core template folder, as shown in Figure 10-3.
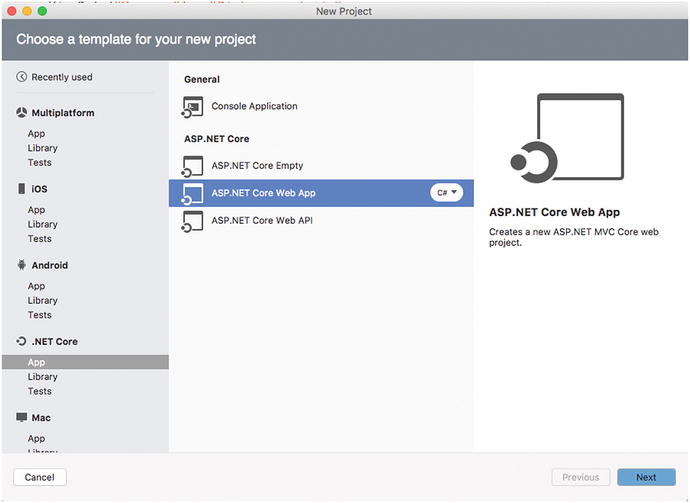
Figure 10-3. Creating a new ASP.NET Core web project
Click Next. If multiple versions of .NET Core are installed on your system, you will be asked to specify what version of .NET Core should be used for the new project. For the current example, select either version 1.1 or 2.0 and then click Next. Like with the other project templates discussed in the previous chapters, you will then need to specify a project name, such as CrossComputerVision (see Figure 10-4).
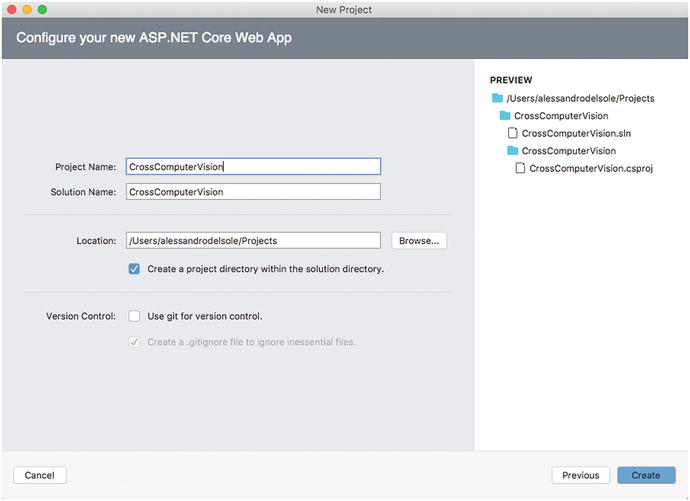
Figure 10-4. Specifying a project name
Click Create when ready. Visual Studio for Mac will run the appropriate dotnet command line on your behalf. After a few seconds, your solution will be ready and visible in the Solution pad. I will now provide an explanation of the structure of an ASP.NET Core solution based on MVC.
Understanding ASP.NET Core Solutions
ASP.NET Core solutions are based on the MSBuild solution system (.sln files) and on the C# project system (.csproj). In the Solution pad, you can see a number of files and folders. Table 10-1 summarizes the most important elements that compose an ASP.NET Core solution.
Table 10-1. Files and Folders in an ASP.NET Core Solution
Element Name | Type | Description |
|---|---|---|
Dependencies | Folder | Contains the NuGet packages and the SDK libraries required by the application. |
Controllers | Folder | Contains the C# controller classes that implement the application’s business logic. |
Views | Folder | Contains .cshtml files and subfolders with other .cshtml files that define the user interface of the application. |
wwwroot | Folder | Contains all static files such as assets, fonts, Cascading Style Sheets (CSS) files, JavaScript files, and HTML files. It also contains all the necessary JQuery files. |
favicon.ico | File | Sets the icon of the application as it will appear in the web browser. |
bower.json | File | Contains a list of client-side Bower packages that represent additional dependencies. |
appsettings.json | File | Allows you to define application settings with the JSON notation. |
appsettings.development. json | File | Allows you to define application settings with the JSON notation that you can use at development time. |
Program.cs | File | Defines the Main C# method that is the main application entry point and that allows you to configure the application host. |
Startup.cs | File | Defines MVC routing strategies and allows for configuring framework services and host settings. |
If you have built ASP.NET MVC applications in the past, you will see that there are many commonalities between ASP.NET MVC solutions and ASP.NET Core MVC solutions. There are certainly important differences, but the structure of a Core solution should at least sound familiar. In the next sections, you will start writing code that interacts with the Computer Vision service by creating an appropriate controller and a convenient user interface that will help users upload an image for analysis. You will also see how to implement data access with Entity Framework Core.
The Model: Working with Entity Framework Core
Entity Framework Core is a lightweight, cross-platform version of the popular and successful object relational mapping (ORM) engine from Microsoft. With Entity Framework Core, you can write C# classes that represent a table in the database (entities) and have properties represent columns in the table. Then, you read, write, and manage a database using a data context C# class.
This way, you work in a strongly type, .NET-oriented approach, and because Entity Framework provides an abstraction layer, it can be used in the same way against several data stores, such as SQL Server and SQLite. In the pure philosophy of .NET Core, Entity Framework Core entirely ships as NuGet packages. In this section, you will see how to include Entity Framework Core in your ASP.NET Core app to store a list of image file names and the result of Computer Vision recognition. If you need more information about Entity Framework, you can visit http://docs.microsoft.com/en-us/ef/ .
First, you need a model class that represents the information you want to store in a database. This is called a code-first approach. Put succinctly, with the code-first approach, you can start with a simple class definition, and Entity Framework will do the work for you to persist objects to a data store just by using that class.
For instance, you might want to store the image file name, the result of the image analysis returned by the Computer Vision APIs, and a timestamp. To accomplish this, by reusing the knowledge you got in the previous chapters, create a new folder called Models in the project and add a new class file called ImageData.cs. When ready, add the following code:
public class ImageData{public int Id { get; set; }public string ImageName { get; set; }public string AnalysisResult { get; set; }public DateTime TimeStamp { get; set; }}
Notice the Id property, which Entity Framework will use as the primary key for the corresponding table. The next step is to add some NuGet packages, but first you have to decide what kind of data store you want to use. In real-world applications, you might want to consider SQL Server or SQL Azure as the data store, but in this chapter I will be showcasing SQLite. The reason is that SQL Server is not available for macOS, and therefore you could not test this option locally; additionally, not all readers might have the opportunity to test Entity Framework against a remote SQL Server. Instead, it is interesting to demonstrate .NET Core’s capabilities to work against the serverless, portable SQLite data store that is available on all platforms. You will then be able to use almost the same techniques with a different data store, just choosing the appropriate NuGet packages. In the case of SQLite, the NuGet packages you need are as follows:
Microsoft.EntityFrameworkCore.SQLite
Microsoft.EntityFrameworkCore.Design
These provide all the .NET objects required to work against a SQLite database. In the case of SQL Server, you would instead download the Microsoft.EntityFramework.SQLServer and Microsoft.EntityFrameworkCode.SQLServer.Design packages. If you have worked with Entity Framework and .NET Framework in the past, you know that you need a class that inherits from DbContext in order to interact with a database, tables, and columns, and to read and write data. A DbContext class exposes properties of type DbSet<T>, where each property basically represents a table in the database in the form of a C# collection. So, in this case, you need a DbContext class that exposes a property of type DbSet<ImageData>. Having that said, in the Models folder, add a new class file called ImageContext.cs with the following code:
using System;using Microsoft.EntityFrameworkCore;namespace CrossComputerVision.Models{public class ImageContext : DbContext{public DbSet<ImageData> ImageList { get; set; }protected override void OnConfiguring(DbContextOptionsBuilder optionsBuilder){optionsBuilder.UseSqlite("Data Source=ComputerVision.db");}}}
Notice how the class must override the OnConfiguring method in order to supply a connection string via the DbContextOptionsBuilder.UseSqlite instance method. The connection string contains the name of the local database, which you can replace with a different name of your choice. The next step is to generate the database through Entity Framework Core, which is accomplished via code migrations. Put succinctly, code migrations allow you to update the database schema incrementally, every time you make edits to your C# data model. When you apply code migrations, Entity Framework generates some C# code files that are responsible for updating the database schema. At this writing, there is no built-in tool in Visual Studio for Mac that allows you to generate code migrations from within the IDE, so you need to use the dotnet.exe command-line tool. Additionally, command-line tools for Entity Framework are not included by default in the .NET Core SDK, so you need to manually add an additional reference into the .csproj project file. To accomplish this, in the Solution pad, right-click the project name and then select Tools ➤ Edit File. This opens the .csproj file of the sample project in the XML code editor. At this point, add the following XML node:
<ItemGroup><DotNetCliToolReference Include="Microsoft.EntityFrameworkCore.Tools.DotNet"Version="1.0.1" /></ItemGroup>
This will add command-line tools for Entity Framework Core to the current project. Save the .csproj file, and you will see how Visual Studio for Mac will reload NuGet packages, but this is not enough. With the help of the Finder system application, open a Terminal instance inside the project folder. The project folder is the one that contains the .csproj file, not the solution file. When ready, type the following command:
> dotnet restoreThis command will cause .NET Core to restore NuGet packages for the project and will download and include the tools you specified. The next step is to create a first code migration that you accomplish with the following command:
> dotnet ef migrations add FirstMigrationWhen you create a code migration, you need to supply a migration identifier, FirstMigration in this case. You can replace this identifier with another one of your choice, and you are totally free to decide the identifiers you want to use. The final step is to update the database, and because this is the first code migration, the database will also be created. This is accomplished with the following simple line:
> dotnet ef database updateNote
In the current example, there is only one class that inherits from DbContext. In this case, the Entity Framework tool automatically resolves the class and generates a migration for it. However, it is common to have multiple DbContext classes, such as when you implement authentication. In such situations, you must supply the --context command-line switch and pass the name of the context class that represents the database schema, such as ImageContext in the current example.
You will see in the Terminal a list of SQL commands that Entity Framework Core uses to generate the SQLite database. At this point, you have completed setting up the data context and the data model. You will write code that interacts with the context and the database in a specific controller, as discussed in the next section.
Working with Controllers
Controllers are C# classes that contain the code that executes actions against a data source, such as a database or a web service, according to the required business logic. Any new ASP.NET Core project contains a controller called HomeController.cs that defines methods that invoke the proper pages in the user interface, such as Index, About, and Contact. These methods are also referred to as actions. In Visual Studio, there is a page for each action under the Views project folder. This one contains as many subfolders as many controllers you have in your project, and each subfolder contains view pages whose name recalls the name of an action.
For example, the HomeController class has the Index, About, and Contact actions. So, in the Views folder, there is a Home subfolder that contains the Index.cshtml, About.cshtml, and Contact.cshtml pages. Then the ASP.NET Core runtime knows what page it needs to launch according to the action. In the sample application, for a better separation of the logic, you will create a new controller called VisionController.cs, which you add in the Controllers folder. Right-click this folder, then select Add ➤ New File, and in the New File dialog select the MVC Controller Class item, as shown in Figure 10-5.

Figure 10-5. Creating an MVC controller
The purpose of the new controller is to expose an action called Vision that sends an image file to the Computer Vision API’s endpoint and that elaborates the response that the service sends back. In the constructor, you create an instance of the ImageContext class that will be used to persist the image analysis results.
ImageContext context;public VisionController(){context = new ImageContext();}
Before implementing the action, a couple of preliminary considerations are necessary. In ASP.NET Core, a file is represented by an object of type IFormFile. Implementations of this type expose a method called OpenReadStream, which is used to read the content of the file under the form of a Sytem.IO.Stream object . ASP.NET Core uses streams because accessing the file system directly is something that would require platform-specific implementations, but this is not possible in the .NET Core cross-platform environment. Then the file is converted into an array of bytes through a MemoryStream object and its ToArray method. Because your goal is also to display the image in the user interface within an img HTML control later, it is necessary to convert the byte array into a string encoded with 64-base digits that such a control can read. This is accomplished with the following code:
private string FileToImgSrcString(IFormFile file){byte[] fileBytes;using (var stream = file.OpenReadStream()){using (var memoryStream = new MemoryStream()){stream.CopyTo(memoryStream);fileBytes = memoryStream.ToArray();}}return BytesToSrcString(fileBytes);}private string BytesToSrcString(byte[] bytes) => "data:image/jpg;base64," +Convert.ToBase64String(bytes);
The next code is about the implementation of the Vision action , which includes a constant that stores the secret key generated by the Azure Portal for the Computer Vision APIs. Type the following code, and then comments will be provided shortly:
public const string _apiKey = "YOUR-KEY-GOES-HERE";[HttpPost][ValidateAntiForgeryToken]public async Task<IActionResult> Vision(IFormFile file){//put the original file in the view dataViewData["originalImage"] = FileToImgSrcString(file);string result;using (var httpClient = new HttpClient()){// Request parametersvar baseUri ="https://westeurope.api.cognitive.microsoft.com/vision/v1.0/analyze?visualFeatures=Description";//setup HttpClienthttpClient.BaseAddress = new Uri(baseUri);httpClient.DefaultRequestHeaders.Add("Ocp-Apim-Subscription-Key", _apiKey);//setup data objectHttpContent content = new StreamContent(file.OpenReadStream());content.Headers.ContentType =new MediaTypeWithQualityHeaderValue("application/octet-stream");//make the requestvar response = await httpClient.PostAsync(baseUri, content);var responseContent = response.Content as StreamContent;// get the string for the JSON responsevar jsonResponse = await responseContent.ReadAsStringAsync();// Deserialize the JSON response to retrieve the analysis resultvar jresult = JObject.Parse(jsonResponse);result = jresult["description"]["captions"].First.ToString();}ImageData imageInfo = new ImageData();imageInfo.TimeStamp = DateTime.Now;imageInfo.ImageName = file.FileName;imageInfo.AnalysisResult = result;context.ImageList.Add(imageInfo);await context.SaveChangesAsync();ViewData["result"] = result;return View(context.ImageList.ToList());}
ViewData is a property of controllers and is of type ViewDataDictionary. You may think of ViewData as a dictionary that you can populate with key/value pairs dynamically. In practice, in the HTML markup, you will be able to invoke C# code and bind property values directly into the markup. This way, with ViewData you can send to the user interface the information you want to display. In this case, ViewData is used to send to the user interface the image and the analysis result. All of the Cognitive Services receive HTTP POST requests and return a JSON response.
To send a POST request, you use the HttpClient class and its PostAsync method . You first supply the service URL as the HttpClient.BaseAddress value and the secret key in the request headers, by invoking the HttpClient.DefaultRequestHeaders.Add method and supplying a key/value pair made of the Ocp-Apim-Subscription-Key key and your secret key as the value. The content of the POST request (HttpContent) contains the image encapsulated in a StreamContent object, populated with the IFormFile.OpenReadStream method. PostAsync receives a response from the Computer Vision service in the form of a StreamContent object that is converted into a string returned by ReadAsStringAsync. This conversion is required because the response actually contains JSON , which is an indented string. The following JSON exemplifies the structure of a response you receive by the service:
{"description":{"tags":["person","man","outdoor","building","smiling","camera","standing","holding","sitting",],"captions":[{"text": "a man smiling for the camera","confidence": 0.95715732768096673}]},"requestId": "ddfccd26-96d3-45bf-95c2-c36559d67186","metadata":{"width": 234,"height": 234,"format": "Jpeg"}}
As you can see, an array of tags contains autogenerated categorization tags for the image, but this is not required for the sample application. The goal is retrieving the text and confidence contained in the captions array, so the code must deserialize this JSON string into an object that can be further elaborated.
ASP.NET Core projects already include the popular Newtonsoft.Json library that can be quickly used to parse JSON content into .NET types. The Newtonsoft.Json.Linq.JObject.Parse method is used to get an array of values, and the result of the image analysis is actually the first value in the array called captions, nested in the description JSON element. The resulting string contains the type and result of the image analysis. Once you have the image analysis result, you can create an instance of the ImageData class and store the result itself, the timestamp, and the file name. Then the new instance is added to the collection of ImageData called ImageList, and the data is saved using the SaveChangesAsync method of the DbContext class. This means you are adding a new row to the table in the database, using a completely .NET-oriented approach. Notice the return statement: the View method will search for a view that is bound to the Vision action , passing the ImageList collection as the data for the view. This is demonstrated in the next section about views. The last piece of code the controller needs is an action called Index, which returns the default view for the controller and which looks like the following method:
public IActionResult Index(){return View();}
Now that you have a controller ready, it is time to implement a basic user interface and see how the controller works against the Computer Vision API service.
Working with Views
In the MVC pattern, views represent the user interface. In the case of a web application, views are pages that a web browser can render. In ASP.NET Core, pages are (usually) .cshtml files. This kind of file can be considered an evolution of HTML files, in that they fully support the well-known markup language, plus they extend the opportunities by using additional controls and by embedding C# code directly into the HTML code. Visual Studio for Mac provides a great experience when editing HTML files with the usual power. In fact, it provides not only syntax colorization but also word completion based on the context, as you can see in Figure 10-6 and as you will discover while typing the markup code described in this section.
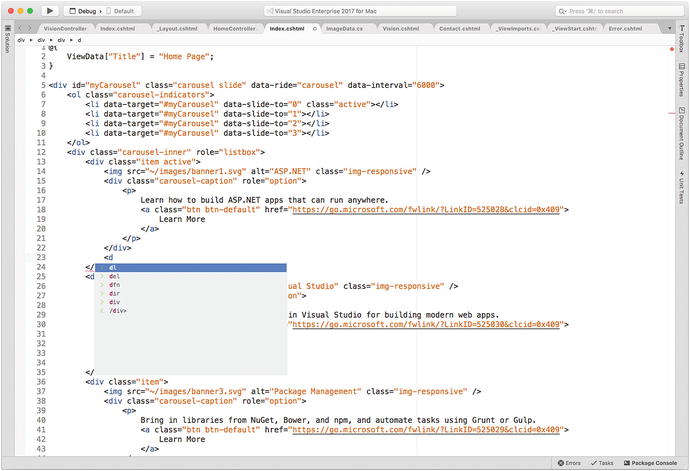
Figure 10-6. The HTML editor provides syntax colorization and word completion as you type
When you create a new ASP.NET Core project, a number of pages are already included. In fact, there is a master page, a home page, a contact page, and a page that shows information about the application. Pages are located inside the Views project subfolder and organized within subfolders. The logic for organizing pages is based on which controller a page responds to. For example, the HomeController class has the three actions: Index, About, and Contact. Therefore, the runtime expects to find three pages called Index.cshtml, About.cshtml, and Contact.cshtml inside a folder called Home, whose name is taken from the controller name without the Controller literal. This also affects the URL the application exposes to reach a page. For example, www.myapp.com/home will point to the HomeIndex.cshtml page, www.myapp.com/home/contact will point to the HomeContact.cshtml page, and so on. This is something that you must keep in mind for the next steps and, more generally, every time you work with views and controllers.
Additionally, you can find a Shared subfolder that contains two shared pages: _Layout.cshtml, which you may think of as a master page, and Error.cshtml, a page that displays common error messages. In summary, there should be a page for each action in a controller. The VisionController class has two actions, Vision and Index. As an implication, you must create a subfolder called Vision under the Views folder and add two new pages called Index.cshtml and Vision.cshtml. Visual Studio 2017 for Mac has an item template for .cshtml files, so you must select the MVC View Layout Page template in the ASP.NET Core category, as shown in Figure 10-7.

Figure 10-7. Adding a .cshtml file
Let’s start with the markup code of the Index.cshtml page, which is the main page for image analysis (you will see how to include a shortcut in the master page in a few moments). The code is as follows:
@{ViewData["Title"] = "Select an image for analysis";}<h2>@ViewData["Title"]</h2><h3>@ViewData["Message"]</h3><div class="row"><div class="col-md-12"><form asp-action="Vision" enctype="multipart/form-data"><div class="form-horizontal"><div class="form-group"><label for="file">Image</label><input type="file" name="file" id="file" class="form-control"><p class="help-block">Images must be up to 4 megabytes and greater than 50x50</p></div><div class="form-group"><input type="submit" value="Upload" class="btn btn-primary" /></div></div></form></div></div>
With .cshtml files , you can embed C# expressions and statements. In the previous code, you can see how the ViewData property from the controller is embedded in the markup. C# expressions must be preceeded by the @ symbol; also, code snippets that contain only C# expressions (and no HTML tags) must be enclosed within curly braces. In the Index page, the Title key in the ViewData dictionary is assigned with a string, and this is pure C# code. In the h2 tag, instead of hard-coding a string, the value of the ViewData["Title"] is displayed by binding such a property value. In the h3 tag, the text that will be displayed instead comes from the value of the ViewData["Message"] property, which is assigned by the controller at runtime. A group of controls is then provided in the form element. Notice how an action in the backing controller is associated with the asp-action attribute. If you are familiar with HTML, the code will be simple to you. In fact, at its core, it contains an input control that allows you to select a file from disk by assigning the type attribute with the file value. The other input control, with type submit, allows you to upload the selected file to the server. The rest of the code is easy. The next page to write is the Vision.cshtml one. This will be displayed once the controller receives a response from the Computer Vision API service and saves the image information into the database. So, this page will display the original image, the result of the Computer Vision analysis, and a table that shows the list of images that were previously analyzed. The following is the code for the page:
@model IEnumerable<CrossComputerVision.Models.ImageData>@{ViewData["Title"] = "Image list";}<h2>@ViewData["Title"]</h2><div class="row"><div class="col-md-12"><h4>Original Image</h4><img src="@ViewData["originalImage"]" width="100" height="100"/></div></div><div class="row"><div class="col-md-12"><h4>Result</h4><label>@ViewData["result"]</label></div></div><div class="row"><table class="table"><tr><th>Image</th><th>Result</th><th>Date</th></tr>@foreach (var item in Model){<tr><td>@Html.DisplayFor(modelItem => item.ImageName)</td><td>@Html.DisplayFor(modelItem => item.DetectionResult)</td><td>@Html.DisplayFor(modelItem => item.TimeStamp)</td></tr>}</table></div>
The @model expression determines the .NET type of the data model bound to this page. This implies that you can bind C# expressions to HTML controls, which provides a lot of flexibility when designing pages.
In this case, controllers can pass to the page any collection that implements the IEnumerable interface and whose type parameter is ImageData such as the List. This data source is referenced in the HTMK markup via the Model property of the bound controller. This allows for iterating the collection with a foreach loop and for using the Html.DisplayFor helper that shows the bound data in the appropriate control depending on the type of the property passed with a lambda expression. This is useful with controls of type table, where you simply define column headers with the th tag, and then you can populate the columns by simply iterating the model with limited effort on your part. Notice how the img control has an explicit size and how the image analysis result will be displayed based on the value of the ViewData["Message"] property assigned at runtime by the controller, once it receives a response from the Computer Vision service. The last step is to add a shortcut to the VisionIndex.cshtml page in the application’s master page. To accomplish this, open the Shared\_Layout.cshtml file and add the line highlighted in bold:
<li><a asp-area="" asp-controller="Home" asp-action="Index">Home</a></li><li><a asp-area="" asp-controller="Home" asp-action="About">About</a></li><li><a asp-area="" asp-controller="Home" asp-action="Contact">Contact</a></li><li><a asp-area="" asp-controller="Vision" asp-action="Index">Computer Vision</a></li>
This way, in the application home page there will be a new item called Computer Vision that points to the Index action in the Vision controller and that therefore will launch the VisionIndex.cshtml page. After this much work, you are ready to debug your first ASP.NET Core web application based on MVC.
Running, Debugging, and Testing ASP.NET Core Web Applications
Running, debugging, and testing an ASP.NET Core application in Visual Studio for Mac are tasks similar to what you already saw about Xamarin, which means you can simply select Start Debugging and leverage all the available debugging tools such as breakpoints and debugging pads.
As I mentioned in Chapter 3, .NET Core applications can be debugged using the .NET Debugger, an open source and cross-platform debugger that Visual Studio for Mac attaches to a running .NET application. However, in the case of ASP.NET Core, this is not enough. In fact, a web application needs to be hosted on a web server to be started.
If you have developed ASP.NET applications with .NET on Windows in the past, you had Internet Information Services (IIS) and Internet Information Services Express as available choices to host the application. These are available only on Windows, so .NET Core ships with a special, open source development web server called Kestrel ( http://github.com/aspnet/KestrelHttpServer ). Kestrel’s behavior is similar to IIS Express, with the important difference that it runs across platforms, which means macOS, Linux, and Windows. With Kestrel, you can run, debug, and test your application like it were on a real web server. Having that said, select Run ➤ Start Debugging. After a few seconds, the application will be running inside Safari, as shown in Figure 10-8.
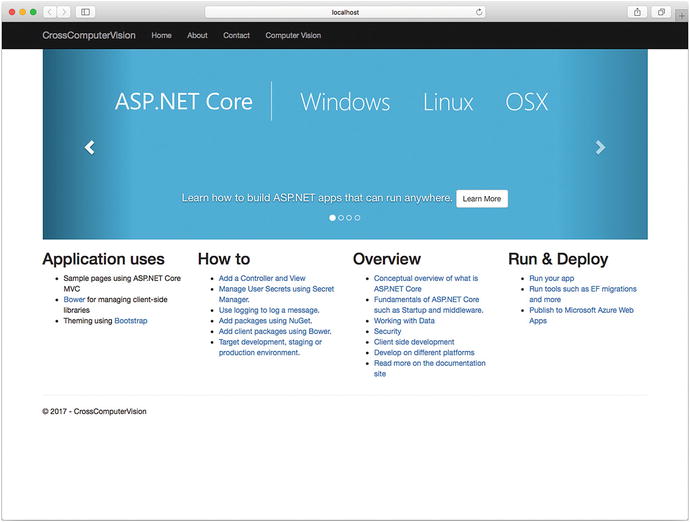
Figure 10-8. The ASP.NET Core application running in the Safari browser
As you can see, a shortcut called Computer Vision is available at the top. This is possible because of the addition you made to the _Layout.cshtml file. If you click that shortcut, the Vision/Index page will be shown, as demonstrated in Figure 10-9.
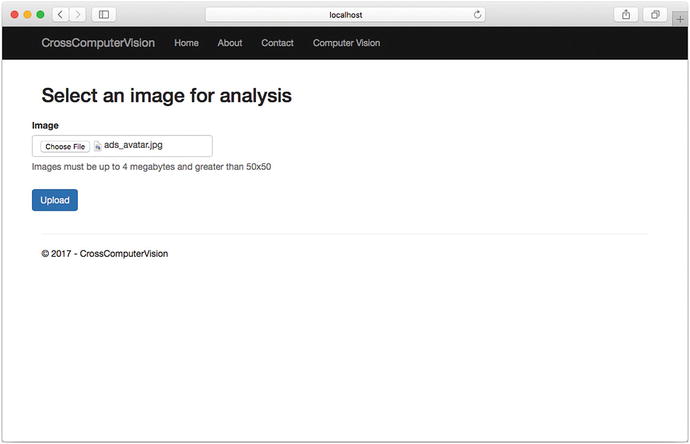
Figure 10-9. Selecting an image file
Click Choose File and select an image file. Supported formats are .jpg, .png, .gif, and .bmp. Make sure the image is greater than 50 × 50 pixels and that it is no larger than 4MB. When ready, click Upload. After a few seconds, you will see the Vision/Vision page displaying the original image, the result of the image analysis, and a table that shows a list of results, as shown in Figure 10-10.
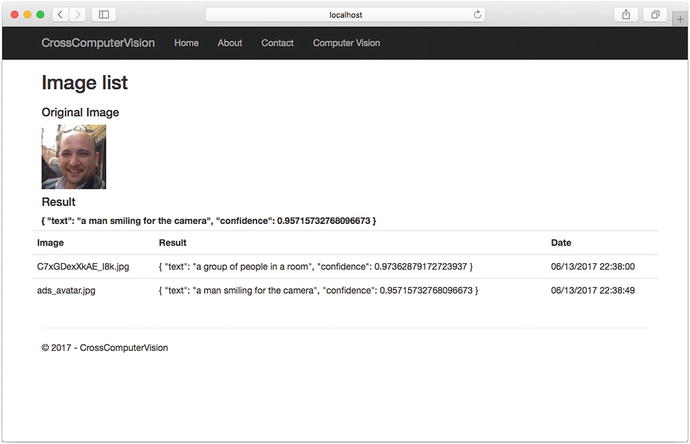
Figure 10-10. Displaying the result of the image analysis
The result contains a natural-language description of what has been detected on the image and a confidence level, which is between 0 and 1. The table shows the list of files you uploaded previously with the description, and this data has been stored in a SQLite database with the Entity Framework Core. As you would expect from a development server, the URL for the application always starts with http://localhost followed by the port number. You can simply click the address bar to see the current port number. If you want to provide a different port number, you can right-click the project name in the Solution pad, select Options, and see the current value in the Default run configuration under Run ➤ Configurations. The App URL field in the ASP.NET Core tab (see Figure 10-11) contains the current URL, and here you will be able to supply a different port number.
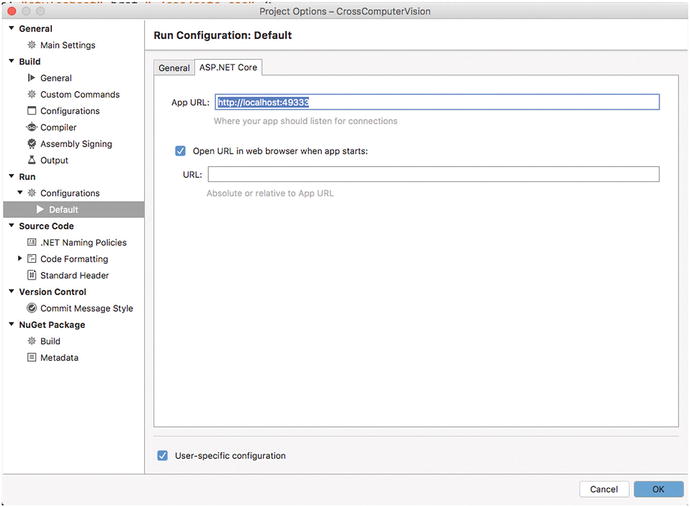
Figure 10-11. Specifying a port number for Kestrel
Testing the application locally is certainly fun, but at a certain point you will need to publish the application online so that customers can reach it on the network.
Publishing ASP.NET Core Web Applications
As you would expect, you can publish an ASP.NET Core web application to several hosts, including Linux servers, Internet Information Services on Windows servers, and Microsoft Azure if you opt for a cloud solution. As a general rule, you can generate all the files required for publication on the local file system using the dotnet publish command line, and then you need specific steps depending on the host.
Visual Studio for Mac offers built-in tools that allow you to quickly publish an ASP.NET Core application to Microsoft Azure. Because of the focus on the IDE in this book and because you might not have a Windows PC with IIS installed, in this section I will demonstrate how to take advantage of the built-in tools to quickly publish the sample app to Azure.
If you want to publish your app to an on-premises IIS host, you can follow the documentation at http://docs.microsoft.com/en-us/aspnet/core/publishing/iis . If you instead prefer publishing to Linux, the documentation has a specific page at http://docs.microsoft.com/en-us/aspnet/core/publishing/linuxproduction . Having that said, in the Solution pad, right-click the project name and then select Publish ➤ Publish To Azure. The Publish to Azure App Services dialog will appear and will first ask you to select a subscription if you have multiple Azure subscriptions; otherwise, this step will be skipped. Notice that Visual Studio for Mac can automatically connect to an Azure subscription if you used the same Microsoft Account to sign into both Azure and Visual Studio. In the dialog, click New. Now take a look at Figure 10-12, which shows an example of how the required information should be provided.
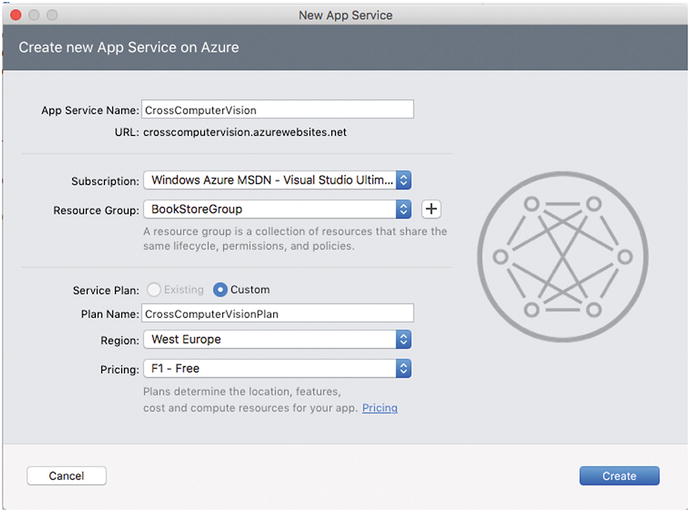
Figure 10-12. Specifying information to publish an app to Azure
App Service Name is the name for your app service on Azure and will also comprise the service URL, which has the following form: yourservicename.azurewebsites.net. When you type the service name, Visual Studio automatically checks whether that URL is available. In the Subscription field, you can specify the Azure subscription that will host your app service. The Resource Group setting allows you to specify the Azure resource group that will contain the new app service. You can use the same resource group you used when you created the Computer Vision service. The Service Plan setting allows you to specify the location and pricing for your service. Plan Name is totally up to you, while in the Region field select the location that is nearest to you. In my case, I selected West Europe because it is the closest data center region to where I live. In the Pricing field, select F1 – Free. If you do not see this option, make sure you click the Pricing hyperlink and read the documentation before you select a plan that might result in undesired charges. When ready, click Create. Visual Studio for Mac will show a warning saying that creating the service on Azure will take some time and that you can do other things while waiting. The status bar will show the progress of the operation with messages such as “Provisioning service” and “Publishing to Azure.” Additionally, you will be able to follow the publish progress in the Publish pad via the tab that appears at the bottom of the IDE (see Figure 10-13).
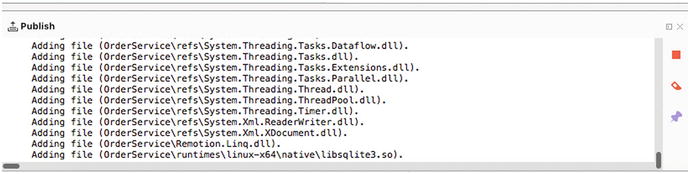
Figure 10-13. The Publish pad shows the progress of publishing the app to Azure .
When finished, Visual Studio will automatically open Safari and launch the application pointing to the publish URL, as demonstrated in Figure 10-14 where you can see the URL in the browser’s address bar.
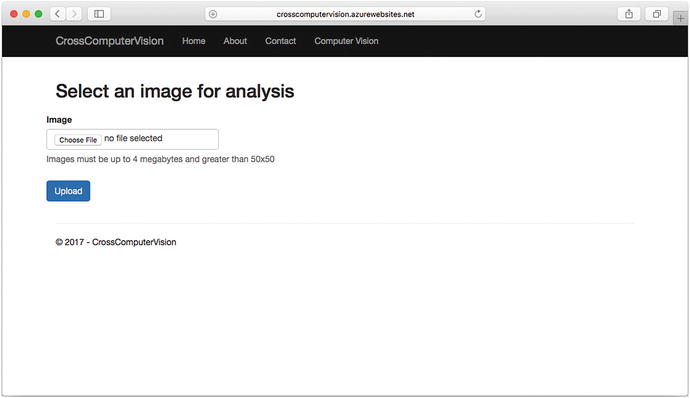
Figure 10-14. The sample app hosted on Microsoft Azure and available through the Internet
As you can see, with Visual Studio for Mac and Microsoft Azure you have been able to publish an application online in a few minutes and with a few mouse clicks. Azure is therefore a perfect choice if you do not have your own server infrastructure.
Note
Remember to completely delete any app services you do not intend to use any longer from your Azure subscription. This can be easily done in the Azure Management Portal by simply selecting a service and then using the Delete button. If you do not delete app services, they will continue to consume computational resources, and your account could potentially be charged, especially if you did not enable a spending limit.
Summary
ASP.NET Core is the cross-platform, open source, modular runtime to create web applications that run on macOS, Linux, and Windows in C#. Visual Studio for Mac allows you to create ASP.NET Core web applications with convenient integrated tools that avoid using the command-line interface. ASP.NET Core web projects rely on the MVC pattern, which involves creating model classes, controllers, and views.
In this chapter, you saw how to use Entity Framework Core to create and access data models against a SQLite database. You saw how to create controllers that expose the business logic and that can execute actions against data sources such as databases and other services. In the sample application, you saw how to interact with Microsoft Cognitive Services to perform Computer Vision recognition over image files managed by a controller. Then you saw how to create pages to allow for user interaction and to display information sent by controllers. You discovered a new development web server called Kestrel that allows you to test and debug ASP.NET Core locally, together with the usual, powerful debugging instrumentation available in Visual Studio for Mac. In the end, you saw how to publish an application to Microsoft Azure in a few minutes and with a few clicks and how to be on the market in minutes. Sometimes you need to develop web services that expose APIs that other clients will consume. This is discussed in the next chapter.