
Unless your characters have a very unique style, their eyes will have to look at something. Based on this idea, there is a common practice of making this "something" a bone where the eyes will always point to. This is very useful when animating, since you can position this bone to the exact place where your character should look at without further worries.
- Open the file
003-Eyes.blend. This file has a head mesh with two eyes ready for you to work on them. Notice that the eyes are separate objects from the head. - Select the left eye object, press Shift + S, and choose Cursor to Selected to position the 3D cursor into the center of the object.
- Add an Armature: press Shift + A and select Armature | Single Bone. Go to Edit Mode (Tab) in side view (Numpad 3) and move the tip of the bone so that it points to the character's front, next to the eye's pupil, similar to the next screenshot. Activate the armature's X-Ray display mode in the Properties Window, under the Object Data tab, within the Display section to make things easier to see.

- Name this bone as
Eye.Land extrude (E its tip, creating a small bone in front of it. Name it asT_Eye.L("T" stands for "target"), select it, press Alt + P, and choose Clear Parent, so it's no longer a child of the eye bone. You should also disable its Deform property by pressing Shift + W and selecting Deform. You should have the two bones positioned as seen in the following screenshot: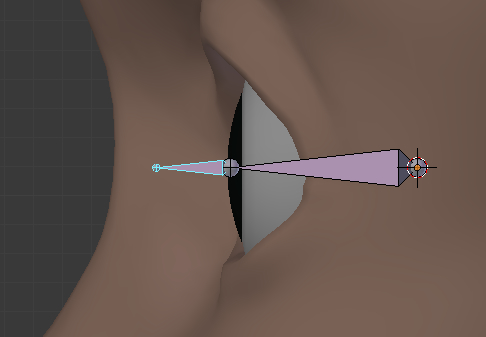
- Now let's add a IK constraint: enter Pose Mode (Ctrl + Tab), select the target bone, hold [Shift], select the
Eye.Lbone, press Shift + I, and select Add IK to Active Bone. If you move (G) theT_Eye.Lbone around, you'll see that theEye.Lbone keeps pointing to it. - Enter in the Armature's Edit Mode (Tab) again. Place the 3D cursor at the front of the character's head, between his eyes, and add another bone through Shift + A. Name this bone as
LookAtand scale it down to about half its height. Select the target bone, hold Shift, select theLookAtbone, press Ctrl + P, and choose Keep Offset. Now the movement of theLookAtbone will drive the target, and you can see this new bone in the next screenshot: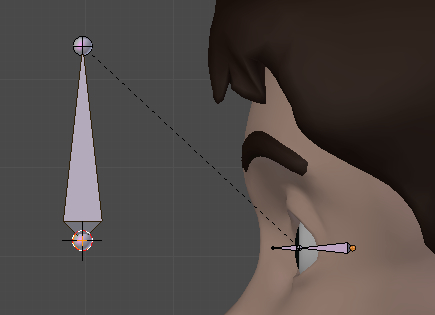
- Go back to Pose Mode. Select the left eye mesh, hold Shift, select the
Eye.Lbone, press Ctrl + P, and choose Set Parent to Bone. Move theLookAtbone and you'll see that the left eye rotates accordingly, but you'll also notice that the eyeball rotates too much depending on where you place theLookAtbone. We need to limit the amount of its rotation. - Still in Pose Mode, select the
Eye.Lbone and go to the Properties Window. Under the Bone tab, navigate to the Inverse Kinematics section. - Enable the Limit fields for the X and Z limits. The two sliders on the right-hand side are for minimum and maximum angle values. An acceptable value for this setup is -20o and 20o for the X axis and -45o and 45o for the Z axis, and you can see a visual feedback of those limits while the
Eye.Lbone is selected: very useful for visualizing what are the rotation limits. In the next screenshot you can see the values set up and the limits shown on the 3D view: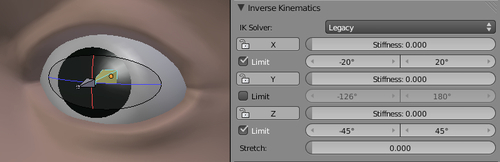
Now, when you move the LookAt bone, the eyeball rotates only until the pupil reaches the eye borders.
- To the other eye, enter into the armature's Edit Mode, select the bones
T_Eye.LandEye.L, go to Front View (Numpad 1), duplicate (Shift + D), and move (G) them across the X axis until they are in the middle of the right eye. - With the bones still selected in Edit Mode, press W and select Flip Names, so Blender automatically detects the bones' suffixes and alters them to the correct side.
Note
When you append suffixes such as
.Land.R, .leftand.rightto your bones, Blender understands that these bones are mirrored so you can make changes to one bone and have its "mirrored" one update as well when you enable the X-Axis Mirror option in the Toolshelf (T). These suffixes are not case sensitive, but you have to stick to one convention, since Blender will not understand this mirroring if you name one bone asEye.leftand the otherEye.RorEye.Right. - Go back to Pose Mode, select the right eye mesh, hold Shift, select the
Eye.Rbone, press Ctrl + P, and choose Set Parent to Bone. Now, if you move theLookAtbone, both eyes should follow accordingly and within their limits. - The last thing that you should do is select the
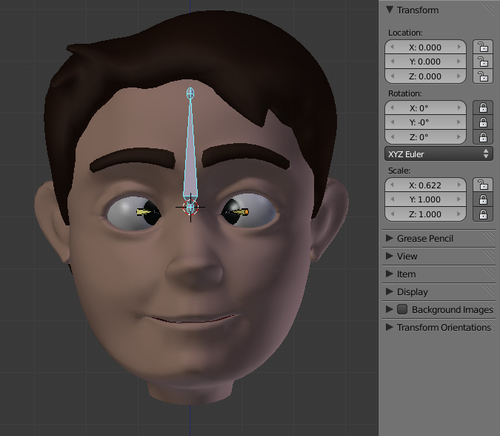
LookAtbone, go to the Transform Panel (N), and lock all Rotation and the Y and Z scale values. Leaving the X axis for scaling allows you to change the alignment of the eyes, as seen in the next screenshot, where theLookAtbone was scaled (S) down in Front View:
The file 003-Eyes-complete.blend has this finished recipe for your reference.
By creating two IK chains with one parent bone to control their targets, you can easily make a LookAt controller. The IK chain consists of one bone located at the center of the eye and another bone to act as its target. By using a separate bone parent of both targets, you can make your character look at where you need. The use of an IK constraint on the eye bones allows you to set the rotation limits so the eyeballs don't rotate further than you expect them to.
When we look down or up, our eyelids follow the movement softly. This will be accomplished in the next recipe, dedicated only to the eyelids.
The LookAt controller is normally a child of another bone: some like it to be linked to the main head controller, so the eyes follow the head movement; some like it to be child of the Root bone, so the point where the character looks is independent of the head position. You can have the best of two worlds by setting a switcher to alter between these two "spaces". The concept of different spaces and how to create a controller to switch between them is covered in Chapter 5,