
Legs are often controlled with an Inverse Kinematics constraint. Why? Because of the very nature of the IK constraint, which controls a chain by the position of its tip, rather than by its root. Our character's legs position will often be controlled by where its feet are in relation to the ground. This is a somewhat general rule: whenever a limb (arm or leg) has its control point dictated by its tip (hand or foot), you should use an IK constraint.
That's the case we'll find very often for legs, so the feet remain still on the ground while your character moves. The big issue is that there's more than one pivot point to the foot movement: your character can stand over its ankle, ball of the foot, or the tip of its toes. We need an easy way to control the leg regardless of what pivot point is used.
Note
When the chain's control point resides on its root (such as the shoulders or hips), FK can be a good solution to achieve nice and fluid motion arcs.
- Open the file
005-IK-Leg.blend. It has a leg mesh with a deformation bone chain already set up for our work, as you can see in the next screenshot:
By default, all bone chains act in Forward Kinematics mode. If you rotate the D_Thigh.L bone, the whole leg will follow, as you would expect from an FK chain.
- To create the IK motion, let's create another bone chain to drive our deformation ones. In the armature's Edit Mode, select the
D_LowerLeg.Lbone, hold Shift, select theD_Thighbone and duplicate them using Shift + D. Press Esc so the duplicates remain in the same place. - Change to the B-Bone display mode in the Object Data tab under the Properties window and press Ctrl + Alt + S to change these bones' thickness so you can tell them apart from the deformation bones. Disable their Deform property (Shift+ W) and rename them to
IK_Thigh.LandIK_LowerLeg. - Select the
IK_Thigh.Lbone, hold Shift, select theD_Thigh.Lbone, press Ctrl + Shift + C and select the Copy Rotation constraint. Repeat the same for the lower leg bones, then move (M) bothD_LowerLeg.LandD_Thigh.Lto a disabled armature layer in order to remove the visual clutter, since we won't touch them anymore. - Go back to the Octahedral bone display mode, select the tip of
IK_LowerLeg.L, and extrude (E) it to the back of the foot. Name itT_Leg.Land clear its parent relationship (Alt + P). We need this because this bone will drive the leg movement, acting as the IK target. The IK target cannot have a parent-child relationship with the constrained bone chain. The next screenshot shows the created target:
- Go back to Pose Mode, select the
T_Leg.Lbone, hold Shift, select theIK_LowerLeg.Lbone, and press Shift + I to add an IK constraint. Try moving theT_Leg.Lbone around to see the IK constraint in action. Under the Bone Constraints tab, in the Properties window, change the Chain Length slider to2, since we need the constraint to affect only the lower and upper leg bones.After moving the target bone, you'll see that the foot rotates too, since it's a child of the D_LowerLeg.L bone. We want it to remain still, rotating just when we want it to.
- Select the
D_Foot.Lbone, and disable its Inherit Rotation property in the Properties window, under the Bone tab. In the 3D view, select theT_Leg.Lbone, hold Shift, select theD_Foot.Lbone, press Ctrl + Shift + C, and pick the Child Of constraint. Things will look messy, but don't panic: go to the Bone Constraints tab under the Properties window and click on the Set Inverse button in the constraint section. Now the foot rotation will follow the target bone instead of inheriting the lower leg properties, as you can see in the next screenshot:
- Now we need to set up three bones to act as pivots for the foot rotation. Go back to the armature's Edit Mode and add three bones, named
M_Pivot1.L, M_Pivot2.L, andM_Pivot3.L, located at the ankle, ball of the foot, and tips of the toes, respectively, as you can see in the next screenshot:
- Still in Edit Mode, select the
T_Leg.Lbone, hold Shift, select theM_Pivot2.Lbone, press Ctrl + P, and choose Keep Offset to make the target bone children of the second pivot. Repeat this process, now making the ankle pivot parent of the tip of the foot one (M_Pivot3.L); and theM_Pivot3.Lparent ofM_Pivot2.L.This chain of parent relationships will result in the following: if you go back to Pose Mode, rotating the M_Pivot1.L bone will make the foot and leg rotate around the ankle; rotating the M_Pivot2.L bone will rotate them around the ball; and rotating the M_Pivot3.L bone will rotate them around the tip of the toes, as shown in the next screenshot:
Now we just need a way to control these three pivots with only one bone, and you probably noticed that when we rotate the second pivot, the toes should have remained planted on the ground. Lets do that now.
Since this is a somewhat complex transformation requiring different rotations on different bones, we'll use an Action constraint. This is very useful for when we have definite yet complex transformations, because we can "record" that transformation in a separate Action.
- Open a DopeSheet window, making sure the Action Editor type is selected. Click on New to add a new Action, and name it
FootRoll. In the first frame of this action, select all three pivot bones plus theD_Toes.Lbone and insert a keyframe (I) to define their rest rotation states. - Go up ten frames (Up Arrow), select the
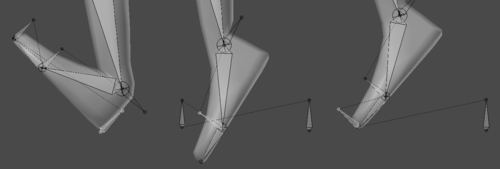
M_Pivot2.Lbone, rotate it 60 degrees left in side view (Numpad 3), holding Ctrl for precision, and press I to set a new keyframe for its rotation. Select theD_Toes.Lbone and rotate it up the same 60 degrees, so it goes back to its rest position, as seen in the following screenshot:
- Select the
M_Pivot3.Lbone and set a keyframe for its rotation too. Go up further 10 frames, rotate theM_Pivot3.Lbone 80 degrees to the left and insert a new keyframe for it. Rotate both theM_Pivot2.Land theD_Toes.Lbones 60 degrees back to their original positions, so you get the foot up on its toes, as seen in the next screenshot:
- Almost there! Now, go up 10 more frames, select the keyframes from the first frame, duplicate(Shift + D), and drag them to frame 31. We're creating another resting position to precede the ankle rotation.
- Go up 10 more frames, select the
M_Pivot1.Lbone and rotate it 45 degrees to the right, making the foot stand over the ankle. Set another keyframe for its rotation. Remember the position keyframes: from 1 to 21 we get the action of standing up on the toes, with the intermediate position of standing over the ball first; from 31 to 41 we get the final rotation over theM_Pivot1.Lbone to stand over the ankle. We'll need these values to set up the foot roll controller. - Go back to the first frame of the animation, enter into the armature's Edit Mode, and add a new bone near the ankle, but pointing in the opposite direction as the foot. This will act as our controller. Name it
FootRoll.Land go back to Pose Mode. - With the
FootRoll.Lbone still selected, hold Shift, select theM_Pivot1.Lbone, press Ctrl + Shift + C, and choose the Action constraint. In the Properties window, under the Bone Constraints tab, choose FootRoll under the Action field; Rotation X under Transform Channel; Start: 1, End: 21 in Action Length; Min: 0, Max: 40 in Target Range; and finally, Local Space in Convert. Repeat this process for theM_Pivot2.L, M_Pivot3.L, andD_Toes.Lbones.If you rotate the controller up, you'll see our recorded action taking place, and the foot will stand on its toes nicely. We just need another constraint on the ankle bone, for the opposite action.
- Select the
FootRoll.Lbone, hold Shift, select theM_Pivot1.Lbone, press Ctrl + Shift + C, and choose the Action constraint. In this constraint panel, choose FootRoll under the Action field; Rotation X under Transform Channel; Start: 31, End: 41 in Action Length; Min: 0, Max: -60 in Target Range; and finally, Local Space in Convert. The next screenshot shows the values for both Action constraints:
Note
It's a good practice to give names to your constraints, so that you can easily remember what they are up to. That's also valid for modifiers: It's not uncommon to have various constraints and modifiers in your mesh and bones. In the previous screenshot we have two very similar constraints, and their names help us understand what they do.
To finish our leg rig we need only two more bones: the main foot controller and the IK pole, to control the direction of the knee bending. Let's add them.
- Go back into the armature's Edit Mode and add a bone below the foot of roughly the same size of it, having its base near the ankle and tip near the toes. Name it
Foot.L. Make it a parent of bothFootRoll.LandM_Pivot1.L. - Still in Edit Mode and in side view (Numpad 3), select the knee joint and position the cursor there through (Shift+ S) | Cursor to Selected. Add a new small bone there and drag it to the left, so it stays on the front of the leg. Name it
P_Leg.Land make it a child of theFoot.Lbone. - Back in Pose Mode, select the
IK_LowerLeg.Lbone and go to its Bone Constraints tab under the Properties window. In the IK constraint attached to it, define Armature as the value for the Pole Target field andP_Leg.Lin the Bone field which will appear. The leg will bend to the side, which is definitely not what we want. To correct this, set the Pole Angle slider to 90 degrees.
Note
Remember to disable the Deform property (Shift + W) of all bones except those with the D prefix!
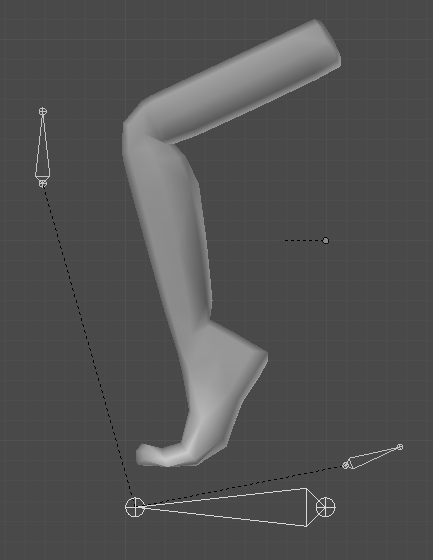
That's it! Now you can move all other bones to a disabled armature layer (M) and keep only the Foot.L, FootRoll.L, and P_Leg.L ones visible, since they're the only bones needed to control the leg. It's also a good idea to define custom shapes to them. The following screenshot shows the finished leg set up with only those three bones visible:
If you want to compare your results, there is a file with this complete recipe called 005-Leg-complete.blend.
By using three helper bones to act as the foot pivots and a recorded action of the foot movement, we can use a single controller to move an IK leg based on three different points. By using a careful set of parent-children relationships, we can reduce the number of controllers of the leg to just three. It can be a bit tricky to set up, but it gives the animator a very easy and flexible rig to use.
IK arms work in a similar but much simpler way, since you don't need to create pivots nor actions: just create a bone to act as the hand controller, used as a target bone for the IK chain and to drive the rotation of the hand with a Copy Rotation constraint; and another bone to act as the pole target. That's all!
Chapter 5: Stretch those limbs!