So you want to create great animations but are still confused by some terms? Let's try to make them clear for you.
Every time you press I on the Blender 3D View for an object or bone, you're creating or replacing a keyframe. In digital animation, a keyframe is a saved property for an object at one frame of the timeline. This can be the location, rotation, scale, color, and basically any property value that you can change and save.
One thing that causes confusion is the fact that a vast terminology developed during years of 2D animation is still used in 3D, and there is an overlap of old and new terms. For the software, every property saved in the timeline is a keyframe. For an animator, each keyframe can be something else.
- Key drawings: This is the most important drawing of the scene. It's the storytelling snapshot (or frame), which can alone be used to tell the story behind the scene. Normally key drawings were made by the director, so that animators could work based on it. The Key drawing is often also an Extreme, but not all Extremes are Keys.
- Extremes: These are the drawings that reproduce the maximum points of movement by a character or object. These points usually happen when a change in the direction of motion occurs.
- Breakdown: This is the intermediate drawing to portray the motion between two Extreme drawings. It's very useful to describe curved natural motions (or arcs), so the movement between two Extreme poses don't happen in a straight line.
Since we need 24 frames to make one second of animation for movies, more drawings are needed in order to fill the gaps between the Extremes and Breakdowns. This is where we have the Inbetween drawings. In traditional animation these are drawn by assistant animators, while in 3D the computer is responsible for the interpolation between keyframes. So, when we define the Interpolation Mode in Blender, we're actually telling the computer how to draw the Inbetween positions.
The big difference is that the computer is a "dumb inbetweener", without any sense of aesthetics. While it does help by automatically creating the Inbetweens, it requires the animator to create more keyframes and adjust the animation curves in order to guide the computer on how to create proper Inbetween drawings.
Since the computer is very quick to create these Inbetween drawings, we often have 3D animation "on ones". Animation "on ones" means that every frame of a movie clip has a different drawing. This is very expensive to do in traditional 2D animation, so normally one drawing is held on the screen for at least two frames.
When we have 12 drawings for a second of animation, we say that this was made "on twos". It means that every drawing is held on the screen for two frames. It's very common to see animations on 3s and 4s, and even a mix between them. From an administrative point of view, it's quicker and cheaper to produce animations with fewer drawings.
Although the default mode in 3D is to make animation on ones, you can change that depending on the style that you want to achieve. 3D animations that try to emulate analog visuals are often rendered with fewer drawings per second to enhance that analog feel.
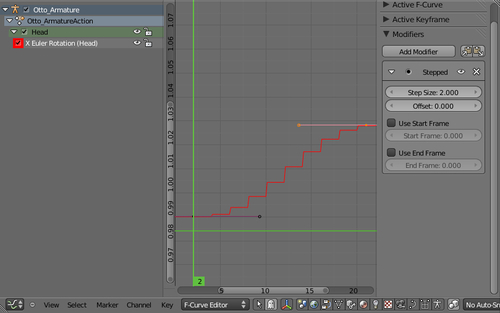
In Blender, we can achieve that by using a modifier over the animation curve on the F-Curve editor. Select the desired channel, click over the Add Modifier button at the Properties panel (N) and choose Stepped. The Step Size value is the mode you want to achieve: 2 for an animation on twos, and so on. This modifier has to be applied over all channels of animation on which you want to enact this effect.