
The human hand is a pretty complex device. The range of actions it allows us to accomplish is pretty unique: we can make very subtle and delicate movements, necessary to create a piece of art, prepare food, write, build things, play instruments, and so on; we can also make broader movements to help us in our locomotion, fight, play sports, and even express our feelings through our hand movements. Our fingers play a huge part in what we can do with our hands.
Due to its innate complexity, with lots of joints and possible combinations of their use, our ideal rig should offer some general controllers together with the ability to fine-tune the results.
- Open the file
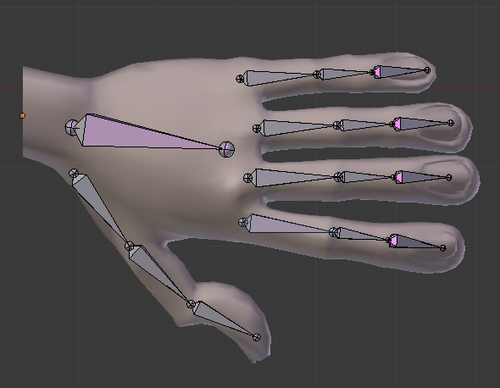
005-Fingers.blend. It has a hand mesh with some basic bones for deformation, ready for us to work on its constraints.You'll see a few chains of bones to deform this mesh: one for the hand and one for each finger. Pay attention to their orientation: the default rotation of joints the bone's local X axis. Since this is a left hand, all bones have the .L suffix at the end of their names. Refer to Chapter 1, Get Rigging if you have any doubts about how to define these orientations. The following screenshot shows this basic setup:
The bones already deform the mesh, so you can rotate them as you wish. The issue that arises is: if our character has five fingers, with three bones each, we'll have to pose 15 bones in order to animate only the fingers! That's neither practical, nor quick to animate. We need a quicker solution to easily pose each finger.
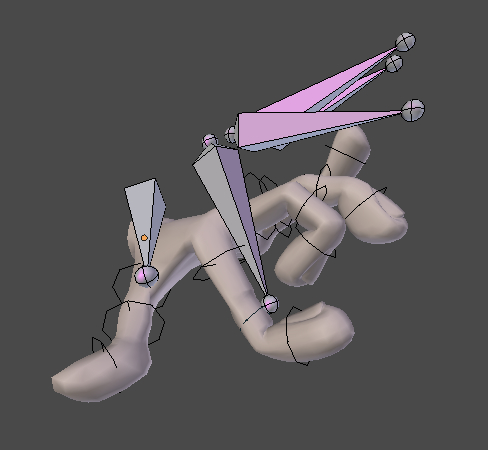
- Enter into the armature's Edit Mode and create five more bones above each finger and roughly of the same size, pointing in the same direction as them. These will be our main controllers for each finger, and should be children of the
D_Hand.Lbone. Name themThumb.L, Index.L, Middle.L, Ring.R, andPinky.L. Select all these five bones and disable their Deform property after pressing Shift + W. Refer to the next screenshot to see the bones that we've created from the top and side views: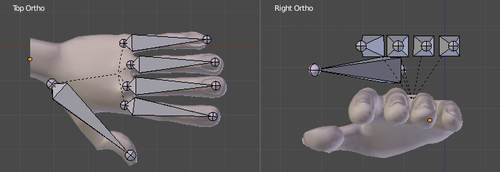
- Enter into the armature's Pose Mode Ctrl + Tab, select the
Pinky.Lbone, hold Shift, select theD_Pinky1.Lbone, press Ctrl + Shift + C, and pick the Copy Rotation constraint. Under the Bone Constraints tab in the Properties window for theD_Pinky1.Lbone, you'll see the constraint that we've just created. Disable the Y axis box (since fingers don't rotate on this axis), enable Offset, and change both Space combos to Local Space, as seen in the following screenshot: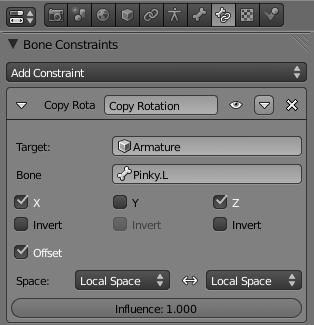
- Repeat step 3 to add the Copy Rotation constraint to the
D_Pinky2.LandD_Pinky3.Lbones, but instead of disabling only the Y axis box, disable both Y and Z. This is because these joints only rotate on their local X axis. - The last step for this finger is adding another constraint to its first bone. Select the
Pinky.Lbone, hold Shift, select theD_Pinky1.L, press Ctrl + Shift + C, and choose the Copy Location constraint. Locate this constraint under the Bone Constraints tab in the Properties window and change both Space selectors to Local Space.Note
The Copy Location constraint is necessary because our fingers don't just rotate from a fixed point. Our hand is a somewhat flexible device, so the base of our fingers can move to better adapt to the surface it's touching, or holding. By using the Copy Location constraint, you can subtly move the controller in order to get a nicer deformation on the character's hand.
- To improve our controller, select the
Pinky.Lbone and disable its rotation on the Y axis and all scaling fields on the Properties panel (N) in the 3D view, as seen in the next screenshot:
- Repeat steps 3 to 6 to create the remaining fingers, and you'll be able to control them with only one controller for each, as you can see in the next screenshot:
But wait, there's more!
These general finger controllers allow us to quickly pose the fingers in their closed and open states, but these are not the only possible positions for the fingers. You should be able, for instance, to bend only one joint of the fingers.
Since we've enabled the Offset option on each Copy Rotation constraint, we can build our custom finger pose on top of the transformation produced by the controller. In order to do this, simply select the desired bone and rotate it until you get what you want.
The deformation bones are inside the mesh, so we need to be able to see them properly without relying on the X-Ray property. In the provided file, there is a ready-to-use shape named Fingers, and you should assign it to each finger bone, from the Bone tab in the Properties window, on the Custom Shape field.
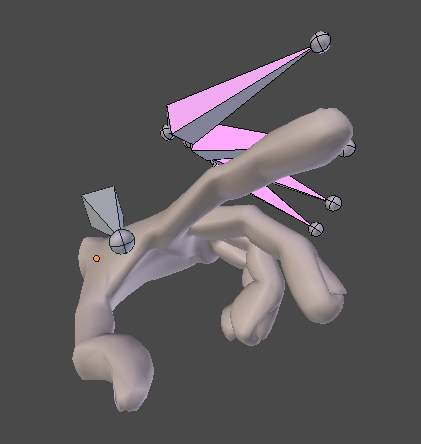
Once you assign this shape to all finger bones, you can disable the X-Ray property of the armature and make custom poses, as seen in the next screenshot:
You can view the final result of this recipe in the file 005-Fingers-complete.blend for your reference.
By assigning a Copy Rotation constraint to a separate controller, you can make the basic (and often used) poses for your character's fingers. The use of the Offset property on each constraint enables you to further refine each finger's pose on top of the transformation created by the constraints.
Since the finger bones are in a FK chain, if you want a cartoony stretching effect, you can use the same principles applied to the FK arms, legs, and torso covered in different recipes in this book.
Chapter 1: Customizing shapes and colors for your bones
Chapter 1: Defining good orientations for your bones