
Rendered frames of a 3D animation can be thought of as individual drawings of traditional 2D animation. Similar to animating with pencil and paper, we must check our digital 3D drawings to see if everything looks proper on the screen.
Two often used techniques to check the quality of a pose for animation are viewing it as a silhouette and with a mirror. When we stare at our work for great amounts of time—and that is particularly true for animators—it becomes difficult to spot imperfections.
When you have a silhouette version of your drawing, all fine details such as textures and shading are removed, and you can focus only on the main shape of your pose. If your pose can be "read" by the audience in silhouette form and communicates what your character feels, you can be sure it will work in the full, shaded version.
Traditional animators also often use mirrors to check their drawings. After being so long in front of a picture, our eyes get used to that shape and we can't see all of the imperfections. A mirror "creates" another shape, one that we're not accustomed to and that we can look at to spot mistakes.
- Open the file
006-Silhouette-and-mirror.blend. It has our character Otto with a basic pose as if he is running. Looking at it for a long time, moving and rotating bones can deceive our eyes, causing us to lose focus, making us unable to pay proper attention to some bad shapes. Lets try to spot them.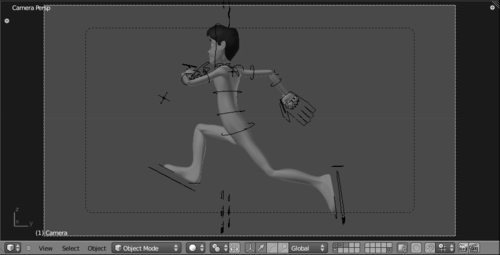
- Open a Node Editor window and select the Compositing Nodes type on the window header. Select the Use Nodes and Backdrop options. The latter shows the result of the composite in the background of the nodes window, while the former makes the scene nodes actually used by Blender.
- Hit F12 to render this frame, pressing Esc when it's done to return to the previous screen. This step is necessary so that you can actually use the scene information for the composite. If you need more space, keep the mouse cursor over the Node Editor window and press Ctrl + Up Arrow to maximize it.
Note
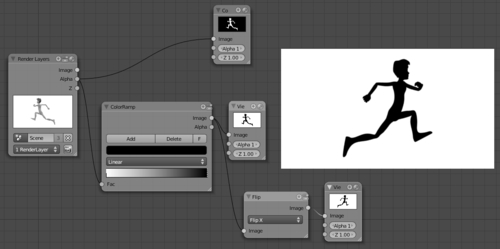
To create the silhouette view, all the information that we need to use in this scene is held by the Alpha channel, since there are no concurrent meshes in front of or behind our character, such as props or walls. In more complex scenes, make sure you only have the meshes you want to check in the silhouette visible. You can move the extra meshes to a disabled layer for this purpose.
- Lets add a ColorRamp node. Press Shift + A and select Convertor | ColorRamp on the menu, as seen in the next screenshot:
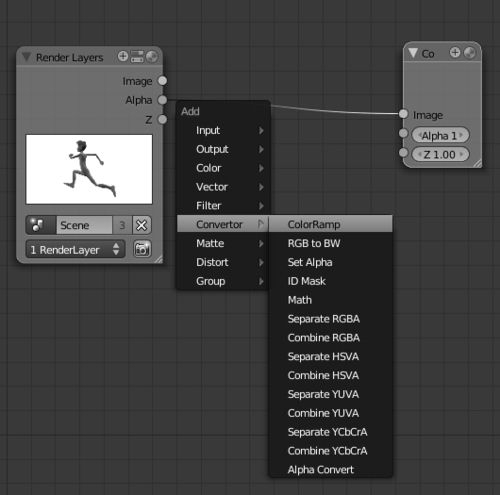
- Now, click on the Alpha grey circle on the Render Layers node and drag its output to the grey input circle at the left-hand side of the ColorRamp node, connecting them. To see the result on the backdrop, select the ColorRamp node by clicking over it, press Shift + A, and select Output | Viewer. This will create a Viewer node connected to the output of the ColorRamp and show the resulting image on the backdrop, as seen in the following screenshot:
Note
To move the nodes around, just click on them and press G, as you do with objects in the 3D View. To move the backdrop, hold Alt, right-click over the image and drag it around. You can make the backdrop bigger with V and smaller with Alt + V.
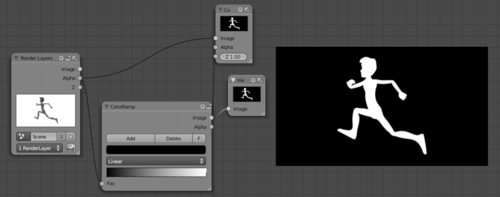
This would make our silhouette view of the scene, but we can enhance it further by making the character black over a white background (or the color that you like best). First, take a look at the gradient box on the ColorRamp node: there is a dotted line on the left border and a black and white one on the right. The dotted one indicates that it's the active point, and you can drag it over the ramp. You can also click on the other point to make it the active one.
- Select the first point on the ramp and change its color from black to white on the color selector just below the Add, Delete, and F buttons. Do the same to the second point, changing its color to black, as seen in the following screenshot:
This will finish our silhouette setup. Now you can check for problems on the overall shape to correct the pose.
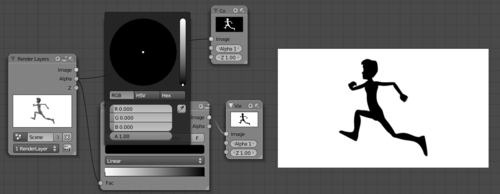
- To make further observations on the shape, we're going to create the mirrored setup on top of this one. With the ColorRamp node selected, press Shift + A and select Distort | Flip to add the Flip node already connected to the ramp node. With the Flip node selected, press Shift + A and pick Output | Viewer to create a second viewer node already connected to it. Now, by clicking on each of the viewer nodes you can switch the backdrop image to check for imperfections in your pose, as seen in the next screenshot:
Now, while creating your poses, you can use this setup to check them quickly by viewing them in silhouette and mirrored modes. Just remember to render the scene again after you make the changes.
Since our goal here is just a quick view of our poses, we don't need to enable the compositing nodes on our Render panel in the Properties window, but you can render an animation this way if you wish (specially if you want to render the full scene in silhouette to see the result in motion). The file 006-Silhouette-and-mirror-complete.blend has this complete example, waiting for you to press F12.
Using the Alpha information of a scene, you can use the ColorRamp and Flip nodes to check your character's poses in silhouette and mirrored modes, to look for imperfections that are harder to spot on detailed images.
To speed up this already quick rendering process, make sure that you disable all options on the Shading panel in the Render settings of your scene. You can also move all the lamps in your scene to a disabled layer, since we're only making use of the Alpha channel and discarding everything else. Just remember to enable these options back to make the final renders of your scene.
Chapter 7: Easy to Say, Hard to Do: Mastering the Basics