
Lip syncing is normally a hot topic for animation students. The good news is that it's quite an easy task, if you follow some basic guidelines:
As with most things in animation, lip syncing gets easier once you have an organized workflow. Looking for a good reference is also important to get inspiration: notice how every person says the same word a bit differently than the others.
- Open the file
010-Talk.blend. It has our character Otto with all his facial controllers, looking at someone behind our camera, as seen in the following screenshot: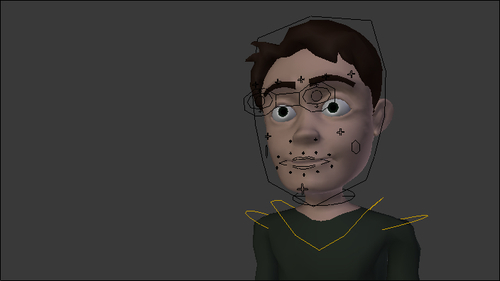
We have an audio file recorded for our scene in the file 010-Talk.wav, in which we have a man's voice saying "So... what do you want to do?"
- We first need to import it to our scene and set up this audio as background. For that we must use the Blender Video Sequence Editor (VSE) . Open a new VSE window, press Shift + A, and choose Sound in the menu, as seen in the following screenshot:

- Blender will open a file browser window, in which you should select and load the file
010-Talk.wav. Make sure that you set the Start Frame slider to 1 on the left-hand side of the window, so our sound strip starts on the first frame of our scene. You should also enable the Cache option to load this audio file into system memory. - Once your audio strip is loaded into the VSE, press Alt + A to listen to the file. Maximize the window (Ctrlx + Up Arrow) to see a better visualization of the waveform. You will notice that the louder parts (or accents) of the audio are represented with larger waveforms, as seen in the next screenshot:

- On a Timeline window, make sure the Audio Scrubbing, AV-sync, and Frame Dropping options are enabled on the Playback menu, so you can move through the timeline and listen to portions of the audio strip. The next screenshot shows these options:

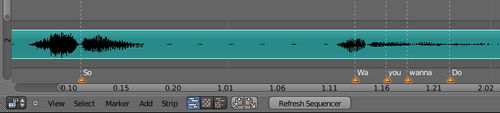
Back to the VSE window, and we're going to add some markers to indicate the syllables and frame positions we need to animate. These markers are visible in all timeline-type windows, such as the DopeSheet, the Video Sequence Editor, and the actual Timeline window. This makes it easier to spot where we should insert the keyframes to match the audio strip.
- Position the frame indicator on frame 11, which is where we listen to the "O" sound. Press M to add a marker on this position, and then press Ctrl + M to rename it to
So. You can move markers by selecting them with the right mouse button and pressing G. Repeat this process for the other sounds that you think are stronger.Note
Remember that not every syllable should be animated. You should identify the stronger sounds, because they are the ones you should focus on. In our example, the stronger sounds are set in bold: "So, what you wanna do?"
The following screenshot shows our markers set and named properly on the VSE:
- We now have our scene set up for animation work. Open a DopeSheet window and a 3D View window to start animating.
The layered animation approach we use for our characters' bodies is also relevant for animating mouth shapes. We're going to animate the basic shapes first and then add layers of details until we finish the shot.
- The first "layer" is created only by animating the movements of opening and closing the mouth. Move the marker through the timeline, move only the
Jawbone and insert keyframes to make our character open and close his mouth to match the sounds of the audio strip. Remember that we're only focusing on the jaw here; the lips will be taken care of in the next layer. The next screenshot shows our character with his mouth a bit open to match the sound of the word "so...".
On the next layer, we'll match the narrowing or widening of the mouth shape. The vowel sounds "O" and "U", for instance, require narrow mouth shapes while "A", "E" and "I" need wider shapes.
- Once again, go through the timeline, move and insert keyframes for the mouth controller bones to match these sounds. Notice that some near sounds (and mouth shapes) overlap each other, such as the words "you" and "wanna"; the end of the first sound is the beginning of the second. That's why you should animate the sounds you hear, not the text in the transcript.
- After you're happy with the second layer of mouth shapes, start adding details to make the forms more interesting. It's nice to have some asymmetrical contours: not only the mouth controllers, but the jaw and head may be changed to add some interesting shapes. The next screenshot shows the mouth closed after the word "so..."; notice that the controllers were set so the jaw is rotated a bit to his left, and the mouth shape is not symmetrical:

- Repeat until you're happy with the results. Remember that nobody talks only with their mouth; head, eye, eyebrow, and body movements must enhance what's being said.
That holds true for any scene that you're animating. If your audio has someone screaming in anger at someone, for example, the whole body should follow the sound accents. In your planning phase, it's useful to act the scene in front of a mirror or camera, sketch thumbnails of your pose ideas regarding those sounds and then transpose them to your character rig.
A useful tip when making these acting choices is to avoid being too obvious or literal; if your character says the word "big", you don't have to make his pose say the same. Try to make your character's body match the emotional state, not the word's meaning.
The file 010-Talk-complete.blend has this finished recipe for your reference.
By loading an audio file and setting up markers for the sound accents, you can have visual feedback to help create the mouth shapes for lip syncing. Building the mouth shapes in a layered fashion—just like you do with the body motion—is a good way to be more productive when animating your character while speaking.
You should always build asymmetry into the facial movements in order to achieve natural and fluid results. Remember that nobody speaks only with their mouth; the full body must be taken into account. When animating the body on top of a sound file, try to match the emotional state of your character. Avoid being too obvious and literal in your acting choices.
Appendix: Understanding Extremes, Breakdowns, Inbetweens, ones and twos
Chapter 6: Non-linear animation
Chapter 6: Animating in layers
Chapter 7: Easy to Say, Hard to Do: Mastering the Basics