
Timing, by itself, is a subject that goes well beyond the scope of a simple recipe. It is, in fact, the main subject of a number of animation-related books. Strictly speaking, Timing in animation is how long it takes (in frames or seconds) between two Extreme poses.
You can have your character in great poses, but if the timing between them is not right, your shot may be ruined. Maybe it is a difficult thing to master because there are no definite rules for it: everyone is born with a particular sense of timing. Despite that, it's enormously important to look at video and real life references to understand the timing for different actions.
Imagine a tennis ball falling to the ground and bouncing. Think of the time between its first and second contact with the ground. Now replace it with a bowling ball and think of the time required for this bounce. You know, from your life experience, that the tennis ball bounces slower than the bowling ball. The timing between these two balls is different. The timing here (along with spacing, subject of the next recipe) is the main factor that makes us perceive the different nature and weight of each ball.
The "rules" of timing can also be broken for comedic effect: something that purposely moves faster or slower than usual may get a laugh from the audience. We're going to see how different timings can change how we perceive a shot with the same poses.
- Open the file
007-Timing.blend. It has our character Otto with three poses, making him look from one side to the other:
- Press Alt + A to play the animation. You may think the timing is acceptable for this head turn, but this method of checking the timing is not ideal. When you tell Blender to play the animation through Alt + A, you're relying in your computer's power to process all the information of your scene in real time. You'd probably end up seeing something slower than what you'll actually get after rendering the frames.
Note
When playing the animation inside the 3D view, you can see the actual playback frame rate on the top left corner of the window. If it's slower than the scene frame rate (in this case, 24 fps), it means that the rendered animation will be faster than what you're seeing.
When adjusting the timing, we must be sure of the exact results of every keyframe set. Even a one-frame change can make a huge impact on the scene, but rendering a complex scene just to test the timing is out of the question, because it just takes too long to see the results. We need a quick way to check the timing precisely.
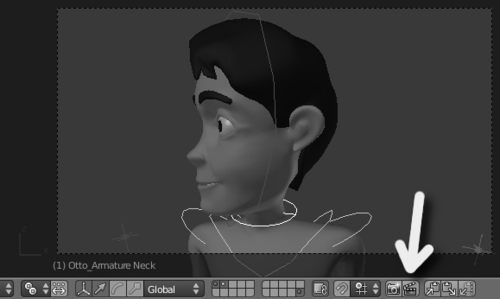
Fortunately, Blender allows us to make a quick "render" of our 3D view, with only the OpenGL information. This is also called "playblast", and is exactly what we need. Take a look at the header of our 3D view and find the button with a clapperboard icon, as seen in the next screenshot:
Note
OpenGL stands for Open Graphics Library, and is a free cross-platform specification and API for writing 2D and 3D computer graphics. Not only are the objects inside Blender's 3D view made using this library, but also the user interface with all its buttons, icons, and text are drawn on the screen with OpenGL. From OpenGL version 2.0 it's possible to use GLSL, a high level shading language heavily used to create games and supported by Blender to enhance the way objects are displayed on the screen in real time. From Blender 2.5, GLSL is the default real time rendering method when the user selects the Textured viewport shading mode, but that option has to be supported by your graphics card.
- Click on that clapperboard button, and the active 3D view will be used for a quick OpenGL render of your scene. This preview rendering shares the Render panel settings in the Properties window, so the picture size, frame rate, output folder, file format, duration, and stamp will be the same. If you can't see the button in your 3D View header (it is available only in the header) it may be an issue of lack of space; you can click with the middle button (or the scroll wheel) of your mouse over the header and drag it to the sides to find it.
- After the OpenGL rendering is complete, press Esc to go back to your scene and press Ctrl + F11 to preview the animation with the correct frame rate to check the timing.
Note
Starting with the Blender 2.5 series, there's no built-in player in the program, so you have to specify one in the User Preferences window (Ctrl + Alt + U), on the File tab. This player can even be a previous version of Blender in the 2.4 series or any player you wish, such as DJV (http://djv.sourceforge.net/) or Mplayer (http://www.mplayerhq.hu). With any of these options you must tell Blender the file path where the player is installed.
Now that you can watch the animation with the correct frame rate, you'll notice that the head turns quite fast, since it only takes five frames to complete. This fast timing makes our action seem to happen after the character listens to an abrupt and loud noise coming from his left, so he has to turn his head quickly and look to see what happened.
Let's suppose our character is watching a tennis match in Wimbledon, and his seat is in line with the net, at the middle of the court (yep, lucky guy). Watching the ball from the serve until it reaches the other side of the court should take longer than what we have just set up, so let's adjust our keyframes now.
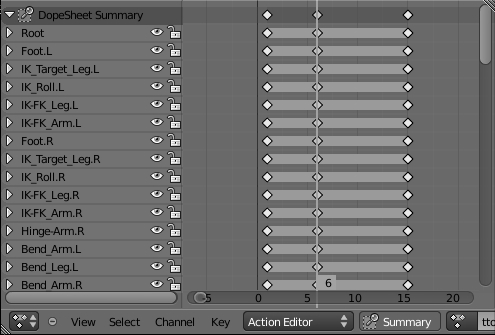
- In the DopeSheet window, leave the first keyframe at frame 1. Select the last column of keyframes by holding Alt and right-clicking on any keyframe set at frame 5. Move (G) the column to frame 15 (hold Ctrl for snapping to the frames), so our action takes three times longer than the original.
Note
Another way of selecting a column of keyframes is through the DopeSheet Summary option on the window header. It creates an extra line above all channels. If you select the diamond on this line, all keyframes on that column will be selected. You can even collapse all channels and use only the DopeSheet Summary to move the keys along the timeline to make timing adjustments easily.
- Now, the Breakdown, or intermediate position between two Extreme poses. It doesn't have to be at the exact middle of our action. Actually, it's good to avoid symmetry not only in our models and poses, but in our motions too. Move (G) the Breakdown to frame 6, and you'll have something similar to the next screenshot:
Now you can make another OpenGL render to preview the action with the new timing. You can choose to disable the layer where the armature is located, the second, by holding Shift and clicking over it, so you don't have the bones on the preview. Of course this is far from a finished shot: it's a good idea to make the character blink during the head turn, add some moving holds, animate the eyeballs, add some facial expressions, and so on. This rough example is only to show how drastically the timing can change the feel of an action. If you set the timing between the positions even higher, our character may seem like he's looking at something slower (someone on a bike, maybe?) moving in front of him.
Along with good posing, the timing is crucial to make our actions vivid, believable, and with a sense of weight. The timing also is very important to help your audience understand what is happening in the scene, so it must be carefully adjusted. To have a precise view of how the timing is working in an action within Blender, it's best to use the OpenGL preview mode, since the usual Alt + A shortcut to preview the animation inside the 3D View can be misleading.
Depending on the complexity of your scene, you can achieve the correct frame rate within the 3D view with Alt + A. You can disable the visibility of irrelevant objects or some modifiers to help speed up this real time processing, like lowering (or disabling) the Subdivision Surface modifier and hiding the armature and background layers.
Appendix: Extremes, Breakdowns, Inbetweens, ones and twos
Chapter 6: Non-linear animation
Chapter 7: Spacing: favoring and easing poses