
Along with the more "traditional" way of animating characters, Blender offers the Non-linear Animation (NLA) Editor, where you can mix different actions to produce new movements. This editor allows a lot of flexibility, with the ability of stacking simple movements to create a more complex animation. Tasks such as repeating and reversing an animation, which demands time and care to do in the DopeSheet, are very simple to do on the NLA.
- Open the file
006-NLA.blend. It has our character Otto with a basic animation of a jumping jack exercise. You'll notice that the arms movement is missing. Let's do them using the NLA Editor. The following screenshot shows our starting point, with the first pose in the 3D View and its keyframes set in a DopeSheet window: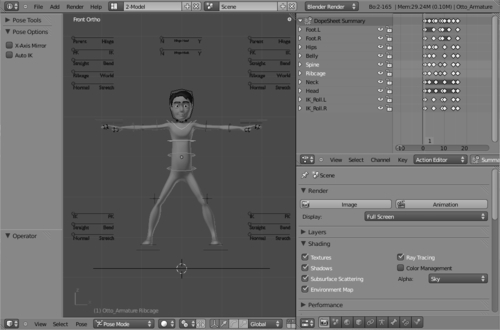
- Press Alt + A to playback the animation. You'll see that, along with the missing arm movements, there is only one jump. We need this action to be repeated for a number of times so we have a real jumping jack exercise.
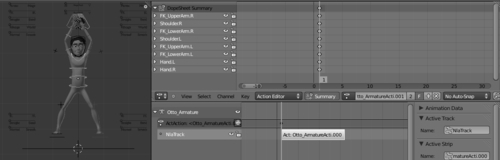
- Change the Properties window below the DopeSheet into a NLA Editor using the window header. You'll notice a red line with some keyframes. This is our jumping action defined on the DopeSheet. Let's turn it into an Action Strip, so it can be treated independently as a layer of animation. Click on the "snowflake" icon right next to the action name to turn it into a strip, as shown in the next screenshot:

You'll notice that all keyframes set on the DopeSheet window are gone. They are now grouped inside the yellow action strip you see in the NLA Editor. To edit the keyframes of this action, select it on the NLA Editor and press Tab, just like you do to enter Edit Mode for objects. Once you finish editing, press Tab again.
- Now let's create the arms action. The first frame has the legs spread wide, so the hands need to be touching overhead. Move and rotate the arms, hands and shoulders on frame 1, setting a new keyframe (I) when you're happy with the results. When you set the first keyframe, you'll see that a new Action is automatically created on the NLA Editor above the saved strip, as you can see in the following screenshot:
The first action of the legs and torso has 16 frames, and we want our arms action to be the same length to a perfect match. Since it's a repeating action, the first frame should be identical to the last.
- Select all keyframes set on the first frame by holding Alt and right-clicking over one of the yellow keyframes; press Shift + D to create a copy and move them to frame 16.
- Frame 9 is where the feet stay together and the torso is straight, so the arms and hands need to be down. Create another extreme keyframe there. Continue adding more keyframes to create good breakdown positions and in-betweens until you have a nice movement of the arms. Once you finish, go to the NLA Editor window and click on the "snowflake" icon for this new action to create another strip.
- You may rename the strips and tracks on the Properties panel (N) at the right-hand side.
- Now, for the repetition. This is very easy to do in the NLA Editor. In the DopeSheet you'd have to manually duplicate the keyframes, causing an undesirable redundancy. In the NLA however, it's just a matter of selecting the desired strip and changing the Repeat value in the Action Clip section of the Properties panel, as seen in the next screenshot, where the strip is set to repeat five times:
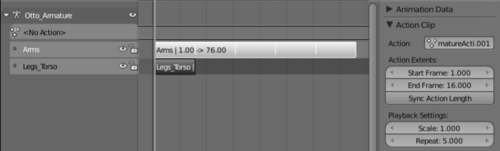
- Select the bottom strip and change its Repeat value to
5also, so both strips have a matching length. In the NLA you can drag strips around to change their sync, so you can easily offset motions to increase the sense of overlapping actions. If you play the animation with Alt + A, you'll see the animation repeating seamlessly for five times.Note
Using the Properties panel in the NLA Editor you can also change the overall timing of a strip by changing its Scale value. Reversing a strip is just a matter of enabling the Reversed option. Strips can also receive modifiers, so you can add a random noise to movements or simulate the feel of a stop-motion video by using a stepped interpolation.
- Make a quick OpenGL rendering of the active 3D viewport by clicking on the clapperboard button on the 3D view header. After finishing, play the results by pressing Ctrl + F11. You may feel this animation is too quick, so it's a good idea to slow it down a bit.
In the "traditional" way, using the DopeSheet, we would have to move keyframes around to adjust the timing, but on the NLA Editor you can just change the Scale value on the Properties panel to 1.5 for both strips. Blender will automatically resize the strips and calculate the new timing for them. That's very useful when you need to adjust the timing for an entire action.
The file 006-NLA-complete.blend has this finished recipe, and you can refer to it if in doubt or to compare your results.
The Non-linear Animation (NLA) Editor in Blender allows us to logically separate and stack pieces of animation, making it easy to combine different movements, and make repetitions and timing adjustments. The pieces, or strips, are seen by Blender just like film strips in a non-linear video editor, where you can move around and mix layers of different actions.
You can use the NLA Editor to apply the layered refinement approach that we talked about on the recipe Animating in layers. Each step of refinement (key poses, Extremes, Breakdowns) can be a separate action visually layered on the NLA Editor. This way you can also keep the steps separate in a non-destructive way.
Chapter 6: Animating in layers
Chapter 7: Adjusting and tracking the timing
Chapter 9: It's time for secondary actions