Chapter 6
Working with Gmail and Google Calendar
IN THIS CHAPTER
![]() Navigating Gmail
Navigating Gmail
![]() Writing and sending emails
Writing and sending emails
![]() Receiving and reading emails
Receiving and reading emails
![]() Accessing non-Gmail accounts with Gmail
Accessing non-Gmail accounts with Gmail
![]() Using Gmail offline
Using Gmail offline
In the beginning, Google was a search engine. Over time, however, Google has created or acquired hundreds of software tools and platforms and connected them together to make up what is commonly referred to as the Google ecosystem. Gmail was an early innovation that quickly took root and gained international appeal. At first, Gmail was nothing more than a free email platform that offered users 1GB of email storage. However, Inbox size, coupled with Gmail’s easy-to-use interface, made the perfect recipe for growing a user base. Over the past 15 years, Gmail has acquired 1.4 billion users (yes, that’s billion with a b), and it is still free. And now, users receive 15GB of free storage in Gmail.
In this chapter, you learn how to launch Gmail on your Chromebook, read emails, and sort your emails with labels. You can explore how to write emails, add multiple recipients who can be seen and unseen, and attach files to email messages. You learn how to use Gmail to access your other email accounts, even those outside of Google. Navigate your sent mail and save messages in your Drafts folder for editing at a later time. Write emails, even when you don’t have Internet access, and send them when you’re connected at a later time with Gmail Offline.
Gmail for Chromebook
Before you can access your Chromebook, you must log in using your Google Account username and password. Your Google Account gives you access to almost all of the Google platform, which includes Gmail. Your Chromebook came with a Gmail app icon that you can use to send and receive email.
 If you have a non-Gmail email address that you’ve been using for a long time, you can still use it on your Chromebook. You can use the Gmail app to access it. If your non-Gmail email is a webmail service (such as Hotmail, Yahoo! Mail, or Pobox.com), you can simply use your Chrome browser to access any or all of those email services.
If you want to use the Gmail app for your Google account, or some non-Google account, you want to read and follow the steps in this section. If, on the other hand, you use your Chrome browser to access non-Google email services, you don’t need to read this chapter at all.
Launching Gmail
Before you get started, have your Gmail username handy. Chances are, this is the account you used to initially set up and sign in to your Chromebook. You use that Gmail username (also known as your email address) in the procedures here.
To launch Gmail, just open the Launcher and click the Gmail icon. When you do so, Gmail launches in a Chrome browser window.
If you haven’t created a Gmail email account, you’re prompted to create an account, thus adding it to your Google Account. Gmail is free and perhaps always will be. Even if you don’t intend to use Gmail as your preferred email application, you still need a Gmail account to send and receive message from other email apps on your Chromebook. To create your Gmail account, follow these steps:
On the Add Gmail to Your Google Account page, shown in Figure 6-1, complete all the fields in the sign-up form on the right side of the screen.
If you intend to use your Gmail account to send and receive email, make sure you select an email address that’s easy to remember to avoid awkward conversations down the road. It’s best if you write it down, along with your password.When you complete the form, click Submit.
The Verify Your Account page appears, where you’re requested to verify your identity.
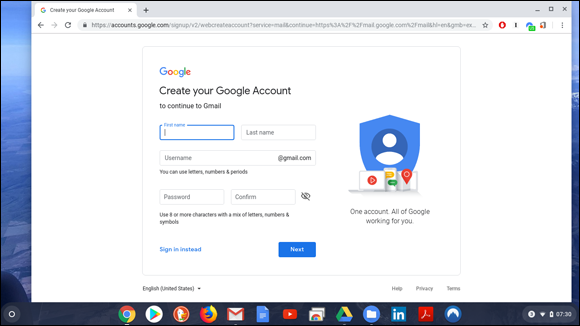
FIGURE 6-1: The Google account creation page.
Enter your phone number, or any phone number at which you can be reached.
Google will call or text this number to give you a verification number. You should use a number at which you can be reached most of the time because you might need it in the future to verify your login.
- Using the radio buttons, select to receive a text message or a phone call.
Click Continue.
The Verification page appears, on which you’re prompted to enter the verification code that you received on your phone.
- Enter the verification code you received by phone call or text.
- Click Continue.
When Google asks for a Recovery email address, enter the email address of another email account that you normally use.
If you get locked out of the new account you are creating here, your recovery account can help you get this new email account unlocked.
Enter your date of birth and gender.
Google will not verify this now, but it may use your date of birth later to help you recover your account. It is important that you remember the date you use here.
Review and agree to Google’s privacy and terms.
If you click More Options, you can opt out of various advertising and privacy features if you want.
After being verified, you’re logged into your new Gmail account.
Navigating Gmail
When you log into Gmail, you see Gmail’s minimalist interface. (See Figure 6-2.) The Gmail interface is broken up into two main areas. On the left is a list of folders, including your Inbox. In Gmail, these folders are called labels. Directly to the right of your list of labels is the email area. Above the email area is the Gmail toolbar, and above the toolbar is the Search bar.
Gmail gives you a default set of labels for categorizing your email, as shown in Figure 6-3. Labels are a lot like folders, except messages, unlike files, can have multiple labels. (More on categorization in the section “Organizing your Inbox,” later in this chapter.)
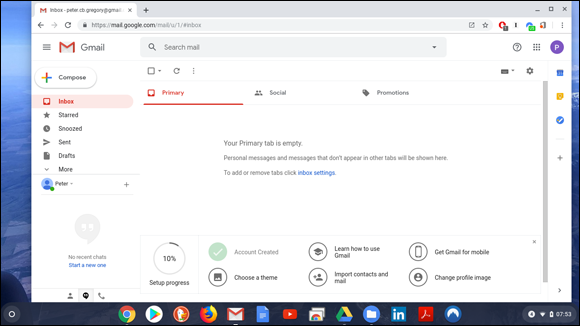
FIGURE 6-2: Gmail’s user interface.
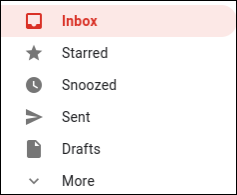
FIGURE 6-3: Email labels.
The basic labels in Gmail are the following:
- Inbox: Your Inbox is the location where your new mail is delivered. The Inbox doesn’t include spam, trash, or sent mail.
- Starred: Give your messages a special status by using a star so that you can more easily find them.
- Snoozed: These are email messages that you don’t want to be notified about at this time.
- Sent: Any email you send to others is labeled Sent.
- Drafts: Emails that you write but don’t send are labeled Drafts.
- Spam: Junk mail that Google automatically identifies as spam.
- Trash: Email that you delete is labeled Trash and can be erased from existence.
Spam will not appear until either you or Gmail has marked an incoming email as spam. Similarly, Trash will not appear until you have deleted email messages.
Your Gmail view defaults to the Inbox label. When you have unread emails in your Inbox, a number appears directly to the right of the label. Both read and unread emails appear in the main email message area. Unread emails show up in bold, as shown in Figure 6-4. Directly above your email messages, by default, are three tabs — Primary, Social, and Promotions. Gmail automatically sorts the emails in your Inbox based on what it believes the incoming email to be. Google places emails from social outlets into your Social tab, emails judged to be advertisements into your Promotions tab, and the remainder into your Primary tab.

FIGURE 6-4: The email area.
Customizing your view
You have several ways to customize the look and feel of Gmail. By default, Gmail leaves a good deal of space between lines, emails, and so on. However, if you prefer, you can condense this space to make room for more information on your screen. To compact the space, follow these steps:
Click the Settings icon on the right side of the toolbar.
The Settings icon looks like a little gear.
The Settings menu opens, as shown in Figure 6-5. The first option, Display Density, pertains to your Gmail display. If you click Display Density, a new window opens that shows the Default, Comfortable, and Compact options. Display Density options determine how close together messages in your folders appear, as shown in Figure 6-6.
Pick a Display Density option and click OK.
Your Gmail display automatically reconfigures itself and refreshes the page.

FIGURE 6-5: Customizing your Gmail view.
You can also change the way your Gmail account handles the messages in your Inbox. By default, messages are grouped in the order they are received, regardless of whether they’re read, and they are filtered based on the tab settings you’re using. You can, however, change your Inbox view to assign different priorities to the messages you receive. Configuring your Inbox to keep all unread messages at the top can help you avoid missing a message. You can reconfigure your Inbox by following these steps:
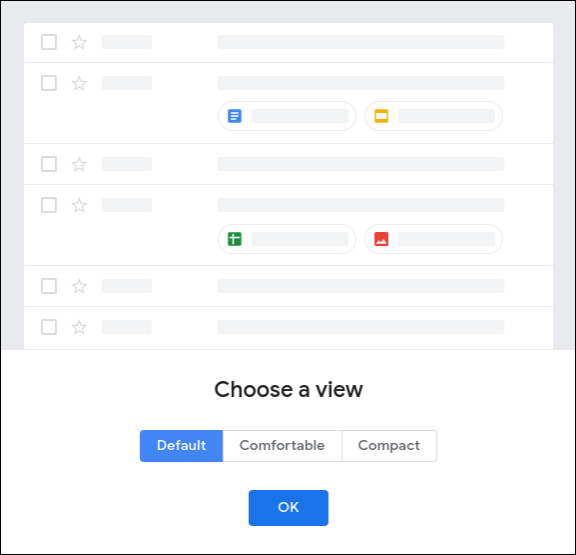
FIGURE 6-6: Selecting the density of display of email messages in Gmail.
Move your pointer over the Inbox label on the left side of your window and click the down-pointing arrow that appears.
A menu appears, as shown in Figure 6-7, revealing several options for configuring your Inbox.
- Mouse over each option to reveal a description of what the option will do to your Inbox.
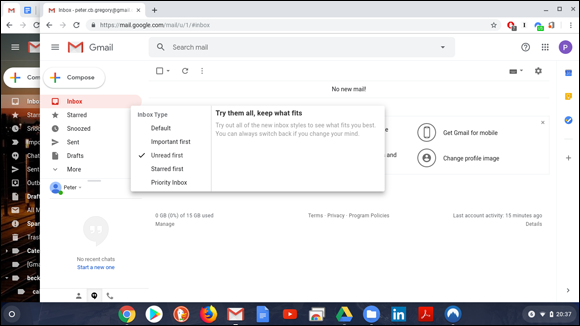
FIGURE 6-7: Configuring your Inbox view.
Choose Unread First.
Your Inbox is reconfigured to keep all unread emails at the top. All read emails are sorted by date, as shown in Figure 6-8.
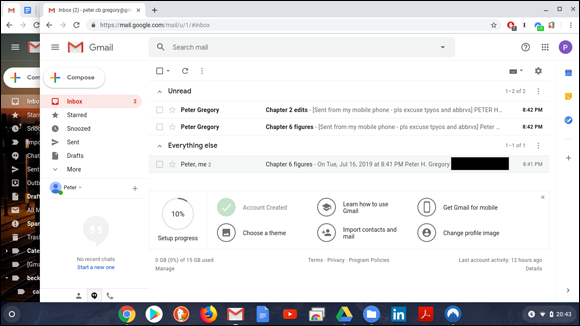
FIGURE 6-8: Unread emails appear first.
Adding a theme
Gmail also comes with several different themes for adding color and images to your account screen. Add flavor to your Gmail with a theme by following these steps:
Click the Settings icon on the right side of the toolbar.
The Settings menu opens.
Choose Themes.
Gmail loads the Themes page that contains images of several themes. You can scroll down to see many more.
Browse the selection of color themes and HD themes. Select a theme by clicking the option, clicking Select, and then clicking Save.
Gmail automatically applies the theme to your Gmail, and returns to the Inbox display. Do you like the theme you selected? If not, go back and find another!
Sending Email with Gmail
All email consists of the same core elements — it must have a sender, a receiver, and a message — and email sent using Gmail is no different. The message is typically comprised of a subject line and a body of text. You can have multiple recipients and, in addition to text, your message can include documents, music, videos, archives, and more.
Navigating Gmail email
The New Message window has three main parts. The header of the email window is located at the top of the email message. The header contains the window controls for your email. The footer contains the editing tools for formatting and styling your email, and the middle portion is the email itself. Figure 6-9 shows a blank email message in Gmail. The email message is composed of the following parts:
- To: Specify the recipient(s) by entering an email address (or email addresses) here. You can add recipients using the carbon copy feature. Carbon copy is used to send a message to someone who isn’t the primary intended recipient. You use a carbon copy (or Cc, as it’s commonly referred to), to start dialogues among multiple people over email. You use a blind carbon copy, or Bcc, to send an email to one or many recipients, but none of the recipients know who any other Bcc recipients are (if any).
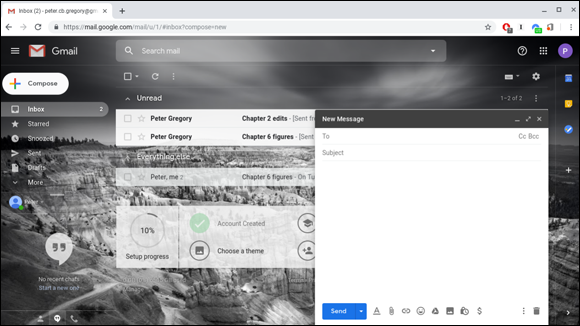
FIGURE 6-9: Sending an email message in Gmail.
- Subject: Add a subject line to your email. Subjects are usually 50 characters or fewer.
- Body: You type your message in the body, which is the big, white, blank area below the Subject line.
Writing an email
Writing an email with Gmail is very similar to writing a letter using Google Docs or any other word processor. To write an email in Gmail, take the following steps:
Click the Compose button at the top-left of your Gmail window.
A new, blank message appears on the bottom-right of the Gmail window.
Click the To field at the top of the Email Editor and enter the email address of the person to whom you want to send your email.
Email addresses follow the format of [email protected]; for instance, my email address is
[email protected].Click in the Subject field and enter a subject line for the message.
It’s always good advice to keep your subject line short and to the point.
- Click in the Body of the email and type your message.
When you finish writing your email, click Send.
The Email Editor vanishes, indicating that the email has been sent.
Styling text
Gmail provides you with several advanced features for spicing up your emails, such as word-processor features to style your text. You can make your text bold or italicized by using the formatting palette located at the bottom of the composition area, as shown in Figure 6-10.
To apply boldface, italics, or underline to the text in your email, follow these steps:
- Select the text you want to format by clicking and dragging your pointer.
- Click the underlined A button next to the Send button in the footer of the Email Editor.
Select the B button (to make the selected text bold), the I button (to make it italic), or the U button (to add an underline).
The selected text changes appropriately.
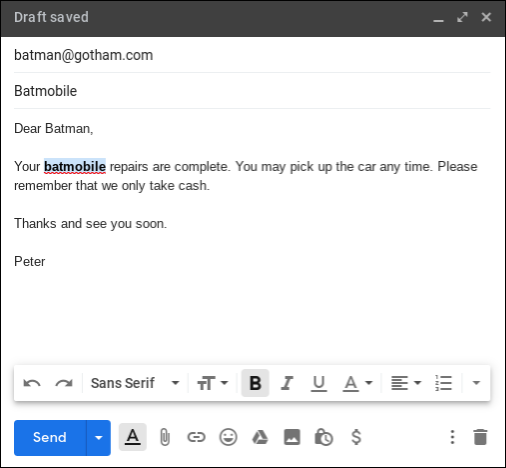
FIGURE 6-10: The formatting palette in an email message.
You can also use keyboard shortcuts to apply formatting to text in your emails. While your text is selected, use the following shortcuts to apply the associated style:
- Bold: Ctrl+B
- Italics: Ctrl+I
- Underline: Ctrl+U
To change the color of the text in your email, follow these steps:
- Select the text whose color you want to change by clicking and dragging your pointer.
Click the A button on the left side of the formatting toolbar.
A menu appears, giving you the option to select a color to apply to your text or to apply as a highlight on your text.
Select your desired color from the available options.
Your text changes to the selected color.
Attaching files to an email
Email has come a long way since the early days of the Internet. Now you can send more than just a digital letter; you can also send files with your emails. Want to send pictures of your sister to Mom and Dad? Maybe you need to submit your homework to your teacher? Or maybe you’re just swapping files with your friends. Email is a great way to do it.
 Most email service providers limit the file size of attachments that can be sent or received to 10–30MB (megabytes) or less. If you need to send a larger file, you may be forced to find a different way to send it. Gmail’s limit, by the way, is 50MB — the total allowed size for all attachments.
You can attach a file to your email done by following these steps:
Click the Attach Files icon (the paperclip) in the footer of your email.
Files launches.
- Using Files, navigate to the location of the file you want to attach. Select the file.
Click Open.
The file uploads and appears at the bottom of your email, as shown in Figure 6-11.
You can also attach files from your Chromebook by dragging and dropping the files directly from the Files app onto the body of the message.
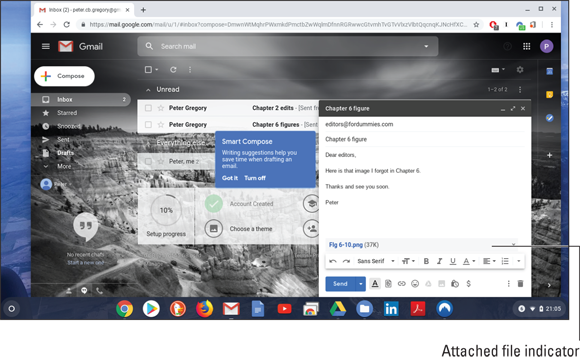
FIGURE 6-11: The Uploaded File indicator in an email.
Customizing your email view
By default, the New Message window appears as a window on the bottom-right of your Chrome browser while you’re in Gmail. You can, however, change the view so that the New Message window is full screen (actually, it’s only three-quarters of a full screen, but who’s counting?). Using the New Message window in Full Screen mode is helpful for writing emails that are longer in content. You can write emails in Full Screen mode by clicking the arrow icon in the top-right corner of your New Message window. To take your New Message window out of Full Screen mode, click the same arrow icon located in the top-right corner of the full-screen New Message window.
To tell Gmail to default to Full Screen mode every time, follow these steps:
Click the Compose button on the top-left of the Gmail window.
A New Message window appears in the bottom-right corner of your window.
Locate the More Options button in the bottom-right corner of the Email Editor (next to the little trash can) window and click it.
A menu appears, revealing several options.
Click Default to Full Screen.
The menu disappears, and the Email Editor window remains the same size. New emails created from this point forward will automatically appear in Full Screen mode.
You can also set the default view of your New Message window to partial screen by following the preceding steps.
Creating an email signature
Every good letter deserves a great closing. As you write emails, you may find that your sign-off is the same for each email. Or you may find that it’s helpful to include some contact details at the bottom of each of your emails, such as your email address or phone number. With Gmail, you can create a standard email signature so that every email you write contains a standardized closing. To create an email signature, follow these steps:
With Gmail open, click the Settings icon (which looks like a cog or widget) at the top right of your screen.
The Settings menu appears, revealing several options. (Refer to Figure 6-5.)
Choose Settings.
The Gmail Settings window appears.
- To ensure that you’re in the General tab, click General at the top left of the Settings window.
- Scroll down to the Signature section and click the radio button located directly below the No Signature radio button.
- Click in the text box, shown in Figure 6-12, and begin typing your signature.
- When you finish typing your signature, scroll to the bottom of the Settings Editor and click Save Changes.

FIGURE 6-12: Adding an email signature that will appear at the end of every email message.
Place a line or two of blank space at the top of your email signature to ensure that you have enough space separating your signature from the body of your email. You can test your spacing by composing a new email to view your newly created, or edited, signature. If it doesn’t look quite right, go back and modify your signature. Practice makes perfect!
Reading Email
All your incoming email is delivered to your Gmail Inbox. By default, the most current emails appear on top unless you changed your view to keep all unread emails on the top regardless of the date. Your Inbox gives you just enough information about the email for you to decide whether to read it. Each line starts with the name or address of the sender of the email, followed by the subject of the email. Gmail then previews the contents of the email with the remaining available space.
Unread emails appear with the sender’s name and subject line in bold. After you read an email, the message appears unbolded in your Inbox, indicating that it has been viewed. To view an email, place your pointer over the email line and click. Gmail opens the email and loads it in the main email area, as shown in Figure 6-13.
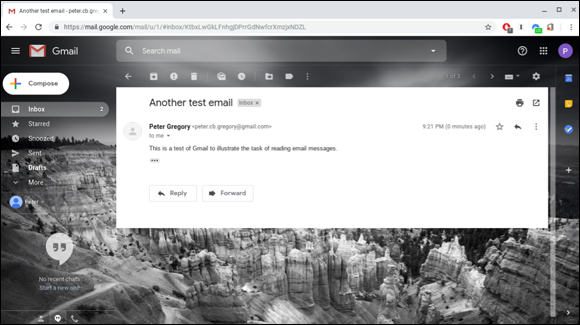
FIGURE 6-13: Reading an email message.
When you finish reading the email, you can click the Inbox link in your labels list on the left side of the Gmail window to return to the list of messages in your Inbox. You can also click the Older and Newer email buttons located next to the Settings icon in the top-right corner of the Gmail window if you want to read other messages in your Inbox.
Replying to email
After you read an email, you may want to send a reply message to the sender. You can write a reply email by following these steps:
While viewing an email in your Inbox, click the Reply button at the bottom of the email message.
The message you were reading transforms into a window resembling a New Message window and containing a flashing cursor, which indicates that you can write an email. The only difference is that you can see the message you are replying to in the upper part of the window.
If you’re replying to an email that was sent to multiple recipients, including yourself, you may want to send your reply to every person on the original email. This action is called Reply All. To reply to everyone, click Reply All in the email message. Reply All appears after you click More, to the right of the Reply button.Compose your reply email.
Gmail automatically includes the original email message so that you have a history of your email dialogue in one place.
When you’re satisfied with your reply, click Send.
Your email is sent.
Organizing your Inbox
Every email you receive is delivered to your Inbox. You can, however, make your Gmail more manageable by placing your emails into groups. Gmail allows you to organize your emails by applying labels.
 Gmail uses the term labels instead of folders. Labels act a lot like folders. However, you can apply multiple labels to an email, thus categorizing it in multiple locations.
By applying labels to your emails, you can quickly locate emails at a later date. Maybe you want to group all emails from your family members with a label you call Family. Or maybe you want to group all emails pertaining to work with the label Work. Whatever the case may be, labels are a helpful way to create order in your Inbox. Add a label to an email by following these steps:
With Gmail open, click the Inbox link in the list of labels to ensure that you’re in your Inbox.
Your Inbox loads into the main email area.
Locate the email you want to label and select the check box to the left of the email.
The selected email is highlighted.
Click the Labels icon (which looks like a tag) directly above the main email area.
The Label menu appears, as shown in Figure 6-14.
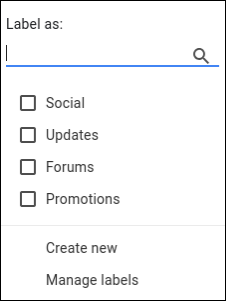
FIGURE 6-14: Placing a label on an email message.
You can either select the desired labels from the available options or click Create New to create a completely new label.
Clicking Create New opens the New Label pop-up window.
You can also type the name of a label in the Search bar at the top of the Label menu and then click Create New.- Enter the name of the new label.
- (Optional) If you would like to make your label a subcategory of another label, click Nest Label Under and, from the drop-down list, select the label under which you want to create a subcategory.
Click Create.
After you apply a label to your email, that email appears in the associated group in the label list on the left side of the screen.
With the nested labels feature, you can manage a large volume of incoming email messages into a filing system arranged any way you choose.
Setting up a vacation responder
When you’re ready to go on that monster vacation that you’ve been planning, you may want to totally unplug from technology. You don’t have to worry about offending your family and coworkers by leaving them wondering and waiting for a reply. You can use the vacation responder to automatically send a message to every person who sends you a message. When you come home from your vacation, you can then get to the business of replying to the emails that you received while you were away, without needing to explain the delay to everyone who emailed you. To set up your vacation responder, follow these steps:
With Gmail open, click the Settings icon in the top-right corner of the window.
The Settings menu appears.
Click Settings.
The Settings Editor appears in the main email area.
- Scroll to the bottom of the Settings Editor, to the Vacation Responder section. Click the Vacation Responder On radio button.
Enter the first day you want your responder to start in the First Day field.
If you know the last day you want your vacation responder on, enter it as well.
If you don’t set the last day for your vacation responder, you need to turn your vacation responder off manually. Otherwise, Gmail will continue to automatically send your message to each email you receive until someone reminds you that your vacation three months ago has probably ended by now.- Enter the subject in the subject field and body in the body field for your vacation responder email. (See Figure 6-15.)
Don’t forget to scroll down and click the Save Changes button.
Anyone who sends you an email will receive an auto-response at least once while you’re away.
Gmail reminds you that your vacation message has been set by displaying a yellow band across the top of your Gmail window with a reminder message. The reminder includes a link there where you can change your vacation responder settings.
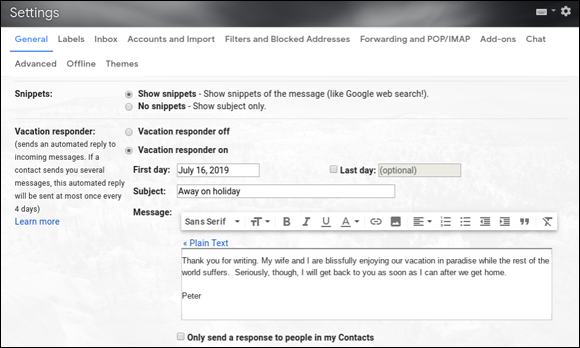
FIGURE 6-15: Setting a vacation responder to make people envious of your beautiful vacation.
Use Gmail to Access Non-Gmail Accounts
If you already have an email address and it happens to not be a Gmail account, you may not want to create and use a new email address. That’s understandable. Your contacts are likely quite familiar with your current contact info, and changing your details could prove to be frustrating. Gmail can work as an email client for up to five other email accounts.
Gmail can access your other email account, pulling in all your received emails and categorizing the messages by applying labels to them. You can then use Gmail to compose new email messages but have them appear to be sent from your other email account.
Setting up Gmail to send and receive mail for a different account requires that you provide answers to several highly technical questions. Be prepared to enter your email address, password, POP3 or IMAP Server address, and security settings. Generally speaking, you should be able to find this information in either the Help, Support, or Settings sections provided by your other email provider. Don’t proceed until you have been able to find this information.
Access your non-Gmail accounts through Gmail by following these steps:
Launch Gmail by opening the Launcher and clicking the Gmail icon.
Gmail loads in a Chrome web browser.
Click the Settings icon at the top right of the window.
The Settings menu appears.
Click Settings.
The Settings Editor loads into the main email area.
Open the Accounts and Import tab in the Settings menu at the top of the Settings Editor.
The Accounts and Import settings load.
Scroll down and click Add a Mail Account.
A new window appears.
- Enter the full email address of your other account and then click Next.
On the next window, select Link Accounts with Gmailify or Import Emails from My Other Account (POP3).
Select each option to view the subsequent steps. This should help you decide how you want to access your other email account. With Gmailify, Gmail will try to figure out what your technical settings need to be. If Gmail can’t figure this out, you need to select the Import Emails option instead. Figure 6-16 shows the Import window.
Complete the text boxes as indicated and click Add Account.
After your account has been added, you’re asked if you want to be able to send email as this address.
- Follow the prompts accordingly.
Setting up Gmail to process emails for a non-Google account is not a simple task, even for experts. If you’re trying to do this, be prepared for some trial and error. You’ll want to use a pen or pencil and paper to write down all the settings you need to use to make it work.
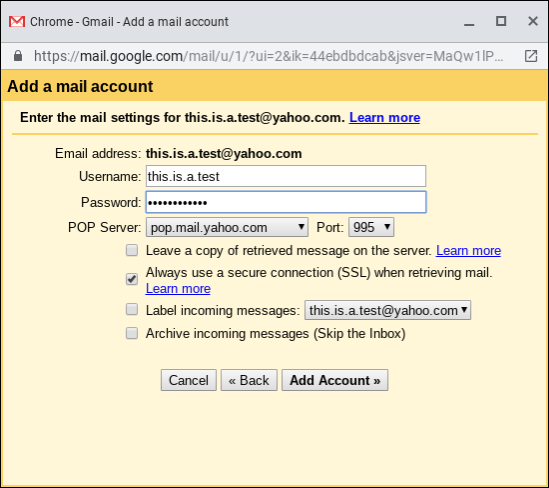
FIGURE 6-16: Configuring Gmail to read email from a non-Google email service.
Using Gmail Offline
To send and receive email, you must be connected to the Internet. Gmail, however, has an Offline mode that allows you to write emails, even if you don’t have an Internet connection, and Gmail will send those emails the next time you are online. To use Gmail offline, follow these steps:
Launch Gmail by opening the Launcher and clicking the Gmail icon.
Gmail loads in a Chrome web browser.
Click the Settings icon at the top right of the window.
The Settings menu appears.
Click Settings.
The Settings Editor loads into the main email area.
- Click Offline.
Select the Enable Offline Mail check box, as shown in Figure 6-17.
The window expands to show additional options. Select how many days of offline email you want to store locally on your Chromebook.
Scroll down to read the two options in the Security section and select the option you want. On your own Chromebook, you’ll probably want to select Keep Offline Data on My Computer.
Click Save Changes.
Gmail reloads and displays a message that reads, “Create a bookmark for offline access.” Click Got It and then press Ctrl+D to bookmark Gmail offline.
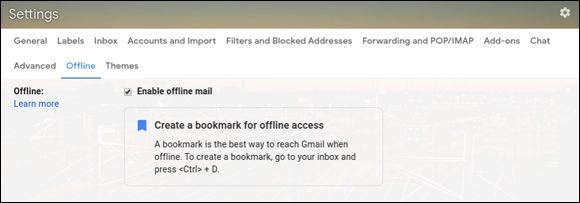
FIGURE 6-17: Enabling Gmail for offline use.
The Gmail Offline interface is essentially the same as the online Gmail interface. Everything appears as you are accustomed to seeing it. Your Inbox is displayed just as you remember, and the big white Compose button resides near the upper-right corner of the screen. After you click Send, a message appears at the bottom of the Gmail window that reads, “Offline. Message will be sent later.” And remember: No new messages will arrive in your Inbox until you are back online.
Using Google Calendar
I have a calendar hanging in my office. Not to keep track of important dates, but because I like the pictures. For years, I’ve kept important dates of all kinds in my Google Calendar, from reminders for garbage and recycling day to important birthdates and anniversaries, and reminders to renew professional certifications and the like.
![]() Google Calendar is a part of your Google account. The easiest way to start Google Calendar is to open a new browser window, and enter calendar.google.com in the Omnibox. If you’re already logged in to Google, you can click the Google Apps button near the upper-right corner (next to your profile photo) and then click Calendar. See Figure 6-18 to view the features of Google Calendar.
Google Calendar is a part of your Google account. The easiest way to start Google Calendar is to open a new browser window, and enter calendar.google.com in the Omnibox. If you’re already logged in to Google, you can click the Google Apps button near the upper-right corner (next to your profile photo) and then click Calendar. See Figure 6-18 to view the features of Google Calendar.
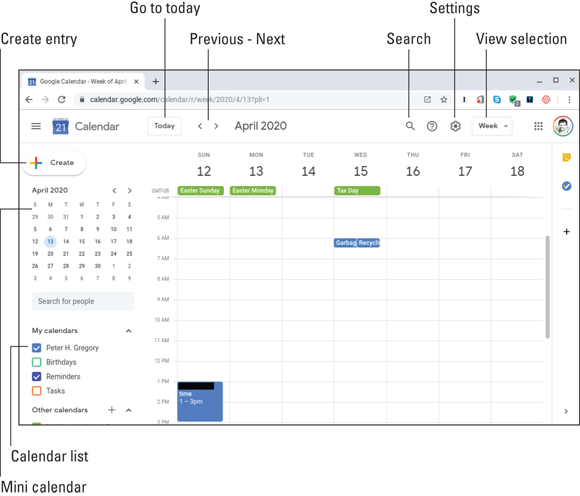
FIGURE 6-18: Google Calendar.
Curiously, Google doesn’t provide a shortcut for Google Calendar on a Chromebook. However, you can make one by following these steps:
- Open Google Calendar by navigating to calendar.google.com with your Chrome browser.
- Click the menu button (three little dots) to the right of the address bar.
- Click More Tools.
Click Create Shortcut.
You see Google Calendar appear on the shelf.
Your Calendar workspace has a few key areas: the left sidebar, controls at the top, and a calendar view taking most of the window. The left sidebar contains a mini-calendar that defaults to the current month. Below the mini-calendar is a collapsible list of all your calendars. Below your calendars is another collapsible list of calendars that have been shared with you. The top Settings bar contains buttons for changing your view, navigating through your calendar in the current view, and a Settings icon that can display several options for customizing and controlling your calendar.
The main calendar area is a grid of days and hours. The columns are the days of the week or month, and the rows are the hours of the day. Each cell in your calendar grid is a moment in time that can contain one event or multiple events.
Customizing your calendar view
By default, your calendar shows a complete seven-day week from Sunday to Saturday. Your calendar lets you know the day of the week by highlighting the day in your calendar with a light gray background Calendar gives you the option to customize the number of days you view. In the Settings toolbar, located above the calendar area, you can change the view by clicking one of the buttons, as follows:
- Day: Your view shows the current day’s calendar from midnight to midnight. Day view is pictured in Figure 6-19.
- Week: This is the default view for Google calendar. Sunday to Saturday is shown.
- Month: The full month view looks like a traditional calendar. Events are indicated but, due to space limitations, little additional information is provided. The Month view is shown in Figure 6-20.
- Schedule: The Schedule view gives you a list of events across all days in your calendar, as seen in Figure 6-21. Find events by scrolling.
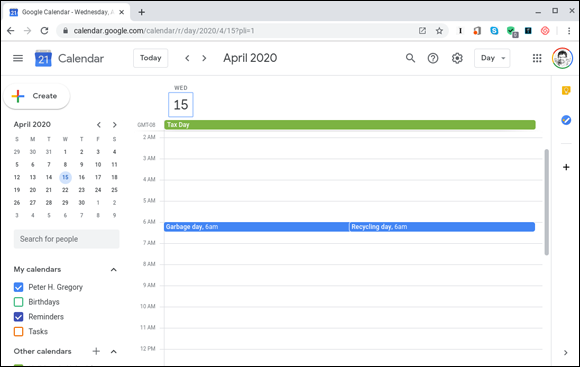
FIGURE 6-19: Google Calendar in Day view.
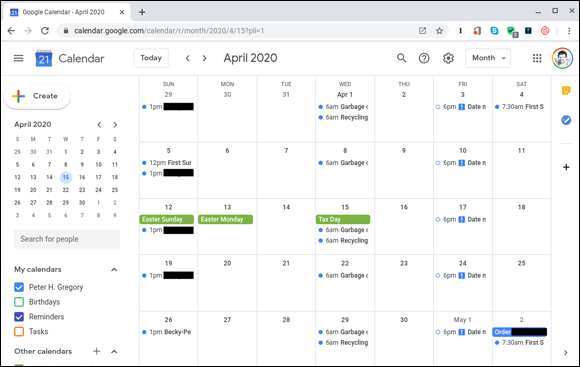
FIGURE 6-20: Google Calendar in Month view.
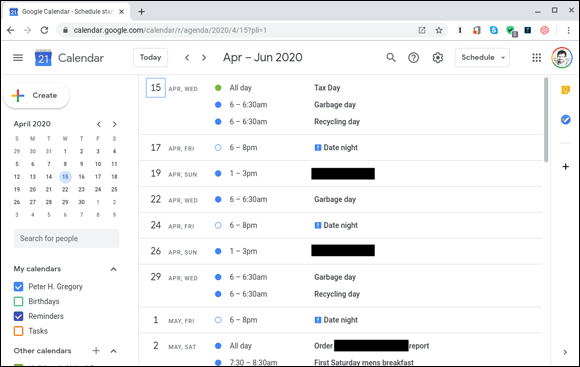
FIGURE 6-21: Google Calendar in Schedule view.
Creating additional calendars
Google Calendar gives you the option to have multiple calendars so that you can organize your events into groups. Use multiple calendars to keep your work, play, and other activities separate. If you’re a parent trying to manage the activity schedules for each of your children, create a calendar for your children or a calendar for each individual child. You may want to keep the birthdays of your friends and family organized on a calendar so that those reminders don’t clutter up your other calendars. With Google Calendar, you can organize the business of life any way you see fit, as simple or complex as you want.
You can add another calendar into your Google Calendar account by following these steps:
With Google Calendar open, click the ‘+’ (plus sign) to the right of Other Calendars in the left sidebar.
A menu of options appears, as shown in Figure 6-22.
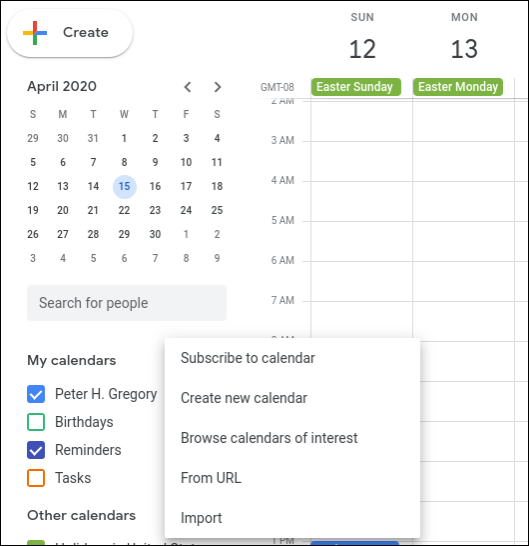
FIGURE 6-22: Adding a calendar.
Choose Create New Calendar.
The Create New Calendar page, pictured in Figure 6-23, opens.
In the Name text box, name your calendar.
Keep the name short and to the point.
- Enter a description for your calendar in the Description text box.
Choose a time zone for your calendar from the Now Select a Time Zone drop-down list.
The time zone for your calendar is important because Google Calendar will schedule all of your events with this time zone. When you travel to different time zones, Google maintains your calendar based on the default time zone of your calendar events.Scroll to the bottom of the screen and click Create Calendar.
Calendar view reappears, and your newly created calendar appears in the My Calendars collapsible menu.
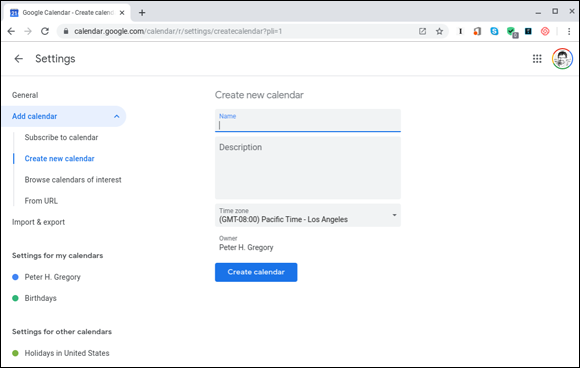
FIGURE 6-23: Creating a new calendar.
Creating a calendar event
Your Calendar is an organized collection of activities called events. Each event you create contains the following information that describes the event:
- Event name
- Date
- Start and stop time
- Time zone
- Event location
- Calendar
- Event description
- Reminders
- Event guests
Aside from the date, you can create events with as little or as much of the remaining information outlined above as you want. However, the more information that you include, the more helpful your calendar becomes.
Creating a new calendar entry in Google Calendar is simple. In fact, you have at least two ways to do it:
- Click the Create button in the upper-left corner of the Calendar window.
- Click anywhere on the day in which you want to create an entry.
In either case, a window appears that looks like Figure 6-24. Just fill in the title, time, and click on any of the other options.
To see a full list of things you can do in a calendar entry, click More Options; then, a window that looks like Figure 6-25 will appear.
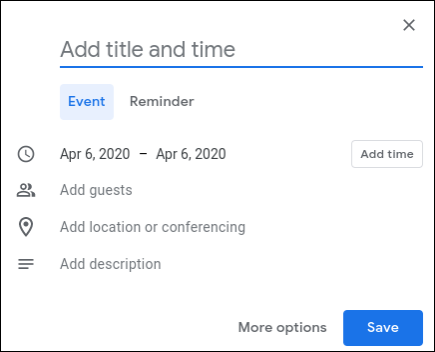
FIGURE 6-24: Adding a new event to your calendar.
The items you can add to a calendar entry include:
- Title: This is the name of the event; for example, Bobby’s Birthday.
- Date: You can put in a single date, or a date range; if you’re going on a five-day trip, your dates could read April 7, 2020 to April 12, 2020.
- All Day: Select this box if this is an all-day event. If you deselect this, you can put in the time.
- Time: The time of day of the event.
- Repeat: This can be a one-time event, or one that occurs every N days, weeks, months, or years. Never forget an anniversary again!
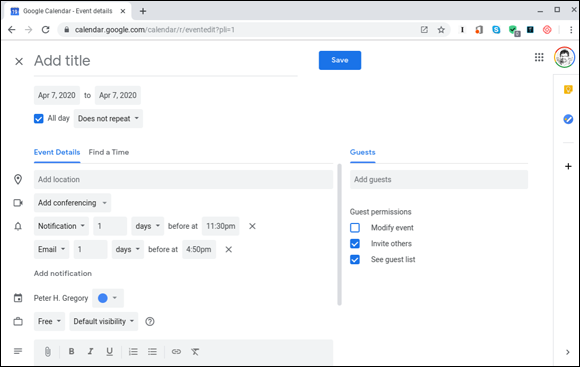
FIGURE 6-25: Adding more details to a new event to Google Calendar.
- Location: Put in the address or other information that will help you remember.
- Add Conferencing: This can be a Hangouts call. Because Google is transitioning away from Hangouts to Duo (see Chapter 15 for more information), Duo might be your choice here.
- Notification: You can put in a reminder that will pop up a notification on your Chromebook before the start of your event.
- Email: You can have Google Calendar send you a reminder email at a set time before the start of the event.
- Calendar. You can specify which calendar to put the event in.
- Free / Busy: You can specify whether this event should block time on your calendar. This is handy if you are sharing your calendar with others and you want them to be able to see your busy and free times on your schedule.
- Guests: You can enter the email address of one or more guests. Doing so causes an invitation to be sent to their email.
- Guest Permissions: This item determines whether you will permit guests (people you invite) to be able to modify your calendar entry, invite others, or see the list of guests.
- Attachment: You can add an attachment to the event. Doing so causes the attachment to be emailed to any guests you list.
- Save: This item creates a permanent record of your event in Google Calendar. Don’t worry if you don’t know all the details for your event now; you can always edit the entry and add more details later.
Updating and deleting an event
After an event is created, you may find that you need to edit the event to add more notes, change the date or time, and so on. You can edit your events by following these steps:
In your Calendar, click the event you want to edit.
A window appears, as shown in Figure 6-26, showing the basic information about the event.
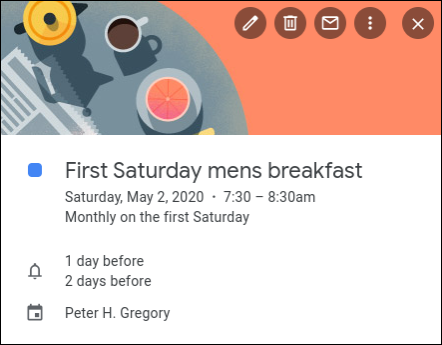
FIGURE 6-26: Editing an event in Google Calendar.
Click the little pencil icon to edit the Event.
The Event Details page, where you can edit the selected event, appears.
You can quickly remove events from your calendar by clicking Delete instead of Edit Event. The selected event is removed from your calendar. Make sure you absolutely want to delete an event before you click Delete. There’s no undo feature in Calendar, so you have to re-add any deleted events manually.- When you’ve made your desired changes, click the Save button.
Inviting others to your event
Events often involve other people. You can make sure that other event participants don’t forget about your scheduled events by adding those participants to your Calendar event. When you add someone to an event, Google Calendar sends each participant an invitation to the event via email. The email invitation contains a calendar entry so that your invitees can add the event to their own calendars, as well.
You can invite others to your events when you create a new event. Sometimes, though, you might want to complete the creation of your event first so you can be sure it contains all the necessary details, and then go back and add invitees to the event. Your invitees receive updates every time you modify the event, and that can become annoying. To invite participants to a calendar event, follow these steps:
Click the calendar entry to which you would like to add invitees.
A window containing the event appears.
Click on the pencil icon to edit the event.
The Event Details page loads, with the Add Guests text box on the right.
- Enter the email address of an event invitee in the Add Guests text box and click Add.
Repeat Step 3 for each invitee.
The invitee appears below the Add Guests field when you enter him.
Click the Save button at the top of the page.
Upon saving, Google Calendar sends an event invitation to each invitee.
Later on, if you need to add or change event details, or cancel the event, all the invitees will be notified.
One cool feature of Google Calendar and other calendar tools is having some standard protocols at work under the surface. For example, you can invite others to your calendar event without needing to know whether they use Google Calendar, or a different tool such as Microsoft Outlook, Apple Calendar, or something else. Most of the time, people will be able to accept your invites, which places events on their calendar whether they use Google Calendar or something else.
Sharing Calendars
Whether your calendar is for work, home, or family, sharing a calendar can alleviate the need to have to constantly communicate your availability with other people. Share one of your calendars with your coworkers or your spouse so that they can see your events and even add events directly to your calendars. Share one of your calendars by following these steps:
In the left sidebar, open the My Calendars collapsible menu.
All of your calendars appear.
Move your pointer over the desired calendar.
A Settings icon appears to the right of the calendar name.
Click the Settings icon.
A menu appears, revealing multiple options.
Click Settings and Sharing.
The settings menu appears.
- Click Share with Specific People.
- Click + Add People.
- Enter the email address of the person with whom you wish to share your calendar in the Share with Specific People section. (See Figure 6-27.)
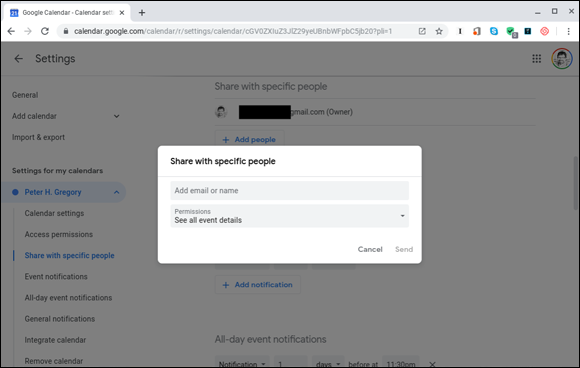
FIGURE 6-27: Sharing your calendar with specific people.
Open the Permission Settings drop-down list.
The following options are revealed:
- See Only Free/Busy (Hide Other Details): Allows others to see only your events and whether you’re free or busy, but does not reveal any other event details.
- See All Event Details: Allows others to see your events but not make changes.
- Make Changes to Events: Allows others to view and make changes to your events only.
- Make Changes AND Manage Sharing: Allows others to make changes to your calendar and invites others to access your calendar.
- Select the desired permission setting and click Send.
You can un-share your calendars by following the preceding Steps 1 through 7 and then clicking the X to the right of the person you want to delete.
If you have a calendar that you would like to make public — that is, so that the entire world can view it — follow these steps:
In the left sidebar, open the My Calendars collapsible menu.
All your calendars are displayed.
Move your pointer over the desired calendar.
A Settings icon appears to the right of the calendar name appears.
Click the Settings icon.
A menu appears, revealing multiple options.
Click Settings and Sharing.
The Calendar settings details load.
- Click Access Permissions.
Select the Make Available to Public check box.
Your calendar is publicly accessible and completely visible in Google Search.
You can also link people to your calendar so that they can navigate to it and bookmark it. Locate the link by following these steps:
In the left sidebar, open the My Calendars collapsible menu.
All of your calendars appear.
Move your pointer over the desired calendar.
A Settings icon appears to the right of the calendar name.
Click the Settings icon.
A menu appears, revealing multiple options.
Click Settings and Sharing.
The Calendar settings details load.
- Click Access Permissions.
Click Get Shareable Link.
A shareable link window appears, as shown in Figure 6-28, containing your calendar’s web address (URL). Click on Copy Link and paste it wherever you wish to share it.
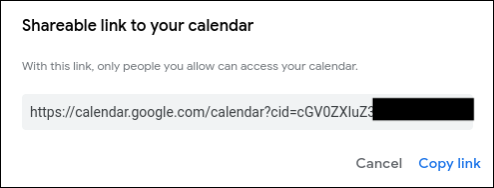
FIGURE 6-28: Your calendar has a publicly reachable URL.