Chapter 7
Finding Your Files
IN THIS CHAPTER
![]() Working with the Files app
Working with the Files app
![]() Using external storage on your Chromebook
Using external storage on your Chromebook
![]() Migrating data from your Mac or PC
Migrating data from your Mac or PC
![]() Setting up and using Google Drive
Setting up and using Google Drive
Although you might not install many applications on the Chromebook itself, you will likely have a need for some storage. For instance, you might want to download a file attachment from an email, or take a screen shot or capture some video footage or stills with your Chromebook’s camera. You need not only storage space for these files but also a way to gain access to them.
If you want to manage files on your Windows PC, you use Windows Explorer. If you use a Mac, you turn to the Finder. On a Chromebook, you use an app called Files. In this chapter, you learn how to navigate your Chromebook file system, how to add and use external storage, and how to set up and use Google Drive. Although you can consider the Chrome browser to be the gateway to the world of the Internet, Files is the gateway to your own content, wherever it may be on your Chromebook or in Google Drive.
Finding Files with the Files App
To launch Files, follow these steps:
Click the Launcher icon in the bottom-left corner of your screen.
The Launcher opens.
Locate the app icon for Files and click it.
Files opens in a new window. Note that the Files app runs separately from your Chrome browser. You’ll see a separate icon on the Shelf just for Files.
Navigating Files
Figure 7-1 shows the open Files app window. On the left side of the window is a listing of storage locations. At first, you’ll only have two options here:
- Downloads: Your Downloads folder is your hard drive (also referred to as local storage).
- Google Drive: This is Internet-based storage (also referred to as cloud storage). I discuss Google Drive in the section “Working with Google Drive,” later in this chapter.
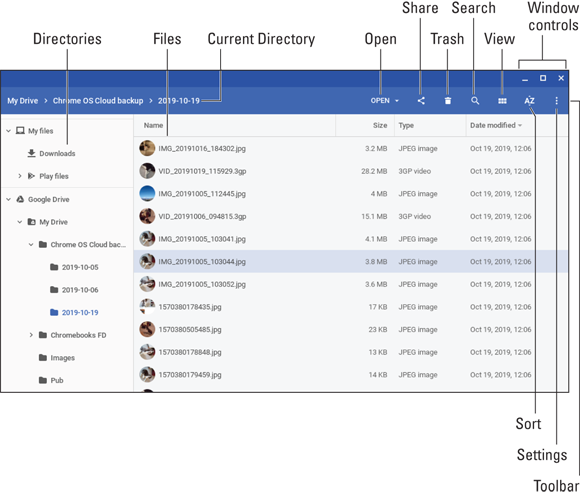
FIGURE 7-1: Use the Chromebook Files app to access and manage files.
The toolbar spans the top of the Files app window. In the toolbar, you find the following:
- Open button
- Share
- Trash can
- Search
- View button
- Sort button
- Settings button
- Window controls
Click Settings to open the File Settings menu, as shown in Figure 7-2.
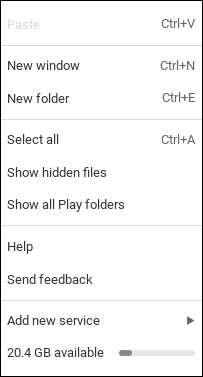
FIGURE 7-2: The File Settings menu.
In this menu, you have the option to launch another Files window, create a new subfolder within the open folder, select all the files currently shown (presumably for some subsequent action), show hidden files, show Google Play files, get help, send feedback to Google, and add a new service.
 At the bottom of the Settings menu, a meter shows your available storage. This information is critical because your Chromebook does not offer much storage, so you want to periodically check to make sure you don’t run out. Pictures, screenshots, music, downloads, and the like add up the more you use your Chromebook, so beware! You can see the storage meter at the bottom of Figure 7-2. Never fear: You’ll be storing most of your content in Google Drive, which I discuss later in this chapter, in “Working with Google Drive.”
Beneath the Files toolbar is the file browser. This is where you can view, edit, move, or otherwise interact with your files.
Creating and navigating folders
Folders are helpful for organizing and sorting your files so that you can easily find them later. Create a new folder using the following steps. (In this example, you create a subfolder within the Downloads folder.)
- On the left side of the Files window, select the Downloads folder.
Click Settings in the top-right corner of the window.
The File Settings menu appears.
Click New Folder.
A new folder appears with the name highlighted to indicate that it can be edited. Until you rename it, its name is “New folder.”
Type the desired name for the folder and press Enter.
The new folder name is saved.
If you would like to open your newly created folder, double-click or double-tap the new folder icon. A window for the folder opens, which at first will be empty.
While you are in your newly created folder, take a look at the top of the Files app window. You can see your path, or breadcrumbs, as shown in Figure 7-3.
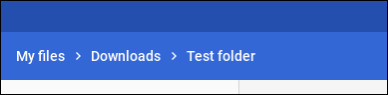
FIGURE 7-3: Following the Files breadcrumbs.
 On your Chromebook, folders are divided into parent folders and child folders. A parent folder contains a child folder or folders. In the path, the parent folder appears to the left of a child folder.
To return to the parent folder, click the parent folder’s name in the path. In this case, doing so would take you back to the Downloads folder, which is the parent folder.
You can also click the folder name in the breadcrumbs to go to a folder.
If you need to make several folders, constantly clicking on Settings can get tedious. To create a folder quickly, you can type Ctrl+E. You can also rename a folder by following these steps:
- Click the desired folder.
Press Ctrl+E.
The folder name becomes editable.
- Type the newly desired name and press Enter.
Moving files and folders
Use Files to move and otherwise organize your files. Creating several folders to group your files together and keep things in order is useful as you download and store files in your Chromebook’s internal storage. You can move files and folders by following these steps:
Click the Launcher icon in the bottom-left corner of your screen.
The Launcher appears.
Locate the Files icon and click it.
Files opens in a new window.
Click and hold the file that you want to move; then drag the file to the desired folder. (See Figure 7-4.)
 When using the touchpad, after clicking and holding the file, use another finger to drag the file to the desired folder.
Hovering the file over the folder highlights the folder.
- Release to drop the file into the target folder.
To move multiple files and folders at one time, you can do so using the following steps:
From within the Files application window, hold the Ctrl key and click the desired files.
The files you click are all highlighted. Each selected file’s icon is replaced by a check mark, indicating that it has been selected. You can Ctrl+click a file again to deselect it.
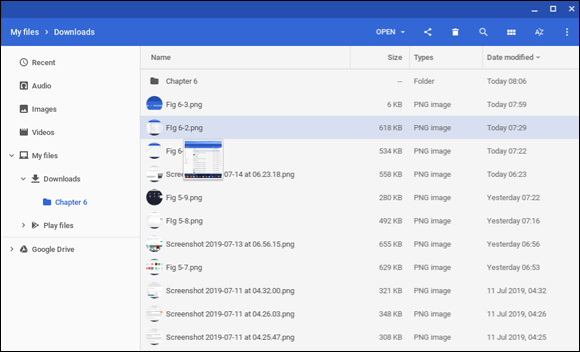
FIGURE 7-4: Dragging a file to a new location.
Click and hold any part of your selection; then, without releasing, drag the selection to the desired location.
Hovering the files over the destination folder highlights the folder.
- Release to drop the files into the target folder.
To select an entire collection of files, follow these steps:
- Hold down the Shift key and then click with one finger or thumb and move the pointer with another finger to highlight several consecutive files at one time.
Click any part of your selection; then, without releasing, drag the selection to the desired location.
Holding the files over the destination folder highlights the folder, indicating that it is okay to release your finger from the touchpad.
- Release to drop the files into the target folder.
Don’t be discouraged if selecting, dragging, and dropping doesn’t work exactly right the first time. It takes a bit of coordination, like shifting gears on a manual transmission car (okay, maybe not that tricky). But with a bit of practice, it will soon become second nature.
Searching for files
If you want to search for a specific file, you can do so by following these steps:
Click the magnifying glass icon on the far right of your Files toolbar.
A cursor appears in the Search bar.
Type in the word or words that are in the name of the file you desire.
As you type, Chrome displays all files that fit your search term.
Deleting files and folders
Deleting files and folders can be accomplished with the following steps:
Click the Launcher icon in the bottom-left corner.
The Launcher appears.
Locate the Files icon and click it.
Files opens in a new window.
- Select the file that you want to delete by clicking or tapping the file once.
- Click the trash can icon located in the toolbar of the Files app window.
When Chrome asks “Are you sure that you want to delete …?” click Delete to delete the file, or Cancel if you’ve changed your mind.
After you click the trash can icon, your file is gone forever. That’s right. Unlike with Windows and Macs, which let you change your mind and get things out of the trash, the Chromebook allows no opportunity to change your mind. When you delete an item, it evaporates into the ether. Forever.
 Make sure you really don’t need a file any longer before you delete it.
You can delete multiple files and folders: First, select them by holding down the Ctrl key and clicking the files (or tapping the files with your touchpad). Then press the trash can icon in the lower-right of the Files app window to delete all the selected files at one time. If your files are all in a row, you can select them more easily by pressing Shift+click and then moving the cursor to select the desired files.
Adding and Using External Storage
External storage in the form of a thumb drive (also known as a USB stick or jump drive), an external hard drive, or an SD card can easily be used on a Chromebook. You may have a number of reasons for using external storage, including to
- Transfer pictures or video from a dashcam, GoPro, or digital camera
- Copy pictures to a thumb drive or external hard drive to share with someone else
- Back up data to an external hard drive that you don’t want to save to the cloud
If your jump drive or external hard drive has a USB connection, simply plug it into one of your available USB ports on your Chromebook. If your Chromebook has an available SD card slot, insert your card. Chromebook automatically detects your storage devices and makes them available to browse within Files, as shown in Figure 7-5.
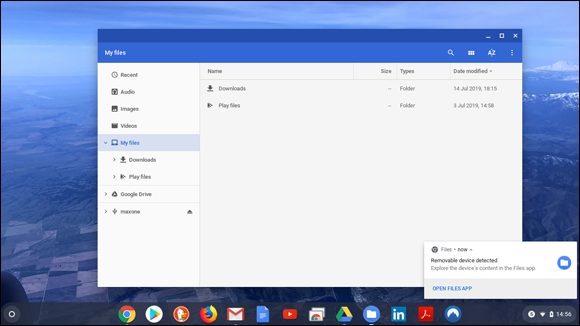
FIGURE 7-5: Accessing external storage.
To navigate to your external storage, first select it on the left side of the Files window and then follow the directions outlined in the section “Creating and navigating folders,” earlier in this chapter. Click and drag files or folders to the desired location. If you want to move them to your Chromebook hard drive, just drag them to the Downloads folder that appears under Files on the left side of the Files window. Hover over the Downloads folder long enough to open the folder and then drop the files or folders on the right side of the Files window.
To remove your external storage devices, you should click the Eject button, which is located next to the device name on the left side of the Files window. (Refer to Figure 7-5.) After you’ve clicked the Eject button, the device vanishes from your Files window, indicating that it is safe to remove from your Chromebook.
If you do not click the Eject button before removing external storage, you take the chance of corrupting the data on the external storage device. If such a case, you might not be able to read data on the device.
Working with Google Drive
Google Drive (or just Drive) is Google’s cloud-based storage service. Cloud-based storage is really just a fancy way of saying “your hard drive on the Internet.” Users can create a Drive account at no cost and receive 15GB of storage space. Drive comes with every Chromebook, but you can also install the Google Drive app on your smartphone or on another computer like a Mac or a Windows PC. You can also access Google Drive from any web browser where you can add, change, or remove any of your files. Anything you put in your Drive folder is then be synced across all your devices. Pretty awesome, right?
As a Google account user, Google gives you access to Google Drive. Google has had a long-standing record of offering additional space on Google Drive at little or no cost. As of late 2019, Google was providing new Chromebook owners with a free one-year membership to Google One, which includes 100GB of free storage space for a year. That’s a great value, because other companies charge a few dollars each month for that much storage. To take advantage of that discount, you need to first set up your Google Drive account. Read on.
Creating a Google Drive account
Account registration is required to use Google Drive. Registration protects your data so that only you can access it. The good news is that Drive access comes with every Google Account. You don’t have to actually re-register to gain access to Drive from your Chromebook; however, if you want to take advantage of any free Google Drive upgrades or other offers that are made available to new Chromebook users, follow these steps:
Click the Launcher icon in the bottom-left corner of your screen.
The Launcher opens.
Locate the Chrome web browser icon and click it.
The Chrome web browser launches.
- In the Omnibox, enter the URL
www.google.com/chromebook/offersand press Enter. Read the page and find any offers that might be available; then click the Redeem Offer button.
You may be required to validate your eligibility.
- Click OK to allow Google to validate your eligibility.
Figure 7-6 depicts an offer available in 2019.

FIGURE 7-6: Google often has promotions for new Chromebook users.
After being approved, you may have additional Google Drive storage for free. The terms of any offer are specific to your particular device and any promotions that may be active when you purchase your Chromebook. Make sure you understand what the terms are by reading the documentation that came with your Chromebook.
Using Google Drive
You have a few different ways to use Google Drive. Google Drive has a web interface that you can access from any Internet-enabled device like a smartphone, tablet, PC, or Mac. To access the Drive web interface from your Chromebook, follow these steps:
Click the Launcher icon in the lower-left side of your screen.
The Launcher appears.
Locate the Chrome web browser icon and click it.
The Chrome web browser launches.
In the Omnibox, enter the web address
https://drive.google.comand press Enter.You are directed to your Drive web interface, and you’ll already be logged in thanks to Chromebook.
As you can see in Figure 7-7, the Google Drive web interface and Files on your Chromebook are somewhat dissimilar in appearance but similar in function.
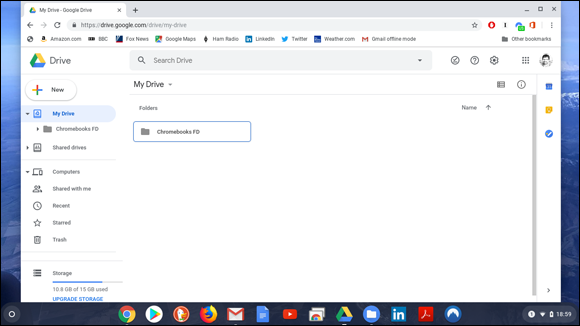
FIGURE 7-7: The Google Drive web interface.
On the left side of the Drive interface, you have several options:
- My Drive: This is your main Drive folder where you store all your files.
- Shared Drives: These are directories in Google Drives that someone else has shared with you. If no one has shared a Google Drive with you, this will be empty or not appear at all.
- Computers: This is a list of computers that are syncing their contents to Google Drive. If you have not set up any computers to sync with Google Drive, this will be empty.
- Shared With Me: This folder contains all files and folders shared with you by other Drive users. Google Drive is a great tool for collaboration because it simplifies sharing documents and managing versions of documents. When you work on a document, Drive updates the document for everyone who has access to it.
- Recent: Documents that have been created, edited, or otherwise utilized recently appear in this folder. As your Drive gets more and more use, the Recent folder becomes increasingly useful because it allows you to quickly access files and folders that you use frequently, thus saving time looking for them.
- Starred: You can “star” documents and folders in Drive to indicate them as important. Starred files and folders show up in the Starred folder.
- Trash: Whenever you delete a file (or when a file is deleted automatically), that file is stored in the Trash folder before being removed permanently.
- Storage: Beneath the options, you see a little graph that shows the total amount of storage available as well as how much you have used. Figure 7-7 shows that I have used 10.8GB out of the 15GB available storage. I took that screen shot before taking advantage of the free upgrade to 100GB that I discuss earlier in this section.
The right side of the Google Drive web interface is broken into two key parts. The top portion of the screen contains a Search bar that you can use to search for files by keyword. Next to the Search bar is the Settings area, which contains some buttons for customizing the appearance of your Drive, as well as a widget for accessing your Drive settings. You also find a button to launch Google apps, and your profile photo appears here, too, which gives you a quick link to your Google profile.
Directly below the Search bar, the My Drive label has a built-in menu that lets you create a folder, upload files, upload a folder, and open any of several Google apps. To the right of this menu, you can change how your files and folders are displayed. To the right of that, a lowercase letter i in a circle lets you view details about your contents.
Directly below the My Drive bar is your main work area. As you add files and folders, they populate this space.
Uploading files to Google Drive
Transitioning from a Mac or PC to your new Chromebook requires you to migrate your files to Google Drive. Use Google Drive for your file storage so that you can quickly access those files on your Chromebook anywhere you have an Internet connection. You have a few different ways to upload files to your Google Drive. Use the steps in the following sections to upload your files from your Mac or PC to your Google Drive.
Uploading files to Google Drive from a Mac, PC, or Linux system
If you are transitioning to a Chromebook from a Mac, PC, or Linux system, you can do so using the browser. Or you can install a Google Drive app on your Mac or PC and use the Google Drive app to migrate your files. If you want to use the Google Drive app, skip to the upcoming Mac or Windows sections. To use your browser instead, follow these steps:
- Launch your web browser on your Mac, PC, or Linux system.
In the navigation bar, enter the following URL and press Enter:
https://drive.google.com.Google Drive’s website loads.
Log in using your Google username and password — the same that you use to log in to your Chromebook.
You are taken to your Google Drive.
Click the Upload button on the left side of the screen.
The Upload button is located next to the Create button.
A menu appears, giving you the ability to select files for upload. (See Figure 7-8.)
Select the files you want to upload to Drive and then click Open.
Drive begins uploading the files immediately. When uploading has completed, you can access your files from your Chromebook or any other device when you log in to Google Drive.
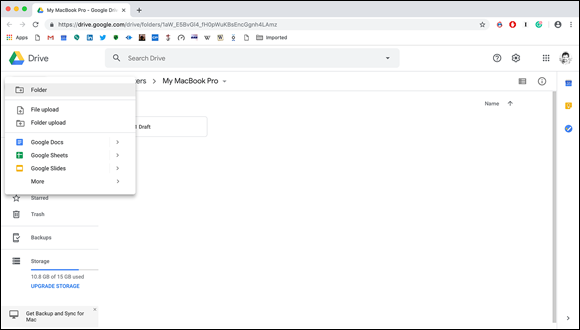
FIGURE 7-8: Uploading files to Google Drive from a Mac using a browser.
Uploading files to Drive from your Mac with the Drive app
In this section, you are migrating your files on your Mac to Google Drive by using the Google Drive for Mac app. Proceed by following these steps:
- Open Safari or other web browser.
In the navigation bar, enter the following URL and press Enter:
https://drive.google.comGoogle Drive’s website loads.
- Click Settings in the top-right corner of the screen.
- Click Get Backup and Sync for Mac.
Click Download under Personal.
A window containing the Terms of Use loads.
Read and accept the Terms of Use by clicking Agree and Download.
The application downloads.
- Navigate to your Download folder with Finder.
Click the InstallBackupAndSync.dmg file.
An Install window appears.
- In the Install window, click and drag the Google Drive logo to the Applications folder.
- Follow the prompts until you are asked to enter your username and password.
Enter your Google username and password.
Google installs and configures your Drive.
Click the Google Drive icon located in the toolbar at the top of your screen.
A menu of options opens.
Select Open Google Drive Folder.
Your Google Drive directory opens.
Drag and drop your files into your Google Drive directory.
Google Drive automatically uploads the files to your Google Drive account. When uploading has completed, you can access your files from your Chromebook or any other device when you log in to Google Drive.
Figure 7-9 shows the Google Drive app on a Mac.
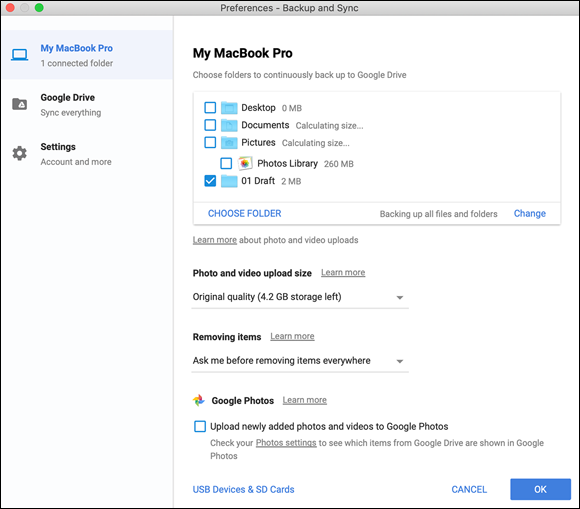
FIGURE 7-9: Uploading files to Google Drive using the Google Drive for Mac app.
Uploading files to Drive from your PC with the Drive app
In this section, you are migrating your files on your Mac to Google Drive by using the Google Drive for Windows app. Proceed by following these steps:
- Open your favorite web browser on your PC.
In the navigation bar, enter the following URL and press Enter:
https://drive.google.com.Google Drive’s website loads.
- Click Settings in the top-right corner of the screen.
- Click Get Backup and Sync for Windows.
Click Download under Personal.
A window containing the Terms of Use loads.
Read and accept the Terms of Use by clicking Agree and Download.
The application downloads.
- Install the app on your computer.
- Launch the app.
- Follow the prompts until you are asked to enter your username and password.
Enter your Google username and password.
Google finishes installing and configuring your Drive.
You might need to sign in with the Chrome browser on your PC before you can sign in to Google Backup and Sync. If this is the case, open your Chrome browser and log in to your Google account.
Click the Google Drive icon in the toolbar at the bottom right of your screen.
A menu of options appears.
Select Open Google Drive Folder.
Your Google Drive directory opens.
Drag and drop your files into your Google Drive directory.
Google Drive automatically uploads the files to your Google Drive account.
Figure 7-10 shows the Google Drive for Windows app.

FIGURE 7-10: Setting up Google Drive using the Google Drive for Windows app.
Using Google Drive with Your Smartphone or Tablet
Google Drive is also available on Android and Apple smartphones and tablets. For Android, go to the Google Play store and install Google Drive if it’s not already installed. For Apple devices, go to the App Store and install Google Drive.
On either platform, after you log in to Google Drive, you have access to all the files you’ve stored there. But it goes beyond access: You can create directories, add files, and even update files. Figure 7-11 shows Google Drive on an Apple iPhone 8.
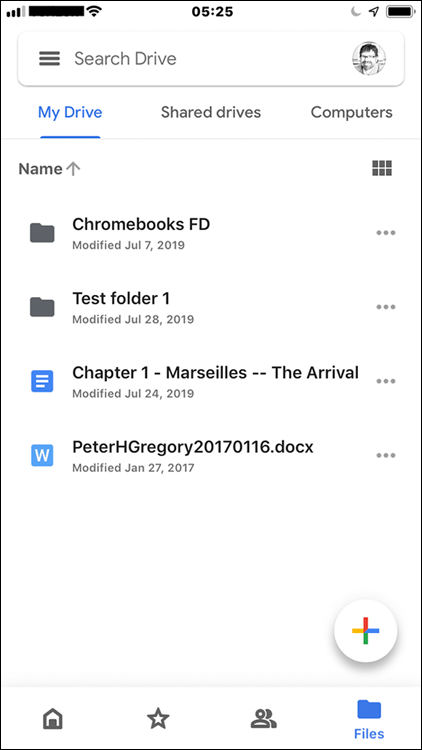
FIGURE 7-11: Google Drive on an Apple iPhone 8.
Collaborating with Drive
Google Drive makes sharing your work with others easy so that you can collaborate. Drive manages changes and controls versions so that your team is always working on the most current version of documents and worksheets. Before you can collaborate, you need a document, slide, or spreadsheet in your Drive folder. If you do not have one of these file types in your Drive folder, create a sample Docs file by following these steps:
Click the Launcher icon in the bottom-left corner of your screen.
The Launcher appears.
Click the Docs icon.
Google Docs loads in a Chrome browser window.
Click the colorful + (plus sign) in the lower-right corner of the Docs window to create a new document.
A new, blank document appears.
Type some text in the document and then close the window.
The file now appears in your Drive folder as Untitled Document.
Now you can share your document with others by following these steps:
Click the Launcher icon in the bottom-left corner of your screen.
The Launcher appears.
Click the Files app icon.
Files load in a window.
- On the left side of the Files window, click Google Drive.
Locate the document (in this example, Untitled Document) that you want to share and click it once to select it.
The document is highlighted, indicating that it is selected.
Click the Share button at the bottom of the Files window.
The Share window opens.
- At the bottom of the window in the Invite People box, enter the email address for each person you want to invite for collaboration. (See Figure 7-12.)
Click Done.
Everyone you invited receives an email with an invitation to collaborate. Upon clicking the link, each collaborator can access your file in her Drive folder. Any changes made by any of the collaborators will be reflected immediately in everyone’s Drive folders.
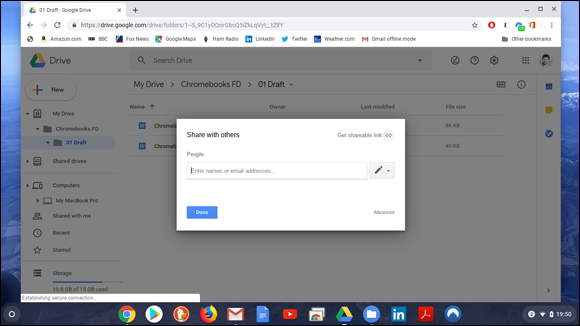
FIGURE 7-12: Sharing a document in Google Drive.
Using Google Drive offline
Even though a Chromebook is designed for Internet access, you can’t be online all the time. If you want, you can tag a file or a directory as being available even when you are not connected to the Internet. To configure a folder or file for offline use, right-click or Alt-click the folder or file and change the Available Offline selector. Figure 7-13 shows this selector.
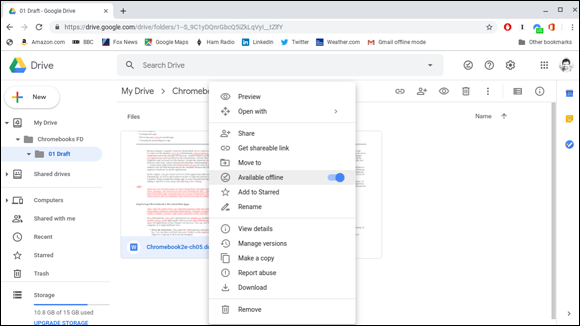
FIGURE 7-13: Marking files or folders in Google Drive for offline use.
After you have marked a file for offline use, a small check mark icon appears to the right of the file name in Google Drive. If you hover over the icon, the message “Available Offline” appears.
The Google Drive app shows which files are available offline with the little Available Offline check mark. To see which files are available offline using the Files app, Alt-click a file and see whether the Available Offline option is selected.
When you select folders or files for offline use, you access them with the Files app. In the Files app, navigate to Google Drive and then to the file(s) or folder(s) you selected, as described previously. Here you will find synched copies of these files. You can edit these files while offline. When you are back online, the changes you made are synched with Google Drive and are available from all your devices.