Chapter 18
Securing Your Chromebook
IN THIS CHAPTER
![]() Protecting your Chromebook from thieves and eavesdroppers
Protecting your Chromebook from thieves and eavesdroppers
![]() Keeping hackers out of your Chromebook
Keeping hackers out of your Chromebook
![]() Managing and protecting your login credentials
Managing and protecting your login credentials
![]() Controlling who can access your Chromebook
Controlling who can access your Chromebook
![]() Resetting your Chromebook back to factory settings
Resetting your Chromebook back to factory settings
Evil abounds in the world, and it takes many forms. In the context of computers and the Internet, countless cybercriminal organizations, gangs, and lone hackers lurk with the intention of pilfering, stealing, defacing, and destroying — for profit, for enjoyment, and because they can. Doubtlessly, you’ve heard about breaches, small and large, and ransomware, viruses, and other plagues and calamities.
The good news is that you have a Chromebook! Chromebooks are not targeted the way Windows, Macs, Android phones, and iPhones are. Chromebooks themselves are quite secure and are fitted with the latest safeguards. But that doesn’t mean you don’t have to be careful. Cybercriminals have many ways to try to trick people out of information and money.
Sometimes increased usability can mean increased security concerns. Face it: The more protection you put in place, the more hassle there is. Today’s airports are a great example of this. To prevent an attack on a plane, we endure the hassle of taking off shoes, belts, jackets, and hats and removing computers, metal objects, and liquids from our luggage as we walk through x-ray machines and body-image scanners. Chromebook security is the same way. You can add or remove as much security as you want, but there are consequences both ways — and unfortunately, security isn’t always convenient.
In this chapter, you learn how to protect against malicious invaders and manage your access to your Chromebook through user accounts and Guest mode. You see how to increase your peace of mind by locking your screen and managing your passwords and ensure that you aren’t leaving valuable information around by managing your privacy settings. You can even get the ultimate protection through Google Advanced Protection. Concerned that something is amiss with your Chromebook? Power wash it to ensure that it’s as clean as can be and start fresh! Also, this chapter tells you about webcam filters, privacy screen filters, and cable locks for keeping prying eyes and hands away.
Conducting User Management
Google takes security seriously, and thus the Chromebook is no slouch when it comes to security, as well. To access a Chromebook, you must have a Google Account. This requirement is just as much about enhancing your interaction with the Chromebook and the Google platform as it is securing your interaction. By default, when you first use your Chromebook, you have the option to log in with a Google Account, or you can use the Chromebook as a guest. Guest users don’t get any of the privileges that registered users get. In fact, Guest mode is a lot like surfing the web incognito because none of your traffic is tracked, stored, or otherwise logged in the Chromebook.
When you log in to your Chromebook with a Google Account, that user account becomes the master account, or Owner account, of the Chromebook. With this account, you can administer and manage all other users who access the Chromebook, or you can restrict users whom you don’t want to access the Chromebook.
Adding and deleting users
Account management is an essential part of securing your Chromebook. By default, anyone with a Google Account can log in and utilize your Chromebook. The good news is that Chromebook doesn’t allow each user to access other users’ data; however, you may not want your computer to be accessible to everyone on the planet. If you would like to limit access to your Chromebook to specific users, follow these steps:
- Log in to your Chromebook with the Owner account’s username and password (that’s probably you).
Open the settings panel on the Shelf and click Settings.
The Settings window opens.
- Click People.
Click the Manage Other People button in the People section.
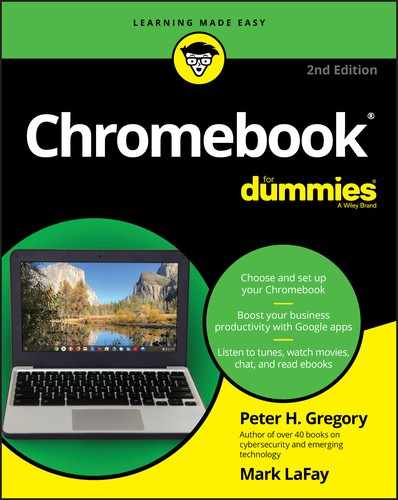
The People window appears, as shown in Figure 18-1.
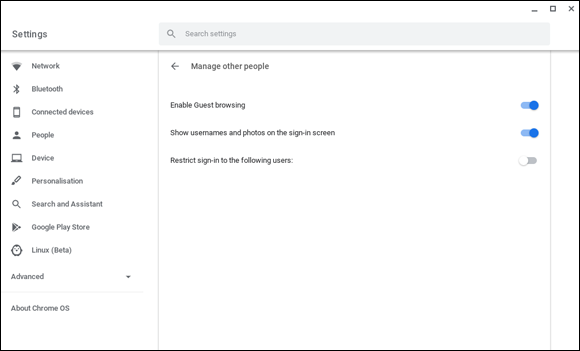
FIGURE 18-1: Managing users on a Chromebook.
Select the Restrict Sign-In to the Following Users selector.
A form located below this selector activates, revealing all the users who have logged into your device already, as shown in Figure 18-2.
 If you’re the only person who has accessed the Chromebook up to this point, the only account you see in this box is yours. Notice that next to your account name is the word Owner, which means that your account is the owner of the Chromebook. With the Restrict Sign-In to the Following Users option enabled, the only users who can access your Chromebook are listed with your account.
To add users, in the Add Person text box, enter the email addresses for the Google Accounts to which you wish to grant access. Press Enter.
The names are added to the list of approved accounts, as shown in Figure 18-3.
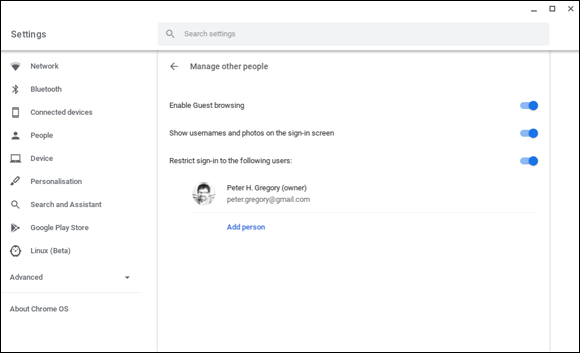
FIGURE 18-2: Viewing active user accounts on a Chromebook.
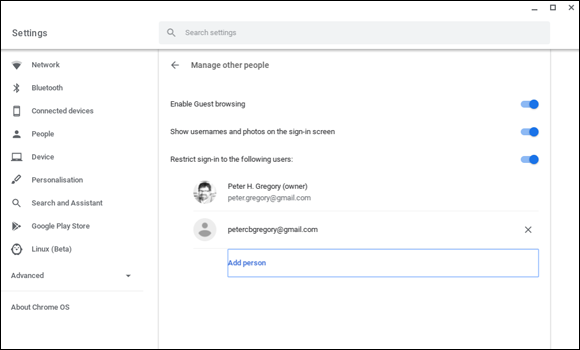
FIGURE 18-3: Adding names to the list of users allowed to use your Chromebook.
 The Add Person form calls for either a name or an email address. To save on headaches or errors, use only the email addresses assigned to the Google Accounts that will access your Chromebook.
To delete an added user, click the X to the right of the user’s name in the list. No X appears to the right of the owner’s name because the owner’s access can’t be revoked. Users who aren’t listed as the owner can’t modify the user settings for your Chromebook. If they attempt to do so, a notification appears, like the one shown in Figure 18-4.
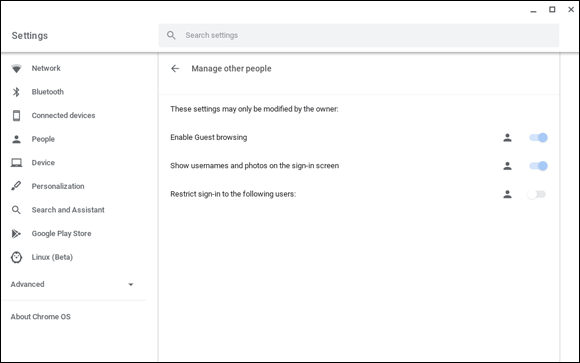
FIGURE 18-4: Changing user settings is permitted by the owner only.
Hiding users on the login screen
When you add new users to your Chromebook, their names and profile pictures are shown on the login screen. Showing these can make access for frequent users easy and convenient. However, it also reduces security: The approved user accounts are in plain sight, so potential intruders don’t have to work so hard. Instead of having to guess both a username and a password, intruders need guess only a password. To hide users so that they don’t appear on the login screen, follow these steps:
- Log in to your Chromebook with the Owner account’s username and password.
Open the settings panel on the Shelf and click Settings.
The Settings window opens.
- Click People.
- Click the Manage People button in the People section.
- Deselect the Show Usernames and Photos on the Sign-In Screen selector, as shown in Figure 18-5.
Click Done.
The Users window closes.
Verify that your settings were applied by logging out.
To log out, reopen the Settings window in the Shelf and click Sign Out.
You’re signed out of your Chromebook, and the usernames and photos disappear from the login screen. Instead, a generic login box appears, requiring you to enter your full account username and password.
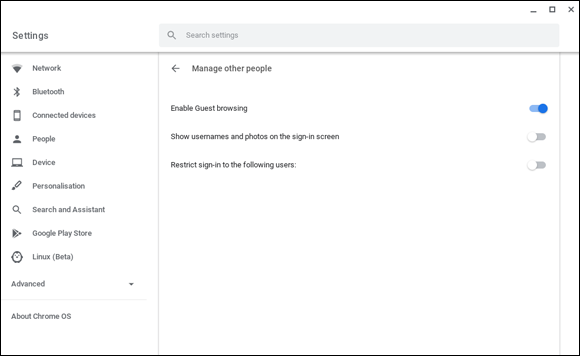
FIGURE 18-5: Hiding user accounts on the login window.
Guest mode
Guest mode is an easy way to allow anyone to use your Chromebook without putting your personal account — or your Chromebook’s settings — at risk. Key features, such as saving data to the device, changing settings, or otherwise modifying the Chromebook, are disabled. Any changes, downloads, or tweaks done to the Chromebook while in Guest mode are deleted when the Chromebook is powered off or when the guest logs out. If you ever want to give someone quick access without having to create a user account, Guest mode is the way to go!
Even so, you may find that Guest mode leaves you more vulnerable than you like. In that case, you can revoke guest browsing by following these steps:
- Log in to your Chromebook with the Owner account’s username and password.
- Open the settings panel on the Shelf and click Settings.
- Click People.
- Click the Manage People button in the People section.
- Deselect the Enable Guest Browsing selector, as shown in Figure 18-6.
Verify that your settings were applied by logging out.
To log out, reopen the Settings window in the Shelf and click Sign Out.
You’re signed out of your Chromebook.
If you successfully disabled Guest mode, the option to use the Chromebook as a guest disappears from the login screen. If you want to turn Guest mode back on, log back in and follow the steps above, enabling the selector in Step 5.

FIGURE 18-6: Disabling guest access on a Chromebook.
Using Google 2-Step Authentication
Using only user IDs and passwords isn’t as safe as it once was. Criminals use malware, which is designed to steal your login credentials, to try to steal from you. Google comes to the rescue with Google 2-Step Authentication, a mechanism that goes further than your user ID and password and serves as an additional safeguard to ensure that, even if attackers do steal your login credentials, they still can’t log in to your Google account.
With Google 2-Step Authentication, you log in to Google with your user ID and password. Then, Google pops up a window on your smartphone and asks whether you are currently trying to log in on your Chromebook. Answer Yes if you are, No if you aren’t. If you are logging on your Chromebook, of course you answer Yes. Voilà — you’re logged in.
The security behind 2-Step Authentication is that if a hacker steals your login and password and tries to log in to Google as you, you unexpectedly receive an “Is this you?” alert on your smartphone. Answer no! Then you want to change your Google password.
To set up Google 2-Step Authentication for the first time, follow these steps on your Chromebook:
- Log in to your Google Account with your smartphone.
Log in to your Google Account on your Chromebook.
Logging on to Gmail or any other Google service is sufficient.
Click the Google Account settings near the upper-right corner.
You click your photo or avatar if you set one up to go here. Otherwise, click the little circle in the upper-right corner of the window.
Click Manage Your Google Account.
The page opens that lets you manage virtually every aspect of your Google account.
- Click Security.
In the Security window that opens, scroll down until you see the Signing In To Google section and, in that section, click the arrow to the right of 2-Step Verification.
The 2-Step Verification window opens.
Click Get Started and provide your password, if prompted to do so.
Google shows your smartphone’s make and model and will ask if you have it.
On your smartphone, answer Yes that you are trying to change the way you sign in to Google.
Google may ask other questions to verify that you have your phone with you and are proceeding with 2-Step verification.
Click Try It Now.
On your smartphone, a window pops up, asking whether you are trying to log in from your Chromebook. Your location is shown as well.
Click Yes if you are indeed the user trying to log in. (See Figure 18-7.)
Google asks whether you want to set up a backup method for logging in. Google will ask you for your mobile number.
Enter your mobile number, select whether you want Google to call you or send you a text message, and click Send.
Google calls your phone or sends a text to your phone with a code.
Type in the code received in the text message and click Turn On.
This setup gives you a backup method to log in to Google in case you don’t have your smartphone (back in Step 11, you can have Google call a landline phone).
When you set up 2-Step Verification, every time you log in to Google, this one little extra step gives you the peace of mind of knowing that others can’t access your Google accounts easily. But if you want to get even more serious about your Google account security, read on.
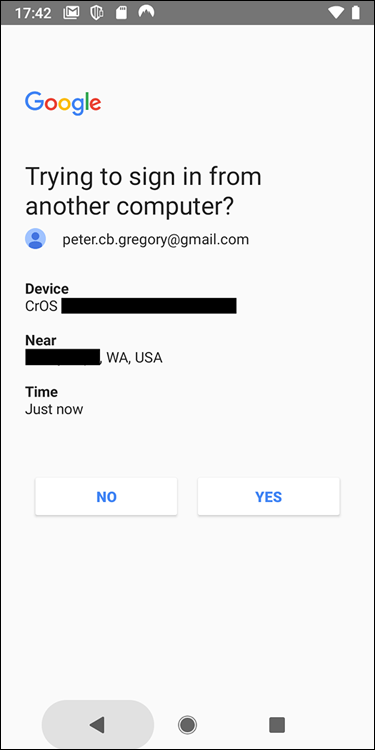
FIGURE 18-7: Verifying your Google login on your smartphone.
Obtaining ultimate security with Google Advanced Protection
In case Google 2-Step Verification is not enough security for you, you will be glad to know that Google has developed Google Advanced Security. This service offers the ultimate protection for your Google account, making it virtually impossible for anyone but you to ever access your Google account.
Here are a few things to know about Google Advanced Protection:
- You purchase two tiny, inexpensive security devices that you need to carry with you. (I carry mine on my key ring.) You have to purchase them only once,
- You need to use those little security devices only the first time you log in to any Google application on each device, and on any device from which you have logged out.
- Google Advanced Protection works not only on your Chromebook, but also on Android and Apple phones, iPads, Windows computers, and Macs.
- On Windows, Macs, and Chromebooks, to log in to Gmail and other Google services, you must use the Chrome browser. Firefox, Edge, Safari, and other browsers won’t work.
- On Android phones and iPhones, you must use the Gmail app to access email in your Google account. Using other email apps won’t work.
- If, after using Google Advanced Protection, you decide it isn’t for you, you can always turn it off and go back to using Google Authenticator or just your user ID and password.
I’ve been using Google Advanced Protection for more than two years, and speaking as a 20-year cybersecurity professional, I have found it to be rock solid and reliable, and have never had a bit of a problem with it.
Figure 18-8 shows me using my Google Titan key to log in to Google on my Chromebook. To learn more about Google Advanced Protection, go to https://landing.google.com/advancedprotection/.
Google Authenticator is another handy to use to improve your login security. Available for Android smartphones and Apple iPhones, Google Authenticator is used to store secure tokens used to log in to websites with sensitive information, such as financial and medical services. Although Google Authenticator is not available as an app for your Chromebook, you can still use it with your smartphone to improve the security of your most important websites. You can find out more at https://google-authenticator.com/.
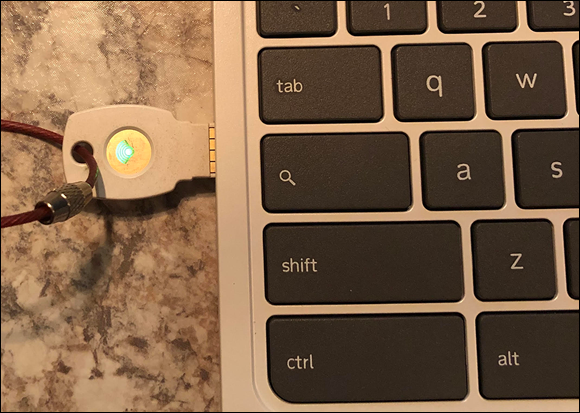
FIGURE 18-8: Using a Google Titan USB key to complete logging on to a Chromebook with Google Advanced Protection.
Managing and protecting Your passwords
People’s use of the Internet today involves having many user accounts that require user IDs passwords, and often, but not always, an email address. Trying to remember so many passwords can be downright frustrating, but in this section, I discuss three methods for storing them that can make your use of passwords both easier and more secure. You can store them in an online password vault, in your browser, or in a hard-copy book.
There are some highly important rules about passwords that I want you to understand clearly. If you learn anything from this book, it should be these password safeguards. You can find these rules in Chapter 23, “Ten Important Security Tips.”
Using an online password vault
My preferred method for storing user IDs and passwords is a password vault, which securely stores all your user IDs and passwords and will provide them to you when you need them. My favorite password vaults are LastPass (at www.lastpass.com), Keeper (at www.keepersecurity.com and shown in Figure 18-9), and Dashlane (at www.dashlane.com).
With an online password vault, your passwords are available on all of your devices. Here are some of the essential principles regarding the use of an online password vault:
- The password for your password vault is the only password you need to remember (other than your Google password for logging in to your Chromebook). Thus, make sure that your password vault password is strong and not easily guessed by others. If anyone guesses your password vault’s password, they will have all your passwords!
- Use the password-generating feature of your password vault to ensure that every password is strong and different from every other password you use. This way, if a website is hacked and the intruder obtains your password, it will work only for that one website and no other.
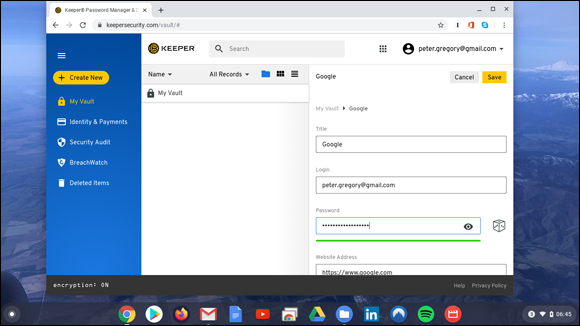
FIGURE 18-9: Using the Keeper password vault to store a user ID and password.
The selection of a password vault solution is an important decision, because you’re entrusting another party to keep your passwords safe. This is why using known, trusted brands like those mentioned in this section is essential. These companies are, after all, storing all your important login credentials. If this prospect makes you squeamish, consider using a hard-copy book, as discussed later in this chapter.
Storing passwords in the Chrome browser
In case using a password vault (see the preceding section) isn’t for you, an alternative for your Internet password storage is to use your Chromebook’s default feature for storing and managing your Internet passwords. This feature of the Chrome browser made it into the Chromebook, and it’s great if you have several passwords for several online products.
Don’t worry: Chrome doesn’t store your passwords without your permission. You have to approve the storage of a password the first time you enter it on a particular web page, as shown in Figure 18-10.
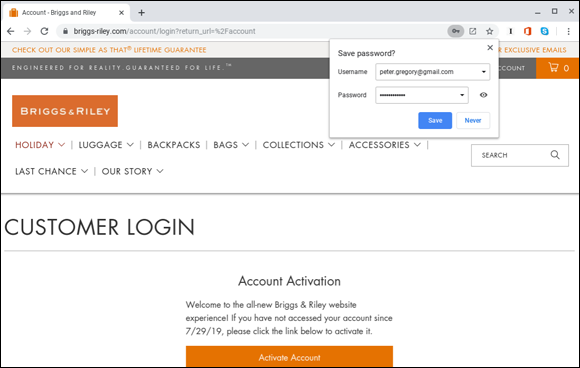
FIGURE 18-10: The Chrome browser offers to store your password.
If you choose to store your password, Chrome encrypts the password and stores it in your account for later. Later on, when you go to log in to the website, the Chrome browser automatically types it in for you.
If you ever forget a password, you can go to the Password Manager and click the password you’ve forgotten. A Show button appears that reveals your password when clicked.
You don’t have to save passwords in your browser; however, you may find that saving them makes your web-browsing experience better. If you opt not to save a password but change your mind later, you need to delete the website from the Never Saved section of your Password Manager. To do so, follow these steps:
- Ensure that you’re logged in, and then open the Settings panel on your Shelf and click Settings.
- Click Chrome Browser Settings.
- Scroll down to Auto-fill.
Click Passwords.
The Password Manager window appears, revealing every stored password.
In the Never Saved section, click the X to the right of the website you want to remove from this list.
Now, the next time you return to that website and enter your login credentials, you’re prompted with the option to save your password, at which point you can approve saving it.
Storing passwords in a hard-copy book
You can keep your user IDs and passwords in a “little black book.” This method can be the most secure of the three described in this chapter, provided that you guard that book diligently — and don’t lose it!
You can purchase special-purpose, hard-copy password journals from online merchants. But seriously, you can also just get a small journal book and write your passwords down there. See Figure 18-11 for an example.
If the prospect of using a password vault is intimidating, using a hard-copy notebook is a good alternative — as long you still use unique, complex passwords and keep the book safe.
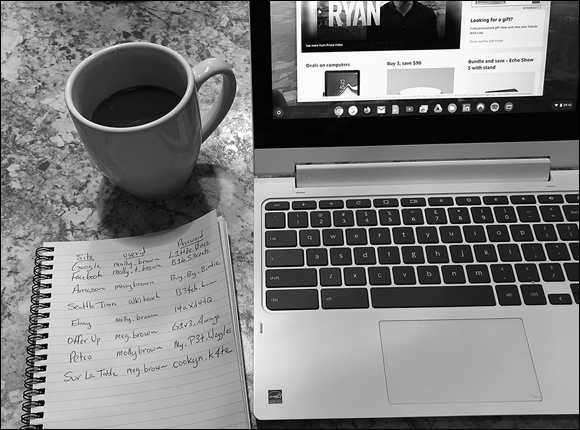
FIGURE 18-11: Writing your passwords down in a little black book.
Keeping hackers at bay with multifactor authentication
The term multifactor authentication can sound a bit scary — but actually, the reverse is true: Not using multifactor authentication is a scary prospect. Without multifactor authentication, malware can steal user IDs and passwords and use them to log in to your user accounts in online banking sites and other places where you spend or manage money.
When you use multifactor authentication, you use something in addition to your user ID and password when logging on to web site. That “something” involves your smartphone in a simple way: When you begin to log on to a web site, you enter your user ID and password, and then you’re told to enter a value displayed on your smartphone to complete your login. This technique for logging in makes it very difficult for a criminal to log in to your Internet accounts.
Earlier in this chapter, in “Using Google 2-Step Authentication,” I discuss multifactor authentication for getting in to Google itself.
Locking Your Screen
Walking away from your Chromebook without first logging out or shutting it off can leave you vulnerable, even for only a brief moment. Locking your screen is a great way to ensure that your device, your email, or your Google account isn’t tampered with while you’re away. You have three ways to lock your Chromebook screen:
- Press and hold your Power button for a moment. A window appears onscreen that lets you power down, sign out, lock, or provide feedback, as shown in Figure 18-12. Click Lock.
- Open the Settings menu on the Shelf and click the Lock button, as seen in Figure 18-13.
- If your Chromebook has a Lock key on the keyboard (see Figure 18-14), press it for about a second, and your Chromebook locks and displays the password screen for your Google account.
To unlock your Chromebook, enter your Google password.
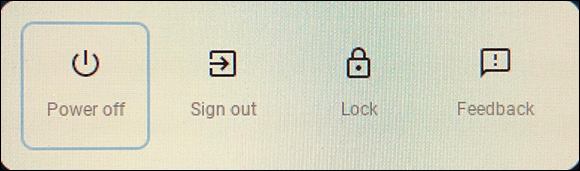
FIGURE 18-12: Locking your Chromebook with the Lock menu.
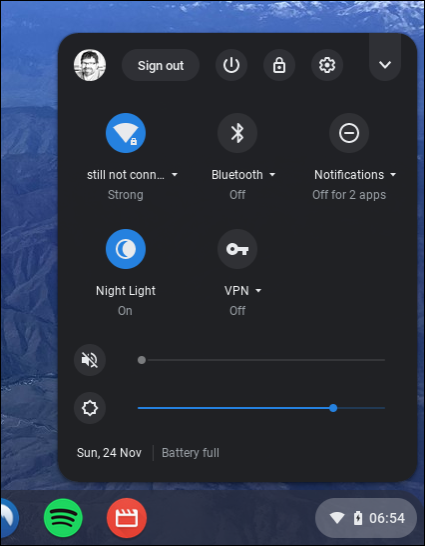
FIGURE 18-13: Locking your Chromebook with the Lock button in the Settings window.
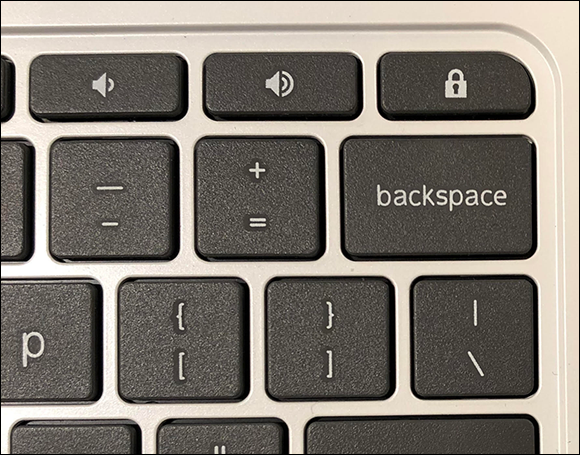
FIGURE 18-14: Locking your Chromebook with the Lock key on the keyboard.
Setting a secure wake–from-Sleep mode
To add a little more security to your Chromebook, you can require a password to wake your Chromebook from Sleep mode. Sleep mode is a mode that your Chromebook uses to conserve power when not in use. Your Chromebook automatically goes into Sleep mode after eight minutes of inactivity when plugged in and six minutes of inactivity when not plugged in, but you can put the Chromebook into Sleep mode immediately by closing the lid.
By default, a sleeping Chromebook is still vulnerable. Entering Sleep mode doesn’t log you out or lock your screen. So if you rarely turn off your computer, enabling a wake-from-Sleep password is probably a good idea. To set this feature, log in to your Chromebook and then follow these steps:
- Open the Settings panel on the Shelf and click Settings.
Enable the Show Lock Screen When Waking From Sleep selector in the People section, as shown in Figure 18-15.
From here on out, you need your account password to bring your computer out of Sleep mode!
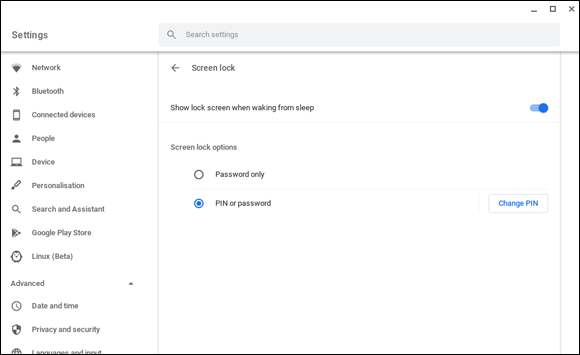
FIGURE 18-15: Enabling the wake-from-sleep password requirement.
Protecting Your Network Traffic with VPN
More often than not, public hotspots such as those found in coffee shops, airports, and hotels do not encrypt your data as it crosses the airwaves, which means that an attacker may be able to see the data you’re sending and receiving. If you need to send sensitive data in public places, you might want to download a VPN app that encrypts your network traffic and keep it away from prying eyes.
VPN is short for “virtual private network,” which is a fancy-pants way of saying that your network transmissions are encrypted from your Chromebook to the VPN service.
My favorite VPN software is Nord VPN (www.nordvpn.com), but some other good ones are available, including ExpressVPN (www.expressvpn.com) and CyberGhost VPN (www.cyberghostvpn.com). I use Nord VPN on my Chromebooks, MacBooks, iPhone, and Android phone.
To obtain and install a VPN program, go to the Google Web Store and search for one of mentioned here.
 I need to caution you here: There’s no such thing as a free lunch. Good VPN software comes with a modest subscription fee, typically from $35 to $75 per year. Stay away from free VPN services. Providing VPN service costs money, and if it’s free, it’s probably doing the opposite of what you want — that is, usurping your data and selling it.
Although VPN provides essential protection, occasionally you may find some app that doesn’t function while using the VPN. In my case, one of my online banking apps does not work unless I turn off the VPN software momentarily.
Keeping Your Chromebook Up to Date
From time to time, Google releases software updates for the Chrome OS that runs your Chromebook. Sometimes these software updates are security related, installing these updates when they’re available is always a good idea.
To check for updates, follow these steps:
Go to Settings.
If a software update is available for your Chromebook, you see a message like the one shown in Figure 18-16.
Click Restart to Update.
Your Chromebook downloads the update and restarts.
When you click Settings, you might also see a message like the one shown in Figure 18-17 that tells you that apps you downloaded from the Google Play Store have updates available. When you see this message, click Update All.
In checking for Chrome OS updates, you’re just looking at your notifications. It’s a good idea to get into the habit of glancing down at the lower-right corner of the screen at the notifications area to see whether Chrome OS wants to tell you things, such as about updates and other issues.
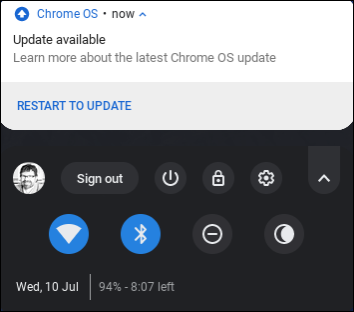
FIGURE 18-16: Checking your Chromebook for updates.
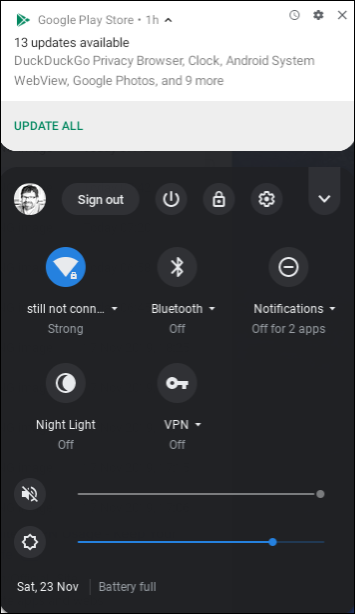
FIGURE 18-17: Updating software from the Google Play Store.
Protection from Viruses and Other Malware
Microsoft products MS-DOS and Windows have been plagued with computer viruses and other malware since practically the beginning of time. Android phones are now the biggest target of malware, and even the Apple Mac and iPhone are attacked. What about Chromebooks? Well, because Chrome OS is functionally similar to Android, it’s safe to say that hackers are working on attacks on Chromebooks.
Even if few or no viruses target Chromebooks specifically, two potent threats exist that are highly relevant: attacks on the Chrome browser and malicious Chrome browser extensions. Because Chrome is the world’s most popular browser, attacks against Chrome definitely occur.
Attacks against Chrome can, for instance, steal the login credentials you use to log in to websites (including online banking and others). These password-stealing attacks are one of the most significant threats, but not the only one.
Anti-malware programs for Chromebooks stop such attacks. I highly recommend that you select one of the following browser extensions and install it to protect you from these invisible but very potent threats:
- AVG Online Security (see Figure 18-18)
- Malwarebytes
- McAfee Endpoint Security
Go to the Google Web Store to search for and install any of these.
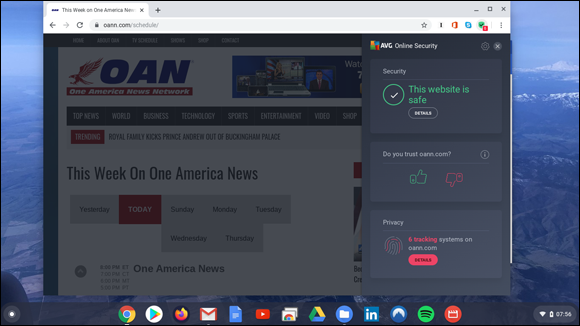
FIGURE 18-18: AVG Online Security helps to protect you from Internet threats.
Although you may be protected from Internet hazards by one of the aforementioned tools or something similar, you should not throw caution to the wind and assume that these programs will bail you out of every kind of trouble. The nature of cybercrime makes it better for you to remain diligent even if you are protected by one of these programs.
Power Washing
Sometimes it’s nice to have a clean start. Your Chromebook makes it easy for you to wipe the slate clean and start over. You may find doing so useful when you have too much junk on your device. Or maybe you want to reset your Chromebook to its default settings because you’re giving your Chromebook to another person. You can wipe your device quickly, easily, and securely by using Chromebook’s built-in Powerwash feature.
To power wash your Chromebook, log in to your Chromebook and follow these steps:
- Open the Settings panel on the Shelf and click Settings.
- Scroll to the bottom of the screen and click Show Advanced Settings.
Click the Powerwash button in the Powerwash section at the bottom of the screen, as shown in Figure 18-19.
A dialog box appears, telling you that a restart is required.
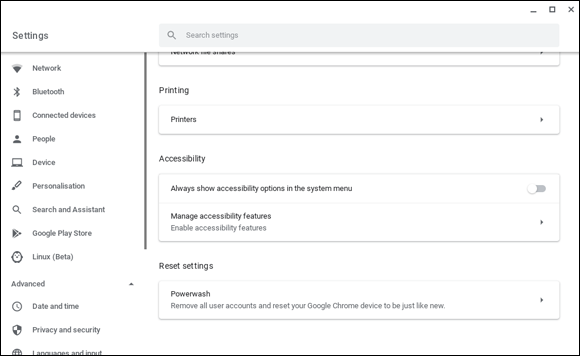
FIGURE 18-19: The Powerwash feature.
If you’re positive that you want to wipe your Chromebook clean, click the Restart button, shown in Figure 18-20.
You can’t undo power washing any more than you can unbreak an egg. After you click Restart, your Chromebook turns into a secure, power-cleaning machine. Nothing on the device will be left. The good news is that it won’t touch anything on your Google Drive or other web services. But anything stored locally on your Chromebook will be gone forever.Your Chromebook restarts, as clean as can be — just like new.
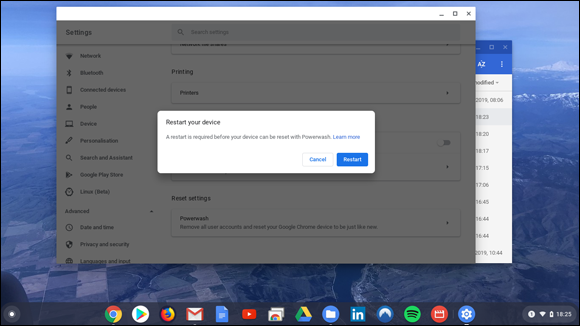
FIGURE 18-20: Are you sure?
Protecting Your Chromebook from Prying Eyes and Thieves
In this brief section, I describe protection that’s more physical: covering your webcam so that no one can view whatever’s happening in the room where your open Chromebook might be; using a screen privacy filter to limit what others can view on your Chromebook screen; and using a cable lock to make it more difficult for someone to steal your Chromebook.
Cover your webcam
Your Chromebook most likely has a built-in camera that faces you so that you can do live video chats, as I discuss in Chapter 14. As a security precaution, I recommend that you employ some sort of a cover for your webcam when you’re not using it. You might forget to end a video call, or an attacker could figure out how to access Chromebook webcams. (However, this advice doesn’t apply only to Chromebooks but also to some smart TVs – but good luck locating a secret camera on a TV!) You’re better safe than sorry, particularly if your Chromebook is in private areas of your home, such as your bedroom.
Several methods are available for covering your webcam. You can use a purpose-made webcam cover (search “webcam cover” online to see what they look like). These are available at online retailers for minimal cost, and they’re often given away at computer and electronics trade shows. Or you can take the budget route and use a small piece of electrical tape or a part of a sticky note.
Use a privacy screen filter
If you spend much time working with sensitive content on your Chromebook, and if you find that you’re doing this in public places like coffee shops and airports, you might want to consider getting a privacy filter for your Chromebook. A privacy filter makes it easy for you to view the content on your screen, but more difficult (and nearly impossible) for others to view what’s on your screen. In case you’re not sure what I’m talking about, Figure 18-21 shows a typical privacy filter on a Chromebook.
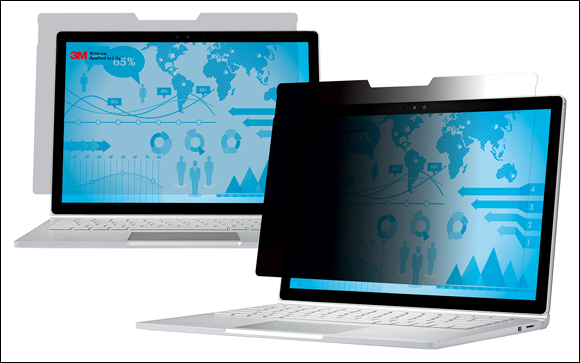
Image courtesy of 3M
FIGURE 18-21: A privacy filter makes it more difficult for others to view the data on your screen.
A screen privacy filter is a thin, semitransparent piece of plastic that goes over the top of your laptop screen. Often it’s affixed with an adhesive that lets you remove the filter when you want to. The filter permits anyone directly in front of the laptop (you, and anyone right behind you) to view the screen, but anyone to the left or right of you would not be able to view what is on your screen.
Preventing the theft of your Chromebook
In case you are concerned about the actual theft of your Chromebook (and who wouldn’t be!), you’ll be glad to know that most Chromebooks come with a Kensington lock slot that allows you to attach a specially made security lock to your Chromebook to deter theft. In Figure 18-22, you can see how I lock my Chromebook with one of my security cable locks.
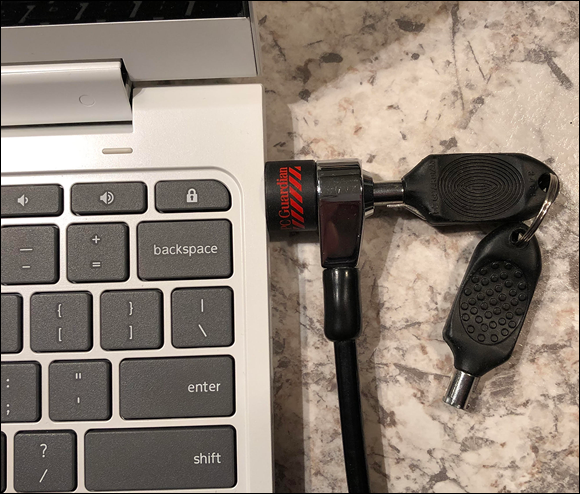
FIGURE 18-22: Locking your Chromebook with a security cable lock.