Chapter 4
Getting Your Hands on the Keyboard and Touchpad
IN THIS CHAPTER
![]() Taking a tour of the keyboard and touchpad
Taking a tour of the keyboard and touchpad
![]() Learning about shortcut keys
Learning about shortcut keys
![]() Changing your keyboard and touchpad settings
Changing your keyboard and touchpad settings
![]() Using an external keyboard and mouse
Using an external keyboard and mouse
It’s hard telling whether Christopher Latham Sholes thought that his design and letter layout of the keyboard would still be in use well into the 21st century. Regardless of what his original intent was, his legacy is alive and well in the world today. When Sholes devised the layout and functionality of the keyboard that we use today, his intent was to reduce typewriter jams and thereby speed up the typist. (“Glass half empty” people argue that the arrangement of letters was really to slow down the typist and thus also reduce typewriter jams.)
Over the last 140 years, the keyboard has evolved very little. The basic layout of letters and numbers is the same; the only major additions have been multipurpose keys like the ?/ key or the :; key. Additionally, with the advent of word processors and computers, keys like Alt, Caps Lock, Num Lock, and Shift appeared, as well as function keys (you know, the F keys located at the top of some keyboards).
Several other modifications came about as computer manufacturers and software developers like Microsoft and Apple fought to differentiate themselves within the marketplace. For instance, Windows computers have a Start key and rely heavily on the function keys. Apple keyboards ditched the Alt key for the Apple key (now the Command key) and the Fn key. Vive la différence!
Each computer manufacturer created nuances designed to improve users’ experiences while typing and otherwise operating their computers. The Chromebook is no different! In this chapter, you explore the Chromebook keyboard and touchpad in all their glory. You learn how to customize the language of your keyboard, adjust the function of some keys, and save time with keyboard shortcuts. You also learn how to add an external mouse or keyboard and how to customize external devices.
The Chromebook Keyboard at a Glance
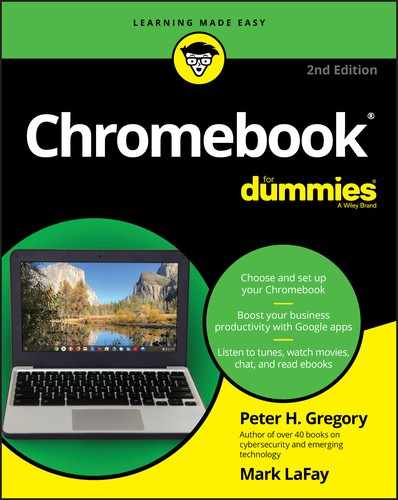
Google didn’t stray too far from the norm when it created the keyboard for the Chromebook. Figure 4-1 shows the keyboard on the Lenovo C330. Check out the top row: If you’ve done much work on a Mac or a PC, you probably remember the function keys (F1 through F12), used as shortcuts for various operating-system-specific functions. On Chromebook, the function keys are gone, replaced by a series of more intuitive keys, called shortcut keys.

FIGURE 4-1: The Chromebook keyboard on the author’s Lenovo C330.
Moving left to right, the top row of keys are
- Esc: The “get me out of here” key. Often used to stop something you’re doing. In the web browser, it stops a page from loading.
- Back (indicated by a left arrow): Navigates to the previous web page.
- Forward (indicated by a right arrow): If you navigated back a page, use forward to navigate forward.
- Refresh/Reload (indicated by a circular arrow): Reloads your current web page.
- Full Screen (indicated by a box with little arrows in two corners): Makes the current window full screen, without the menu bar or other ancillary window controls.
- Reveal All Windows (indicated by a box with two bars to the right): If you have multiple windows open, clicking this key reveals them all on the screen at one time so that you can quickly click and navigate between windows.
- Dim (indicated by a small sun): If you’re in a dark environment, you may want to reduce the screen’s brightness so that the light emitted isn’t a disturbance to others. This feature is also a great way to extend battery life if you’re using your Chromebook with its internal battery, away from electric power.
- Brighten (indicated by a bigger sun): If you’re in a bright environment, you may want to brighten your screen because the screen may be too dim to see.
- Mute (indicated by a speaker with a slash through it): Quickly eliminates all sound coming from your machine.
- Volume Down (indicated by a speaker with a single sound wave): Decrease your machine’s volume incrementally.
- Volume Up (indicated by a speaker with two sound waves): It’s time to party. Turn up the volume!
- Lock: Locks your Chromebook if you are stepping away and don’t want others to tamper with it (requires that you have your screen lock setting turned on).
The remaining keys on the keyboard are more or less what you’d expect — with the exception of the Search key, as shown in Figure 4-2.
 As is typical of laptop manufacturers, you can find some minor variation in the layout of keys among various makes and models of Chromebooks. The two Chromebooks in our home differ a bit, and you might notice that the keyboard of yours varies slightly from what I show in Figure 4-1.
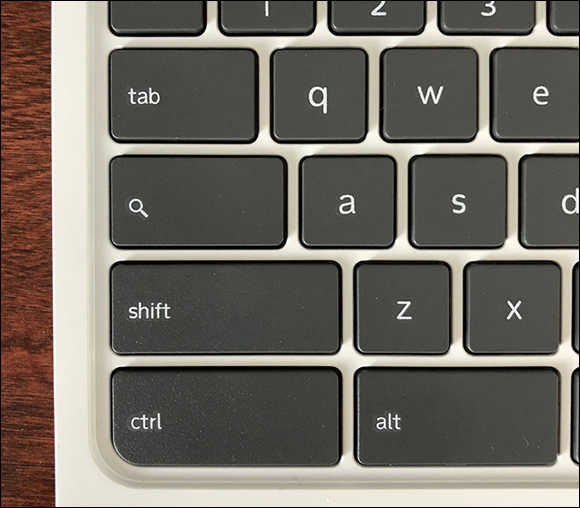
FIGURE 4-2: The Chromebook Search key.
Pushing the Search key opens the Launcher and puts your cursor in the search bar so that you can quickly submit a search query. If you’re searching for an application, like Gmail, simply type in gmail, press Enter, and your Chromebook opens the Chrome web browser and loads your Gmail. Maybe you want to quickly do a Google search. This search can even find one of your Google Docs documents. To do a Google search, enter your query in the search bar and press Enter. Chromebook opens a Chrome browser and loads Google.com (or your default search engine, if it’s something else) with your search results teed up.
The last thing you should notice about the keyboard is that the bottom row of keys includes no Start key, Fn key, or Command/Apple key. Instead, it simply has a Ctrl and Alt key on both sides of the spacebar. Ctrl and Alt are used quite a bit in shortcut combinations, so you might as well get used to having them there!
Using Shortcut Key Combinations
In addition to shortcut keys, several key combinations perform a litany of tasks on your Chromebook without making you navigate and click your way through the Chrome OS menu system. Tables 4-1, 4-2, and 4-3 show several different shortcut key combinations that will make your experience on a Chromebook more intuitive and efficient. (You can find a full list in the Cheat Sheet for this book at www.dummies.com.)
 When you see a keyboard shortcut like Ctrl+N, it means you should press the Ctrl and N keys at the same time. When you see a keyboard shortcut like Ctrl+Shift+N, press the Ctrl, Shift, and N keys at the same time.
TABLE 4-1 Shortcuts for Chromebook and Chromebook Apps
Shortcut |
Function |
Ctrl+Alt+/ |
Open the list of available keyboard shortcuts. |
Ctrl+/ |
Open Help center. |
Ctrl+O |
Open a file. |
Ctrl+Shift+W |
Close the current application window. |
Alt+= |
Maximize the application window. |
Alt+- |
Minimize the application window. |
Shift+Search+Esc |
Unpin an app from the shelf. |
Ctrl+Shift+T |
Reopen the last tab or window you’ve closed. Google Chrome remembers the last ten tabs you’ve closed. |
Search+1 through Search+= |
Use F1 to F12. |
Alt+Tab |
Go to the next window you have open. |
Alt+Shift+Tab |
Go to the previous window you have open. |
Ctrl+Shift+= |
Zoom in entire screen. |
Ctrl+Chift+- |
Zoom out entire screen. |
Ctrl+Shift+0 (zero) |
Reset screen zoom level. |
Ctrl+Alt+(Reveal All Windows key) |
Take a screen shot of the current window. |
Ctrl+(Reveal All Windows key) |
Take a screen shot of the entire screen. |
Full Screen key |
Toggle full screen. |
Ctrl+Full Screen key (confirm) |
Configure one or more monitors. |
Speaker Off key |
Mute sound. |
Alt+Shift+M |
Open the Files app. |
Alt+Shift+S |
Open the Status area. |
Alt+Shift+N |
Display notifications. |
Search key |
Open/Close the Launcher. |
Search+L |
Lock your Chromebook (requires your Chromebook password or PIN to unlock). |
Ctrl+Shift+Q |
Log out of the Chromebook. |
Shift+Search+L |
Put your Chromebook in sleep mode. |
Brightness Up key |
Make the display brighter. |
Brightness Down key |
Make the display dimmer. |
TABLE 4-2 Shortcuts for Chrome Browser Pages
Shortcut |
Function |
Windows and Tabs |
|
Ctrl+N |
Open a new Chrome browser window. |
Ctrl+Shift+N |
Open a new Chrome browser window in incognito mode. |
Ctrl+T |
Open a new Chrome browser tab. |
Ctrl+W |
Close the current Chrome browser tab. |
Ctrl+9 |
Go to the last Chrome browser tab in the window. |
Ctrl+Tab |
Go to the next Chrome browser tab in the window. |
Ctrl+Shift+Tab |
Go to the previous Chrome browser tab in the window. |
Ctrl+click a link |
Open the link in a new Chrome browser tab in the background. |
Ctrl+Shift+click a link |
Open the link in a new Chrome browser tab and switch to the newly opened tab. |
Shift+click a link |
Open the link in a new Chrome browser window. |
Type a URL in the address bar, then press Alt+Enter |
Open the URL in a new Chrome browser tab. |
Browsing History |
|
Ctrl+H |
Open the History page. |
Alt+left arrow |
Go to previous page in your Chrome browser browsing history. |
Alt+right arrow |
Go to the next page in your Chrome browser browsing history. |
Viewing Web Pages |
|
Alt+up arrow |
Scroll up. |
Alt+down arrow |
Scroll down. |
Alt+left arrow |
Go to previous page. |
Alt+right arrow |
Go to next page. |
Spacebar |
Scroll down the web page. |
Ctrl+Alt+up arrow |
Go to top of page. |
Ctrl+Alt+down arrow |
Go to bottom of page. |
Ctrl+Enter |
Add www. and .com to your input in the address bar and open the resulting URL. |
Alt+Home (the Home icon in the Chrome browser if you have made it visible) |
Go to the home page. |
Ctrl+P |
Print your current page. |
Ctrl+R |
Reload your current page. |
Ctrl+Shift+R |
Reload your current page without using cached content. This forces a reload of all content from the website. |
Ctrl++ (plus sign) |
Zoom in on the page. |
Ctrl+- (dash) |
Zoom out on the page. |
Ctrl+0 |
Reset zoom level to original setting. |
Ctrl+F |
Open the find bar to search for text in the current tab. |
Ctrl+G |
Go to the next match in your search. |
Ctrl+Shift+G |
Go to the previous match in your search. |
Bookmarks |
|
Ctrl+D |
Save your current web page as a bookmark. |
Ctrl+Shift+D |
Save all open pages in your current window as bookmarks in a new folder. |
Drag link to Bookmarks bar |
Save link as a bookmark. |
Configuring the Chrome Browser |
|
Alt+E or Alt+F |
Open the Chrome menu. |
Ctrl+K or Ctrl+E |
Places focus on the Chrome browser Omnibox. Press Esc to revert. |
Ctrl+Shift+Backspace |
Clear browsing data |
Ctrl+J |
Open the Downloads page. |
When using external keyboards: If you are using a Windows keyboard, use the Windows key when Chromebook specifies the Search key. If you are using a Mac keyboard, use the Command key for Chromebook’s Search key.
TABLE 4-3 Shortcuts for Text Editing
Shortcut |
Function |
Selecting Text |
|
Ctrl+A |
Select everything on the page. |
Ctrl+Shift+right arrow |
Select the next word or letter. |
Ctrl+Shift+left arrow |
Select the previous word or letter. |
Navigating in the Document |
|
Ctrl+right arrow |
Go to the end of the next word. |
Ctrl+left arrow |
Go to the start of the previous word. |
Ctrl+Search+left arrow |
Go to the beginning of document. |
Ctrl+Search+right arrow |
Go to the end of document. |
Alt+up arrow |
Page up. |
Alt+down arrow |
Page down. |
Ctrl+Search+up arrow |
Home. |
Ctrl+Search+down arrow |
End. |
Changing Content |
|
Ctrl+C |
Copy selected content to the Clipboard. |
Ctrl+V |
Paste content from the Clipboard. |
Ctrl+X |
Cut. Copies selected content to the Clipboard and deletes the content. |
Ctrl+Backspace |
Delete the previous word. |
Search+Backspace |
Delete the next letter (forward delete). |
Alt+Search |
Turn Caps Lock on and off. |
The good news is that when you don’t have your copy of Chromebook For Dummies, 2nd Edition nearby, you can use Google’s built-in Help tool for quick reference. To access the visual helper, press Ctrl+Alt+/. The Keyboard Shortcuts window appears. The main categories of keyboard shortcuts appear on the left; select one and view the individual shortcuts on the right. (See Figure 4-3.) Use the Keyboard Shortcuts screen for a quick reminder as you use your Chromebook.
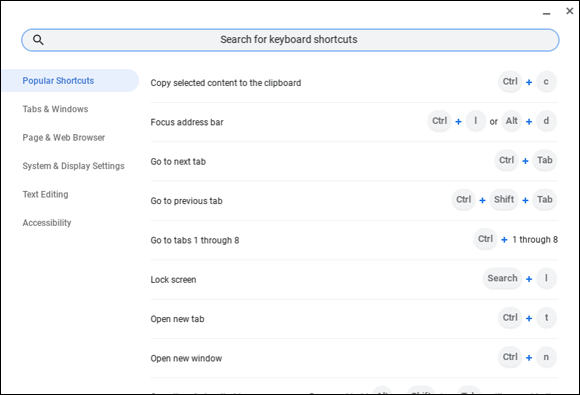
FIGURE 4-3: The Keyboard Shortcut Help page.
Don’t be intimidated by the long list of keyboard shortcuts. You are not obligated to memorize them! Even every-day Chromebook experts use a small number of these shortcuts.
Configuring Keyboard Settings
The first time you turn on your Chromebook, you have to complete a basic setup process that includes selecting your language and desired keyboard language layout. You can edit this setting, among other keyboard settings, after the fact. To access your keyboard settings, follow these steps:
Click the status area located in the bottom-right corner of your desktop.
You might recall that the status area contains your clock, Wi-Fi indicator, and battery charge level indicator. It is also pictured in Figure 4-4.
Your settings panel appears.
Select Settings.
A window launches and loads your Chromebook Settings page.
Scroll down to the Device section and select Keyboard Settings.
A Keyboard Settings window appears, as shown in Figure 4-5.

FIGURE 4-4: The Chromebook status area.
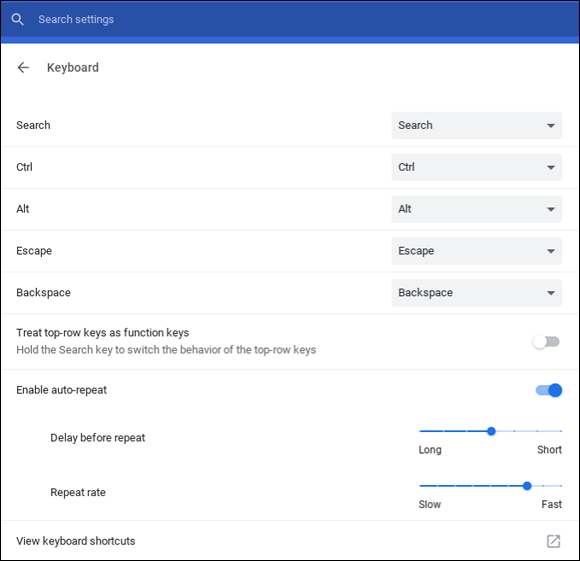
FIGURE 4-5: The Keyboard Settings dialog box.
In the Keyboard Settings dialog box, you can
- Reconfigure your Search, Alt, Ctrl, Esc, and Backspace keys.
- Turn your shortcut keys into function keys (F keys).
- Change your keyboard language configuration.
I discuss these options more fully in the next few sections.
Reconfiguring keyboard keys
By default, the Alt, Ctrl, Search, Esc, and Backspace keys perform their intended tasks: You use the Alt and Ctrl keys in combination with other keys (and the mouse) to access additional functionality, and you use the Search key to quickly access the search function in the Launcher, as well as to unlock additional functionality when used in combination with other keys. The Esc key is the “get me out of here” key that has somewhat different meanings, depending on what you’re doing at the time. You use the Backspace key to delete characters to the left of the cursor.
You can modify these keys so that they serve different purposes. For instance, you can change your Search key to behave like a Caps Lock or set your Ctrl key to act like the Alt key. To change the function of the Alt, Ctrl, and Search keys, follow these steps:
Click the status area in the bottom-right of your desktop.
The settings panel appears.
Click Settings.
Your Chromebook Settings page loads the Chrome browser.
Scroll down to the Device section and select Keyboard Settings.
The Keyboard Settings dialog box appears.
Another way to quickly open the Keyboard Settings dialog box is to press your Search key, type chrome://settings/keyboard-overlay, and then press Enter.Click the corresponding box for the key you want to reconfigure.
A drop-down list appears with options for changing the selected key’s function, as shown in Figure 4-6.
- Make your desired changes and click OK.
This feature allows you to configure your keyboard in a manner that is convenient to you. You can reconfigure your keys as many times as you like.
The reason that the Search, Ctrl, Alt, and other keys can be modified is that these keys appear in slightly different positions on different kinds of keyboards. As advanced users move between different computers and keyboards, this helps give everything the same feel.
Turning shortcut keys into function keys
On most Chromebooks, the function keys (F1 to F10) common to Macs and PCs have been replaced by shortcut keys. Few Chromebook models come with F11 or F12, and depending on your model, you may not even have a reference to the function key on each shortcut key.
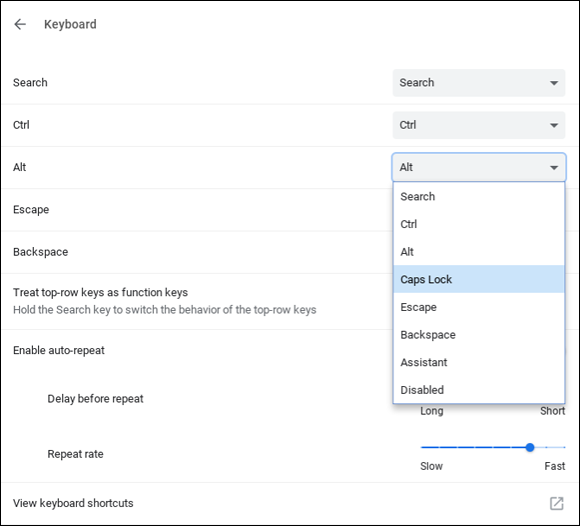
FIGURE 4-6: Reconfiguring the Alt key.
If you have a need for function keys, don’t fret; you can disable the shortcut keys and enable function keys in your keyboard settings by following these steps:
Click the status area in the bottom-right of your desktop.
The settings panel opens.
Select Settings.
Your Chromebook Settings page appears in the Chrome browser.
Scroll down to the Device section and select Keyboard Settings.
The Keyboard Settings dialog box appears.
Deselect the Treat Top-Row Keys as Function Keys setting.
This disables the shortcut functionality of the shortcut keys and enables their functions as function keys.
To re-enable shortcut keys and disable function keys, simply deselect the setting.
Changing your keyboard language
Your keyboard language configuration is set the first time you log into your Chromebook. If you’re in America, you probably set your language to English (United States) and your keyboard to US Keyboard. If you would like to change your keyboard language, you can do so by following these steps:
Click the status area in the bottom-right of your desktop.
The settings panel appears.
Select Settings.
Your Chromebook Settings page loads in the Chrome browser.
- Scroll down to the bottom and click Advanced.
- In the Languages and Input section, select Language.
Select the desired language.
If you don’t see your language, click Add Languages. When you find the desired language, click Add.
Next to your desired language, click More (three dots) and select how you want to use the language.
You find two settings here. The first indicates the language used by your Chromebook; the second indicates the language that Google will translate web page content into.
The Languages and Input page appears, as shown in Figure 4-7.
The language you selected when setting up your device appears in the Languages pane on the left side of the dialog box.
To change the language, click the Add Languages button.
The Add Languages dialog box appears. (See Figure 4-8.)
- Select the language you want from the drop-down list of available languages.
Click OK.
The language you selected is added to the list of languages in the Languages pane.
Click the newly added language to highlight it.
A list of options appears in the right pane of the Languages and Input dialog box.
- In the Input Method section, select the box for the desired keyboard(s).
- Click Done.
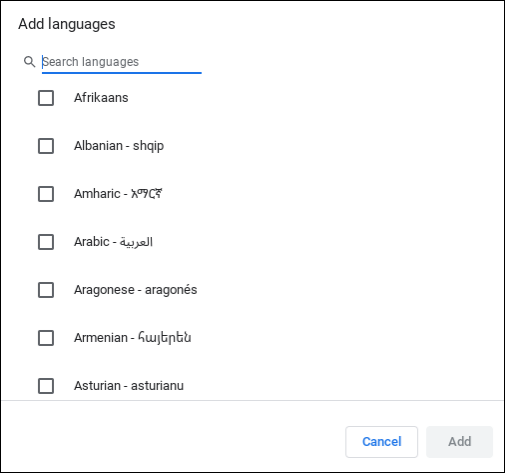
FIGURE 4-8: The Add Languages dialog box.
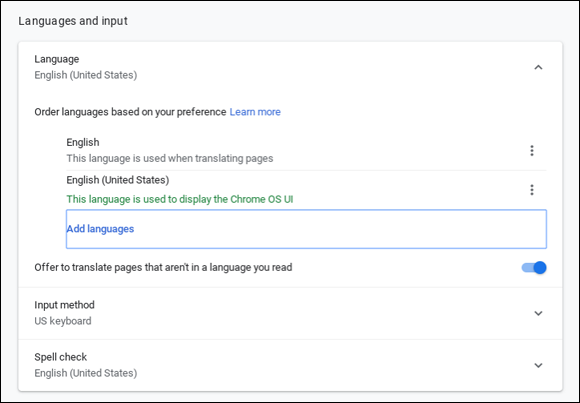
FIGURE 4-7: The Languages and Input dialog box.
You can activate your newly added keyboard by following these steps:
Click the status area in the lower-right of your desktop.
The settings panel opens.
Click the keyboard option located at the top of the panel.
A menu of available keyboards appears.
- Click the desired keyboard language.
After you switch your keyboard, you’ll notice as you type that your keys have changed to the standard for the language and country you selected. Change your language by repeating the preceding steps.
Using the Touchpad
Over the years, numerous different laptop mouse controllers have appeared. The trackball was cool until you got too much of your lunch stuck under the ball. The pointing stick was nice if you didn’t mind that it was the size of a pencil eraser. Then came the touchpad. The touchpad on the Chromebook is a lot like most touchpads that are used on Windows, Linux, and Mac computers. Here are some basic gestures to get you going:
- To move the cursor across the screen, simply place one finger on the touchpad and move it in any direction.
- Click buttons and links by pressing down on the bottom half of the touchpad until you feel or hear a click. Or, if you like tap-to-click instead, just tap the touchpad to click.
- Right-click by tapping with two fingers.
- Scroll vertically by placing two fingers on the touchpad and moving them up and down; scroll horizontally by moving them left and right.
- Drag items or highlight text by simultaneously pressing (and holding down) with one finger and moving the pointer using another finger.
Finger gestures
Google aimed to make Chromebook one of the easiest and most intuitive devices on the laptop market. Naturally, Google has built in several advanced features for the touchpad to make using the Chromebook fluid and intuitive. Some of these features include the following:
- You can reveal all available windows by placing three fingers on the touchpad and swiping up simultaneously. You can then click the desired window to make it active and bring it to the front.
- While you are in the Chrome browser, use two fingers to swipe from left to right across the touchpad to go backward in your browsing history.
- In the Chrome browser, use two fingers to swipe right to left across the touchpad to go forward in your browsing history.
Touchpad and keyboard combinations
Google has implemented several different ways to perform the same function, mainly to accommodate users transitioning from other devices. Some quick ways to use the touchpad and keyboard together are
- Right-click: Hold down the Alt key and click the touchpad. Right-clicking is useful in revealing common functions without having use a menu or shortcut keys.
- Highlight content: Click one side of the content you want to highlight. Then, holding down the Shift key, click the other side of the content. The text is highlighted. This feature is particularly useful when you want to copy a body of text. Alt+click the highlighted text to reveal options like Copy or Cut.
Customizing Touchpad Settings
The touchpad is not without customization capability. You can make changes to the touchpad settings from within the Chromebook Settings page. To open the touchpad settings, follow these steps:
Click the status area in the bottom-right of your desktop.
The settings panel opens.
Select Settings.
Your Chromebook Settings page opens in the Chrome browser.
Scroll down to the Device section and select Touchpad Settings.
The Touchpad dialog box appears, as shown in Figure 4-9.
In the Touchpad dialog box, you can make the following customizations:
- Change the touchpad speed.
- Adjust your click settings.
- Change scroll directions.
I discuss these settings in the next few sections.
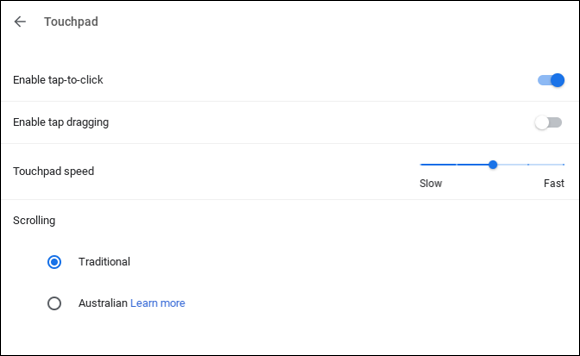
FIGURE 4-9: Configuring the Touchpad.
Changing the touchpad speed
Found in the Device section of your Chromebook Settings page, the Touchpad Speed slider allows you to adjust the speed of your touchpad — that is, the distance your cursor moves onscreen in relation to the distance your finger travels on the touchpad. To move the cursor faster, move the slider to the right. To move it slower, move the slider to the left. Figure 4-9 shows the Touchpad Speed control.
Adjusting the touchpad click settings
Clicking the touchpad requires you to press down on the bottom half of the touchpad until you hear a click. If you want to use less effort to click, you can also turn on the Tap to Click feature. After you engage this feature, your touchpad treats any quick tap or touch of the touchpad as a click. To enable this feature, follow these steps:
Click the status area in the bottom-right of your desktop.
The settings panel opens.
Select Settings.
Your Chromebook Settings page opens in the Chrome browser.
Scroll down to the Device section and select Touchpad Settings.
The Touchpad dialog box appears.
Select the Enable Tap-to-Click check box.
After you enable this option, you can immediately tap the touchpad to click links, buttons, and so on. You can also double-click by tapping twice.
Changing scroll directions
You can accomplish scrolling on the Chromebook in a few ways:
- Move your pointer over to the right side or bottom of the screen to reveal the available scroll bars. You can then scroll by clicking the scroll bar and dragging up and down (to scroll vertically) or left and right (to scroll horizontally).
- Place two fingers on the touchpad and move them up and down to scroll vertically, or left and right to scroll horizontally.
By default, the Chromebook is set up to scroll traditionally, meaning that swiping your fingers up on the touchpad makes the window scroll up and swiping your fingers down makes it scroll down.
You may, however, be more familiar with the opposite action, meaning that when you swipe up, it’s as if you’re pushing your finger on the screen and pulling more content from the bottom of the screen, and vice versa if you swipe down. On Chromebook, this scrolling style is referred to as Australian scrolling (remember that Australia is “down under,” where everything, including scrolling, apparently, is upside-down). You can activate this feature by taking these steps:
Click the status area in the bottom-right of your desktop.
The settings panel appears.
Select Settings.
Your Chromebook Settings page opens in the Chrome browser.
Scroll down to the Device section and select Touchpad Settings.
The Touchpad dialog box appears.
- Select the Australian Scrolling radio button.
Click OK.
Your scroll has now been changed, mate!
Connecting a Mouse or Keyboard
Sometimes when duty calls, you have to work on your computer for hours on end. Spending hours upon hours using a laptop keyboard and touchpad may make your mobile-computing experience a bit of a grind. To make things easier, it’s sometimes nice to have a separate keyboard or mouse that you can plug in and use with your laptop. With your Chromebook, you can add a physical keyboard or mouse by using USB or Bluetooth.
To connect a USB keyboard or mouse to your Chromebook, you just need to locate the USB port on the side of your computer and insert the USB connector for your device into the port. (Your USB connector can go in only one way, so don’t force it.) Your Chromebook automatically detects the new keyboard or mouse and applies all existing settings to it. You might not see any messages as you would on a Windows computer; instead, it will just begin to work automatically.
If your keyboard or mouse and your Chromebook are Bluetooth enabled, no cable is necessary! Connect your Bluetooth keyboard or mouse by following these steps:
Click the status area in the bottom-right of the desktop and then click the Settings icon.
The settings panel opens.
- Select Bluetooth.
If your Bluetooth is disabled, click to enable it.
Chromebook begins searching for available Bluetooth devices.
- Ensure that your Bluetooth keyboard or mouse is enabled and wait for it to appear in the Bluetooth list.
- Select your keyboard or mouse from the list and follow any instructions for “pairing” them to your Chromebook that appear.
6a. When connecting a keyboard, enter the randomized pin on the keyboard to ensure that it’s the correct device.
Upon successfully pairing your keyboard with your Chromebook, your Bluetooth keyboard assumes all existing keyboard settings, and you can start typing immediately.
6b. When connecting a mouse (optional): After your mouse has been plugged in or paired and Chromebook has identified it, you can configure it to be a “left-handed” mouse — that is, to swap the functionality of the left and right mouse buttons — by following these steps:
- Open the settings panel and choose Settings.
Scroll down to the Device section and select Touchpad Settings.
The Mouse and Touchpad dialog box appears. (See Figure 4-10.)
- Select the Swap Primary Mouse control.
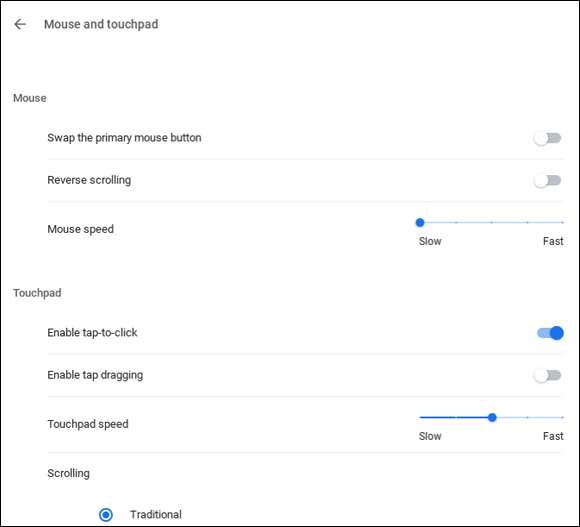
FIGURE 4-10: Configuring a mouse.