Chapter 15
Chatting with Friends and Family
IN THIS CHAPTER
![]() Discovering Google Hangouts for video and text messaging
Discovering Google Hangouts for video and text messaging
![]() Figuring out the Google Duo and Google Voice basics
Figuring out the Google Duo and Google Voice basics
![]() Chatting and texting through the Skype app
Chatting and texting through the Skype app
![]() Using Google Contacts
Using Google Contacts
A stand-up comic mused about the paradigm shift from landline phones to mobile phones, remarking on how calling a phone number used to mean calling a place, but today it means calling a person, no matter where that person is. Fast forward to today. People can now communicate with typed words, audio, and even video, no matter where they are. What a time to be alive.
Google is in transition with its video and text chat apps. Google Hangouts, which has been Google’s video chat service for many years, is being transitioned into two new products, Hangouts Chat and Hangouts Meet. Then there’s Google Duo, a new video chat service that lets you talk with friends and family live, as well as record video messages that recipients can listen to later. Google also offers Google Voice, with text, phone calling, and voice-mail capabilities. This chapter spends time with each of these services.
But Google Hangouts, Duo, and Voice are not the only games in town. Skype is also wildly popular and is available on Chromebooks. With Skype, you can text, have audio and video calls, and even call real phone numbers (as opposed to only Skype connections). You’ll learn how to do texting and video chats with your Skype friends.
All these services run on Chromebooks as well as on Windows computers, Macs, Android phones, and iPhones. You can stay in touch with people no matter where they are.
One more thing: If you want to chat with your friends and family through Hangouts, Duo, and Voice, you need to add them to your contacts. You find out how to do that at the end of the chapter.
Hanging Out with Hangouts
Hangouts is the future of voice calls in the Google world, but it’s so much more than that, too. With Hangouts, you can send messages and make audio and video calls. You can organize group text messaging chats with up to 150 people at one time and organize free video calls for up to ten people.
![]() Hangouts might already be installed on your Chromebook. Here’s how to find out:
Hangouts might already be installed on your Chromebook. Here’s how to find out:
- Open the Google Play Store.
Search for Google Hangouts.
If Google Hangouts is already installed, you see the Uninstall and Open buttons.
If Google Hangouts is not already installed, you see the Install button, as shown in Figure 15-1. Go ahead and click Install to install Duo on your Chromebook.
Click the Install button to install Hangouts.
The Hangouts app is installed on your Chromebook.
Click Open to launch Hangouts.
Hangouts asks whether you want to associate your phone number in your Google profile with the Hangouts app. Doing so permits others to reach you on Hangouts if they know your phone number.
Hangouts next asks whether it can have access to your contacts. Granting it access permits you to easily reach people on Hangouts.
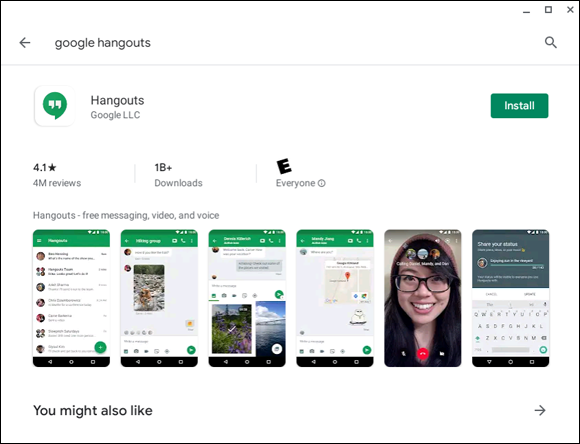
FIGURE 15-1: Installing Hangouts on a Chromebook.
Texting with Hangouts
You can easily send text messages to other Hangouts users. After opening the Hangouts app, follow these steps:
- Click the + (plus sign) symbol near the lower-right corner of the Hangouts window.
Scroll through and select a contact to send a message to.
Hangouts switches to a text conversation mode, as shown in Figure 15-2.
- Type your message where it says Write a Message.
Click the Send button at the lower-right corner of the window.
In this same texting window, you can also initiate an audio call or a video call, as described in the following sections.
Audio calls on Hangouts
You can start an audio call on Hangouts with anyone in your contacts list. To start an audio call, open a texting session as described in the previous section and then click the Call icon near the upper-right corner of the window (refer to Figure 15-2). If your contact has Hangouts on a device, that contact is alerted to your call and can accept it to start your conversation.
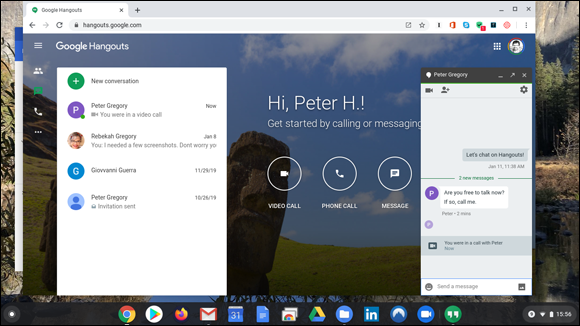
FIGURE 15-2: Sending text messages with Hangouts.
Video calling on Hangouts
Video calling is a natural with Hangouts. As with texting and audio calls, you just open a new conversation window and then click the Video Call icon near the upper-right corner of the Hangouts window, shown in Figure 15-3. Figure 15-4 shows a video call on Hangouts. Each party needs to click the green Click to Join the Video Call button; after they do, they are connected with video and audio.
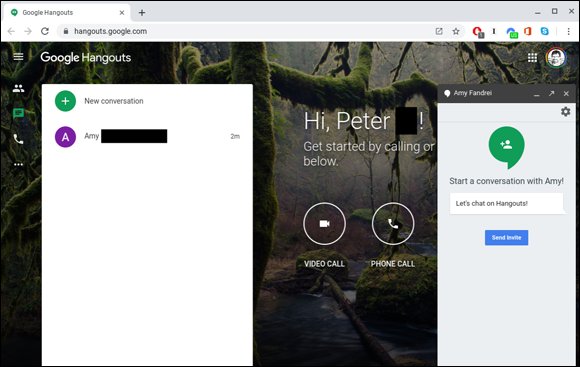
FIGURE 15-3: Selecting a user to chat with on Google Hangouts.
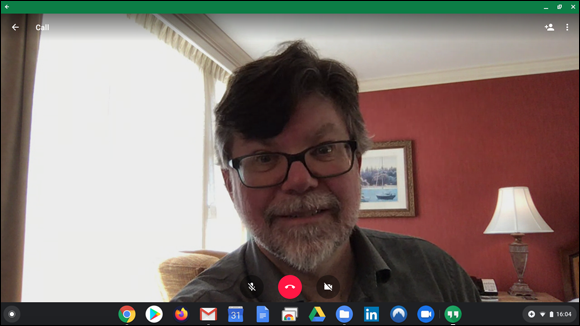
FIGURE 15-4: A video call on Google Hangouts.
To end the call, both parties need to click the red Hangup icon that’s at the bottom center of the window.
Sending photos on Hangouts
While you have the Hangouts conversation window open with a contact, you can tap the Attach Photo or the Take Photo button at the bottom of the conversation window.
When you click Attach Photo, you’re prompted to select the photo (or other type of file, such as a PDF) from your Chromebook. You can also select a file in your Google Drive.
When you click Take Photo, the Camera window opens, and you can take a picture. Hangouts then shows you the photo and sends it to the recipient if you click the blue check box.
Making a phone call with Hangouts
If you don’t want to make a video call, or if you simply want to give someone a ring and don’t have your phone handy, you can call that person by following these steps:
- Launch Hangouts.
Click the Add Telephone link that appears above the Invite button.
The Call a Phone Number dialog box appears.
Enter the phone number you want to call and click Call.
Hangouts calls the number entered.
 If you’re in the United States or Canada, calls to these countries are free. Calls outside the United States or Canada may incur long-distance charges, which are charged to the credit card you have on file with Google Wallet.
Click the icon in the control menu that looks like a video camera with a slash through it.
 The video camera turns off. If you’re making a phone call, you can avoid burning extra battery by having your video camera off.
- Enjoy your call!
- When you’re ready to disconnect, click the Leave Call button at the top of the Hangouts window.
Sharing your screen with Hangouts
Sharing your screen on a hangout is a great way to demonstrate an activity on your Chromebook remotely. Or maybe you just want to show someone a bunch of photos or videos without having to package and email them. Sharing your screen is great for a number of scenarios. You can share your screen by following these steps:
While you’re in an active hangout, click the green Screenshare arrow on the left side of the Hangouts window.
A dialog box appears, asking you to confirm that you want to present your entire screen to everyone participating in your hangout.
Click Share.
In place of your video stream at the bottom-right corner of the Hangouts window, an image of your desktop appears. Anyone who joins your hangout can see your computer screen.
Exit Screensharing mode by clicking the Screenshare icon on the left side of the Hangouts window once again.
The main Hangouts window reappears.
Getting Started with Duo
Like the majority of applications on the Google platform, Duo is a web-based application that makes it easy for you to connect with people all over the world. Duo enables you to video chat or send video messages to other users through Gmail or a slew of Chrome browser plug-ins. With your Chromebook, however, Google has upped the ante by creating an application that resides on your Chromebook and taps into the Duo system, giving you a better experience all around.
Depending on when you purchased your Chromebook, Duo might already be installed, but perhaps not. Here’s how to find out whether you have Duo or to install it if not:
- Open the Google Play Store.
Search for Google Duo.
If Google Duo is already installed, you see the Uninstall and Open buttons.
If Google Duo is not already installed, you see the Install button, similar to Figure 15-1. Go ahead and click Install to install Duo on your Chromebook.
Enter a mobile device number when prompted.
Duo asks you for a mobile number to associate with your Duo account. This association enables people to reach you on Duo if they know your mobile number.
![]() You can launch Duo by opening the Launcher, searching for Duo, and clicking the Duo icon. Duo then displays, as shown in Figure 15-5.
You can launch Duo by opening the Launcher, searching for Duo, and clicking the Duo icon. Duo then displays, as shown in Figure 15-5.
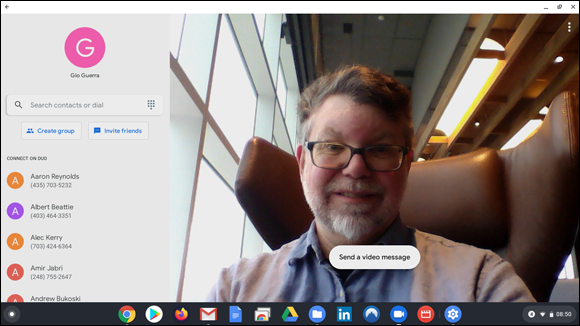
FIGURE 15-5: The Duo home screen.
Recording a video message with Duo
You can record a video message with Duo and send it to one or more recipients. Family members can record video birthday greetings that they send to Uncle Ned, who can then watch the video when he’s online. And, Uncle Ned can watch it more than once. To send a video message, follow these simple steps:
- Open the Duo app on your Chromebook.
Click Send a Video Message.
Duo enters recording mode, but it’s not recording yet. You should see your own live image looking back at you (which may feel a bit creepy if you haven’t done this before).
- When you’re ready to start, tap the red-and-white Record button in the lower center of the window, as shown in Figure 15-6.

FIGURE 15-6: Preparing to record a video message in Duo.
Start speaking your message, and when you’re done, click the Stop Recording button (which is in the same place as the Record button).
Duo plays back the video you recorded, over, and over, and over, until you proceed to the next step.
Click Next.
Duo shows your contacts.
- Select one or more recipients on the left by clicking each of them, one at a time.
Click the blue Send button at the bottom center of the window.
Duo sends your video message to your recipients.
When searching your contacts to send a video message, if you see their name and number beneath Connect on Duo, you can proceed and send them a message. If, however, the word Invite appears next to their name, this means that they are not yet using Duo. You can click Invite, which sends them a message and invites them to install and set up Google Duo. After they have done so, you and your contact can send video messages or chat on live video.
Video messages sent by Duo expire in 24 hours. You can watch it as much as you like, but after 24 hours, it will be gone.
The procedure for sending an audio message is the same as for a video message. Before you start recording your message, click Voice just below the Record button. Then, just like a video message, click Record, speak your message, click Stop, and then select your recipients.
Voice and video chatting with Duo
With Duo, you can place live video calls to anyone in the world who also has the Duo app and reasonably good Internet access. Best of all, it’s free! To start a live video call, follow these steps:
- Start the Duo app.
- Scroll through your contacts (or search, if you have a lot of them).
- When you find the desired contact, click him or her. The contact information appears, as shown in Figure 15-7.
Click Video Call.
The recipient’s computer (whether a Chromebook, Android phone, iPhone, Mac, or PC) notifies the recipient of the incoming call.
If the recipient accepts your incoming call, you are connected via video and audio, and your call can begin, as shown in Figure 15-8.
When you’ve finished your call, you or the other party clicks the End Call button at the bottom center of the window.
If you don’t see the End Call button, just give your touchpad a nudge and the calling controls, including End Call, appear.
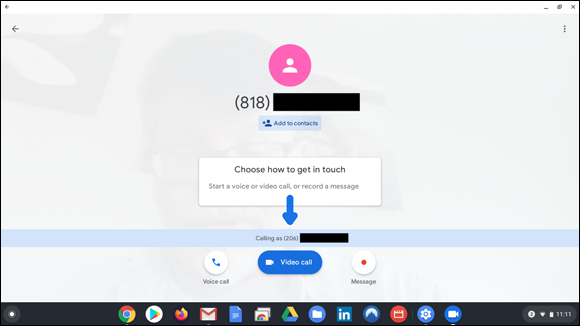
FIGURE 15-7: Displaying a contact in Duo in preparation for a video or voice call.
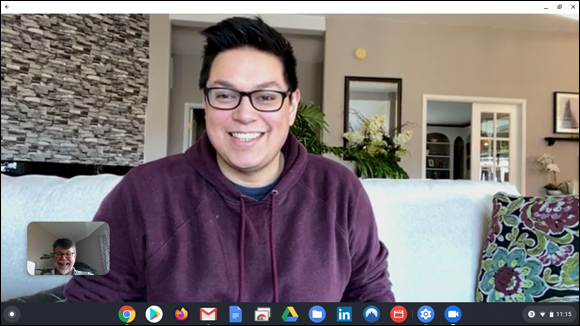
FIGURE 15-8: Video chatting with Duo.
Calling and Texting with Google Voice
Google provides a lot of choices when it comes to communicating with others. Another nifty service is Google Voice, which lets you make phone calls and send and receive text messages using a new “virtual” phone number.
Setting up Google Voice
Follow these steps to get started with Google Voice:
Go to
https://voice.google.comwith your browser.The main Google Voice website launches. You can scroll down to read all about Google Voice to see if this is something you’re interested in trying out.
- Click the For Personal Use button to proceed.
A menu appears in which you select Android, iOS, or Web. If you’re on your Chromebook, select Web.
You can use Google Voice on any of these devices.
The Welcome page appears.
Click Continue.
The Choose a Google Voice Number screen appears. In the search field, type in a city name or area code.
A list of available numbers appears.
Click Select on a number you want to use.
The verification process begins.
Click Verify and follow the instructions.
You need to provide a real phone number (landline or mobile). Google then sends a code (via text or a phone call), which you type in to the Verify field to complete the process.
After you set up your Google Voice account, it’s available on all your devices, including Windows laptops, Macs, Android phones and tablets, iPhones, iPads, and, oh yeah, Chromebooks. You can send and receive phone calls, receive voice mail, and text and receive text messages, all via the web or Google Voice apps.
On your Chromebook, after your Google Voice account is set up (and after you’ve been using it for a while), your main window will resemble Figure 15-9.
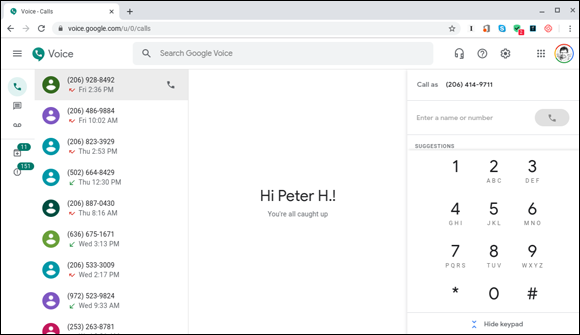
FIGURE 15-9: The Google Voice main screen.
Sending text messages with Google Voice
Sending text messages with Google Voice is easy; just follow these steps:
From the Google Voice main window, click the Messages button near the upper-left corner.
Your history of recent messaging appears in the left side of the window.
Click Send New Message.
The cursor moves to the To field in which you can begin typing in a person’s name. A list of suggestions will appear that you can scroll through and select.
Select a recipient from the list or enter a new phone number.
If you’ve exchanged messages with this person before, the message history appears.
- Type a new message in the Type a Message field at the bottom of the window.
Click the Send icon to send the message.
The Send icon is to the right. Messages you send, and messages sent to you, appear in the main window.
You can send and receive messages in Google Voice with other Google Voice users, as well as any mobile phone numbers.
Making a call with Google Voice
Although making phone calls with Google Voice simple, here are the steps:
From the Google Voice main window, click the Call button near the upper-left corner of the window.
A list of recent calls appears on the left side of the window. A dial pad appears on the far right.
Select a recipient from your contacts by typing a name or number in the Enter a Name or Number field. Or tap the numbers on the keypad to call a number that is (or is not) in your contacts list.
The recipient’s phone rings. If the recipient accepts the call, you can begin talking.
- Tap the hangup icon to end the call.
Other Google Voice features
All the features of Google Voice could easily fill an entire chapter, but in this section, I just give you a few pointers to other features that I enjoy with my Google Voice account:
- Voice mail: People can call you and leave voice mail if you don’t pick up. Google Voice can send you an email (or text) transcript of the voicemail message.
- Call screening and pick-up: When someone calls your Google Voice number, you can have that incoming call ring on one or more of your phones simultaneously. You can pick up the call, and Google Voice will tell you who is calling. You can accept the call or send it to voice mail. If you send the call to voice mail, you can listen to the caller’s message while the caller is still talking, and you can even pick up the call in progress and talk live if you want.
- Calls on any device: You can send and receive calls with your Google Voice number on any device on which you have the Google Voice app installed. This includes mobile phones, tablets, laptop computers, and desktop computers.
- Call schedules: People can call your Google Voice number 24 hours a day, but you can set a schedule so that your mobile and landline phones don’t ring during certain hours.
You can explore many other features and settings by clicking the Settings button near the upper-right corner of the Google Voice window.
Communicating with Skype
Skype was the first highly popular worldwide chat and video chat services in the world. Founded in 2003, Skype catapulted to fame through its ease of use and the fact that you could make free Skype voice calls to anyone in the world who also had Skype and a decent Internet connection. By 2010, Skype had hundreds of millions of users.
Skype is now part of the Microsoft ecosystem. It is available on Chromebooks, as well as practically every other kind of device out there: Windows PCs, Macs, Linux, Android phones and tablets, iPhones, iPads, and more.
Although Hangouts and Duo are a part of the Google family of apps, Skype is clearly the world’s leader in chat and video chat. Chances are, you have more friends using Skype than anything else.
Getting started with Skype
![]() To get started with Skype, head on over to the Web Store and search for Skype. You’ll find that Skype is offered as a Chrome browser extension, as shown in Figure 15-10. Click Add to Chrome to install it.
To get started with Skype, head on over to the Web Store and search for Skype. You’ll find that Skype is offered as a Chrome browser extension, as shown in Figure 15-10. Click Add to Chrome to install it.
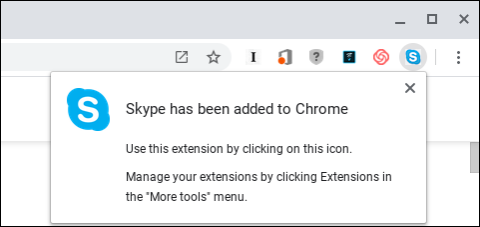
FIGURE 15-10: The Skype icon appears within the Chrome browser.
To launch Skype, click the Skype logo in the Chrome browser. A little window appears, asking whether you want to launch Skype or share on Skype. Click Launch Skype. After you launch Skype, the main Skype window appears, as shown in Figure 15-11.
If you are using Skype for the first time, you’re taken through the new account process in which you provide some information such as your name, email address, and phone number. You’re prompted to create a Skype ID, which is a set of characters without spaces. After you enter what you want for your Skype ID, Skype tells you whether it is available; if so, you can proceed; if not, you can try other names until you find one that hasn’t been used.

FIGURE 15-11: The main Skype window.
SkypeIDs are like personalized license plates. You need to keep trying until you find a name that hasn’t already been taken. All the good names are gone until you come up with something new and clever.
Adding Skype contacts
Before you can send messages or have video chats on Skype, you need to add people to your Skype contacts by sending a contact request. Follow these steps to add Skype contacts:
- In the main Skype window, click Contacts (near the upper-left corner).
In the Skype Contacts window, click + Contact.
The Add a New Contact window opens, as shown in Figure 15-12.
Enter the Skype contact name in the Find People field.
After the contact approves your request, you have a new contact in Skype!
It works the other way around as well. If you send someone your Skype ID, that person can add you as a contact, and you then receive a Skype message asking whether you would like to connect with the person. Click Block if you do not want to connect, or click Accept if you do want to connect.
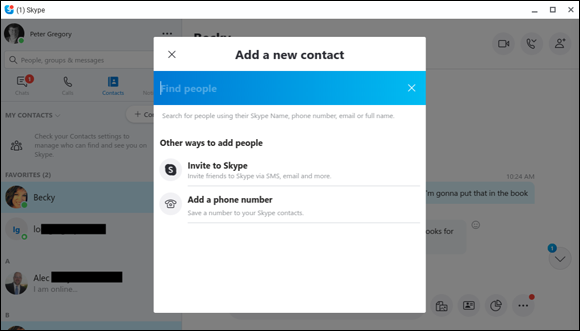
FIGURE 15-12: Adding a contact to Skype.
Sending text messages with Skype
To send a message to a Skype user, follow these steps:
In the main Skype window, click Chats to go to the Chat window.
(There’s no harm in clicking Chats if you’re already there.)
Click a contact you want to chat with.
The Chat window occupies the right two-thirds of the Skype window.
Start typing messages near the bottom of the Chat window where it says “Type a message.”
Your messages appear on the right side of the window, and your contact’s messages appear on the left side. As you continue chatting, your conversation rolls off the top of the Chat window. You can scroll through the message history to see older messages. Figure 15-13 shows a Skype texting conversation.
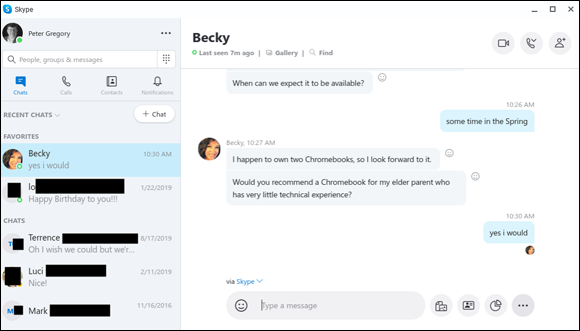
FIGURE 15-13: Text messaging with someone using Skype.
Chatting on Skype video
Skype is great for live video chats as well. Skype is so easy to use that you probably don’t even need me to tell you how to proceed, but here goes anyway:
- In the main Skype window, click Chats.
- Click the contact with whom you want to have a live video chat.
Click the Video Call button near the upper-right corner of the window.
If your contact’s Skype app is running, it plays a little tune that’s distinctive to Skype, signaling your incoming call.
- After the contact accepts the call, you can see and hear each other. (See Figure 15-14.)
When you’re done with the call, hang up by clicking the red button with the phone icon.
If the other party disconnects first, you need not take any action; the call automatically disconnects.
You can also chat on Skype using audio only by clicking the Audio Call button to the right of the Video Call button. (It looks like an old-fashioned telephone handset.)

FIGURE 15-14: A live video chat using Skype.
Working with Google Contacts
Google Contacts is just that: a list of the people you communicate with, via email, video, text, and even good old-fashioned snail mail. Google Contacts is your online address book, accessible from all your devices and from any other device (such as a hotel kiosk computer) when you log in to Google services.
![]() Google provides no separate app for your contacts; instead, you just point your browser to
Google provides no separate app for your contacts; instead, you just point your browser to https://contacts.google.com/. You see the Contacts main window, as shown in Figure 15-15.
Adding contacts
You can easily add a contact to Google Contacts by clicking the Create Contact button found near the upper-left corner of the Google Contacts window. A new window appears, as shown in Figure 15-16, where you can fill in the contact’s name, phone number, email address, and other details.
Viewing and editing contacts
To browse your contacts in Google Contacts to see whether you already have a certain contact there, start typing the contact’s name in the Search field. As you type, Google Contacts displays contacts just below the search bar. If any of the visible contacts is the one you are looking for, you can click it to view it.
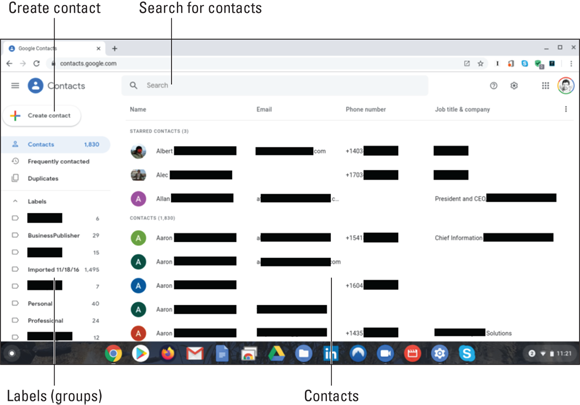
FIGURE 15-15: The Google Contacts main window. The author’s personal contacts are redacted for privacy.
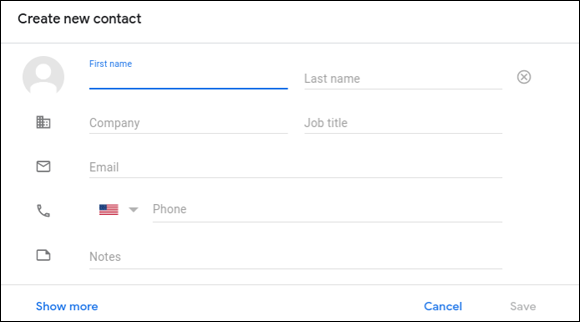
FIGURE 15-16: Adding a new contact with Google Contacts.
To edit a contact, click the pencil icon in the window where the contact appears, as shown in Figure 15-17. You can now update any of the existing fields or add new information. When you’re done making changes, click Save. If you think you messed up, click Cancel.
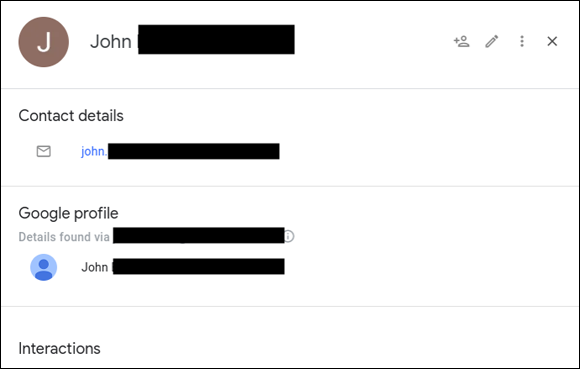
FIGURE 15-17: Updating contact details with Google Contacts.
If you have contacts with whom you frequently correspond or otherwise need to refer to from time to time, you can add them as favorites, which causes them to go to the top of your contacts list. Just click the star next to the contact.