Chapter 17
Customizing Your Chromebook
IN THIS CHAPTER
![]() Customizing and adding displays
Customizing and adding displays
![]() Adjusting the shelf
Adjusting the shelf
![]() Connecting Bluetooth devices
Connecting Bluetooth devices
![]() Configuring the touchpad
Configuring the touchpad
![]() Managing notifications
Managing notifications
Chromebooks are made to be easy to use. Out of the box, a Chromebook user can be up and running in less than five minutes. By default, the features and functionality of a Chromebook make the user experience top-notch without much customization. However, Google recognizes that all people are different. Although Google’s user-experience designers are some of the best in the world, the way people use technology isn’t a one-size-fits-all proposition. For that reason, you can customize several look-and-feel aspects of your Chromebook.
In this chapter, you learn how to customize your display with your own wallpaper images, change the resolution of your display, and add a monitor to your Chromebook. You also find out how to customize the appearance and position of your shelf. Also, I explain how to manage notifications so that you can stay informed about what’s happening in your Chromebook.
Customizing Your Display Settings
Out of the box, your Chromebook’s default settings are what the manufacturer found to be the ideal settings for viewing, computing, and so on. Your display defaults to the best screen resolution. Your Chromebook likely also comes with some standard background images, called wallpaper, that you can use to change the look of your desktop area. However, if you would like to customize your display so that it better matches your taste, you can do so in several ways.
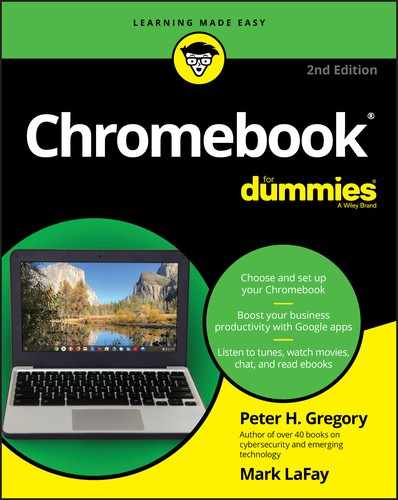
To view your settings, go to the Settings menu. Click the Settings area in the bottom-right corner of the shelf, which reveals a list of options — the Settings panel — and choose Settings — the little gear-like icon.
Changing your wallpaper
When you start your Chromebook, the image that fills your desktop background is called wallpaper. Your device manufacturer provides several options for wallpaper that you can try. You also have the option to change the wallpaper to almost any photo that you desire. To change your Chromebook wallpaper, follow these steps:
Open the Settings panel on the shelf and choose Settings.
Your Chromebook Settings window appears, as shown in Figure 17-1.
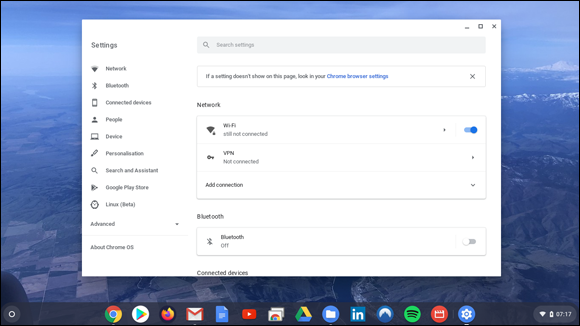
FIGURE 17-1: The Chromebook Settings window.
- Click Personalization on the left side.
Click the Wallpaper button in the Personalization section.
The Settings window minimizes, and the Wallpaper window appears. Available images and options are displayed, as shown in Figure 17-2.
Your Chromebook has an extensive library of images that are available in several categories, listed on the left side of the window.
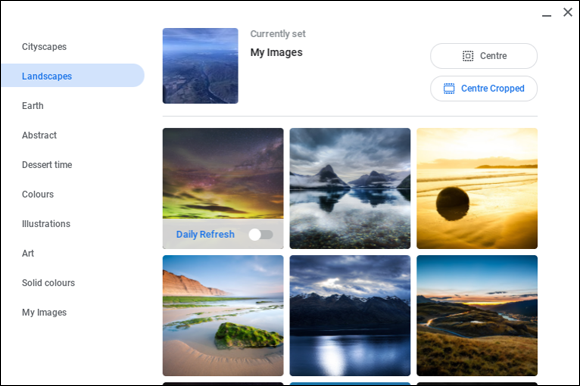
FIGURE 17-2: Chromebook’s wallpaper browser.
- If you have an image of your own that you would like to use, click My Images in the lower-left corner of the Wallpaper selection window to view your own images.
Select the desired wallpaper image by clicking the image.
Your Chromebook’s wallpaper changes to match your selection.
 In each of the image libraries already on your Chromebook, note that in the first image, you can click the Daily Refresh selector to display a different image from that collection every day. Variety is the spice of life!
Click the X in the top-right corner of the Wallpaper window.
The window closes and the Chromebook Settings window reappears.
Changing your screen resolution
Screen resolution, simply put, is the measure of the sharpness and clarity of the image displayed on your screen. Resolution is expressed in terms of horizontal rows and vertical columns of pixels. A pixel is a tiny area of illumination on a display. Think of each pixel as a dot that can vary in color and brightness; together, all these dots make up the images you see on the screen. For instance, the typical flat-screen television may have a resolution of 1920 x 1080, which means that the image is 1920 pixels wide and 1080 pixels tall. When you increase or decrease your resolution, the physical size of your screen doesn’t change. What changes is the number of pixels you’re packing into that physical area. High resolution equals more pixels, which equals greater clarity.
Now that you have a general idea of what screen resolution means, customize your Chromebook’s screen resolution by following these steps:
Open the Settings panel on the shelf and click Settings.
Your Chromebook Settings window opens.
- In your Chromebook Settings window, click Device on the left side of the window.
In the Device section, click Displays.
The Displays Settings window appears, as shown in Figure 17-3.
FIGURE 17-3: The Chromebook Displays Settings window.
- Scroll down to the Internal Display section (refer to Figure 17-3).
Scroll the Display Size slider back and forth to choose a new resolution.
As you scroll, the resolution (the horizontal and vertical pixel count) is indicated.
Your Chromebook display automatically adjusts to match your selection. Figure 17-4 shows what the screen might look like at an extremely low resolution. Such a setting makes it easier for the elders among us to read text on the screen easily.
When you’re satisfied with your selection, click the X located in the top-right corner of the window.
The Chromebook Settings window closes.
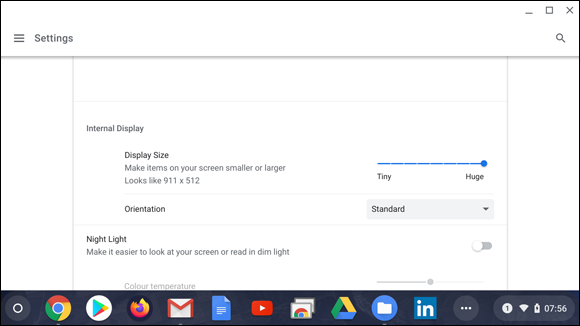
FIGURE 17-4: Chromebook’s display with a low resolution.
Using the Night Light feature
Many laptop computers, tablets, and smartphones are now equipped with a “night mode” display setting. This setting lowers the color “temperature” of the display from a bright blue-white to a yellow-ish display. The science behind this feature is related to how the human brain interprets bright white light. The brain thinks it’s sunlight. If you are using your device late at night, your brain might think it’s daytime, and consequently, you could have trouble falling asleep. (In other words, bright smartphone and laptop displays are the new caffeine.) The night mode, called Night Light on a Chromebook, automatically adjusts your display color so that it appears more yellowish (akin to candlelight or firelight) at night.
Night Light does not adjust the actual brightness of the display, but rather its color temperature. Follow the steps below, and you’ll see what I’m talking about:
- Click Settings on the shelf and then click Device on the left side of the Settings window that appears.
- Click Displays and then scroll down until the Night Light section appears, as shown in Figure 17-5.
Click the Night Light selector.
The screen’s color shifts into the yellow color spectrum.
Use the Color Temperature slider to adjust the degree of color shift.
Setting the slider all the way to the Cooler setting is like having no Night Light set at all.
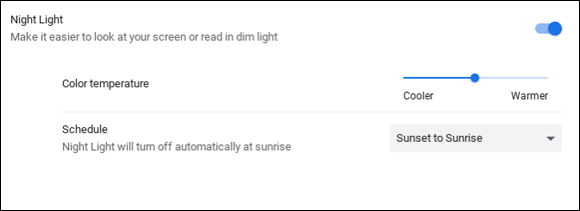
FIGURE 17-5: Use the Chromebook Night Light settings to configure night mode for your display.
Set the schedule for Night Light.
The default setting is Sunset to Sunrise (which is adjusted to your time zone and latitude), but you can set a Custom Schedule in which you specify the time of day that the Night Light turns on and off. By default, the Custom Schedule is set to On at 6 p.m. and Off at 6 a.m. When creating a Custom Schedule, move the slider to the desired times.
Using an external display
Working with a laptop all day long can result in eyestrain for some people. Thankfully, you have the option to use an external display device with your Chromebook. To add and customize an external display device, follow these steps:
Locate the display (HDMI) port on your Chromebook.
The majority of Chromebooks on the market come with at least one HDMI port, such as the one shown in Figure 17-6.

FIGURE 17-6: A Chromebook HDMI display port.
- Ensure that your external display device is powered on.
Connect the external display device to your Chromebook using an HDMI cable.
Your Chromebook screen may flicker briefly as it auto-configures the new display. At length, the external display device shows the image from your Chromebook.
You can now begin working from your Chromebook using both screens.
If you have a flat-screen television, you can also connect your Chromebook to your TV for an extra-large display. This capability can be great for viewing your pictures, movies, YouTube, and so on.
An external monitor can work with a Chromebook in two ways:
- Mirrored: This means that everything you see on your Chromebook display is shown on the external display. The external display is a “mirror” of your Chromebook display.
- Extended: This means that the external monitor represents additional (“extended”) space to show apps and windows.
To switch between mirrored and extended display as well as to change other settings, follow these steps:
Open the Settings panel on the shelf and click Settings.
Your Chromebook settings appear.
Click Device in the left margin of the Settings window and then click Displays.
The Displays Settings window appears, as shown in Figure 17-7, and you see the Arrangement configuration, where your two (or more) displays are shown side-by-side in the Displays Settings window.
The Arrangement configuration allows you to choose whether your external display is mirrored or extended.
To change this, select or deselect the Mirror Internal Display check box.
When you change the display, a notification appears, like the one shown in Figure 17-8.
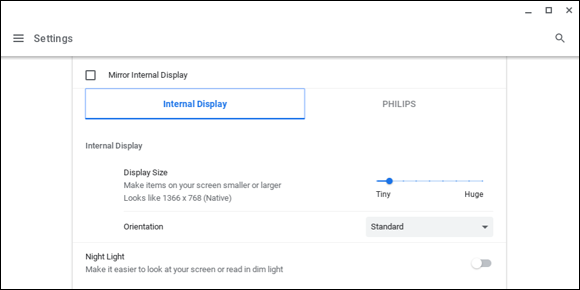
FIGURE 17-7: Manage the arrangement of multiple displays.
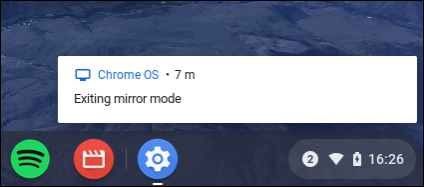
FIGURE 17-8: Chromebook tells you when you’ve entered or exited Mirror mode.
(Optional) If you chose not to mirror the displays, configure the arrangement of the two monitors by dragging the depictions of the displays to match the orientation of the actual displays.
Configuring the arrangement of the representative monitors allows you to logically arrange how your physical monitors work in relation to one another. For example, if your external monitor is to the left of your Chromebook, you can drag the little boxes representing the displays so that their orientation on the screen resembles their physical orientation, which comes in handy is when you move the mouse pointer between the two displays. When the displays on the Arrangement configuration screen are arranged like the actual displays, the mouse pointer can move smoothly from one display to the other.
You can also adjust the resolution of an external display. To do so, follow these steps:
- Open display settings, as in the previous procedures in this section.
In the Arrangement section, click the external display symbol and then scroll down past the Arrangement section.
The configuration settings for the external display appear, as shown in Figure 17-9. In this section, you can adjust the resolution (the number of rows and columns of pixels), the size of text that appears in windows and apps, and whether your external display is oriented in the usual way, or whether the display is rotated 90, 180, or 270 degrees.
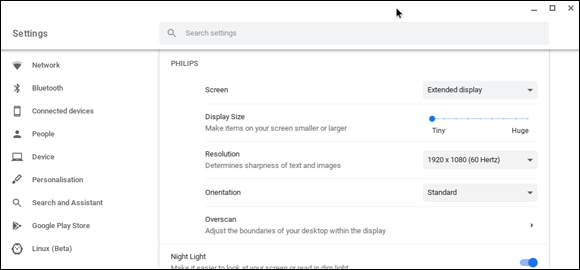
FIGURE 17-9: Configuring an external display.
If the image on the external display is too big or too small, click Overscan to open the Overscan section of the display configuration settings.
Symbolic arrows appear on the external display to assist in this effort, as shown in Figure 17-10.

FIGURE 17-10: Configuring the Overscan setting to correct external display positioning.
- Press the arrow keys on your keyboard to adjust the image size and position.
- To accept your changes, click OK; to ignore your changes, click Reset.
 Your external monitor might also have settings to adjust the size and position of the image on the screen. Consult your monitor’s owner’s manual for more information.
Mirroring your Chromebook display onto an external display device is helpful when presenting or demonstrating a task to a larger audience. Display devices can be televisions, monitors, or even projectors.
Customizing Your Shelf
The shelf is the home base for controlling what happens on your Chromebook. By default, the shelf is located along the bottom of your screen. Your app menu (similar to the Start button on a Windows PC) appears on the left side of your shelf. Next to the Launcher icon are shortcuts to your favorite apps. You can find your notification panel and status area on the right side of your shelf. (Flip to Figure 2-1 in Chapter 2 to take a quick look at these elements.)
Hiding your shelf
By default, your shelf is always visible on the screen. You can, however, set the shelf to be hidden when you’re not using it. To auto-hide your shelf, follow these steps:
- With the pointer somewhere on the wallpaper, Alt-click (or two-finger tap).
- In the pop-up menu that appears, select Autohide Shelf.
Whenever you launch an application, the shelf hides to give you more usable space on your screen. To reveal the shelf when you’re working in a browser window, simply move your pointer so that it hovers over the shelf area at the bottom of the screen, and it will reappear.
Changing the position of your shelf
By default, your shelf is located along the bottom of your screen. To move the shelf to the left or right side of your screen, follow these steps:
- Alt-click (or two-finger tap) the background of your Chromebook.
In the menu that appears, hover your cursor over Shelf Position.
A submenu appears, as shown in Figure 17-11.
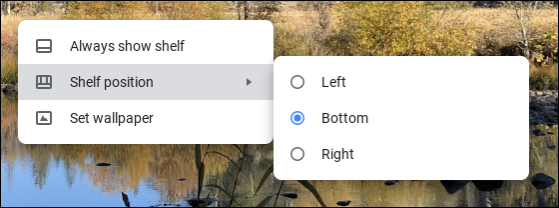
FIGURE 17-11: Relocating the shelf.
Select the option that corresponds with the side of the screen to which you’d like to move your shelf.
The shelf relocates to the designated side, as shown in Figure 17-12.
If the shelf is located at the bottom of the screen and contains a lot of app icons (as mine does), they won’t all show if you move the shelf to the left or right side of the screen. This spillover is indicated by an icon displaying three dots. Click this icon to make the remainder of your app icons appear.
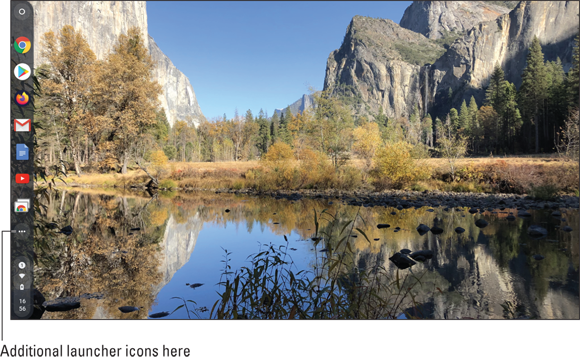
FIGURE 17-12: The shelf on the left side of the display.
Connecting Bluetooth devices to your Chromebook
Bluetooth, which has saved the world from the tangle of headphone and speaker wires, is a wireless protocol that you can use to connect devices together up to a distance of 30 feet apart.
You connect Bluetooth devices through a process known as “pairing.” To connect devices together, both need to be put into “pairing mode,” which allows them to make a new connection. It’s like introducing a couple of your friends on a blind date: You introduce them to each other, and from then on, what happens is up to them.
The kinds of devices you can connect to your Chromebook include speakers, headphones, earbuds, and external pointing devices such as a mouse or trackpad. Other more specialize devices qualify as well, such as those little tags that you put on your keychain after you misplaced them — again. (In my household, we also have one of those little automotive diagnostic plugs that you plug into the diagnostic port of your car so that an app on a smartphone or Chromebook can read the codes and give us an idea of how our car is feeling today.)
![]() To connect a Bluetooth-enabled device to your Chromebook, follow these steps:
To connect a Bluetooth-enabled device to your Chromebook, follow these steps:
Click the Settings area on the shelf and then click the Settings gear.
The Chromebook settings window opens.
Click Bluetooth in the Bluetooth section.
The Bluetooth settings window opens. Look to see whether the word Off or On appears just below the Bluetooth logo.
- If Bluetooth is off, turn it on by clicking the Bluetooth logo.
Read the instructions, if necessary, for the device you’re using to learn how to put it into pairing mode.
Pairing a device often involves holding down its Power button, or another button, for some seconds.
- When the device’s name appears under the Unpaired Devices heading, as shown in Figure 17-13, click it.
- If your Chromebook and the device agree to pair, the device name and the word Connected appear under the Paired Devices heading, as shown in Figure 17-14.
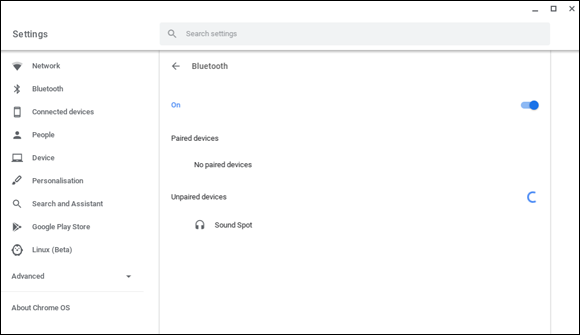
FIGURE 17-13: Getting ready to pair a Chromebook to a Bluetooth device.
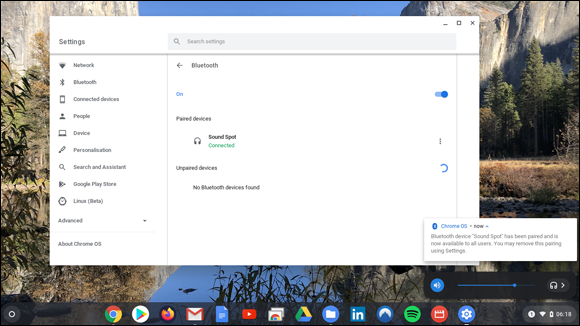
FIGURE 17-14: Chromebook has successfully paired with a Bluetooth device.
In the future, your Chromebook should automatically pair with the same device if both are turned on and near each other, and if Bluetooth is active on your Chromebook.
Later on, to disconnect a device, you can just turn it off. Or you can turn off Bluetooth on your Chromebook. Yet another way is to go into the Bluetooth Settings window, click the device name, and click Disconnect. If you want your Chromebook to forget about your device forever, click the device in the Bluetooth Settings window and click Remove From List.
You may notice the little spinning circle on the Bluetooth Settings window beneath the Unpaired Devices heading. This signifies that your Chromebook is always listening for new Bluetooth devices. New, unfamiliar devices are listed in the Unpaired Devices section, whereas known (previously paired) devices are automatically paired if they are unpaired and powered on.
In my experience, some Bluetooth devices are rather friendly and pair and re-pair easily, whereas others are cranky or even cantankerous, at which time I have to tell my Chromebook to forget about a device entirely and re-pair it as though I’d never used it before. Some devices just don’t know how to get along.
You can also control Bluetooth on your Chromebook in the Settings window on the shelf, as shown in Figure 17-15. Click the Bluetooth logo to turn Bluetooth on and off. Click below the logo to pair or unpair known devices.
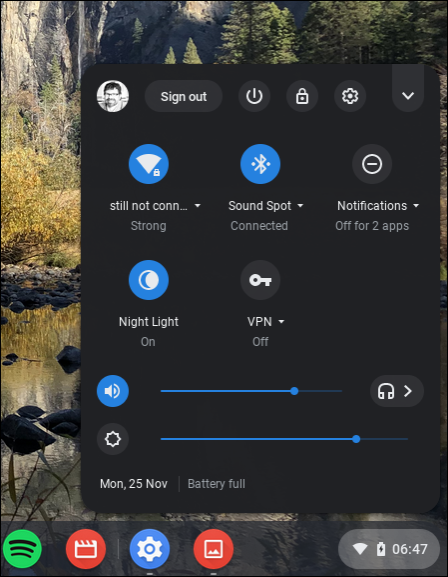
FIGURE 17-15: Configuring Bluetooth right in the Shelf Settings window.
Managing Notifications
A lot can go on “under the hood” of your Chromebook, and your Chromebook can get rather chatty in telling you about it through notifications. Some of these notifications might just be noise to you, but others are potentially useful. Sometimes the noise is so loud that you might feel like foregoing notifications altogether; however, a few are vital, such as for software updates.
Notifications are the messages that appear on the lower-right side of the Chromebook display — and sometimes they can run all the way to the top-right side of the display!
To close individual notifications, click the tiny X in the upper-right corner of the notification, as shown in Figure 17-16. To manage notifications settings, follow these steps:
- Open the Settings window on the shelf.
Click the word Notifications that appears beneath the Notifications logo.
A window showing a list of apps appears, as shown in Figure 17-17. Note that the list might be longer than the display window; scroll through the list to view apps that can send notifications.
To prevent an app from sending notifications, deselect the check box next to its name.
For example, if you don’t want the Chromebook’s camera app to notify you every time you take a picture, deselect the box next to Camera.
To temporarily suspend all notifications, click the Do Not Disturb selector.
You can also click the Notifications logo in the Shelf Settings window. Great shortcut, right?
To turn notifications back on, click the Do Not Disturb selector again.
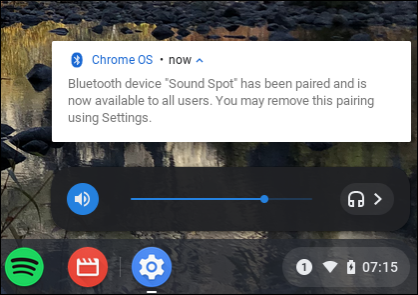
FIGURE 17-16: A notification on the Chromebook display.
Here’s a nice shortcut for Notifications: On the shelf to the left of the clock, battery, and Wi-Fi symbols, a small, white circle with a number in it appears if you have notifications waiting. (See Figure 17-18.) If you click that circle, the Shelf Settings window appears, and the notifications appear above it.
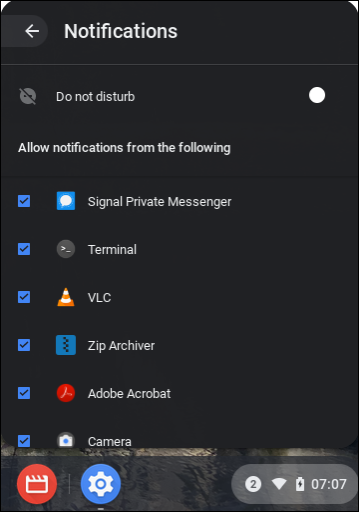
FIGURE 17-17: Configuring notifications settings on a Chromebook.
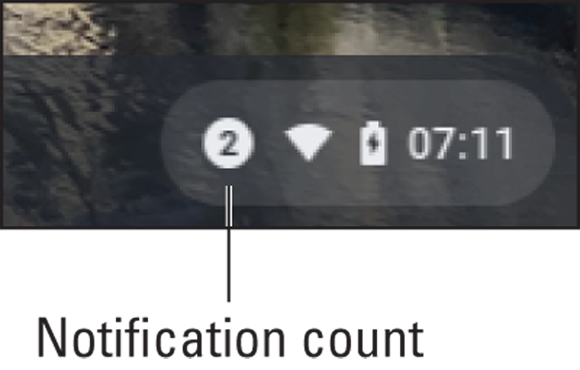
FIGURE 17-18: See how many notifications are waiting for you to view them.
Configuring Your Touchpad
Unless you have a touchscreen Chromebook and you use the touchscreen for all your interactions, the touchpad is the main way for you to interact with your Chromebook. You use it to open apps, click buttons and selectors, and move the cursor about on a web page. The touchpad has a few settings that you may want to explore to see whether you prefer different ways of using it.
To configure the touchpad, follow these steps:
Click the Settings area of the shelf and then click the Settings icon.
The Chromebook Settings menu opens.
- Click Device in the left margin of the Settings window.
In the Device section, click Touchpad.
The Touchpad window displays, as shown in Figure 17-19, with the following settings:
- Tap-to-Click: This is one of my favorite features. When you enable this feature and then have the pointer over a button or a link, a single tap on the touchpad works the same as clicking in the lower-left corner of the touchpad (which offers an audible and tactile click). To enable Tap-to-Click, click the selector.
- Tap-dragging: This is an easier way to use drag-and-drop. Enable it by clicking the selector.
- Touchpad speed: This feature determines how fast the pointer moves about the screen when you slide your finger across the touchpad. Click anywhere on the slider to see how this works; it takes immediate effect.
- Scrolling: You can set scrolling to be traditional, or “Australian,” which sets scrolling to work in the opposite direction to your scrolling gesture on the touchpad.
- When you are done with your Touchpad settings, close the window by clicking the X.
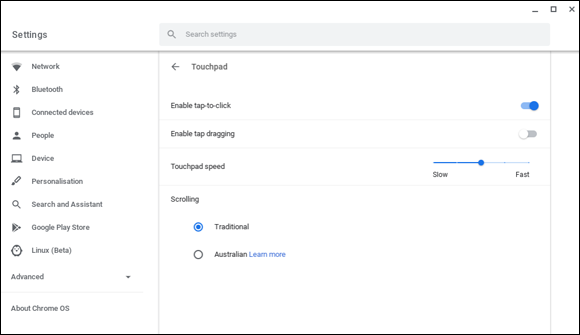
FIGURE 17-19: Configuring the Chromebook touchpad.