Chapter 11
Using Other Office Tools
IN THIS CHAPTER
![]() Using Microsoft Office Online apps
Using Microsoft Office Online apps
![]() Using emailing and the calendar with Microsoft Outlook
Using emailing and the calendar with Microsoft Outlook
![]() Using iCloud office tools
Using iCloud office tools
![]() Storing data in the cloud with OneDrive and iCloud
Storing data in the cloud with OneDrive and iCloud
![]() Displaying and commenting on PDF files with Adobe Reader
Displaying and commenting on PDF files with Adobe Reader
Google has made tremendous headway with its suite of office products: Gmail for email, Docs for word processing, Sheets for spreadsheets, and Slides for presentations. These are popular both in business as well as with home users. And, as previous chapters note, they all work great on Chromebooks. That said, you may have your reasons for considering and using alternatives.
The undisputed leader in office software around the world in business, schools, and homes is Microsoft Office, whose powerhouse programs include Outlook for email, calendar, and contacts, Word for word processing, Excel for spreadsheets, PowerPoint for slide presentations, OneNote for note-taking, Skype for collaboration, and OneDrive for storing data in the cloud. These tools are all available in the Office suite. They are also available for Chromebooks, and they work great on Chromebooks as well as Windows PCs and even Macs.
For the average user, it's fair to say that Microsoft Office and Google’s suite of tools are roughly equivalent in terms of features and functions. How you get things done varies a bit between the two. But if you are reasonably good at Google Docs, for instance, you’ll require no time at all to be productive with Microsoft Word. The same can be said of Sheets versus Excel and Slides versus PowerPoint. Only a professional user will spot the differences, but for everyone else, Google versus Microsoft is a little bit like Coke versus Pepsi, Ford versus Chevy, or the Yankees versus the Mets. They’re all good and they get the job done.
In this chapter, you dive into the Microsoft Office Online world, including installing and using all the tools. I don't go into as much detail on the Microsoft Office tools as I do the Google tools (Gmail, Docs, Sheets, Slides, and Drive) in other chapters, but I show you enough to get started. If you are using Office tools on your Chromebook, I recommend you pick up a copy of Office 2019 All-in-One For Dummies, by Peter Weverka as well as Office 365 All-In-One For Dummies, by Peter Weverka and Timothy L. Warner.
But wait! No, I’m not about to try to sell you Ginzu knives, but you do have even more choices to consider. This chapter looks at Apple’s iCloud suite of office tools as well. Yes, Virginia, you can run Apple iCloud apps on a Chromebook. Oh, and the chapter covers about using Adobe Reader for reading, inserting comments, and signing PDFs.
Getting Started with Office Online
![]() To get started with Office Online, make sure that you’re logged into your Chromebook. Open your Chrome browser and go to
To get started with Office Online, make sure that you’re logged into your Chromebook. Open your Chrome browser and go to https://www.office.com/.
As with Google’s suite of tools, you can use the basic version of Office Online for free. Office Online includes 5GB of free storage in OneDrive and versions of Word, Excel, and PowerPoint. The information offered in this chapter deals mainly with the use of a free account.
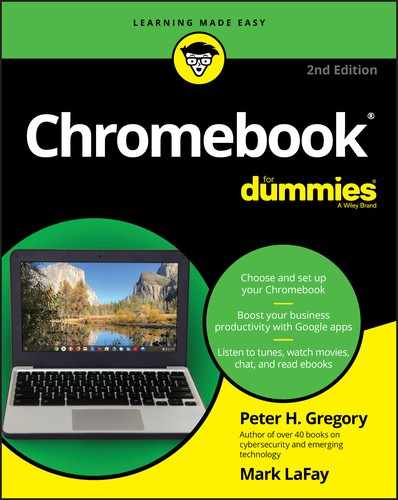
If you don’t have a Microsoft Office account, this is a good time to create one. You need to use the free or the paid versions of Office. To create a Microsoft account, go to https://www.office.com/ and click the Sign In link. Then, find the link to create an account. Your email address will be your user ID (even if it’s a Gmail address), and you need to create a password and answer some other questions. After your account is set up, go back to www.office.com and sign in. After signing in with your new account, you see the Office Online home page, shown in Figure 11-1.
 As any good for-profit company would, Microsoft will try to convince you to go with one of the paid versions of Office 365 instead of Office Online. It is unnecessary to get a paid account unless you know for certain that you require features that are available only with the paid versions.
If you use Office Online, you want to bookmark the landing page because this page is where you begin. On the landing page, you can access all the free Office Online tools, which I briefly explore in this section.
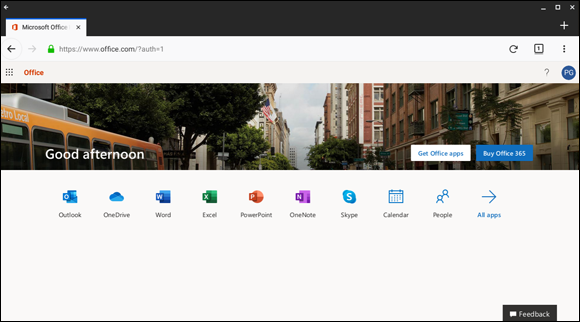
FIGURE 11-1: The Microsoft Office main page.
Verifying your Office account
As soon as you begin some operation in Office Online (sending your first email, for example), you are asked to verify your account. Office Online asks for your mobile number so that it can send you a code to enter. This safeguard helps to prove that you are logging in to your Office account rather than some hacker who luckily guessed your user ID and password (or obtained them in some other way). Figure 11-2 shows an example of a verification screen.
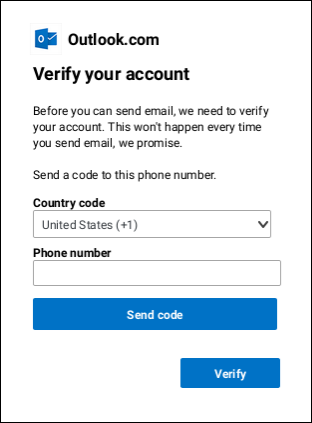
FIGURE 11-2: Office Online uses text messages to verify your identity.
OneDrive
![]() OneDrive is the app you use to store your data in the cloud. If you know the basics about Google Drive, you already understand OneDrive: You have folders and files that you can upload and download; you can also create and edit them using word processing, spreadsheet, and presentation tools.
OneDrive is the app you use to store your data in the cloud. If you know the basics about Google Drive, you already understand OneDrive: You have folders and files that you can upload and download; you can also create and edit them using word processing, spreadsheet, and presentation tools.
From the Office Online main page, click OneDrive. Your list of files and folders appears. The first time you use OneDrive, you see a Welcome page with an offer to show you around. I suggest that you take a minute for the nickel tour.
One nice thing about Office Online is that apps open in new browser tabs, which means that your Office Online main page is still there on another tab. Sure, you can get back to it with your browser bookmark, but it's even easier to click the tab to get back to the main page.
The main OneDrive window shows two default folders, Documents and Pictures, and a file called Getting Started With OneDrive. Until you are familiar with OneDrive, I suggest you keep that Getting Started file as a handy reference. Your initial OneDrive page should resemble Figure 11-3.
FIGURE 11-3: The OneDrive main page.
In OneDrive, you can upload files or directories by following these steps:
Click the Upload button near the top of the OneDrive screen.
A small File Upload window appears.
Click Files.
The file selector window appears.
On the far left, click the Menu button (three horizontal lines).
You can access only the Downloads folder here. If the file you want to upload to OneDrive is in the Downloads folder on your Chromebook, you can select it.
After you have selected files, click Open on the far right side of the window.
The selector window closes and your selected files are uploaded to OneDrive.
If you want to upload files from other folders, such as any in your Google Drive, you can do that, but you need to use a drag-and-drop method (which, by the way, works for any files on your Chromebook). First, make sure your that browser is not in Full-Screen mode. Reduce the size of the window a little bit until you see a part of the desktop. Then follow these steps to upload files from other folders:
- Navigate to your main OneDrive page, which shows your folders and files.
- Open the Files app and position it so that you can see both the Files app and your browser.
- Click the Files app and then Navigate to the folders or files that you want to upload to OneDrive.
- Click and drag the files you want from the Files window to the middle of the OneDrive window in your browser. (See Figure 11-4.)
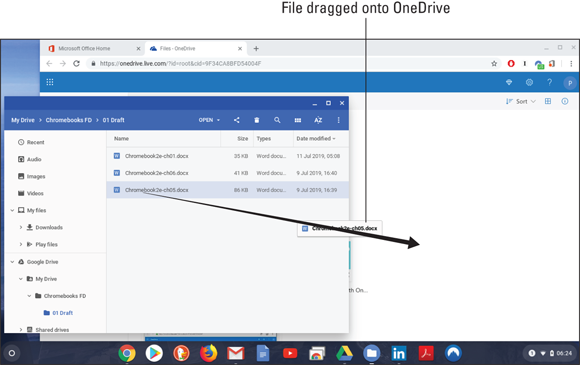
FIGURE 11-4: Dragging and dropping files from your Chromebook or Google Drive to OneDrive.
Outlook Email
![]() Outlook is the Microsoft Office Online app used for email, as well as for managing calendars and contacts.
Outlook is the Microsoft Office Online app used for email, as well as for managing calendars and contacts.
To launch Outlook, log in to Office Online, which gets you to the Office main page (refer to Figure 11-1). Click Outlook, which opens that app in a new tab in your browser. The first time you log in, you might be asked some questions, including your preferred language and your time zone. After you get through any of those one-time formalities, you see the Outlook main page, which includes the display of an initial message welcoming you to your new Outlook.com account. Figure 11-5 should pretty closely resemble what you see.
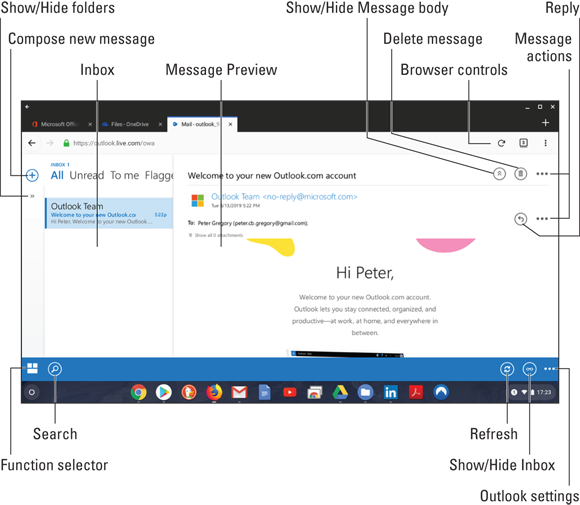
FIGURE 11-5: The Outlook main page with a welcome message from the Outlook Team.
When you create a user account in Office Online, Microsoft assumes that you'll be using its free email service at Outlook.com. The first time you start Outlook, Microsoft sends you the welcome email message that now appears.
Outlook is functionally equivalent to the combination of Gmail, Google Calendar, and Google Contacts — all in one app. Along with Figure 11-5, which shows all the different parts of the Outlook main window, here’s a brief tour of Outlook so that you can find your way around:
- Inbox: Contains a list of your incoming email messages. By default, it displays the sender's name, subject line, and the first few words of the body of the message. At the top of the Inbox area, you see the words All, Unread, To Me, and Flagged. These are buttons that permit you to view all or some of your messages according to these categories.
- Message Preview: The body of the message selected in the Inbox. The subject line is at the top; beneath that is the sender's name and email address, followed by the body of the message.
- Compose New Message: Click this big, circled + (plus sign) button to compose a new message.
- Show/Hide Folders: Click this button to view all your email folders. If you have a lot of them, you can scroll up and down through them all.
- Function Selector: Enables you to select the email, calendar, and contacts functions.
- Search: Lets you search through your email for a specific message by name, subject line, or contents.
- Refresh: Instructs Outlook to check for new, incoming email.
- Show/Hide Inbox List: Toggles the display of your Inbox. Clicking this button displays the selected email message in your Inbox at nearly full screen.
- Settings: Triggers a little window in which you can view and change Outlook options, get help, or sign out of Outlook.
- Reply: Compose a reply to the sender of the message being displayed.
- Message Actions: Brings up a little menu in which you can mark a message as read, flag the message, mark the message as junk, mark the message as a phishing scam, or delete the message.
- Show/Hide Message Body: Determines whether you can view an entire message or just a part of it.
- Trash: Delete the message being displayed.
- Message Actions: Yes, for some reason, there are two of these Message Actions buttons. This one lets you mark the message as read, flag it, move it to another folder, or ignore it.
Before you can begin sending and receiving email with Outlook, you need to connect your Gmail account to Outlook. To do so, follow this procedure:
- In the main Outlook window, click the Settings icon in the lower-right corner (the three little dots).
Click Options.
The Mail Options window opens.
Click Mail, then Accounts, then Connected Accounts.
The Connected Accounts window opens.
Under Add a Connected Account, click Gmail.
The Connect Your Google Account window opens, as shown in Figure 11-6.
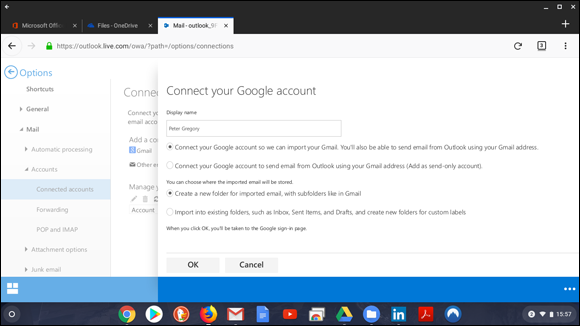
FIGURE 11-6: Adding your Gmail account to Outlook.
- Be sure your Display Name is shown correctly. Change it if you want.
Read the options below the Display Name field carefully and select the one you want.
Your selection will determine how you use Outlook. In this example, I selected the second option so that I can send and receive Gmail using Outlook.
Read the option about where you want your Gmail content to be stored in Outlook and make a selection.
I selected the “Create a New Folder for Imported Email” option.
Click Okay.
The Google login page appears.
Fill in your Google user ID and password.
On the next page, Microsoft Outlook informs you of its intention to move email in your Gmail account over to Outlook.
Read the actions carefully and then click Allow if you agree.
After clicking Allow, you can use Outlook to send and receive email using your Gmail account.
- Click the left arrow to the left of Options to return to the main Outlook window.
 After you log in to your Gmail account with Outlook, Google sends you an email with the subject “Security alert” informing you that Microsoft was granted access to your Google account. Whenever you receive Security Alert emails from Google, read it carefully to make sure that the activity that Google describes is legitimately yours.
Follow these steps to compose a new email message:
Click the blue, circled + (plus sign) near the upper-left corner.
The Compose Message window appears, as shown in Figure 11-7.
- Fill in the recipient's email address(es), as well as any additional people you want to CC.

FIGURE 11-7: Composing a new message with Outlook.
- Enter the subject in the subject line and your message in the message body.
- When you’re ready to send your message, click Send.
Outlook Calendar
Similar to Google Calendar, Outlook has a built-in calendar system that lets you make appointments, set reminders, and invite others to events. To access Outlook Calendar, click the function selector at the lower-left corner of the Outlook window; it looks like three little white boxes. Next, click Calendar. The main calendar is displayed (see Figure 11-8) and contains the following controls:
- Month selector: This is the range of months (and adjacent years) across the top of the calendar. Click one to view that month.
- View/Hide Day sidebar: You can show or hide a view of “today” and any appointments, reminders, or events that are scheduled for today.
- Settings: Change elements of your calendar like the days of the week and hours of the day you work, reminders, display colors, and shared calendars.
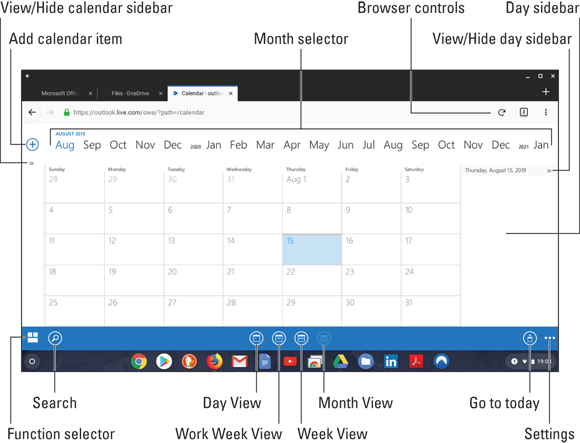
FIGURE 11-8: The Outlook Calendar.
- Go to Today: Click option to instantly view the current day on your calendar. If you are viewing one day at a time, your screen shows you the current day. If you’re showing any of the week or month views, the calendar goes to the week or month that includes today.
- Day/Week/Month view: Choose whether you want to view one day at a time, a work week, a full week, or an entire month.
- Search: Look for an event in your calendar.
- Function selector: Go to Outlook mail or contacts.
- View/Hide Month sidebar: Toggle a view of the current month, which appears as tiny.
- Add Calendar Item: Add a new appointment, reminder, or event.
To add an item to your calendar, click the Add Calendar Item button (refer to Figure 11-8). The window shown in Figure 11-9 opens and allows you to fill in some details:
- Event: Describe the event or reminder.
- Location: Enter an address, a city name, the name of a business, friend, or anything else. Outlook helps you with place names by trying to guess what you are typing (which is sometimes helpful, but also annoying at times).
- Start Date and Time: Enter whatever you want.
Duration: With a default of 30 minutes, you can select any appropriate value, even All Day.
If you click More Details, the window expands in size and shows several more fields.
- Show As: Select Free, Working Elsewhere, Tentative, Busy, or Away.
- Reminder. Outlook will send you a reminder before the beginning of the event. You may also select None to tell Outlook not to remind you.
- Save to Calendar: If you have more than one calendar, Outlook wants to know which one to save to.
Repeat: Outlook asks whether this is a repeating event, such as an anniversary, a weekly chore, or a monthly appointment. If you select this, you have more details to specify, including the frequency of the event and number of times it should occur (or on what date it should end).
When you have filled everything out, click the Save button (a disk-like icon near the upper right side of the calendar window. The event or item appears on your calendar.
This section barely scratches the surface of the Office Online Calendar. It offers so much more, like the ability to invite others to appointments and events, manage multiple calendars, and more. Pick up a copy of Office 365 All-In-One For Dummies, by Peter Weverka and Timothy L. Warner, if you want to dive into Outlook and all that it offers.
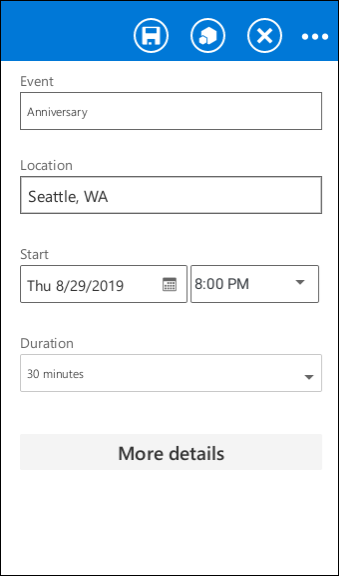
FIGURE 11-9: Adding an event to the Outlook Calendar.
Outlook Contacts
Outlook contacts keeps track of the people in your life, or work, or both! Like an address book or a Rolodex, Outlook Contacts helps you remember all those details. Google Contacts does this, too, so Outlook Contacts doesn’t have any particular advantage here.
To view your contacts, click the function selector (the icon with little squares at the bottom-left corner of the Outlook window) and then click People. The People window appears.
If you’ve just opened a new Outlook account, you probably have no contacts there. To add a contact, follow these steps:
Click the familiar blue, circled + (plus sign) button.
The Add Contact window appears.
- Enter the contact’s name, email, and phone in the appropriate fields, shown in Figure 11-10.
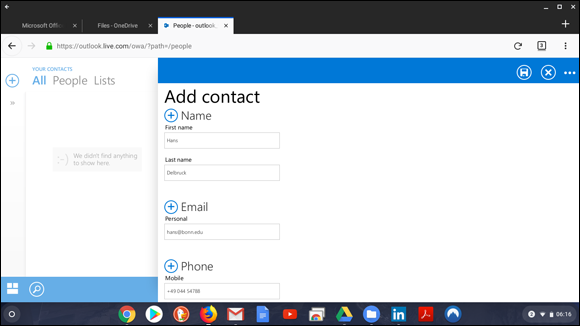
FIGURE 11-10: Adding a contact to Outlook.
- Scroll down to also enter other items like the name of the contact’s company, home and work addresses, multiple phone numbers, nickname, birthday, anniversary, web page, and any notes you might want to include in a free-form notes field.
When you’re done, click the Save button.
If you change your mind and don’t want to add the contact now, click the circled X button that is next to the Save button.
That’s all there is to it!
Anywhere you see a + (plus sign) button when you’re adding a contact, clicking it expands to include several other fields that you can fill in if you want.
After you have added a contact, you see the entry in the list to the left. On the right side, several links to other tasks appear, such as for setting up a calendar event (which invites the contact), or sending an email. If you sync the contact to your phone (covered later in this book), you can call the person if you filled in a phone number.
You can edit a contact later on by following these steps:
- Select the contact from the list of contacts on the left side of the Contacts window.
- Click the pencil icon at the lower-right corner of the window.
- Scroll to the fields you want to add or change and enter the information.
- To remove one of the contact’s details (such as the phone number), go to the that item and use the Delete key to remove the characters one by one.
Click the Save button (the disk-like button near the upper-right corner).
Your changes are saved.
If you change your mind and don't want to keep your changes, click the circled X button that is next to the Save button.
Your changes are discarded and the contact's information is unchanged.
The main power of Outlook Contacts is the ability to send email to people without having to remember their email address. In Outlook email, when you are composing a message, a nifty feature in Outlook email called Autocomplete helps you by filling in the rest of a recipient's email address after you've typed the first few letters of their email address or their name.
Word
![]() Microsoft Word is one of Microsoft’s flagship software products, going back to 1983. Today, Microsoft Word is the gold standard for business word processing, and it’s available on Chromebooks.
Microsoft Word is one of Microsoft’s flagship software products, going back to 1983. Today, Microsoft Word is the gold standard for business word processing, and it’s available on Chromebooks.
Okay, a bit of a disclaimer: The version of Word in Office Online and on Chromebooks is not quite as full-featured as the versions available for Windows and Macs. But for many users, Word has more capabilities than they will ever need. In fact, I’m writing this part of the chapter on my Chromebook using Word, and a part of it using Word Online on my Mac.
To open Word, go to your Office Online main page (https://www.office.com) and click Word. Figure 11-11 shows the Word Online main page.
On the Word main page, you have a lot of options. You can open a new blank document, open a document from one of many templates provided by Word, or upload a file from your Chromebook and edit it with Word. Word employs toolbars called the Ribbon. If you look again at Figure 11-11, you can see that the Home tab is open. On this tab, you can format your text in many different ways, including your choice of font, font size, bold, underline, text color, highlight color. You can format paragraphs to be left- or right-justified, centered, or full, and you can add bullets and numbering. If you click the Layout tab on the Ribbon, you see you find ways to control page size and orientation, margins, and more. On the Review tab, you can run the spelling and grammar checker, insert comments, and count the number of words in your document.
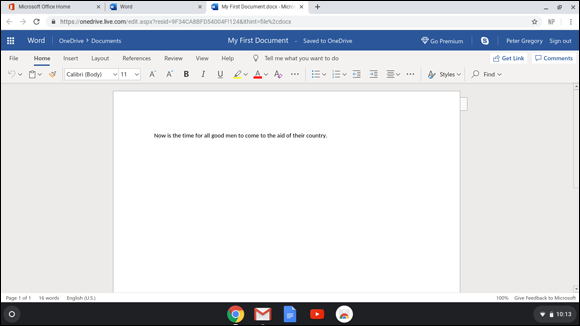
FIGURE 11-11: Using Word from Office Online on a Chromebook.
If you are expect to use Word a lot on your Chromebook, you might consider using the Word app instead of using Word through your browser. However, to do so, you need a paid subscription to Office 365. However, given that Google Docs is already fully functional and free, you would probably base a decision to pay for Word on the need for one or more advanced features in Word that aren’t in Google Docs.
Word and Google Docs are compatible. In other words, you can create and work on a document in Word and then send it to someone else who can work on it using Google Docs. Until you get into some of the very advanced features of Word, such as the use of Word template “.dot” files, you’ll never run into a problem.
To download the Word app, follow these instructions:
- Open the Google Play store app.
Search for Microsoft Word.
You should see the app that resembles what you see in Figure 11-12. Be sure that it says Microsoft Corporation under the app name; otherwise, you’re not viewing the right app!
- Click the Install button at the right.
- When installation is complete, click Open. Or, click the Launcher and then click Word.
- The first time you start Word, it may ask for permission to access photos, media, and files on your device; if so, click Allow.
- Sign in to your Office Online account and enter your user ID and password as directed.
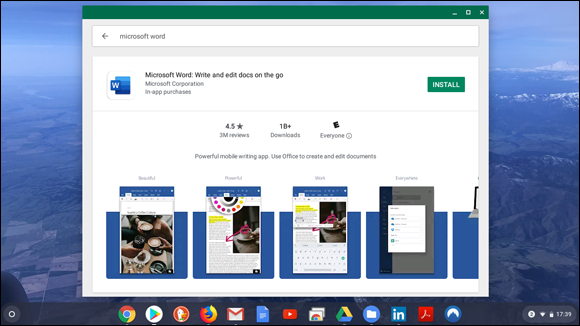
FIGURE 11-12: The Word app in the Google Play Store.
Word works great on Chromebooks, whether you use the web app or download the local app. Entire books have been writing about Word, so you can find far more information than I have time and space to show you here; to learn more, pick up a copy of Office 365 All-In-One For Dummies, by Peter Weverka and Timothy L. Warner.
Excel
![]() Microsoft Excel is the undisputed king of spreadsheets in the business world. And as you can with Outlook and Word, you can use Excel on your Chromebook. In this section, you dive right in.
Microsoft Excel is the undisputed king of spreadsheets in the business world. And as you can with Outlook and Word, you can use Excel on your Chromebook. In this section, you dive right in.
To start Excel, log in to Office.com and click the Excel button. When Excel starts, you see a screen similar to what appears in Figure 11-13. You have several choices: You can start a new, blank spreadsheet by clicking any of the several templates shown; you can upload a spreadsheet (called a workbook) that is stored on your Chromebook; or you can open a spreadsheet that is stored in your OneDrive. Figure 11-14 shows Excel with the New Blank Workbook template chosen.
As with Google Sheets, a spreadsheet in Excel consists of cells arranged in rows and columns. You can put numbers or other text such as dates (or just words, phrases, and sentences) in a cell. You can adjust the height of rows and the width of columns. You can put in formulas to calculate things, like the total or average of cells in a column of cells.
Microsoft Excel and Google Sheets are compatible, which means that, for the most part, you can create a spreadsheet in one program and use it in the other.
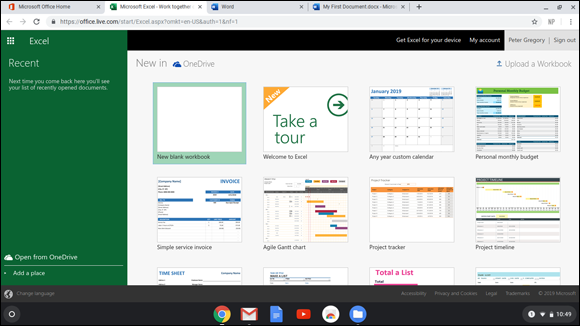
FIGURE 11-13: Microsoft Excel’s starting page.
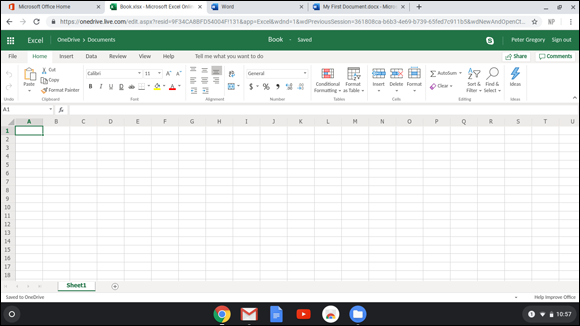
FIGURE 11-14: A new, blank spreadsheet in Microsoft Excel.
If you need some of the more advanced features in Microsoft Excel, you might consider downloading the Excel app to your Chromebook. However, as is true of the downloadable Word app, you must have a paid subscription to Office 365 if you want to use the Excel app locally on your Chromebook.
PowerPoint
![]() PowerPoint is Microsoft's presentation app, and it's very much like Google Slides. More accurately, Google Slides is a lot like Microsoft PowerPoint. As is true of other Microsoft Office applications, PowerPoint is the ruler of presentation applications. Just as you can do with Word and Excel, you can create a presentation in PowerPoint that someone else can view and make changes to using Google Slides. This doesn't mean that every minute feature is available and exactly alike, but they do work together pretty well.
PowerPoint is Microsoft's presentation app, and it's very much like Google Slides. More accurately, Google Slides is a lot like Microsoft PowerPoint. As is true of other Microsoft Office applications, PowerPoint is the ruler of presentation applications. Just as you can do with Word and Excel, you can create a presentation in PowerPoint that someone else can view and make changes to using Google Slides. This doesn't mean that every minute feature is available and exactly alike, but they do work together pretty well.
To open the PowerPoint program, first log in to www.office.com and click the PowerPoint link. PowerPoint starts and shows a screen like the one in Figure 11-15. When you proceed to create your first PowerPoint slide presentation, you start with a blank presentation, as shown in Figure 11-16.
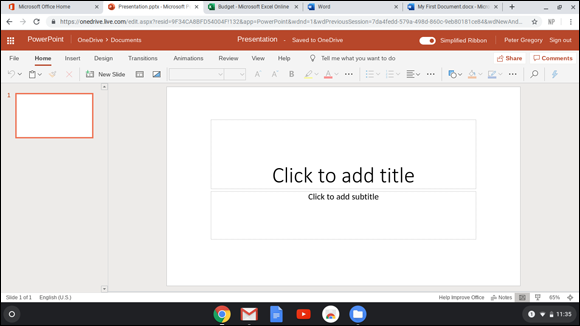
FIGURE 11-16: A new, blank presentation in Microsoft PowerPoint.
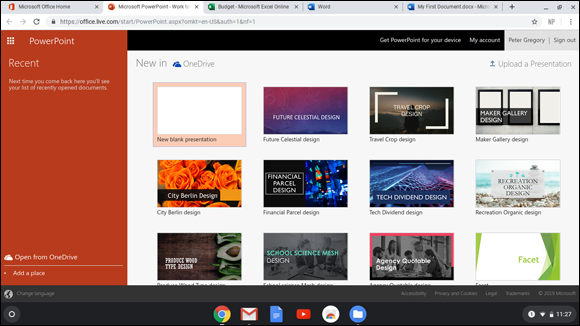
FIGURE 11-15: The Microsoft PowerPoint starting page.
The paradigm for PowerPoint is just the same as that for Google Slides. Each page is called a slide; slides have different layouts; and you can add and arrange text boxes, shapes, and images on each slide. The place for speaker’s notes is the same as in Google Slides, and you can view your presentation in a presentation mode that allows others see your big, beautiful slides on a big screen or projector while you sit back and view it in Presenter’s view, which lets you read your notes and not forget what you want to say.
You can download the PowerPoint app onto your Chromebook if you need more advanced features. Doing so requires you to purchase an Office365 subscription. By the way, this is the case not only on Chromebooks but also on Windows and Mac computers.
OneNote
![]() The OneNote app is made for general note-taking and organizing notes according to categories that the user sets up. OneNote is quite popular for busy people who need to organize random bits of information on many different topics.
The OneNote app is made for general note-taking and organizing notes according to categories that the user sets up. OneNote is quite popular for busy people who need to organize random bits of information on many different topics.
To start OneNote, log in to Office at www.office.com and click the OneNote icon. If you haven’t used OneNote before, a window opens that offers to give you a short tour of OneNote’s features. I suggest you take the time to view this — it takes only a minute. The tour asks you a couple of questions about how you might use the program, and it sets up a set of initial categories for storing your notes. I chose the “personal” categories and accepted the defaults. The result was some pre-made categories that you can see in Figure 11-17.
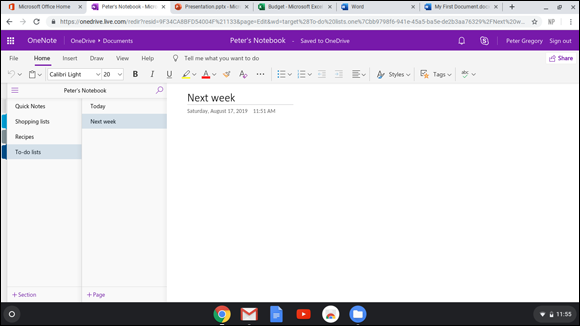
FIGURE 11-17: OneNote’s initial screen with categories chosen in the tour.
In this section, I describe the areas and controls in OneNote, which I identify in Figure 11-18.
- Sections: The main categories in which your notes will appear.
- Pages: The individual notes that appear in each category.
- Page title: The name of a note.
- Page body: Where you enter the details of your note, whether it’s a shopping list, a recipe, a list of invitees for an event, or notes from an important telephone call.
- New Section: Click this to create a new section for notes.
- New Page: Click this to create a new note.
- Toolbar: Lets you change the appearance of text and paragraphs in your notes.
- Menu bar: Leads you to additional toolbars that give you more options and features in your notes.
As with other Google and Microsoft Office tools, you can share a note by clicking the Share button near the upper-right corner.
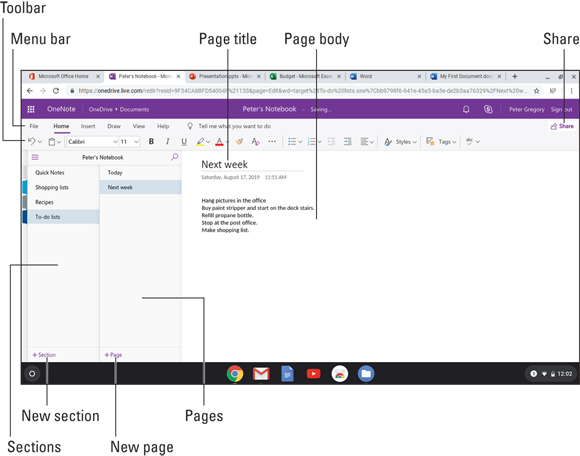
FIGURE 11-18: Features and functions in OneNote.
Collaborating in OneDrive
Just as Google Drive gives two or more persons the ability to edit a Docs document, Sheets spreadsheet, or Slides presentation at the same time, Microsoft’s OneDrive allows multiple people to edit a document, spreadsheet, or presentation at the same time.
For two or more people to edit a document at the same time, the document owner must share the document with others. To share in Excel, you click the Share button; in Word, you click the Share or Get Link button. Figure 11-19 shows a user in Excel sharing a spreadsheet with another user. When you fill in a user’s email address and then click Share, the recipient(s) receives an email that contains a URL that users can click to open the document and view or edit it.
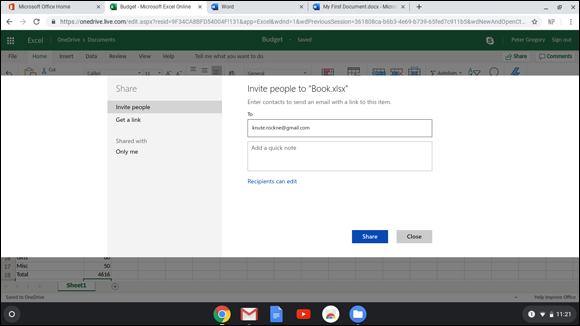
FIGURE 11-19: Sharing a spreadsheet with another user in Microsoft Excel.
Skype
![]() Skype gained a reputation around the world as an Internet-based instant messaging tool. This popularity got the attention of Microsoft, which bought the company in 2011. Skype is now a part of Microsoft's Office suite.
Skype gained a reputation around the world as an Internet-based instant messaging tool. This popularity got the attention of Microsoft, which bought the company in 2011. Skype is now a part of Microsoft's Office suite.
You can use Skype for instant messaging between people. Because Skype works on not only Chromebooks but also Windows and Mac computers, as well as iPads, iPhones, and Android tablets and smartphones, you and your friends and associates are able to stay in touch and reach each other almost any time. Further, you can send not only text messages but also images, and you can even have live video and audio conversations.
For a nominal fee, you can also use Skype to place actual telephone calls to any phone number in the world. To do so, you need to register a credit card. You may, however, be able to try a free trial to see what this service is like.
Skype is available in other forms, too. You can add Skype to your Chrome browser as an add-on, and you can download and use the Skype app.
Follow these directions to start and use Skype:
Go to the Office.com home page and click the Skype icon.
The main Skype window appears, as shown in Figure 11-20.
Note the Enable Notifications window at the left. Skype asks permission to send you notifications, which will appear in the Notifications area on your Chromebook. Receiving notifications can be useful because it lets you know when someone has sent you a message on Skype.
- To view your Skype contacts, click the Contacts icon near the left side of the Skype window.
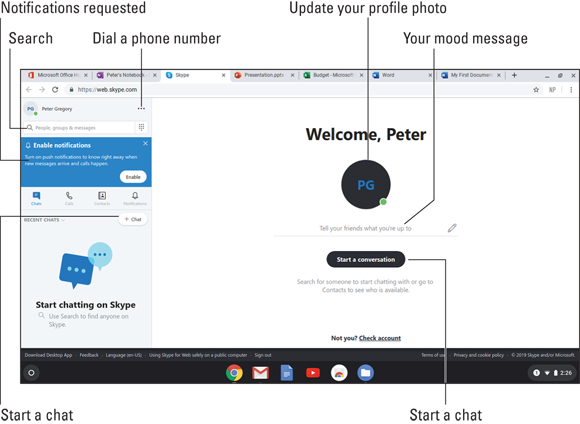
FIGURE 11-20: The Skype main window on a Chromebook.
Add contacts by clicking the Add Contact link and searching by a contact’s name, email, phone, or Skype ID.
If you know someone's Skype ID but you can't find that contact in a search, you need to send an invite to that person, who can then accept you as a contact.
To start a Skype conversation, click Contacts and then select a contact by clicking it in the list of contacts.
A new conversation window opens on the right side of the Skype menu.
Start typing where you see the words “Type a message here” and then click the Send Message icon to send your message.
Clicking Enter when typing a message in Skype starts a new paragraph. Send a message by clicking the Send Message icon.
If the person you’re contacting can receive Skype notifications on an available device, that person immediately sees your message. Figure 11-21 shows a sample conversation.
On a Chromebook, the Skype web app works only with the Google Chrome browser. If your preferred browser is, say, Firefox, you’ll have to go back to Chrome to use Skype.
You can explore much more in Skype. One of the best resources is the Skype Help guide, found at https://support.skype.com.
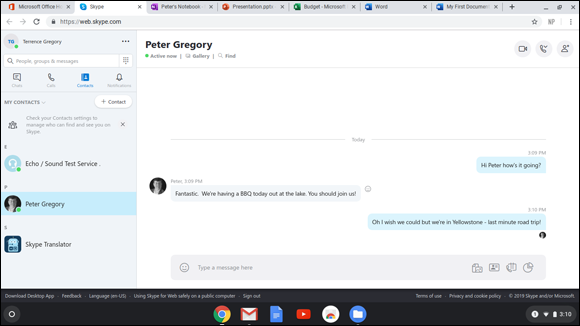
FIGURE 11-21: A Skype conversation on a Chromebook.
Checking Out Apple’s iCloud Suite
As if the Google and Microsoft office suites weren't enough, you can also considers Apple's offering, iCloud, which is as complete as the others. iCloud provides an email app and apps for a calendar, contacts, notes, and reminders. iCloud also offers the Pages word processing app, the Numbers spreadsheet app, Keynote for presentations, and more.
iCloud will be relevant for you if you’re an Apple household (or business) and want to get your Chromebook in on the action. But in contrast to Microsoft Office, iCloud offers no downloadable apps for your Chromebook; instead, all apps are in the cloud that access through your browser, just as you do Google Docs, Sheets, Slides, and so on.
![]() To get started in iCloud, go to
To get started in iCloud, go to www.icloud.com If you don’t have an account, you can sign up for one at no cost. After you set up an account and log in, you see the iCloud main page (see Figure 11-22).
iCloud on a Chromebook works only on the Chrome browser. Sorry, Firefox and DuckDuckGo fans!
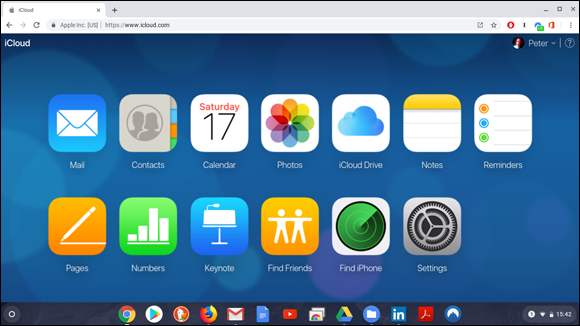
FIGURE 11-22: The iCloud main page.
iCloud file storage
In Apple's iCloud suite, you store files (documents, pictures, and anything else you would save in Google Drive or on your Chromebook) in the iCloud storage service, called iCloud Drive. iCloud Drive makes all your files available from all your devices anytime you're online.
Using the iCloud file storage site is so similar to using Google Drive and Microsoft OneDrive that you can refer to those sections, earlier in the chapter, if you need help getting to it. The main page of iCloud looks like what you see Figure 11-23. By the way, you get here by clicking the iCloud logo after you log in to iCloud at www.icloud.com.

FIGURE 11-23: The iCloud Drive main page.
In the iCloud service, Apple creates folders for Pages, Numbers, and Keynote. Some of the other folders shown in Figure 11-23 are folders I have added.
Pages
![]() Pages is Apple’s iCloud word processing program, and guess what? Pages is similar to Google Docs and Microsoft Word. As with Docs and Word, you can create documents in one of these programs and later open and edit documents in either of the other two — that is, they’re all basically compatible with one another.
Pages is Apple’s iCloud word processing program, and guess what? Pages is similar to Google Docs and Microsoft Word. As with Docs and Word, you can create documents in one of these programs and later open and edit documents in either of the other two — that is, they’re all basically compatible with one another.
Pages, however, is not as fully functional in a web browser as are the Pages apps for Macs, iPads, and iPhones. But for basic editing, you may be fine. When you open a document with Pages, you see a little warning that tells you that Chrome on a Chromebook does not fully support Pages (see Figure 11-24). With Firefox or DuckDuckGo, Pages doesn’t work at all. Still, you can get away with using Pages for basic editing while using the Chrome browser on a Chromebook. Figure 11-25 shows the Pages app, where I’m editing the text in this very paragraph.
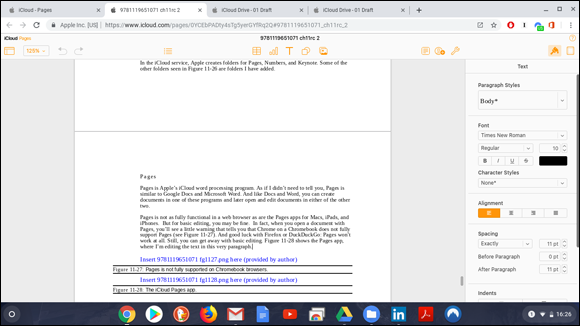
FIGURE 11-25: The iCloud Pages word processing app.
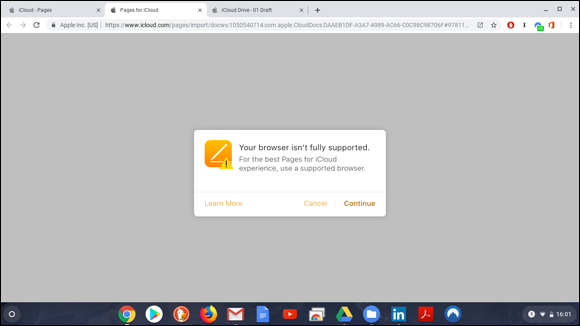
FIGURE 11-24: Pages is not fully supported on Chromebook browsers.
To edit a document with Pages, go to the iCloud main page and open the Pages app. Then, navigate to the file you want to edit (or click Add a Document to create a new one). Click the paintbrush icon on the right side of the toolbar to open a toolbox that provides tools for performing all the usual kinds of character and paragraph formatting that you may need to do.
Numbers
![]() Numbers is the spreadsheet program in Apple’s iCloud suite. I know I’m beginning to sound like a broken record if you’ve read all the way through this chapter, but Numbers is similar to Google Sheets and Microsoft Excel — so much so that you can interchange worksheets with all three programs.
Numbers is the spreadsheet program in Apple’s iCloud suite. I know I’m beginning to sound like a broken record if you’ve read all the way through this chapter, but Numbers is similar to Google Sheets and Microsoft Excel — so much so that you can interchange worksheets with all three programs.
To open a spreadsheet with Numbers, go to the main iCloud pages and click Numbers. Then browse the spreadsheet you want to open, or create a new one. Figure 11-26 shows a spreadsheet that has been opened with iCloud Numbers. Click the paintbrush icon near the upper-right corner to open a formatting window so that you can format the cells, rows, and columns in your spreadsheets.

FIGURE 11-26: The iCloud Numbers spreadsheet app.
With Numbers, you can input numbers, dates, and text in individual cells. You can also input formulas that show the result of calculations on the values of one or more cells. Numbers lets you work with fonts, colors, shading, and borders so that you can spruce up your spreadsheets for the appearance you need to make them more readable and useful.
When you open a spreadsheet with Numbers, you see a little warning that tells you that Chrome on a Chromebook does not fully support Numbers. Basic features will still function in Numbers on a Chromebook.
Keynote
![]() Keynote is Apple’s iCloud presentation program, and it’s compatible with Google Slides and Microsoft PowerPoint. All the same basic functions found in Slides and PowerPoint are in Keynote as well. Like Pages and Numbers, Keynote is not fully supported in the Chrome browser on your Chromebook. Still, you can get the basics done. Figure 11-27 shows a presentation open with Keynote.
Keynote is Apple’s iCloud presentation program, and it’s compatible with Google Slides and Microsoft PowerPoint. All the same basic functions found in Slides and PowerPoint are in Keynote as well. Like Pages and Numbers, Keynote is not fully supported in the Chrome browser on your Chromebook. Still, you can get the basics done. Figure 11-27 shows a presentation open with Keynote.
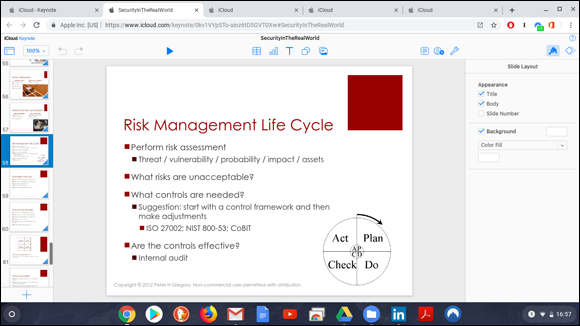
FIGURE 11-27: The iCloud Keynote presentation app.
Using Adobe Reader
![]() PDF, or Portable Document Format, is a widely recognized standard for documents the world over. Although your Chrome browser can read and display PDF documents right in the browser window, you may want — or need — to display PDF documents using the Adobe Reader app.
PDF, or Portable Document Format, is a widely recognized standard for documents the world over. Although your Chrome browser can read and display PDF documents right in the browser window, you may want — or need — to display PDF documents using the Adobe Reader app.
One reason you may need to use Adobe Reader is if you’ve been asked to sign a PDF document, or you want to add comments to a PDF document. If this applies to you, and you want to do this on your Chromebook, you’re in luck.
To get the Adobe Reader application, follow these steps:
- Open the Google Play Store app.
- Search for Adobe Reader.
- Make sure the app you select is from Adobe.
- Click the Install button and then click the Open button to open Adobe Reader.
To open a file with Adobe Reader:
- Open the Adobe Reader app.
- Click the Files button at the bottom center of the Adobe Reader window.
- Navigate to the file you want to open.
Click the filename.
The document opens, as shown in Figure 11-28.
You can also open a PDF document with Adobe Reader by opening the Files app, Alt-clicking the file you want to open, and clicking Select Open With and then Adobe Acrobat.To create a comment in the PDF files you are viewing, click the blue circled pencil icon at the lower-right corner of the page.
A toolbar appears that allows you to insert comments or make suggested changes to the text.
- To save a PDF file into which you have inserted comments or suggested changes:
- Click the Share button near the upper-right corner of the Adobe window.
- Select Save to Files.
- Navigate to the desired folder in Files.
- Type the name for the file.
- Click Save.
- To print your PDF file:
- Click the Share button.
- Select Print.
- Select a printer and any desired print options.
Adobe Reader does not look in Google Drive for your PDF files, but only on your Chromebook or in OneDrive, DropBox, or the Adobe Document Cloud (Adobe's file storage service that is similar to Drive, OneDrive, and iCloud).
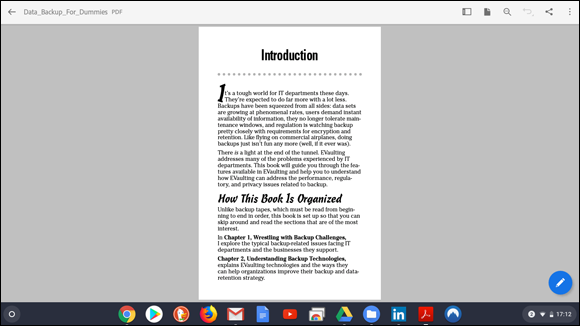
FIGURE 11-28: The Adobe Reader app.