Chapter 14
Playing Video on the Chromebook
IN THIS CHAPTER
![]() Exploring video on Chromebook
Exploring video on Chromebook
![]() Using the Chromebook video player and the VLC app
Using the Chromebook video player and the VLC app
![]() Viewing videos taken with your smartphone on your Chromebook
Viewing videos taken with your smartphone on your Chromebook
![]() Watching movies on Google Play Movies
Watching movies on Google Play Movies
![]() Exploring YouTube
Exploring YouTube
Watching video used to be relegated to televisions and video playback devices like VHS players, DVD, and Blu-ray. However, thanks to the prevalence of high-speed Internet access, increasingly powerful computers, and wireless broadband, the Internet has become a primary delivery mechanism for video content of all kinds, from “television” series to how-to videos and videos of cats.
Streaming video has become one of the major uses of Internet bandwidth in the 21st century. According to a report from Cisco (one of the largest manufacturers of commercial networking equipment), 80 percent of all Internet traffic is video (in the United States, it’s a staggering 85 percent). Recent statistics show that more than 1.9 billion unique users visit YouTube each month. People watch more than 1 billion hours of video each day and upload more than 500,000 hours of video to YouTube every day. You’ll never catch up, and you’ll never reach the end of the Internet!
In this chapter, you learn how to play videos on your Chromebook with the internal video player, as well as how to browse for and stream videos through Google Play Video. You also learn how to navigate Google’s YouTube network and how to create, edit, and share videos using YouTube.
Creating a Video with Your Chromebook
The built-in Camera app on your Chromebook can take still pictures as well as create video. To record a video on your Chromebook, follow these steps:
- Start the Camera app using the Launcher.
In the Camera app, click the Video button just below the Take Photo button.
Your Chromebook is now ready to start recording a video. See how the Take Photo button has changed; it is now the Start Recording button, and it has a red dot on it.
Click the Start Recording button. Smile!
You hear a musical clicking sound when you click the button, and the button changes to all red with a white square in the middle, indicating that video is now being recorded.
As the video is being recorded, you also see a counter on the upper center of the screen that shows how many minutes and seconds you’ve been recording.
- When you are ready to stop recording, click the Stop Recording button.
Watching Video on Chromebook
Video files are simply a series of still images, much like a flipbook. Hence, they tend to be much larger than pictures and audio files, largely because of the length of the videos, the quality of the video, and even the quality of the embedded audio. Although the Chromebook allows you to download video from the Internet, doing so can fill up the available storage rather quickly (because a Chromebook comes with dramatically less internal storage than traditional PCs and Macs do). So rather than download video files on your Chromebook, store them (along with other media files) on external storage devices like USB memory sticks or SD cards, or keep them on Google Drive and Google Photos for instant playback on any of your Internet-connected devices.
![]() Chromebook has a video player that plays most video files. To access video files already on your Chromebook, follow these steps:
Chromebook has a video player that plays most video files. To access video files already on your Chromebook, follow these steps:
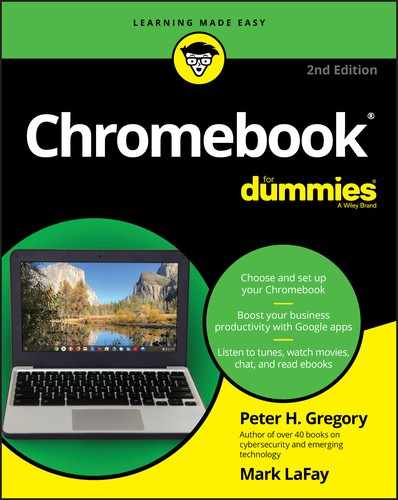
Open the Files app and navigate to the Videos folder.
Or, if your video is on a USB memory stick or SD card, insert the USB stick or SD card into the appropriate plug and find it with the Files app. Figure 14-1 shows an example.
Double-click the video file you want to play.
The Video Player app automatically starts and plays your selected video from the beginning, as shown in Figure 14-2.
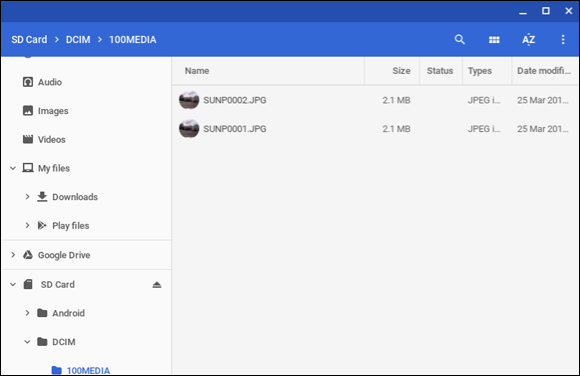
FIGURE 14-1: The Files app showing an external storage device.
FIGURE 14-2: Playing a video in the Chromebook video player.
 Before you remove an SD card from your Chromebook, you need to tell the Chromebook that you want to remove it. Click the Eject button and then remove the card when its name disappears from the Files window. This ensures the integrity of your data on the SD card. Figure 14-3 shows the Eject button for my SD card.
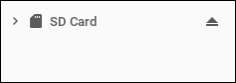
FIGURE 14-3: Click the Eject button before removing an SD card.
Navigating the Chromebook Video Player
The Chromebook video player is very barebones, like a very old school VCR. It offers the usual Chromebook window control bar across the top of the window, which lets you minimize, maximize, and close the video player window — same as with every app on your Chromebook.
Your video occupies the majority of the window space. Near the bottom of the video window are the controls for the video player, which include
- Pause and Play buttons
- Status bar with time indicator
- Volume control
- Full Screen mode control
By default, the Chromebook video player starts your video as soon as that video loads. If you want to pause your video, click the Pause button near the lower-left corner of the window. While the video is stopped, the Pause button turns into a play button. To resume playing, click the Play button.
You can also use the spacebar to pause and resume videos.
Skipping around a video
If you want to skip ahead to your favorite part of a video — or maybe resume where you left off — you can do so with the Chromebook video player. To skip around in a video, follow these steps:
While your video is open and playing, locate the position indicator in the status bar.
The position indicator is a little white ball that moves left to right on a white line across the bottom of the player window as the video plays.
The video control overlay also appears at the bottom of the window, revealing several video control options, including Pause, Full Screen, and Volume Control.
If you don’t see these controls, give the pointer a nudge with your touchpad, and they should appear. Also make sure that the window playing video is on top!
Click and drag the position indicator forward or backward to the place in your video where you would like to start watching.
The video skips to the selected location in the timeline.
You don’t have to pause your video to skip around in the video. However, you can pause the video to ensure that the video doesn’t keep playing when you skip to different locations in the video.
Activating Full Screen mode
By default, the Chromebook video player plays the video at the optimal viewing size. You can, however, make the video occupy the entire screen by using Full Screen mode. To engage Full Screen mode, follow these steps:
While your video is open and playing, move your pointer over the bottom of the video player.
The video control overlay appears at the bottom of the window, revealing several video control options, including Pause, Full Screen, and Volume Control.
Click the Full Screen button on the right side of the overlay.
The video player enlarges to fill the screen, as shown in Figure 14-4.
- To exit Full Screen mode, press the Esc key.

FIGURE 14-4: Chromebook’s video player in Full Screen mode.
Adjusting the volume
To control the volume in the Chromebook video player, follow these steps:
Locate the volume control slider on the right side of the overlay.
The video control overlay appears at the bottom of the window, revealing several video control options, including Pause, Full Screen, and Volume Control.
To mute the volume, click the Speaker icon. To mute it, click it again.
When muted, the icon appears with a slash through it, indicating that the volume has been reduced to zero.
Increase or decrease the volume by moving the slider — to the right to increase and to the left to decrease.
The volume changes per the direction you move the volume slider.
Using Other Video Players on a Chromebook
Although the Chromebook’s built-in video player is nice, it doesn’t always play every video format around. If you have a device that you’re pretty sure is recording video, but you see a black screen, you can choose among several other video player apps to try. Or, perhaps you yearn for a video player with more controls. The best one out there is the VLC video player. I’ve used it for more than a decade on PCs, Macs, and now on my Chromebooks. To get the VLC app, go to the Google Web store (not the Play Store!), search for VLC for Android, and install it.
To watch videos with VLC, open the app, click the menu in the upper-left corner, click Open, and then browse to the movie you want to view (see Figure 14-5).
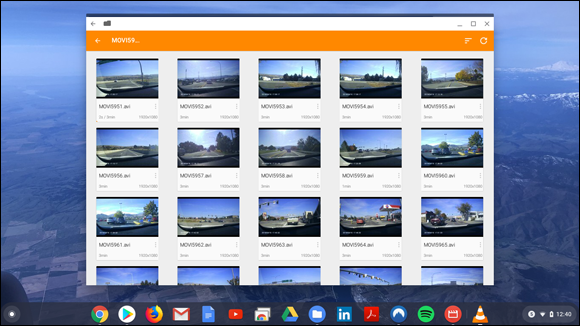
FIGURE 14-5: Selecting a video to play with the VLC video player.
Transferring a Video from an Android Phone to a Chromebook
You probably have your smartphone with you practically all the time, and sometimes you want to shoot some pics or video. Playing it back on that tiny smartphone screen is not so great, though. If you want to view it on your big Chromebook screen, follow these steps:
- Open the video on your Android phone that you want to transfer to your Chromebook.
- Tap the Share button.
- Tap Save to Drive (the Google Drive logo is just above these words).
In the Document Title field, enter a name for the video if you like.
Or you can keep the default name, which consists of the date and time you shot the video.
Tap Save.
The video is saved to Google Photos.
Your Android phone might also be configured to save photos to Google Drive or Google Photos automatically.Open the Google Photos app on your Chromebook.
The videos you recorded appear there, as do photos you’ve taken on your Android phone and any other device with the Google Photos app.
To play the video directly from Google Photos, double-click the video you want to play.
To play in Full Screen mode, click the Full Screen button at the lower-right corner of the video.
To save the video to your Chromebook, click More Options at the upper-right corner of the video and click Save To Device.
The default filename is the date and time the video was created.
After you copy the video from your smartphone to Google Photos, you can safely remove it from your smartphone if you are low on available space. You can always play it again directly from the Google Photos app.
Transferring a Video from a Dashcam or Another Source to a Chromebook
If you have a dashcam, digital camera, or security camera that uses an SD or Micro SD card to store videos, you can play these videos on your Chromebook. Follow this procedure:
Insert the SD card into your Chromebook.
Your Chromebook opens a new Files app window.
Using the Files app, navigate to the directory where videos are stored.
The name of the directory will vary based on the make and model of the device that records video.
When you have found the video you want to view, double-click it.
The built-in video player plays the video. If you hear sound but see a black screen, you need to download the VLC app, as discussed in the section “Using Other Video Players on a Chromebook,” earlier in this chapter.
Getting Started with Google’s Play Movies
Google Play is Google’s online marketplace and is similar to Apple’s iTunes store. Google Play sells videos, televisions shows, books, music, and applications for Android, Chromebook, the Chrome browser, and more. Play Movies is the part of Google Play you use to view movies and TV shows.
As is the case with all the applications on the Google platform, access to video content in Google Play Movies is linked to your Google account. If you have multiple Google accounts, make sure to be logged in to your Chromebook with the account that you want to be associated with Google Play Movies.
![]() You can launch Google Play Movies & TV by opening the Launcher and clicking the Play Movies & TV icon. When you do, the Play Movies & TV app launches.
You can launch Google Play Movies & TV by opening the Launcher and clicking the Play Movies & TV icon. When you do, the Play Movies & TV app launches.
Navigating Google Play Movies & TV
Google Play Movies & TV gives you the ability to purchase movies and television shows for download, as well as for streaming. Any purchases you make are tracked in the My Movies & TV section of Google Play.
The first time you launch Google Play Movies & TV, you’re told that you can join your other subscription movie apps such as Amazon Prime, Hulu, and HBO Now.
Before you can purchase movies or TV shows, you need to first know how to navigate through Google Play Movie’s vast database. You can search for movies and TV shows using the Search bar at the top of the window or by browsing the Google Play Movies & TV charts. For example, to browse for a movie, click Movies near the top middle of the Google Play Movies & TV window to open the Movies page, as shown in Figure 14-6, and then click Shop.
On the Movies page, you can browse movies by category. Categories might include
- Genres including Action, Comedy, Family, Sci-Fi, Romance, Drama, and Documentaries
- Time periods including Recent, the 2000s, 1990s, 1980s, and Classic
- Award Winning
- Highly Rated
Browsing videos by category is a great way to discover outstanding, thought-provoking cinema and mindless entertainment alike.
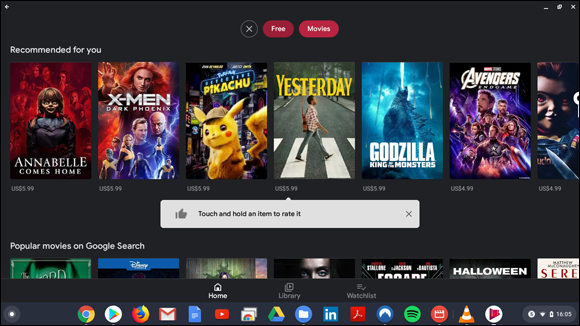
FIGURE 14-6: Browsing movies in Google Play Movies & TV.
Purchasing movies and TV shows
Google Play Movies & TV gives you several options to view movies and television shows. You can either purchase content and access that content for an indefinite amount of time, or you can rent content that’s available for viewing for a specified amount of time. Renting is a cheaper option, but if you like to watch certain movies over and over again, or if you want to build a database of flicks you can dial up whenever you want, purchasing may be the way to go.
To purchase or rent a movie on Google Play Movies, follow these steps:
With Google Play Movies & TV open, click the Search icon near the upper-right corner of the window. Enter the name of the movie or TV show (for example, Beetlejuice), and then click the Search button.
Google Play loads the search results.
Click the video you want to watch (see Figure 14-7).
The Movie Profile page loads.
Click the Buy button at the bottom of the screen. (To rent the movie, click Rent.)
A payment window appears, presenting you with the option to buy your movie.
 Newer movies and televisions shows are typically available for purchase or rent in 4K (highest definition) or high definition (HD)). 4K has a much greater picture quality than HD. For this reason, Google asks you to pay more for 4K during the checkout process. If you don’t have a 4K TV or monitor, you’re better off buying or renting your movie in HD, if you are offered a choice. If you do have a 4K TV or monitor, you can view the movie in much higher quality by selecting 4K.
FIGURE 14-7: Searching movie titles in Google Play Movies & TV
Click the Rent or Buy button.
A Google Wallet window appears, as shown in Figure 14-8, asking you to select your payment method and review your purchase before confirming.
If you haven’t set up your Google Wallet, you need to do so at this point. Follow the prompts to add the desired payment method to your Google account. After you’ve set up your account, you can quickly conduct purchases on the Google network.If you’re satisfied with your purchase decision, click Buy.
Google asks you to enter your Google password to prove that it’s you and not another person using your Chromebook who wants to watch a free movie!
The movie or TV show you purchased appears in My Movies & TV and is available to play. If you rented the content, it’s available in My Movies & TV for only a limited time before it’s removed.
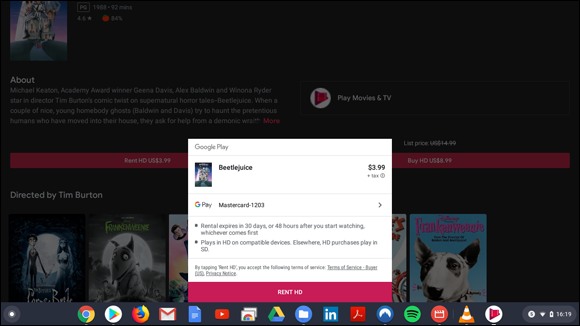
FIGURE 14-8: The Google Wallet window.
Playing movies and TV shows
After you purchase movies or TV shows in Google Play Music & TV, they appear in your Library and are available for playing. To play your movies and TV shows, follow these steps:
With Google Play Movies & TV open, click Library on the bottom center of the page.
Your movies and TV shows are loaded.
Move your pointer over the desired content and click Play.
Your video content begins playing in a new window.
By default, the video plays in Full Screen mode on your Chromebook. You can pause the video by following these steps:
While the video content is playing, move your cursor anywhere on the window.
The video control overlay, containing several video controls, appears.
Click the Pause button in the middle of the screen.
The Pause button looks like two vertical bars.
The video playback pauses.
To resume playing your video, move your pointer back over the video control overlay and click the Play button.
The Play button displays a sideways triangle.
You can also pause playback by pressing the spacebar briefly. To resume playing, press the spacebar again.
Adjusting the volume
To control the volume in the Google Play Movies & TV, follow these steps:
Move your pointer over the bottom of the Google Play Movies & TV window.
The video control overlay appears, revealing several video control options.
- Locate the Volume icon on the left side of the overlay.
To mute the volume, click the Speaker icon.
When muted, the icon appears with a slash through it, indicating that volume has been reduced to zero.
Increase or decrease the volume by moving the slider — to the right to increase and to the left to decrease.
The volume changes per the direction you move the volume slider.
Casting to a TV
Casting means playing back audio or video content from one device to another device, such as a smart TV. If you have a TV set up for casting, you can cast a movie that you’re playing on a Chromebook to a TV. To cast a movie to a TV, follow these steps:
- Start playing the movie on your Chromebook.
- Pause playback by clicking Pause or tapping the spacebar.
 Find and click the Cast icon, which is near the upper-right corner of the window.
If devices are available to cast to, you see a menu from which you can select a device. (See Figure 14-9.)
Select the device you want to cast to.
Movie playback now continues on your smart TV. You use the Play and Pause controls on your Chromebook to pause and resume the movie.
You need to read the instructions for your smart TV to understand how to cast to it. You’ll find that it takes a bit of experimenting to get it working.
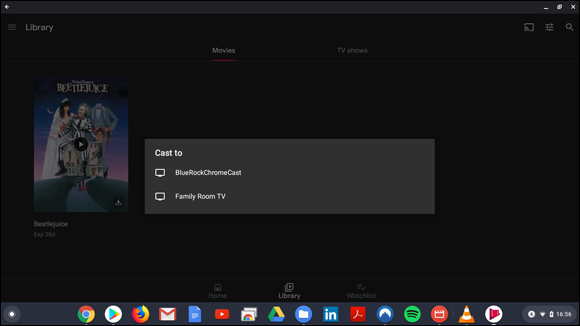
FIGURE 14-9: Casting a movie to a Smart TV.
Exploring YouTube
YouTube is a free video-sharing website that has grown into one of the most trafficked sites on the Internet. YouTube’s video database is largely user generated.
YouTube has become a go-to source for all kinds of video: unfiltered field reporting, documentation of conflict, music videos, self-help and how-to, thought-provoking documentaries, family archives, humorous interpretations, chance happenings, TV commercials from long ago, and more. Users can create channels to store and categorize endless minutes of video. With YouTube, you can upload and edit videos, share video content around the web, keep track of video views, and so much more.
![]() YouTube is a great tool for Chromebook users because it can serve as a bottomless repository for captured video footage. To access YouTube, open the Launcher and click the YouTube icon. When you do so, YouTube loads in the Chrome web browser.
YouTube is a great tool for Chromebook users because it can serve as a bottomless repository for captured video footage. To access YouTube, open the Launcher and click the YouTube icon. When you do so, YouTube loads in the Chrome web browser.
YouTube asks you to log in to your Google account. You want to do this so that you can view your subscriptions and so that YouTube can suggest videos that are consistent with your interests.
Navigating YouTube
When YouTube has loaded, all the available options can cause sensory overload. Covering all the intricacies of YouTube would take an entire book, but this section gives you a few tips to get you started.
The main page of YouTube contains several video options for suggested viewing. Much of what YouTube suggests is driven by your viewing habits and subscriptions. If you like videos of smiling kittens, for instance, YouTube suggests videos of kittens to capture your attention. YouTube also sells advertising placements to businesses, so you may see an advertisement or two at the beginning of a video and occasionally during a longer video. Along the left side of the screen are options for finding videos you’ve seen and videos you haven’t seen yet.
The most useful way to find new videos is by using the Search bar at the top of the screen. YouTube has more than 2 billion unique visitors every month, and those visitors typically search for video content just as they would search for a web page by using Google’s search engine. This search functionality has made YouTube one of the largest search engines in the world.
Enter a term in the Search bar, click the Search button (which looks like a magnifying glass), and then scroll through the pages of search results to find the video you’re searching for. To aid in your search, YouTube ranks the results by relevance to your search query. If you haven’t found the video you’re looking for by the third or fourth page of search results, you may want to refine your search.
Playing and pausing video
Playing a video on YouTube is as straightforward as searching for it. Just find the video you want to play in YouTube’s search results and click the image or title. YouTube loads the Video Profile page and begins playing your selection automatically.
The bottom bar of the video, pictured in Figure 14-10, contains all your play controls, status bar audio controls, and viewing settings.
To pause the video, click the Pause button on the left side of the control bar. (The Pause button looks like two vertical bars.) When video is paused, pressing Pause again (or the Play button) resumes playback. You can also pause and play by tapping the spacebar.
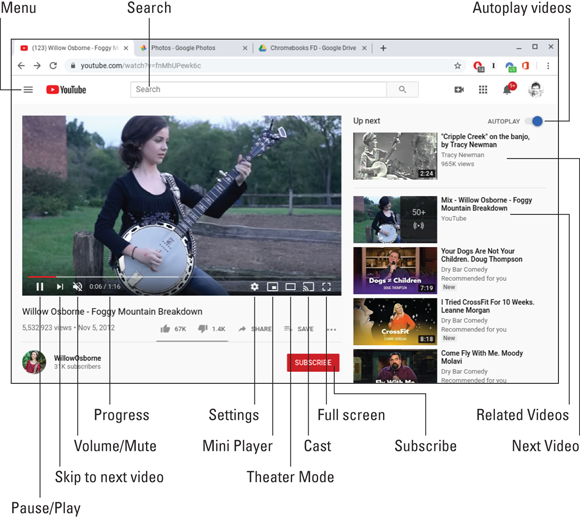
FIGURE 14-10: YouTube’s control bar.
Activating Full Screen mode
By default, YouTube plays the video at the optimal viewing size. You can, however, make the video occupy the entire screen by using Full Screen mode. To engage Full Screen mode, click the Full Screen button on the right side of the video’s control bar. To exit Full Screen mode, press the Esc key.
Adjusting the volume
To control the volume in the YouTube player, follow these steps:
- Locate the Volume icon on the left side of the control bar.
To mute the volume, click the Speaker icon.
When muted, the icon appears with a slash through it, indicating that the volume has been reduced to zero.
Increase or decrease the volume by moving your pointer over the volume icon and clicking and dragging the volume slider that appears.
Move the slider left to decrease volume, right to increase it.
Casting to a smart TV
As with Google Play Movies, you can cast the playing of a YouTube video to a smart TV. Follow these instructions:
- Start playing the video.
- Pause playback by clicking the Pause button or tapping the spacebar.
- Find and click the Cast icon, which is near the lower-right corner of the video playback window.
You need to read the instructions for your smart TV to understand how to cast to it. You might have to experiment with it a bit to get it working.
If you have devices you can cast to, you see a menu from which you can select the device you want to cast to.
Video playback continues on your Smart TV. You use the Play and Pause buttons on your Chromebook to pause and resume the movie.