
In this recipe we will learn how to create a slider UI element by extending the InteractiveObject class mentioned in the Creating an interactive object that responds to the mouse recipe of this chapter.
Please refer to the Creating an interactive object that responds to the mouse recipe to find the InteractiveObject class headers and source code.
We will create a Slider class and show you how to use it.
- Add a new header file named
Slider.hto your project:#pragma once #include "cinder/gl/gl.h" #include "cinder/Color.h" #include "InteractiveObject.h" using namespace std; using namespace ci; using namespace ci::app; class Slider : publicInteractiveObject { public: Slider( ) : InteractiveObject( Rectf(0,0, 100,10) ) { mValue = 0.f; } Vec2f getPosition() { return rect.getUpperLeft(); } void setPosition(Vec2f position) { rect.offset(position); } void setPosition(float x, float y) { setPosition(Vec2f(x,y)); } float getWidth() { return getSize().x; } float getHeight() { return getSize().y; } Vec2f getSize() { return rect.getSize(); } void setSize(Vec2f size) { rect.x2 = rect.x1+size.x; rect.y2 = rect.y1+size.y; } void setSize(float width, float height) { setSize(Vec2f(width,height)); } virtual float getValue() { return mValue; } virtual void setValue(float value) { mValue = ci::math<float>::clamp(value); } virtual void pressed() { InteractiveObject::pressed(); dragged(); } virtual void dragged() { InteractiveObject::dragged(); Vec2i mousePos = AppNative::get()->getMousePos(); setValue( (mousePos.x - rect.x1) / rect.getWidth() ); } virtual void draw() { gl::color(Color::gray(0.7f)); gl::drawSolidRect(rect); gl::color(Color::black()); Rectf fillRect = Rectf(rect); fillRect.x2 = fillRect.x1 + fillRect.getWidth() * mValue; gl::drawSolidRect( fillRect ); } protected: float mValue; }; - Inside the source file of your main application class, include the previously created header file:
#include "Slider.h"
- Add the new properties to your main class:
shared_ptr<Slider> mSlider1;
shared_ptr<Slider> mSlider2;
shared_ptr<Slider> mSlider3;
- Inside the
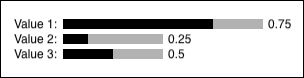
setupmethod do the initialization of thesliderobjects:mSlider1 = shared_ptr<Slider>( new Slider() ); mSlider1->setPosition(70.f, 20.f); mSlider1->setSize(200.f, 10.f); mSlider1->setValue(0.75f); mSlider2 = shared_ptr<Slider>( new Slider() ); mSlider2->setPosition(70.f, 35.f); mSlider2->setValue(0.25f); mSlider3 = shared_ptr<Slider>( new Slider() ); mSlider3->setPosition(70.f, 50.f); mSlider3->setValue(0.5f);
- Add the following code for drawing sliders inside your
drawmethod:gl::enableAlphaBlending(); gl::clear( Color::white() ); gl::setViewport(getWindowBounds()); gl::setMatricesWindow(getWindowSize()); mSlider1->draw(); gl::drawStringRight("Value 1:", mSlider1->getPosition()+Vec2f(-5.f, 3.f), Color::black()); gl::drawString(toString(mSlider1->getValue()), mSlider1->getPosition()+Vec2f(mSlider1->getWidth()+5.f, 3.f), Color::black()); mSlider2->draw(); gl::drawStringRight("Value 2:", mSlider2->getPosition()+Vec2f(-5.f, 3.f), Color::black()); gl::drawString(toString(mSlider2->getValue()), mSlider2->getPosition()+Vec2f(mSlider2->getWidth()+5.f, 3.f), Color::black()); mSlider3->draw(); gl::drawStringRight("Value 3:", mSlider3->getPosition()+Vec2f(-5.f, 3.f), Color::black()); gl::drawString(toString(mSlider3->getValue()), mSlider3->getPosition()+Vec2f(mSlider3->getWidth()+5.f, 3.f), Color::black());
We created the Slider class by inheriting and overriding the InteractiveObject methods and properties. In step 1, we extended it with methods for controlling the position and dimensions of the slider object. The methods getValue and setValue can be used to retrieve or set the actual state of slider, which can vary from 0 to 1.
In step 4, you can find the initialization of example sliders by setting the initial position, size, and value just after creating the Slider object. We are drawing example sliders along with captions and information about current state.