
Graphical User Interface (GUI) is often required for controlling and tuning your Cinder application. In many cases, you spend more time tweaking the application parameters to achieve the desired result than writing the code. It is true especially when you are working on some generative graphics.
Cinder provides a convenient and easy-to-use GUI via the InterfaceGl class.
To make the InterfaceGl class available in your Cinder application, all you have to do is include one header file.
#include "cinder/params/Params.h"
Follow the steps given here to add a GUI to your Cinder application.
- Let's start with preparing different types of variables within our main class, which we will be manipulating using the GUI.
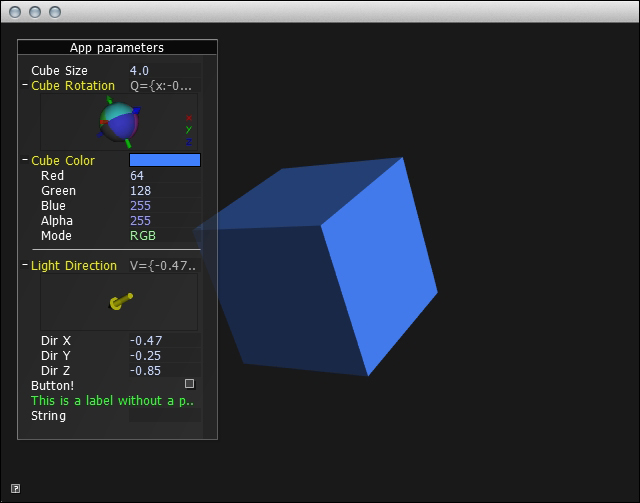
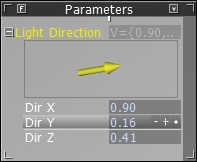
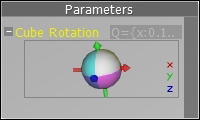
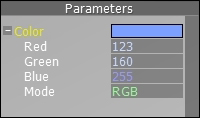
float mObjSize;
Quatf mObjOrientation;
Vec3f mLightDirection;
ColorA mColor;
- Next, declare the
InterfaceGlclass member like this:params::InterfaceGl mParams;
- Now we move to the
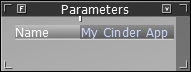
setupmethod and initialize our GUI window passing"Parameters"as the window caption and size to theInterfaceGlconstructor:mParams = params::InterfaceGl("Parameters", Vec2i(200,400)); - And now we can add and configure controls for our variables:
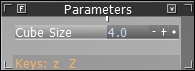
mParams.addParam( "Cube Size", &mObjSize, "min=0.1 max=20.5 step=0.5 keyIncr=z keyDecr=Z" );
mParams.addParam( "Cube Rotation", &mObjOrientation ); // Quatf type
mParams.addParam( "Cube Color", &mColor, "" ); // ColorA
mParams.addSeparator(); // add horizontal line separating controls
mParams.addParam( "Light Direction", &mLightDirection, "" ); // Vec3f
mParams.addParam( "String ", &mString, "" ); // string
Take a look at the
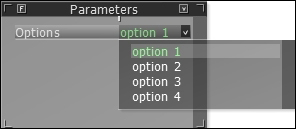
addParammethod and its parameters. The first parameter is just the field caption. The second parameter is a pointer to the variable where the value is stored. There are a bunch of supported variable types, such asbool,float,double,int,Vec3f,Quatf,Color,ColorA, andstd::string.The possible variables types and their interface representations are tabulated in the following table:
Type
Representation

Enumerated parameter
The third parameter defines the control options. In the following table, you can find some commonly used options and their short explanations:
Name
Explanation
The minimum possible value of a numeric variable
The maximum possible value of a numeric variable
Defines the number of significant digits printed after the period for floating point variables
Keyboard shortcut for calling button callback
Keyboard shortcut for incrementing the value
Keyboard shortcut for decrementing the value
Setting the value to
truemakes a variable read-only in GUIDefines the number of significant digits printed after the period for floating point variables
Tip
You can find the complete documentation of the available options on the AntTweakBar page at the following address: http://anttweakbar.sourceforge.net/doc/tools:anttweakbar:varparamsyntax.
- The last thing to do is invoke the
InterfaceGl::draw()method. We will do this at the end of thedrawmethod in our main class by typing the following code line:params::InterfaceGl::draw();
In the setup method we will set up the GUI window and then add controls, setting up a name in the first parameter of the addParam method. In a second parameter, we are pointing to the variable we want to link the GUI element to. Whenever we change values through the GUI, the linked variable will be updated.
There are a few more options for InterfaceGl, if you need more control over built-in GUI mechanism, please refer to the AntTweakBar documentation which you can find on the project page mentioned in the See also section of this recipe.
You can also add buttons to the InterfaceGl (CIT) panel with callbacks to some functions. For example:
mParams.addButton("Start", std::bind(&MainApp::start, this));Clicking on the Start button in the GUI fires the start method of the MainApp class.
A convenient way to control the position of the GUI panel is through the usage of the AntTweekBar facility. You have to include an additional header file:
#include "AntTweakBar.h"
And now you can change the position of the GUI panel with this code line:
TwDefine("Parameters position='100 200' ");In this case, Parameters is the GUI panel name and the position option takes x and y as values.
There are some good looking GUI libraries available as CinderBlocks. Cinder has an extensions system called blocks. The idea behind CinderBlocks is to provide easy-to-use integration with many third-party libraries. You can find how to add examples of CinderBlocks to your project in the Communicating with other software recipe.
An alternative GUI developed by Marcin Ignac as a CinderBlock can be found at https://github.com/vorg/MowaLibs/tree/master/SimpleGUI.
You can check out an alternative user interface developed by Reza Ali as a CinderBlock at http://www.syedrezaali.com/blog/?p=2366.
InterfaceGl in Cinder is built on top of AntTweakBar; you can find its documentation at http://www.antisphere.com/Wiki/tools:anttweakbar.