In this recipe we will learn how we can animate the camera position on our path, calculated as a B-spline.
In this example, we will use MayaCamUI, so please refer to the Using MayaCamUI recipe in Chapter 2, Preparing for Development.
We will create an application illustrating the mechanism. Perform the following steps to do so:
- Include necessary header files.
#include "cinder/Rand.h"
#include "cinder/MayaCamUI.h"
#include "cinder/BSpline.h"
- Begin with the declaration of member variables.
MayaCamUI mMayaCam;
BSpline3f   spline;
CameraPersp mMovingCam;
Vec3f       mCamPosition;
vector<Rectf> mBoxes;
- Set up the initial values of members.
setWindowSize(640*2, 480); mCamPosition = Vec3f::zero(); CameraPersp mSceneCam; mSceneCam.setPerspective(45.0f, 640.f/480.f, 0.1, 10000); mSceneCam.setEyePoint(Vec3f(7.f,7.f,7.f)); mSceneCam.setCenterOfInterestPoint(Vec3f::zero()); mMayaCam.setCurrentCam(mSceneCam); mMovingCam.setPerspective(45.0f, 640.f/480.f, 0.1, 100.f); mMovingCam.setCenterOfInterestPoint(Vec3f::zero()); vector<Vec3f> splinePoints; float step = 0.5f; float width = 20.f; for (float t = 0.f; t < width; t += step) { Vec3f pos = Vec3f( cos(t)*randFloat(0.8f,1.2f), 0.5f+sin(t*0.5f)*0.5f, t - width*0.5f); splinePoints.push_back( pos ); } spline = BSpline3f( splinePoints, 3, false, false ); for(int i = 0; i<100; i++) { Vec2f pos = Vec2f(randFloat(-10.f,10.f), randFloat(-10.f,10.f)); float size = randFloat(0.1f,0.5f); mBoxes.push_back(Rectf(pos, pos+Vec2f(size,size*3.f))); } - Inside the
updatemethod update the camera properties.float step = 0.001f; float pos = abs(sin( getElapsedSeconds()*0.05f )); pos = min(0.99f, pos); mCamPosition = spline.getPosition( pos ); mMovingCam.setEyePoint(mCamPosition); mMovingCam.lookAt(spline.getPosition( pos+step ));
- The whole
drawmethod now looks like the following code snippet:gl::enableDepthRead(); gl::enableDepthWrite(); gl::enableAlphaBlending(); gl::clear( Color::white() ); gl::setViewport(getWindowBounds()); gl::setMatricesWindow(getWindowSize()); gl::color(ColorA(0.f,0.f,0.f, 1.f)); gl::drawLine(Vec2f(640.f,0.f), Vec2f(640.f,480.f)); gl::pushMatrices(); gl::setViewport(Area(0,0, 640,480)); gl::setMatrices(mMayaCam.getCamera()); drawScene(); // draw dashed line gl::color( ColorA(0.f, 0.f, 0.f, 0.8f) ); float step = 0.005f; glBegin(GL_LINES); for (float t = 0.f; t <= 1.f; t += step) { gl::vertex(spline.getPosition(t)); } glEnd(); // draw object gl::color(Color(0.f,0.f,1.f)); gl::drawFrustum(mMovingCam); gl::popMatrices(); // ------------- gl::pushMatrices(); gl::setViewport(Area(640,0, 640*2,480)); gl::setMatrices(mMovingCam); drawScene(); gl::popMatrices(); - Now we have to implement the
drawScenemethod, which actually draws our 3D scene.GLfloat light0_position[] = { 1000.f, 500.f, -500.f, 0.1f }; GLfloat light1_position[] = { -1000.f, 100.f, 500.f, 0.1f }; GLfloat light1_color[] = { 1.f, 1.f, 1.f }; glLightfv( GL_LIGHT0, GL_POSITION, light0_position ); glLightfv( GL_LIGHT1, GL_POSITION, light1_position ); glLightfv( GL_LIGHT1, GL_DIFFUSE, light1_color ); glEnable( GL_LIGHTING ); glEnable( GL_LIGHT0 ); glEnable( GL_LIGHT1 ); ci::ColorA diffuseColor(0.9f, 0.2f, 0.f ); gl::color(diffuseColor); glMaterialfv( GL_FRONT, GL_DIFFUSE, diffuseColor ); vector<Rectf>::iterator it; for(it = mBoxes.begin(); it != mBoxes.end(); ++it) { gl::pushMatrices(); gl::translate(0.f, it->getHeight()*0.5f, 0.f); Vec2f center = it->getCenter(); gl::drawCube(Vec3f(center.x, 0.f, center.y), Vec3f(it->getWidth(), it->getHeight(), it->getWidth())); gl::popMatrices(); } glDisable( GL_LIGHTING ); glDisable( GL_LIGHT0 ); glDisable( GL_LIGHT1 ); // draw grid drawGrid(50.0f, 2.0f); - The last thing we need is the
drawGridmethod, the implementation of which can be found in the Using 3D space guides recipe in Chapter 2, Preparing for Development.
In this example we are using a B-spline as a path that our camera is moving along. Please refer to the Animating along a path recipe to see the basic implementation of an object animating on a path. As you can see in step 4 we are setting the camera position by invoking the setEyePosition method on the mMovingCam member, and we have to set the camera view direction. To do that we are taking the position of the next point on the path and passing it to the lookAt method.
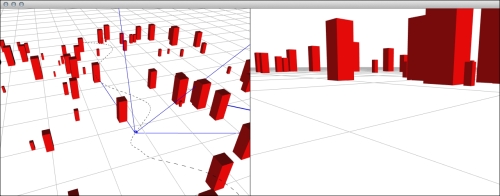
We are drawing a split screen, where on the left-hand side is a preview of our scene, and on the right-hand side we can see what is in a frustum of the camera moving along the path.