CHAPTER 6 Working with Single-and Multi-Page Documents
You have an idea for promoting your product or service; you have your graphics, and you have some body copy and a snappy headline in mind. The next logical step is defining the space within which you express your promotional idea. Do you need a flyer? Or perhaps a four-page booklet? This chapter covers one of the most important aspects of any project: setting up pages in CorelDRAW. You’ll learn about layout styles, page dimensions for your screen and for printing, and page reordering. In the process, you’ll gain a good working knowledge of what you need to do—and what you can have CorelDRAW do—to create a page that suits your ideas.
Setting Up Your Document Page
Every new file you create, every file your coworker shares with you, and every CorelDRAW template you use has its own set of page properties that have two attributes: physical properties and display preferences. The physical properties refer to the size, length, and color of each page. Display preferences control how page values are viewed. Let’s begin with the most common options and then move onto the more specialized features.
Controlling Page Size and Orientation
If you’ve unchecked the “Always show the Welcome screen at launch” check box, the default size whenever a new document is created is the CorelDRAW default, which might depend on the language version of CorelDRAW you use. For the U.S. author, this is U.S. Letter, 8 ½″ by 11″, but this can be changed in a number of ways. The quickest method is via the property bar while the Pick tool—and no objects—are selected. You must have a document in CorelDRAW’s workspace, or you can’t access the property bar. The property bar features options for setting your page to standard-sized pages, custom sizes, and orientation, as seen in Figure 6-1. In case you have a multi-page document, the property bar also has ways to change all pages at once, or to change only the currently visible page.
The Paper Type/Size and orientation options control the format for your document. When you have a specific format for a design you need to print, the following sections cover the options available to you in CorelDRAW X5.
Paper Type/Size
To choose a standard page size for your region, clicking a Paper Type/Size option in the property bar is the quickest method; from the drop-down box, you have Letter, Legal, Tabloid, and so on. If you have a limited need for different paper sizes, click the Edit This List button at the bottom of the drop-down list, and you can delete seldom-used sizes by clicking the Delete trashcan button in the Options box. Once you’ve made a selection, the dimensions are automatically entered as values into the Page Width and Height boxes in the property bar.
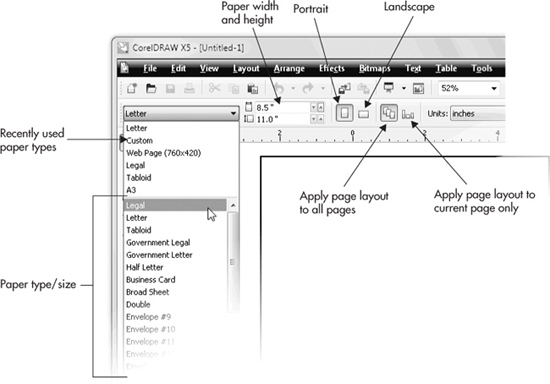
FIGURE 6-1 You change page size and orientation by using the property bar.
• Page Width and Height For a custom page size, type specific values directly into the Page Width and Height boxes, and then press ENTER. Both page width and height values can be between 0.00333 and 1,800 inches. This is equivalent to 1 to 172,800 pixels if you do more web design work than printed page layout.
• Landscape/Portrait orientation Clicking either Portrait or Landscape in the property bar while using the Pick tool (and having no objects selected) sets the page orientation. If the page width you enter is smaller than the page height entered, the orientation is automatically set to Portrait, and vice versa for Landscape. Changing from Portrait to Landscape (or vice versa) automatically switches the values in the Page Width and Height fields.
• All Pages/Current Page In CorelDRAW X5, you can create a document up to 999 pages long, with different pages set to any size or orientation. The All Pages and Current Page buttons operate in “either/or” fashion like the orientation buttons, enabling you to set the page size either for all pages in your document at once (the default) or for only the current page. To set only the current page to be different from the others in your document, click the Current Page button (whose icon is different-sized pages), and set your new page size and orientation as needed. Other pages in the document aren’t resized when you choose this option.
NOTE
If you’ve unintentionally removed a page size you need later, re-create the page size, go to the Page Size list on the property bar, and click Custom and Edit This List. In the Options | Page Size box that appears, click the Save (diskette icon) button, type a name for the page, and click OK.
Page Viewing Options
With CorelDRAW at its default settings, when you choose File | New and click OK, you’ll see a rectangle in the workspace. This rectangle represents your document page in height and width. However, what you won’t see is how your page will be printed to a personal printer or to a commercial press. Whenever you print, you have areas called the printable area and the bleed area. You can add nonprinting guidelines to provide a page preview to see those areas, so objects and text at the edges of your work aren’t partially printed. You want these features visible when designing for print because the grippers on printers often prevent edge-to-edge prints. To have CorelDRAW add bleed area and printable area (safety) guides to your page, press CTRL+J, and then choose Document | Guidelines | Presets; check the Printable Area and Bleed Area check boxes, as shown next. The bleed area extends to the edge of the page, and this is correct for personal printers; see the following Note.
NOTE
Bleed is the part of the printed image that extends beyond the edge of the page. When printing to a personal printer, there is no bleed, because bleed is only relevant when a page on a commercial press is trimmed to final book size. For example, if a commercial press uses 12″ × 14″ paper and the final trim size is 8 ½″ × 11″, you could set up a bleed area of 10″ × 13″ to make a design extend to the edge of the page the audience reads. You’ll see in the next tutorial how to create a No. 10 envelope that features a bleed design.

NOTE
If you are printing to a borderless photo printer, your printable area will be the same size as your page border.
The properties of Printable Area and Bleed Area depend on the printer options you choose in the Print Setup dialog, opened by choosing File | Print Setup:

TIP
Setting a bleed amount is done using Tools | Options | Document | Page Size, using the Bleed option num box. The bleed amount can be defined anywhere from 0 (the exact edge of your page) to 900 inches.
 Creating Your Own Bleed Designs Using Your Home Printer
Suppose you have a need for an elegant No. 10 envelope whose design bleeds at the left side. With the knowledge you now have about bleeds and the printable page size, you can create a bleed envelope using your home laser or inkjet printer.
1. Choose File | New, choose Letter as the Size, and click the Landscape orientation button. Click OK to create the new document.
2. Choose File | Print Setup to access the printer’s setup features. Click the Preferences button, and then click the paper/quality tab at the top (note: this location may differ depending on the printer make and model). Scroll the Paper sizes list to find Envelope #10. Click on the finishing tab (again, the location may differ) to set page orientation in the printer driver to Landscape to match the page orientation in the CorelDRAW document. Click OK and return to the empty page in CorelDRAW.
3. Select Tools | Options and navigate to the Guidelines | Presets section. Check the Printable Area box to put guidelines on the page that will show the shape of the envelope selected previously.
4. Place your design in your page border, but overlapping the printable page area in the position in which you want the design to bleed to the left, as shown in Figure 6-2.
5. Add an address and then choose File | Print (CTRL+P).
Controlling Page Background Color
To specify a page background color for your document, choose Layout | Page Background (CTRL+J) to open the Options dialog to the Background page.
• Solid Choose this option and a color from the selector to specify any uniform color as the page background. Click Other in the color selector to use a color picker in different color models (RGB, CMYK, and so on), a mixer, or a specific color palette. Once a color has been chosen, the page background is set to that color, but the bleed area and the workspace are not.
• Bitmap Choose this option to use a bitmap as the page background. Click the Browse button to open the CorelDRAW Import dialog, and locate and choose a bitmap. Background bitmaps are tiled as many times as needed to fill the page. You can also scale the number of repeating tiles by clicking the Custom Size radio button and entering values. The best bitmaps to use for patterns are ones that have been designed to tile seamlessly. In Figure 6-3, you can see an application of a Background Bitmap that is muted in tone (and therefore is suitable for white headline text) and that was designed to seamlessly repeat. The Bitmap option is terrific for creating several different signs or stationery that contain different text but must be tied together in a theme. You might, for example, create different text on layers such as “Swimsuit Sale,” “Vacation Sale,” and “Inflatable Theme Toy Sale,” and then print different signs by hiding all but one layer for printing. You can’t accidentally move the Background, and this technique is quick to set up when you have 12 different messages that need a common background.
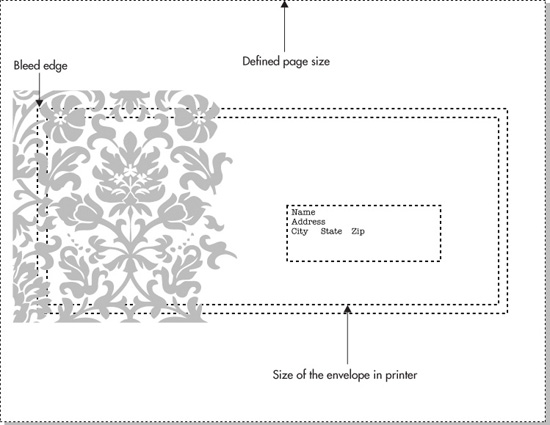
FIGURE 6-2 Creating the bleed design on the envelope
• Source The Source options let you establish an external link to the bitmap file or store a copy of it internally with your CorelDRAW X5 document file. Choose Linked to maintain an external link or Embedded to store the bitmap with your document. While Linked is selected, the file path to the bitmap is displayed, and the bitmap itself must be available to CorelDRAW during printing. This option is very useful when you need to conserve on saved CorelDRAW file sizes; additionally, you can modify the background bitmap in PHOTO-PAINT or Painter, and then reload the edited bitmap in the future.
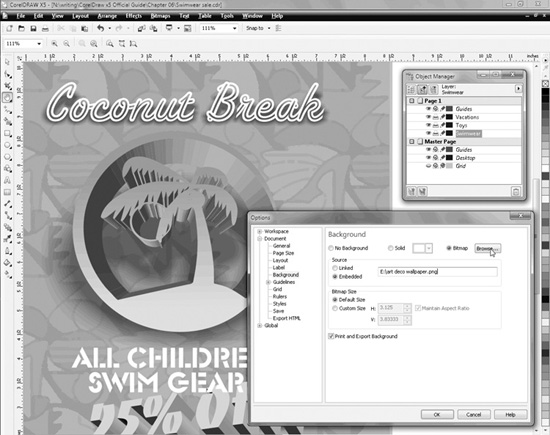
FIGURE 6-3 Use a bitmap as a Background for your design and text.
• Bitmap Size This field contains “either/or” radio buttons. If you choose Default Size, the background appears on the page because the bitmap’s original dimensions allow it to tile as many times as needed to fill the page. However, if you want a smaller bitmap as the background (more tiles), click the Custom Size button. The Maintain Aspect Ratio option is checked by default; you probably don’t want the bitmap background to look smooshed or stretched—with Maintain Aspect Ratio turned on, all you need to do is enter one value in either the H or V field, and CorelDRAW automatically fills in the remaining field. Note that bitmaps are resolution dependent, unlike vector drawings. Thus, you can usually scale down a bitmap, but don’t try to enlarge it, because the bitmap will go through something called resampling, and blurriness is often the result. Scale down = yes; scale up = no.
• Print And Export Background Use this option to control whether the page background you’ve added to your document page is included when exporting your drawing files or when you print the document. It’s available when either Solid or Bitmap is selected for the page background; by default, it’s active.
Using Layouts and Labels
The property bar is used to set up the basic page and paper sizes and orientation. But designers often need to lay out designs for items such as labels, booklets, tent cards, and greeting cards that are printed on standard size paper, but that are definitely not laid out like a single-page flyer. So you don’t have to sit at your workstation all day folding paper to try to figure out exactly where the fold lines are and where the text needs to be upside down. CorelDRAW X5 provides specialized layouts that are just a few clicks away. These timesavers are not on the property bar—you need to open the Options dialog to choose the one you want from the Layout drop-down box.
Choosing Specialized Layouts
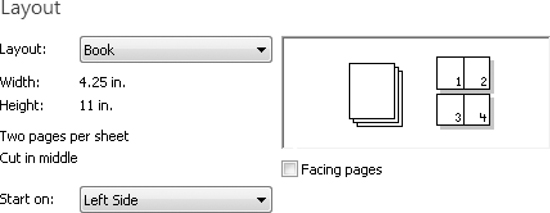
On the Layout page of the Options dialog, you can choose from seven specialized layouts for your document including Full Page, Book, Booklet, Tent Card, Side-Fold Card, Top-Fold Card, and Tri-Fold Brochure.

Choosing one of these layout styles instantly divides the current document page size into horizontal and vertical pages, based on the preview supplied in the dialog.
• Full Page This layout style is the default for all new documents, and it formats your document in single pages, like those shown here.

• Book The Book layout format, shown right, divides your document page size into two equal vertical portions, and each portion is considered a separate page. When printed, each page is output as a separate page.
• Booklet In a similar arrangement to the Book layout, the Booklet layout format divides your document page size into two equal vertical portions. Each portion is considered a separate page. However, when printed, pages are paired according to typical imposition formatting, where pages are matched according to their final position in the booklet layout. In a four-page booklet, this means page 1 is matched with page 4, and page 2 is matched with page 3, as shown at right.

• Tent Card The Tent Card layout format, shown at right, divides your document page size into two equal horizontal portions, each of which is considered a separate page. Because tent card output is folded in the center, each of your document pages is printed in sequence and positioned to appear upright after folding.

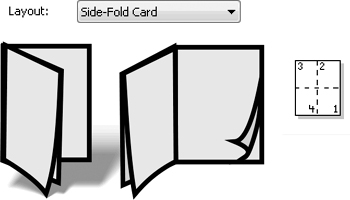
• Side-Fold Card The Side-Fold layout format divides your document page size into four equal parts, vertically and horizontally. When printed, each document page is printed in sequence, and positioned and rotated to fit the final folded layout. Folding the printed page vertically, then horizontally, results in the correct sequence and orientation.
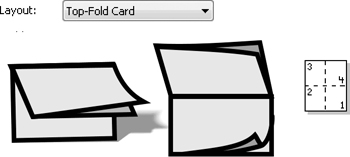
• Top-Fold Card Like the Side-Fold layout, the Top-Fold layout format also divides your document page size into four equal parts, vertically and horizontally. When printed, each document page is printed in sequence, and positioned and rotated to fit the final folded layout.
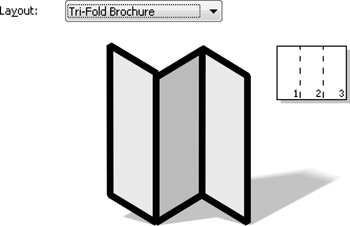
• Tri-Fold Brochure Set your page orientation to Landscape using File | Print Setup, and you then have the ideal layout for travel brochures and restaurant tabletop stand-up menus. If your printer supports it, you can print both sides for a total of six panels, with live space measuring about 3 ½″ wide and 8″ high on the end panels.
After you choose a layout style and return to your document, each subdivision of the layout can be viewed individually. You can also view pages in pairs by choosing the Facing Pages option in the Layout page of the Options dialog for several layout styles. When Facing Pages is selected in the dialog, you also have the opportunity to start your document on either the Left Side or Right Side for some layout styles by making a selection from the Start On menu.
Using Preformatted Labels
CorelDRAW has a comprehensive collection of label formats for preformatted paper stock from vendors such as Avery, Ace, and Leitz. Once you’ve clicked the Labels radio button, the Page Size page turns into the Label page, offering access to the label collection. After you’ve selected a specific label format, the preview window shows its general layout and indicates the number of rows and columns available, as shown in Figure 6-4.
After you choose a label format and return to your document, each of your document pages will represent an individual label. You’ll need to add the exact number of pages to accommodate all of your labels. If you don’t see the exact manufacturer for your specific label type, you can create your own from scratch, or base it on an existing label format (see Figure 6-5). Choose an existing label from the Label Types menu; click Customize Label; set the number of Rows and Columns; and set the Label Size, Margins, and Gutters according to your own label sheet. Once the format is created, you may save your label by clicking the plus (+) button next to the Label Style drop-down list. You can delete a selected label format from the list by clicking the minus (–) button.

FIGURE 6-4 CorelDRAW has just the preformatted label template you need.

FIGURE 6-5 If you don’t find the label you need, modify an existing label using the options.
Naming Pages
Whenever a new document is created, CorelDRAW automatically creates the names, such as “Page 1,” “Page 2,” and so on. These page names are only for your reference as you navigate your multi-page document. However, you can customize your page names by using several different methods.
When creating web page documents—where each document page is a separate web page—adding a unique name to the page creates a title for the exported page. When your document is printed, page names can also be printed in the margins, can indicate the contents of the page, and can provide other page-specific information.
TIP
To quickly display the previous or next page in your document, you can press PAGE UP (previous page) or PAGE DOWN (following page).
Using the Rename Page Command
Use the Rename Page command to assign a unique name to pages. Either choose Layout | Rename Page, or (more quickly) right-click the page tab at the lower left of your document window, and then choose Rename Page from the pop-up menu to access the command. The Rename Page dialog, shown here, can rename a page with a name of up to 32 characters, including spaces.

Save Details with Your File
Document Properties is a CorelDRAW feature that provides details about a document you save without having to type in the margins. To access Document Properties—to both enter and view information—right-click on a blank part of the page. In addition to letting you type yourself little reminders, Document Properties is also a very convenient method to tag designs you export to JPEG and other bitmap file formats. As you can see in Figure 6-6, the same information you type in Document Properties is available to Windows users when they right-click your image in a file folder and choose Details.
NOTE
Users who don’t own CorelDRAW cannot access Document Properties info you’ve embedded in a native CDR file by right-clicking. The solution to this problem is to make them buy CorelDRAW.
Navigating a Multi-Page Document
To go to different pages in a document, click a page icon at the lower left of the document window. If the page isn’t in view, you can scroll to locate it, or (for lengthy documents) open the Go To Page dialog, shown next, by clicking between the Next Page and Previous Page buttons at the lower left of your document window. This dialog enables you to move quickly to a specific page in your document.

FIGURE 6-6 Save your CorelDRAW files and exported bitmaps with Document Properties metadata.

Using the Object Manager
The Object Manager docker offers the advantage of mass-editing page names from within a single docker. To open the Object Manager, choose Tools | Object Manager. Once the docker is open, click to ensure that the docker is set to Show Object Properties by deselecting the Layer Manager View button state, shown here:

In this view, all page and object names are displayed. To rename any page (or any object), click once directly on the page title to select the page you want to name or rename, click a second time to highlight the page name text, then type a name, and finally press ENTER. Page names appear in the page tabs at the lower left of your document window, accompanied by a numeral indicating the page’s order in your document:
![]()
TIP
To see more (or less) of the pages of your document in the page tab area of your document window, click-drag on the vertical divider between the page tabs and the horizontal scroll bar.

Page Commands
There are several ways to add and delete pages from a document; three ways are using menu commands, using shortcuts while holding modifier keys, and using certain page views. However, quick is best, and in this section, you see the most convenient way as well as methods that are easiest to remember. You can decide for yourself which best suits the way you work.
Inserting Pages and Setting Options
From the main menu, choose Layout | Insert Page to open the Insert Page dialog, shown here, which features a host of options for specifying your new page properties and where you would like to add the new page in relation to your existing pages.

Enter the Number Of Pages needed in the Insert Page dialog, and choose to Place them either Before or After your current page, or between specific pages in your document by using the Existing Page box. You are not limited to the orientation or size of your current page when you add pages, unlike the constraints of traditional printed books and magazines!
TIP
To quickly add a new page to the beginning or end of your document, go to the first or last page and click the plus (+) symbol on the left or right of the page buttons at the lower left of your document window. To add a page before or after your current page, right-click a page tab to the right of the + button on the right, and choose either Insert Page Before or Insert Page After from the pop-up menu.
Deleting Pages
Deleting document pages can be done by choosing Layout | Delete Pages from the main menu; you can delete one or more of the existing pages in your document. By default, the dialog opens to display the current page as the page in the Delete Page box, shown next, but you may select any page before or after your current page if you choose. To delete an entire sequence of pages, click the Through To Page option, which enables you to delete all pages in a range between the page specified in the Delete Page box through to any page following your current page. Pay careful attention to the word “Inclusive” after the last page number: if you type, for example, 10 when you want to delete pages 1–9, well, oops—there goes your day unless you press CTRL+Z immediately!

TIP
To delete the current page, right-click the page name on the page tab, and then choose Delete Page from the pop-up menu. There is no confirmation when you delete a page, so make sure you’ve had your second cup in the morning before doing this.
Moving and Duplicating Pages
You’re going to create such fantastic content in CorelDRAW that you might never want to delete it; instead you might want to move and/or copy pages. To move a page, use a click-drag action on the page tab to drag it to a new position. To copy a page—and all its contents—thus creating a new page order, hold CTRL while click-dragging the page tab, dragging the page to a new position. CorelDRAW does not duplicate the name of a user-named page; you’d wind up with an organizational nightmare if it did, so it’s a good practice to name a duplicate page after you’ve created the copy.

Using the Page Sorter
Page Sorter is a view that provides you with a broad look at your document and all its pages. In this view, you can add, delete, move, or copy pages in a single view. You can also change the Paper/Type Size and the page orientation of all the pages or just selected pages. A CorelDRAW document can contain pages of different sizes, which can be very handy when you are designing matching business cards and letterhead or other similarly related materials. To open your document and all its pages in Page Sorter view, choose View | Page Sorter View. The Page Sorter displays all pages in your document.
TIP
Using Page Sorter, you can quickly export either your entire document or only selected pages. Click to select the page(s) you want to export, and choose File | Export, or click the Export button in the standard toolbar to open the Export dialog. To export only specific pages, choose the option to Export This Page Only, which by default is not selected. Exporting is not to be confused with saving; exporting pages is usually done to get your work into bitmap format, Adobe Illustrator file format, or CMX (Corel Media Exchange) for sharing with users who have a compatible application.
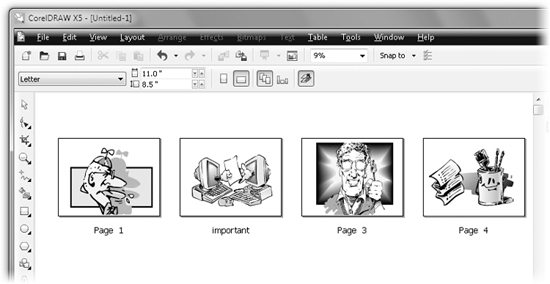
In Page Sorter view, a single click selects a page. Holding SHIFT while clicking pages enables you to select or deselect multiple contiguous pages. Holding CTRL while clicking enables you to select or deselect noncontiguous pages. The following actions enable you to apply page commands interactively to single- or multiple-page selections, as seen in Figure 6-7.
• Move Page(s) To move a page and change its order in your document, click-drag the page to a new location. During dragging, a vertical I-beam appears, indicating the insertion point for the page or the first page of the selected sequence of pages.
• Add Page(s) To add pages to your document, right-click any page and choose Insert Page Before or Insert Page After from the pop-up menu to insert a page relative to the selected page.

FIGURE 6-7 Page Sorter enables you to manage your document pages interactively while viewing all page properties.
• Copy Page(s) To copy pages—and their contents—hold CTRL while click-dragging the page to a specific location. During dragging, a vertical I-beam appears, indicating the insertion point for the page copy or the first page of the selected sequence of pages.
• Name or Rename Page To add a new name or change an existing page name, click the page name below the page to select it; click a second time to highlight the page title and enter a new name; then press ENTER. You can also rename a page by right-clicking a specific page and choosing Rename Page from the pop-up menu to highlight the page name for editing.
• Change Page Size/Orientation of All Pages In Page Sorter view, the property bar displays typical page property options for applying standard or custom page sizes and for changing the orientation between Landscape and Portrait.
If you want to change the orientation of all of the pages in the document, click the All Pages button on the property bar, and then click either the Portrait or the Landscape button to change all pages to that orientation.
• Change Page Size/Orientation of Selected Pages If you want to change only the orientation of some of the pages, click the Current Page button. Then select the pages you want to change, and click the Portrait or Landscape button to change the page(s) to the desired orientation, as shown.

Changing the orientation in the Page Sorter not only changes the view, but also changes how the pages themselves are oriented in the document. As you can see, the second and last pages have drawings that look better in Portrait view; you CTRL-click pages 2 and 4 in this example, click Current Page, and both the Page Sorter view and the pages themselves are reoriented. If you want to rethink this dynamic change, repeatedly pressing CTRL+Z (Edit |Undo) restores your document.
Exiting Page Sorter view is easily done; click the Page Sorter View button, or click any tool on the toolbox. Any changes applied while in the Page Sorter are applied to your document.
TIP
To exit the Page Sorter and immediately go to a particular page in your document, double-click the page.
Page definition, sorting pages, margins, bleeds, and enough other options have been discussed to fill a book! Now that you know how to set up a page, how large do you want that drawing you just created on the page? And how do you precisely move the drawing if you want it perfectly centered on the page? Fortunately, the answers are in the next chapter, which covers measuring and drawing helpers.