CHAPTER 25 An Introduction to PHOTO-PAINT
Photography tells a different story than the vector graphics you create in CorelDRAW; while vector drawings can look crisp, powerful, and brilliant in coloring, photographs typically tell more of a human story, with soft tones, an intricate latticework of highlights and shadows, and all the photorealistic qualities that portray the world as we’re accustomed to seeing it. Understandably, the tools you use to edit a digital photo or other bitmap image are different from those you use to edit paths in CorelDRAW. And this is where PHOTO-PAINT enters the creative scene.
This chapter introduces you to the fundamentals of bitmap images; how you measure bitmaps, how to crop them to suit a specific output need, and ultimately how to make your original photo look better than it came off the camera.
NOTE
Download and extract all the files from the Chapter25.zip archive to follow the tutorials in this chapter.
The Building Block of Digital Photos: The Pixel
The term “pixel” is funny-sounding, and we use it occasionally in a humorous context, but seldom is an explanation or definition of a pixel provided in a way that is useful when you need to alter a digital photograph. A pixel—an abbreviation for picture element—is the smallest recognizable unit of color in a digital photograph. It is not a linear unit of measurement, a pixel doesn’t have to be square in proportions, and it’s not restricted to having any specific color. Now that what a pixel isn’t has been covered, read on to learn what a pixel is and how understanding its properties will help you work with PHOTO-PAINT’s tools and features to make photo-retouching go as quickly as your CorelDRAW work.
Pixels and Resolution
A pixel is a unit of color; as such, it has no fixed size we can measure the same way as you’d measure the length of a 2-by-4 (which is usually 2″×4″). If you were to discuss a pixel with a friend or coworker, it would be hard to do without any context, because these units of color cannot exist unless they’re within a background, usually called the paper or the canvas. The paper in PHOTO-PAINT is an imaginary grid into which you assign units of colors with the Paint tool or the Fill tool. When you open a digital photograph, the “paper” in PHOTO-PAINT is predefined by the presets of the digital camera and software. The resolution of your photographs is then fixed by that combination, but can be changed later.
NOTE
The term “bitmap” was derived from the imaginary grid on an image’s canvas— a map—and the amount of color information placed on this map was expressed as a bit of digital information. Usually, more than one bit of information is held by a pixel; more often a pixel holds a byte of information (8×a single bit), but somehow the term “bitmap” stuck as one of the names for pixel-based images.
Resolution is expressed as a fraction, a ratio: pixels per inch expresses image resolution in the same way that miles per hour expresses speed. We often call this resolution dpi (dots per inch) due to the visual similarity of dots of ink on a printed page and the pixels of color we see on a monitor. Bitmap images are also called resolution-dependent images because once a photo has been taken or a paper size defined for a PHOTO-PAINT painting, you cannot change the resolution without distorting the visual content of the picture. Here’s an example that shows the use of resolution when you press CTRL+N or choose File | New.
1. In the Create a New Image dialog, you’re offered a Preset Destination of PHOTO-PAINT’s default size, which as you can see here is 5 inches in Width by 7 inches in Height. However, the print size is not a complete description of how large the image will be in other important measurements, such as pixels. How many pixels will be created per inch? Pixels are the units of color for the document, so without knowing the resolution, the size of the paper is as meaningful as how many grapefruits per inch will fit on the page! Fortunately, below the Height and Width fields, you’re offered the Resolution, set to the default of 72 dpi.
2. Aha! Now the number of pixels in the new document can be Discovered. This can be important for website work, because we always presume a fixed screen resolution with the audience, and therefore images are always measured in the absolute number of pixels in width and height for graphics. In this example, 504 pixels wide might make a good logo on the top page of a website; the majority of people who visit websites run a screen resolution of 1024×768 or higher, so this default paper size is about half the width of an audience’s monitor.

Image Resolution
Any PHOTO-PAINT document’s resolution can be great for web graphics but not so good for printing. The web display and print quality differ because of the finite number of pixels in the resolution-dependent, bitmap image. Figure 25-1 shows at left a CorelDRAW illustration of a child’s paint box. In this book the drawing looks crisp around the edges, and smooth in its transitions from neighboring tones. It was a graphic suitable for printing as a bitmap because it was exported at a high resolution (300 dots per inch) for printing in this book. However, at right is an illustration of the same paint box, with the imaginary bitmap grid shown, but it was exported at desktop icon size (about 48×48 pixels), and the loss of image detail is evident at its resolution of 72 pixels per inch.
Resolution, Pixel Count, and Printing
It’s a frequently asked question whose answer is imprecise: what is the resolution I need for a photograph to make a good print?
Scanning a physical photograph doesn’t provide the best sampling of color pixels to produce a terrific photograph, but it does ensure that you have a sufficient number of pixels (an image’s pixel count) to print the scanned photo.
The most direct way to acquire a photo and manipulate it in PHOTO-PAINT is by using a digital camera. Today’s digital cameras are capable of taking full-frame pictures that can be printed to inkjets printers at 12″×18″ in high quality. Digital cameras measure the number of pixels in width and height of the picture’s frame in megapixels (MP): a million pixels equal a megapixel. For example, the Nikon D90 can take 12.3 MP—its sensor array captures 4,288 pixels along one dimension and 2,848 pixels along the other. Thus, 4,288×2,848 = 12.2 (plus a fractional amount) megapixels.

FIGURE 25-1 The number of pixels in a bitmap, combined with the image’s resolution, determines whether an image is suitable for printing.
Depending on the make and model of your digital camera (price plays a deciding factor here), you can take images that vary in maximum print size. The following table provides the maximum printable dimensions for different megapixel-capable cameras:

These are not hard-and-fast dimensions, but for two reasons are guidelines for print output:
• The dots that inkjet printers render are imprecise. They are more like splats than dots because the print head sprays color onto the page.
• There is some flexibility when printing to home inkjet printers because image dimensions are inversely proportional to image resolution.
Manufacturers of inkjet printers, makers of inks, and other printing experts agree that the ideal resolution for printing—720 dots per inch—requires about 1/3 this number, in pixels per inch, for the image to be printed. The math goes like this: most affordable inkjet printers offer a high-quality resolution of about 720 dpi. The documentation might claim that the printer offers “enhanced resolution of 1,440 dpi,” but usually this enhancement is only rendered in one direction, height or width, depending on your print layout. The true resolution is always the lower number when two are offered in the inkjet printer’s documentation. Thus, 720 / 3 is 240 (dpi).
NOTE
A pixel is not the same unit of color measurement as a printed dot. Dots per inch (dpi) is the measurement of the fixed resolution of an image as printed to a physical page, and a dot on a page can be physically measured if you have a very small ruler. The resolution of an image as measured on your monitor is expressed in pixels per inch (ppi), and as you’ll learn in this chapter, the dimensions of a bitmap image can be changed by changing the resolution. However, many software manufacturers, including Corel Corp., use ppi and dpi interchangeably. Similarly, the term “dpi” is used in this chapter to express pixels per inch to avoid the discrepancy between terminology used in digital photography and the labels of certain options in PHOTO-PAINT’s dialog boxes.
The good news is that you can change the resolution of an image, thereby changing its real-world dimensions, without changing the pixel count—which tends to sharpen an image when it’s made smaller, but blurs it when enlarged. For example, a photo that is 3″×3″ at 300 pixels per inch has exactly the same number of pixels as the image at 6″×6″ at a resolution of 150 ppi. Both images have the same number of pixels, but the print dimensions and resolution have been changed.
Let’s walk through an example on how to determine a photo’s resolution, and then adjust it for printing.
 Resizing a Photograph
1. In PHOTO-PAINT open CRW_6115.jpg, a photo that has been (mal)adjusted to demonstrate a technique in this chapter.
2. Let’s say that you need to print this photo at inkjet high quality. This means at least 240 dots per inch (dpi) are required. To check the resolution of the current foreground document, use the Object Pick tool to right-click the document, and then choose Document Properties from the context menu.
TIP
To display rulers around the edges of a document, press CTRL+SHIFT+R (View | Rulers). To hide rulers, press CTRL+SHIFT+R again to toggle them off. If the rulers don’t display the units you need, right-click either ruler and then choose Ruler Setup from the context menu.
3. Well, oops. This photo is a nice 8″×11″, but it’s of insufficient resolution to print at the required 240 dpi, as shown in Figure 25-2. It can print with high quality and great image fidelity, but the physical output dimensions need to be decreased to increase the resolution.
4. Right-click the photo and then choose Resample from the context menu. The Resample (Image menu item) box does more than resample an image; it can also resize it, and the two terms are very different. Resize is the action of decreasing or increasing image resolution, affecting image dimensions inversely, and the result is an image that has the same number of pixels. Resampling (covered in this chapter) involves changing the number of pixels in the image. Original pixel colors are moved around the grid, some are duplicated, some removed, and the resulting color pixels are a new color based on an average of neighboring original color pixels. Resampling changes original image data and occasionally blurs or creates unwanted harsh edges in image areas.
5. Check the Maintain Original Size box, make sure the Maintain Aspect Ratio box is checked, and then type 7 in the Height field. Because the photo was doctored for this example, the photo is now a perfect 7″×5″, smaller than its original dimensions. As you can see, as the dimensions decreased, the resolution increased and is now more than adequate in resolution for inkjet printing. Save the file if you like owls, and then print it to see what image resolution does for digital images: it improves them.

FIGURE 25-2 Pictures that need to be printed demand a higher resolution than 144 dots per inch.

Scanning Photos into PHOTO-PAINT
You might want to acquire an image by scanning instead of using a digital camera for two common reasons:
• The picture wasn’t originally taken with a digital camera. There were very few digital cameras in 1924, so your great grandmother’s photo probably exists only as a print, or if you’re extremely lucky, as a film negative.
• The picture is a drawing. You want to use Corel PowerTRACE to clean up a logo or other graphic.
In either event, scanning images is very simple using PHOTO-PAINT as the host for the resulting bitmap. Follow these steps:
1. Make sure the scanner is plugged in, turned on, and connected to your computer directly or through a network. Don’t laugh; these are the first things the manufacturer’s tech support asks you at $5 a minute.
2. Make sure your computer recognizes the scanner. Your scanner came with an installation disk that has drivers Windows needs to read to be able to create a handshake between the two pieces of hardware. Go to the manufacturer’s website, and download and then install the most current drivers if you put the install disk in a safe place you’ve forgotten.
3. Make sure the imaging surface (the platen) on the scanner is clean. Place your image on the platen, making sure the image isn’t crooked within the rectangular edges of the platen, and then launch PHOTO-PAINT.
4. Choose File | Acquire Image | Select Source. Choose your device from the list and then click Select. If you have several devices hooked up to your computer via USB, Firewire, or other connection protocol, choose your scanner. It’s possible that an entry that begins with “WIA” (Windows Interface Application) is a scanning choice. Don’t choose the WIA connection if you can make a different choice; WIA is a generic driver and as such can only access the most basic of features on your scanner.
5. Choose File | Acquire Image | Acquire. The UI for your scanner will appear on top of PHOTO-PAINT’s UI. Different scanners have different interfaces, but the common elements are a preview window in which you can crop the image you want scanned to a bitmap file, and dimensions and resolution fields. Usually, you click the Preview button to refresh the preview, updating your view to the scanner’s current contents on its platen.
6. Choose your color mode for scanning. RGB is generally the best choice because you can always convert an acquired image to grayscale or other color mode directly in PHOTO-PAINT. Only choose Grayscale if you’re scanning a black-and-white photo—aged photos that look like a black-and-white photo can contain valuable image data in sepia areas, so color-scan heirloom photos. If given the option to scan in “bitmap,” “fax,” or “1 bit per pixel,” don’t. This mode should be reserved for documents, faxes, and other material that requires absolutely no image fidelity.
7. Use the interface controls to drag an area of the platen that contains your document. Don’t crop too closely to what you want scanned.
8. Set the scanning percentage to 1:1 (100%) so that a scanned inch actually equals an inch at the resolution you’ll set in step 10.
9. Check the height and width of the highlighted, cropped area on the platen. Many scanners do not offer onscreen rulers; height and width fields should be onscreen, as shown in Figure 25-3. If you need to increase the dimensions, adjust the value in the Percentage field.
10. Set the resolution of the scan. As mentioned earlier in this chapter, if your intended output is 1:1 scale and the printer is a personal inkjet, set the scanning resolution to 240 ppi (often labeled “dpi”). However, if your scan is destined for a desktop publishing document done at a commercial printer, set the resolution to at least 266 ppi. Many commercials printers will ask for 300 ppi.
11. Click Scan and wait a little as the samples of the image are streamed to your computer.
12. When the scan is completed, your scanner’s interface disappears and “Untitled-1.cpt” appears in PHOTO-PAINT’s workspace. Save the image to hard disk (CTRL+S); in the Save an Image to Disk dialog, name the file and choose a file type from the Save As Type drop-down list. PHOTO-PAINT’s native *.CPT file format is fine, except in business situations where you need to share documents. The CPT file format can only be opened on CorelDRAW and PHOTO-PAINT. TIFF and PNG file formats are almost universally understood by applications other than Corel’s—the TIFF format can retain image resolution information, PNG as written by PHOTO-PAINT saves files at the default screen resolution of 72 ppi, but the files are often smaller than uncompressed TIFFs. Be careful when choosing to save a picture as a JPEG— it compresses images by discarding visual detail it thinks is unimportant (but you might not).

FIGURE 25-3 A good size for a scanned image you want to print or retouch should rival the saved file size of photos taken with digital cameras, anywhere from 6MB to 20MB.
NOTE
Some in the imaging community disagree about whether screen resolution should be measured at 72 pixels per inch or 96, the standard that Microsoft put forth with Windows 95. The answer is that when you’re measuring pixels for screen display, resolution makes absolutely no difference. Screen resolution, regardless of how you measure it, is of a fixed size, so a 300-pixel-wide bitmap might look larger or smaller depending on the screen resolution you use for display, but nothing changes the number of pixels in width, nor the total pixel count of a bitmap when you display it on your monitor.
TIP
If you have an older scanner whose drivers do not work with Vista or Windows 7, check out VueScan, a stand-alone scanning software at www.hamrick.com. It runs as an application separate from Windows and separate from PHOTO-PAINT. It will usually restore the use of a scanner you bought even two decades ago that you couldn’t get to work with your new computer.
Resampling and Resizing Photos
At times you absolutely have to upscale a photo; you might not have a better image, and you can’t retake the scene or portrait. When you increase the number of pixels in a photo, you’re not increasing image detail—all the details in the scene were captured when you took the photo. PHOTO-PAINT adds pixels by duplicating existing pixel colors and then averaging the colors a little to make a smooth photo transition between neighboring pixels in the resampled photo if you leave Anti-alias checked in the Resample box.
How much larger you can make a photo before the individual pixels become apparent depends a lot on the visual content of the photo. Pictures of intricate machinery and images of lots of different-colored small objects such as leaves do not “upsample” nearly as well as, say, a photo of soft clouds on an overcast day. If you need to make a photo 150% of its original size, usually you can get away with this with no additional steps. However, if, for example, you need to print a picture from the Web that’s only 300 pixels wide, you have two things going for you in this endeavor:
• Inkjet printers tend to smooth out small rough areas in a digital image, because ink spreads on the printed page, blending flaws together. Don’t count on this factor; it’s an assistant, but a small one.
• PHOTO-PAINT can sharpen edges in the resampled photo while keeping large areas of similar colors smooth in appearance.
TIP
PHOTO-PAINT has several sharpening filters under Effects | Sharpen. PHOTO-PAINT’s Help system provides a good general explanation of the sharpen filters; launch any of them and then click Help in the filter box. Generally, when in doubt, choose Unsharp Mask to add some crispness to resampled photos. Good base point settings to work from and then tune are Percentage: 100, Radius: 1 to 3, and Threshold: 10. They provide very good sharpening without an overwhelming number of options you need to learn. Click the Preview button in filter boxes to see what the filter will look like before applying it.
Figure 25-4 shows a small JPEG photograph; let’s pretend for the purposes of working through a tutorial that you own this condo and want to time-share it. And you want to print postcard-size images to hand out in addition to your website’s image.

FIGURE 25-4 Unless some corrective steps are taken, this small photo would print with huge, clearly visible color pixels.
TIP
The Zoom tool (Z) lets you get in very close to an image area to view and edit. However, if you’re not familiar with resolution-dependent bitmap editing, a zoomed-in view of a photo might look coarse, and your instinct might be to soften the image. Periodically check the document title bar: after the name of the file, there’s an “@” symbol followed by your current viewing resolution. If the zoom factor is greater than 100%, this document is not displaying as your audience will see it. To quickly zoom a document to 1:1, 100% viewing resolution, double-click the Zoom tool on the toolbox.
The following steps are a worst-case scenario—you will almost certainly be able to enlarge photos to become printworthy by resampling up to 150% or so, and not with the gross sort of enlargement and image corrections featured in these steps. However, as you’ll soon see, the High Pass effect you’ll use does indeed enhance a copy of the small JPEG photo to a usable state.
Making a Thumbnail Image Suitable for Printing
1. Open Hollywood-5203.jpg in PHOTO-PAINT. With the Object Pick tool, right-click over the image, and then choose Resample from the context menu.
2. In the Width field, type 7, and then click an insertion point in the Resolution | Horizontal field. Make sure the Maintain Aspect Ratio and Anti-alias check boxes are checked, and then type 240 in the box. Click OK to resample the photo.

3. At 100% viewing resolution, clearly the photo needs a little edge-sharpening without sharpening the larger smooth areas of the photo. Press CTRL+F7 if the Objects docker isn’t docked to the window or isn’t visible. You’re going to duplicate this image and put the copy on top of the original. This is an unusual thing to do, and to be able to do, but PHOTO-PAINT has advanced image-editing features that let you change and merge image areas (called objects) so the pixels in objects can have different colors but are identically aligned to the imaginary grid in the document.
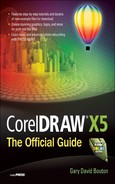
4. With the Object Pick tool, drag the thumbnail labeled “Background” to on top of the New Object button on the Object docker, and then release the mouse button. Doing this duplicates the image, creating the new object directly on top of the original.
5. Click the Object 1 thumbnail on the Objects list to select it—you want to edit this, not the Background object.
6. Choose Effects | Sharpen | High Pass. Wherever sharp transitions between pixel colors appear in the photo, edge details are retained and strengthened. Wherever there is little color difference between neighboring pixels (called low-frequency areas), the visual information is filtered out, leaving a neutral gray. The higher the Percentage you specify (use 100 in this example), the less original color is retained. The greater the Radius (use about 12 in this example), the greater the distance this filter examines from neighboring pixels to filter out areas of little detail difference. Click OK to apply these settings.

7. Beyond the strong edges in Object 1, this object doesn’t look as though it will contribute a lot to enhancing this enlarged image, but the correct answer is, “Yes, it will!” Merge modes are covered in the transparency section of Chapter 22, but for now, here’s a simple explanation of why Overlay mode will turn this largely gray object into a perfect “lens” to sharpen the underlying Background photo. The brightness values in a photo (the tones, not the colors) are usually calculated on a scale from 0 to 255, 255 representing the brightest area (pure white has a brightness of 255). Overlay merge mode can be thought of as a filter: Overlay mode objects that have a brightness over 128 lighten (bleach, screen) objects under them, while brightness pixel values under 128 darken (multiply) the underlying pixels. The High Pass filter made most of the pixels in this object neutral gray—which has no effect in Overlay mode on the underlying pixels. However, the edge details in Object 1 are darker and lighter than the underlying, corresponding Background areas. Choose Overlay from the Merge Mode drop-down list.
8. Objects do not have to be 100% opaque. This Overlay mode object contributes a little too strongly to the overall picture; click the Transparency combo box at the top right of the Object docker to reveal the slider, and then drag the slider left to about 29%, or whatever value looks best in the document window.

9. You can choose to save this file right now as a PHOTO-PAINT (CPT) or Adobe Photoshop (PSD) document, and the objects will retain their order using these special image file formats. And you can now print the composition. However, if you’d like to standardize the image so it can be saved to practically any file format (PNG, JPEG, TIFF, and others) and thus shared with most other computer users, then with the Object Pick tool, right-click either object on the Object docker, and then choose Combine | Combine All Objects With Background.
As you can see in comparison in Figure 25-5, without the High Pass copy of the image in Overlay mode, at left the pixels dominate the image in visual importance. At right, however, with the duplicate object you filtered and merged with the original, it’s a fairly photogenic image…given that you enlarged it to almost 23 times its original file size!
Automation: Recording Your Cropping and Resampling
It’s almost a foregone conclusion that if you work at a small to medium business, you have dozens if not hundreds of photos that need some sort of alterations and uniformity so they’ll look consistent in size when you make a catalog or web page. Cropping is a separate process from resizing photos in PHOTO-PAINT, but the good news is that if your photos are even remotely similar in subject matter, you can record your cropping and resampling moves, and then play this recorded script back on an entire folder of images. The result: no errors, no recalculations, and you might have a free hand to eat your sandwich as you work through lunch.

FIGURE 25-5 Use PHOTO-PAINT filters and objects to selectively strengthen and smooth image areas.
Evaluating a Crop Area for a Collection of Photos
PHOTO-PAINT’s Crop tool does only one thing, perfectly well: it eliminates areas of a picture outside the crop rectangle you drag before double-clicking or pressing ENTER to finalize the crop. You are free before finalizing to reposition, reset, and move the crop rectangle. The Crop tool resizes an image area: it does not resample the area you want to remain in the document. Therefore, if you want to enlarge or decrease the number of pixels in the finished version, the additional step of resampling must be performed before saving a copy of the photo.
The imaginary company in the tutorial that follows specializes in exotic minerals—no common quartz or hematite to be found on their website—and the photographer took seven pictures whose visual content is more or less in the same position from photo to photo. Your mission is to crop out the bottom pedestal and place card in all the photos to favor the mineral itself, and to reduce the size of all the pictures, all sized to exactly the same dimensions, so the collection of minerals can be featured on a web page. Because Windows 7 (and XP) can display large thumbnails of common image file formats such as PNG, it’s easy to preview the contents of an entire folder of images, to better see which individual photo needs the most height or width to then apply a suitable crop for all the images.
Figure 25-6 is a view of the folder of mineral pictures as seen from the File | Open box in PHOTO-PAINT, with Extra Large Icons chosen in the dialog. The overlay of the dotted line shows that the Fliakite.png image requires the greatest width of all the files—this is something you can detect by eye. Therefore, when you begin the tutorial, you’ll begin by choosing Fliakite.png as the image you’ll record your cropping and resampling edits on.

FIGURE 25-6 Out of the many images you need to resample and crop, choose the one that requires the loosest cropping as the basis for your automation recording.
Recording Your Edits
The following steps guide you simultaneously through recording and editing the resampling and cropping process. Playing the saved recording back on a folder is very simple and covered in a following section. If you have a real-world need to crop and resample scores of images, and your boss or client wanted them yesterday, you’re going to have your solution and the images completed sooner than anyone might imagine! Locate the images you downloaded at the beginning of this chapter: put only the mineral PNG files in a unique folder.
1. Choose Windows | Dockers | Recorder (CTRL+F3).
2. Choose File | Open (CTRL+O) and then open Fliakite.png from the folder to which you copied the seven PNG files.
3. Click the red button at the bottom of the Recorder docker; you’re recording now. Choose the Crop tool from the toolbar.
4. Drag a rectangle around the top of the image, excluding the glass pedestal from your crop.

5. Press ENTER to finalize the crop (double-clicking inside the document does the same thing).
6. Press O (Object Pick tool), and then right-click over the image and choose Resample.
7. Allowing for three or possibly four thumbnails across a conservatively sized web page of 800 pixels wide means the width to resample this image should be about 200 pixels. Choose Pixels from the Image Size units drop-down list, and then type 200 in the Width field. When you move your cursor to a different field, the Height will scale down in proportion.
8. Because you’re not measuring in real-world units but instead in numbers of pixels, you don’t have to specify 72 or 96 dpi for the resampled image. On the Web, a screen pixel is an absolute, unchangeable size. Additionally, if you change the dpi setting now, you’ll need to go back and specify the Width to 200 a second time, because you will have changed the resolution value. Click OK to apply.

9. Double-click the Zoom tool to move your view to 100%. The resampled image could use just a touch of Effect | Sharpen | Sharpen, a good choice for extremely small images. Set the Edge Level to about 26%; this is the degree of sharpening with emphasis on neighboring pixels that have dissimilar colors. Set the Threshold to 0 (zero)—the lower the value, the more pronounced the sharpening effect.
10. Click the Stop button on the Recorder docker.
11. Click the Save button on the Recorder docker, name the script, and let PHOTO-PAINT save the script to the default location, because you’ll never find it again if you create a custom location.
NOTE
The Save icon on the Recorder and other dockers represents a floppy disk. Floppy disks were used to store digital media before DVDs, CDs, air travel, and horses were invented.
12. You can close the Fliakite file without saving changes. In the following section, you’ll run the recorded script on this image and save it, so your unfinished work will be automatically done for you.
The Fun Part: Playing Back Your Script
The following steps will seem anticlimactic; the bulk of the work you have ahead of you is accomplished merely by filling out a few fields in the File | Batch Process box and clicking Play.
1. Choose File | Batch Process.
2. Click Add File. Navigate the dialog to where you stored the mineral images. Select all of them: click one file to place your cursor inside the file box, press CTRL+A to select all, and then click Import.
3. Click Add Script. Look at the path to where PHOTO-PAINT default-saves scripts at the top of the box. The location is under your User Account | Appdata | Roaming | Corel if you lose a file in the future. Click the name of the script you saved in the previous tutorial, and then click Open.
4. In the Options area, click the On Completion drop-down list, and then choose Save As New Type. You’ll probably want the JPEG file type for the resampled photos if this is a website display.
5. The Save To Folder option is an important choice if you want to find the processed images later! Because you’ll be saving to JPEG, it’s okay to save the processed images to the same folder as the originals, which are in the PNG file format and will not be overwritten by the batch process.
6. Click the Save As Type drop-down list, and then choose JPG - JPEG Bitmaps.

7. Click Play. Done!

FIGURE 25-7 Standardize scores of image files in minutes by using PHOTO-PAINT’s Recorder and Batch Processing features.
Figure 25-7 is back in CorelDRAW, where the Extrude tool was used for a fancy website banner. As you can see here, when you select the multiple files for import into CorelDRAW from the destination folder to which you saved your batch processing, you can simply click the page to place the images, one at a time, at 100% their size, and in no time you either look like a miracle worker to your boss, or if you’re self-employed, you can look in your bathroom mirror and say, “Darn, I’m good!” (this is a PG book).
TIP
You may not need to use the Zoom tool very often to change your view if your mouse has a scroll wheel. With the Object Pick tool as your current tool, spinning toward you with the wheel zooms your view out, and pushing away zooms you into the current document window.
Flipping Images…with a Twist
Before moving on to Chapter 26 and more advanced image-editing techniques, let’s cover one more common imaging need, and a problem that occurs when you try to accomplish something seemingly as simple as mirroring a photograph. This is going to be your first step into the league of the pros: invisible image-retouching.
Photos of many objects in the real world and portrait photos of people are bilaterally symmetrical—when you look in the mirror, you recognize yourself because even though your image is horizontally flipped, the right and left sides of your face look pretty much the same. This reality usually allows you to flip a photograph when you need, for example, your subject looking to the right instead of to the left. The fly in the ointment, however, is when your subject is wearing a garment that has text on it; similarly, when a building in the background has text, or there’s only one shirt pocket on a garment—these flipped images will have something in them that clearly looks wrong to the audience.
The following steps venture into the area of PHOTO-PAINT objects: how you can lift an area, copy it to a new object, and then flip the background but not the new object, which in this example is the text on a child’s T-shirt. Retouching is not this simple—you will have a little edgework to clean up before considering the task completed—but with a little guidance, you’ll learn a technique now that can be applied to a number of different retouching needs down the road:
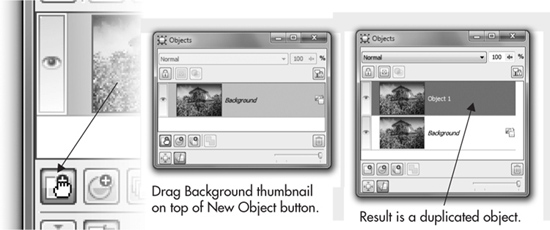
1. Open Two Kids.tif in PHOTO-PAINT. On the Object docker, you need to convert this “normal” bitmap image into an object-capable one so that objects can be flipped independently of one another. Click the Create Object From Background icon at the right of the thumbnail, as shown in Figure 25-8, and the name of the item now changes to “Object 1.” This step can also be performed by choosing Object | Create | From Background on the main menu.
2. Choose the Freehand Mask tool from the toolbox; if it’s not visible, click-drag the second-from-top icon on the toolbox (usually the Rectangle Mask tool) to reveal the entire group of masking tools, and then choose the Freehand Mask tool.
3. On the property bar, set the Feathering value to about 6 pixels. Feathering softens a selection, so inside and outside the edge of a selection mask, pixels are partially selected. This might sound strange to have an area partially selected (like an egg being partially broken), but the effect ensures smooth and seamless retouching work.
4. Drag around the word “Julian” on Julian’s T-shirt to select it; double-click when you’re done, and the image area is now available for editing. If you don’t include all of the name on your first try, click the Additive Mode button on the property bar, and use the Freehand Mask tool to add to the existing mask.
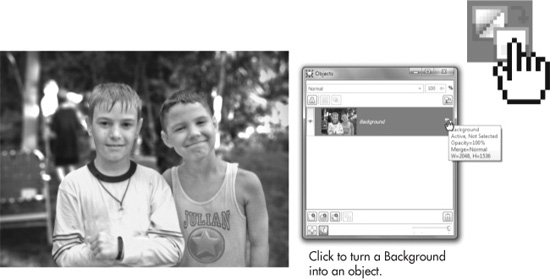
FIGURE 25-8 Once a photo is an object, you can perform many PHOTO-PAINT feats not possible with a standard JPEG or other image file.
5. Right-click inside the dashed indicator lines for the mask area, and then choose Object: Copy Selection from the context menu. On the Object docker, you’ll now see a new thumbnail at the top of the list of objects, titled “Object 2”; see Figure 25-9.
TIP
Pressing CTRL+R removes a mask in a document window. This is equivalent to a Select | None command in other programs. To hide the marquee lines running around a masked area of an object—and you’re only hiding, you’re not deselecting but only hiding an onscreen element—press CTRL+H to alternately Hide and Restore the marquee.
6. Click the Object 1 entry on the Objects list to make it the current editing object. Then, choose Object | Flip Horizontally. And yes, it will look strange to have “Julian” floating above the other kid’s chest!
7. Click the Object 2 entry on the Objects docker, choose Lightness from the Merge Mode drop-down list—a good mode for making underlying areas fade away only if the top affecting object has lighter corresponding pixels—and then move the object over Julian’s chest at image left with the Object Pick tool.
FIGURE 25-9 Copy the image area that you don’t want to flip to a new object in the document.
8. Evaluate the composition for a moment. What needs to be done now is to remove some of the backwards text on Object 1 to keep it from showing through. A straight paint color won’t do the job, because the image area has varying tones of color from the texture of the T-shirt. Choose the Clone tool from the group that contains the Red-Eye Removal tool.
9. The Clone tool picks up an image area you define by right-clicking and then applies the image area to a different area when you drag, based on the diameter and feather amount (softness or soft-edge in other bitmap programs) you set for the tool. On the property bar, choose Medium Soft Clone from the drop-down list.

FIGURE 25-10 Use the Clone tool to visually integrate the areas in Objects 2 and 1.
10. Hide Object 2 by clicking the visibility (the eye) icon to the left of its thumbnail.
11. Right-click with the Clone tool just below the name on Julian’s T-shirt. You’re choosing a sampling area that’s close in tone and color to the area you want to hide.
12. Drag, ever-so-slowly, slightly, and carefully over the backward lettering on the T-shirt, to get a feel for the Clone tool. When you release the mouse button, the sampling point for the Clone tool snaps back to its original position. Therefore, release the mouse button when you see that the traveling sampling point is getting mighty close to an undesired area for sampling. Work from the outside inward, resampling frequently to match the original tones of the light shirt. Periodically, unhide Object 2 to see how much work you need to do, and what areas are not necessary to clone away.
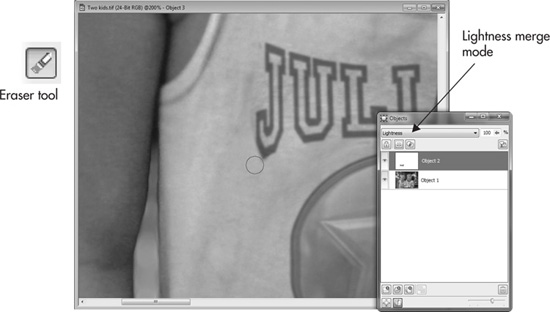
FIGURE 25-11 Erase areas whose tone and color don’t match the edges of the object.
13. When you think you’re finished cloning, restore the visibility of Object 2. You might be done, but you might want to refine the edges of Object 2 with the Eraser tool. If so…
14. Choose the Eraser tool, and then on the property bar, choose a soft tip from the Presets drop-down list, and set the size to about 35 pixels in diameter.
15. Zoom into the editing area, and then drag over any areas whose brightness doesn’t match the edge of the object. Figure 25-11 shows the work in progress, and the illusion looks pretty convincing.
16. Optionally, you can standardize this image’s data by combining all objects—as you did in the Hollywood condo example. Right-click over either object title on the Object docker, and then choose Combine | Combine All Objects With Background.

Consider what you’ve learned in this chapter: you now know how to repeat actions on an entire folder of images, you can scale, crop, and flip pictures, and you have a basic handle on all the sophisticated editing you can perform using transparency, objects, and merge modes. But the biggest payoff is an ironic one: a good photo retoucher’s work should go unnoticed!
Now bring what you’ve learned into Chapter 26, for more invisible mending and a technique or two that will definitely get your work noticed. Special effects and advanced retouching techniques lie ahead.