
Sample Application: Enhanced Skills Matrix
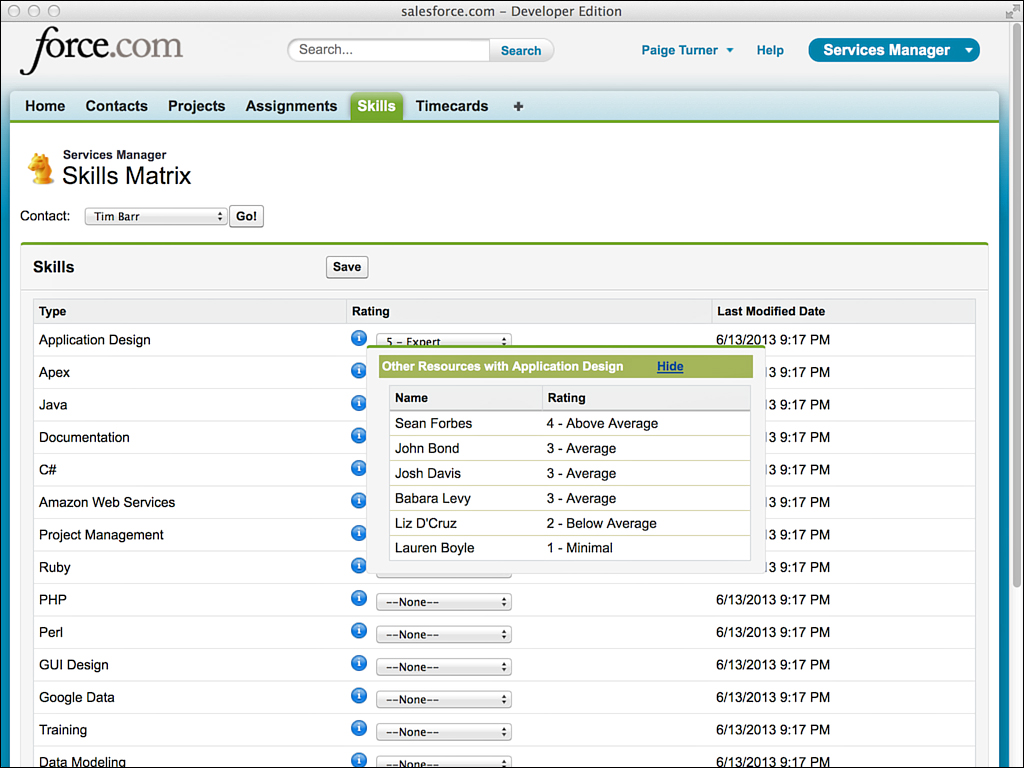
This section builds on the Services Manager’s Skills Matrix feature developed in Chapter 6, “User Interfaces.” Users of the Skills Matrix feature have requested the ability to compare a consultant’s skills with those of other consultants without navigating to a new page. They would like to see the ratings of other consultants in the same skill visually layered atop the existing Skills Matrix user interface, as shown in Figure 7.7.
The following technologies from this chapter are used in the development of the feature:
![]() JavaScript integration—jQuery UI (a free, open source JavaScript and CSS library for Web applications) is integrated to provide an easing effect, fading in and out the list of other resources and their skill ratings. jQuery UI is available at http://jqueryui.com.
JavaScript integration—jQuery UI (a free, open source JavaScript and CSS library for Web applications) is integrated to provide an easing effect, fading in and out the list of other resources and their skill ratings. jQuery UI is available at http://jqueryui.com.
![]() Custom Visualforce components—The overlay containing the other consultants’ skills is encapsulated in its own custom Visualforce component and controller.
Custom Visualforce components—The overlay containing the other consultants’ skills is encapsulated in its own custom Visualforce component and controller.
![]() actionSupport component—This component is used to show and hide the skills comparison overlay when the user hovers over an informational icon.
actionSupport component—This component is used to show and hide the skills comparison overlay when the user hovers over an informational icon.
Begin by developing a custom component for retrieving and rendering a list of skill ratings and consultants. The input to this component is a skill type and a resource identifier of the currently selected consultant. The skill type is the name of a proficiency that consultants are measured on, a picklist value from Skill__c.Type__c, such as Java or Apex. The resource identifier is used to exclude the current consultant from the list because his or her skill ratings are already shown on the Skills Matrix user interface.
Listing 7.21 provides a sample implementation of the controller to support the requirements, and Listing 7.22 shows the custom component that uses it.
Listing 7.21 CompareSkillsController
public class CompareSkillsController {
public String contact { get; set; }
public String skill { get; set; }
public List<Skill__c> getData() {
return [ SELECT Contact__r.Name, Type__c, Rating__c
FROM Skill__c
WHERE Type__c = :skill
AND Rating__c NOT IN ('', '0 - None') AND
Contact__c != :contact
ORDER BY Rating__c DESC ];
}
}
Listing 7.22 CompareSkillsComponent
<apex:component controller="CompareSkillsController">
<apex:attribute name="skillType" description="Type of skill"
type="String" required="true" assignTo="{!skill}" />
<apex:attribute name="contactId"
description="Id of contact to compare with"
type="String" required="true" assignTo="{!contact}" />
<apex:pageBlock >
<apex:pageBlockSection collapsible="false" columns="1">
<apex:facet name="header">
Other Resources with {!skillType}
<span style="padding-left: 30px;">
<a onclick="hideOverlay(); return false;"
href="" style="text-decoration: underline;">Hide</a>
</span>
</apex:facet>
<apex:pageBlockTable value="{!data}" var="item">
<apex:column value="{!item.Contact__r.Name}" />
<apex:column value="{!item.Rating__c}" />
</apex:pageBlockTable>
</apex:pageBlockSection>
</apex:pageBlock>
</apex:component>
To incorporate this component into the Skills Matrix page, perform the following steps:
1. Add the code shown in Listing 7.23 to the bottom of the SkillsMatrixController class. The new method and property are used to refresh the skills comparison component.
Listing 7.23 Adding Component Support to the Skills Matrix Controller
public PageReference refreshCompareSkills() {
return null;
}
public String selectedSkillType { get; set; }
2. Edit the Skills Matrix page to add sidebar="false" to the apex:page component. This frees up extra horizontal screen real estate that is used to display the skills comparison overlay. Also add the CSS in Listing 7.24 to the style tag.
Listing 7.24 Adding Component CSS to the Skills Matrix Page
.compare-skills {
position: absolute;
width: 400px; height: 250px;
display: none;
}
3. Also on the Skills Matrix page, insert the code in Listing 7.25 after the closing tag of the form component. It adds an outputPanel containing the CompareSkillsComponent, rendered as an overlay with a fading effect from jQuery UI in the showOverlay JavaScript function.
Listing 7.25 Adding CompareSkillsComponent to the Skills Matrix Page
<apex:outputPanel id="compareSkills" styleClass="compare-skills">
<c:CompareSkillsComponent skillType="{!selectedSkillType}"
contactId="{!selectedContactId}" />
</apex:outputPanel>
<script src="//ajax.googleapis.com/ajax/libs/jquery/1.10.1/jquery.min.js"></script>
<script src="//ajax.googleapis.com/ajax/libs/jqueryui/1.10.3/jquery-ui.min.js"></script>
<script>
function showOverlay(e) {
$('.compare-skills').css('top', e.layerY)
.css('left', e.layerX).fadeIn();
}
function hideOverlay() {
$('.compare-skills').fadeOut();
}
</script>
4. For the final step, insert the code given in Listing 7.26 to the Skills Matrix page, immediately following the opening tag of the column component containing the skill rating (headerValue="Rating"). It adds an informational icon beside each skill. Hovering over this icon displays the overlay containing the skills comparison.
Listing 7.26 Adding actionSupport to the Skills Matrix Page
<apex:image value="/img/msg_icons/info16.png"
style="margin-top: 2px; margin-right: 10px;">
<apex:actionSupport event="onmouseover"
action="{!refreshCompareSkills}" rerender="compareSkills"
oncomplete="showOverlay(event);" onsubmit="hideOverlay();">
<apex:param name="p1" value="{!skill.Type__c}"
assignTo="{!selectedSkillType}" />
</apex:actionSupport>
</apex:image>