
Sample Application: Mobile Timecard Entry
The goal of this section is to build a mobile-ready timecard entry interface for consultants. The requirements for this interface are as follows:
1. Users are already using Salesforce Touch. They do not want to install a new mobile application on their phones and tablets. They also don’t want to authenticate to an additional application or page.
2. Allow hours to be entered on a project as quickly as possible, with minimal clicking around.
3. Timecards are precreated based on the current week and available assignments, so they are always valid. There is no need to know the assignment or look up any additional information.
4. Hours can be entered and saved, but do not need to be submitted right away. This allows the consultant to keep track of his or her hours on a daily basis rather than waiting until the end of a week.
5. Five of the most recent timecards can be displayed. Timecards in an Approved or Submitted status are locked and cannot be edited. Other timecards can be edited and saved or submitted.
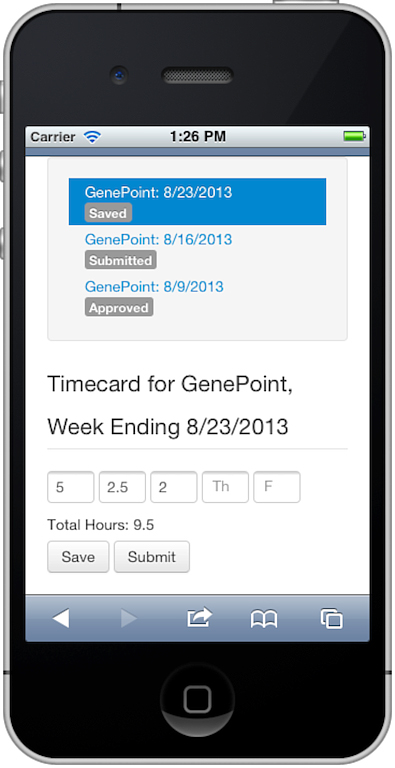
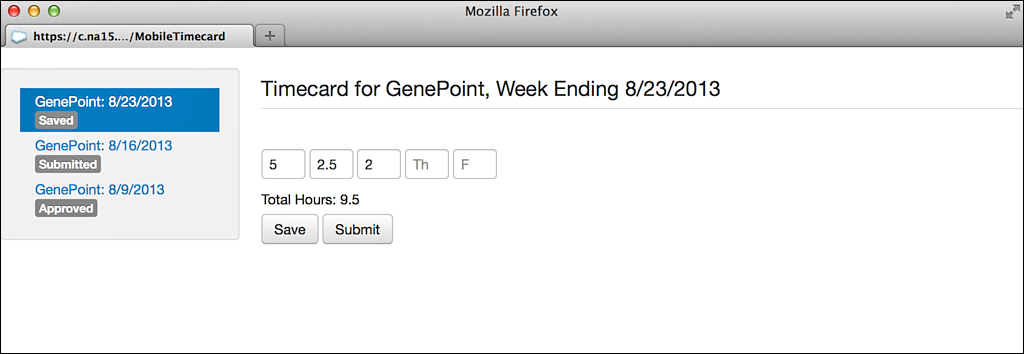
The finished page is shown in Figure 8.1 on an iPhone and in Figure 8.2 on the Web. Upon viewing the page, the consultant is immediately able to see the timecards he or she is responsible for entering based on his or her assignments. The page is responsive, so in the mobile browser the list of timecards is shown at the top. With a wider screen, this navigation list is pulled to the left. Clicking on a timecard displays its hours, which are totaled dynamically as they are entered.
The mobile timecard entry page can be constructed in three steps, described next:
1. List timecards—Write a controller method that returns the five most recent timecards. If no timecards exist yet for the current week and projects that the consultant is assigned to, create and return them in the list of recent timecards. Render each timecard in a list that includes the week ending date, project name, and timecard status.
2. Navigate to timecard—Allow the user to navigate to a timecard by clicking it. This causes the panel described in the next step to be refreshed.
3. View and edit timecard—Display the hours (Monday through Friday only) and total hours for the currently selected timecard. If the timecard is not in an Approved or Submitted status, allow the hours to be edited. Provide a button to save changes made to the hours and another button to save changes and submit the timecard.
Listing 8.1 is the controller to implement the first step. It uses JavaScript remoting rather than ActionFunction to provide the best performance for the Visualforce page. The load method looks up the current user’s Contact record and looks for Assignment records within the current week. For every Assignment record without a Timecard record, a Timecard record is created. Finally, the most recent five Timecard records by Week_Ending__c are returned.
Listing 8.1 Visualforce Controller for Mobile Timecard
public with sharing class MobileTimecardController {
@RemoteAction
public static List<Timecard__c> load() {
Contact c = currentResource();
if (c == null) {
return null;
}
Date currentWeekEnding =
Date.today().toStartOfWeek().addDays(6);
// Create a current week's timecard for each assignment
for (Assignment__c a : [ SELECT Project__c
FROM Assignment__c WHERE Contact__c = :c.Id
AND Status__c = 'Scheduled'
AND Start_Date__c < :currentWeekEnding
AND End_Date__c >= :currentWeekEnding
]) {
if ([ SELECT Id FROM Timecard__c
WHERE Contact__c = :c.Id
AND Week_Ending__c = :currentWeekEnding
AND Project__c = :a.Project__c
LIMIT 1].size() == 0) {
insert new Timecard__c(Project__c = a.Project__c,
Week_Ending__c = currentWeekEnding,
Contact__c = c.Id);
}
}
List<Timecard__c> timecards = [ SELECT Project__r.Name,
Week_Ending__c, Status__c,
Monday_Hours__c, Tuesday_Hours__c, Wednesday_Hours__c,
Thursday_Hours__c, Friday_Hours__c
FROM Timecard__c
WHERE Contact__c = :c.Id
ORDER BY Week_Ending__c DESC
LIMIT 5 ];
return timecards;
}
private static Contact currentResource() {
List<Contact> contacts =
[ SELECT Id, Name FROM Contact
WHERE User__c = :UserInfo.getUserId() ];
if (contacts != null && contacts.size() == 1) {
return contacts.get(0);
}
return null;
}
}
Listing 8.2 is a Visualforce page that provides the timecard list functionality for the first step. It does not include the Visualforce header, sidebar, or standard stylesheets to improve load performance. It uses Twitter Bootstrap for simple styling and responsive grid system, and AngularJS to dynamically bind data from the Visualforce controller to and from the HTML elements. The AngularJS aspects of the page are important to examine closely:
![]()
MobileTimecardCtrl is the name of the AngularJS controller. MobileTimecardController is the Visualforce controller, which is referenced when RemoteAction methods are called. Note the usage of its load method. This sets a scope variable called timecards, which is bound to the HTML list items using the ng-repeat attribute.
![]() Ignore the use of the
Ignore the use of the ng-click attribute and the navClass callout in the list items for now. Those are part of the second step, for navigation.
![]() Bootstrap is an open source project consisting of CSS and JavaScript to help produce clean, consistent, responsive Web applications for desktop and mobile browsers. For more information, see https://github.com/twbs/bootstrap. In this page, the important parts of Bootstrap are the grid. The
Bootstrap is an open source project consisting of CSS and JavaScript to help produce clean, consistent, responsive Web applications for desktop and mobile browsers. For more information, see https://github.com/twbs/bootstrap. In this page, the important parts of Bootstrap are the grid. The row-fluid CSS class sets up a row in the visual grid system that positions the elements in your page. The span family of CSS classes (span1 through span12) makes up the columns of your page. A single row can consist of a single span12, or 12 span1 elements, and everything in between. In the mobile timecard page, the navigation bar on the left is a span3, and the detail area, shown when a timecard is clicked, is span9.
Listing 8.2 Visualforce Page for Mobile Timecard
<apex:page showHeader="false" standardStylesheets="false"
sidebar="false"
controller="MobileTimecardController">
<head>
<meta name="viewport"
content="width=device-width,initial-scale=1.0,
maximum-scale=1.0,user-scalable=0"/>
<link
href="https://netdna.bootstrapcdn.com/twitter-bootstrap/2.3.1/css/bootstrap.css"
rel="stylesheet" />
<style>
input[type="number"] { width: 30px; }
</style>
</head>
<body>
<script>
function MobileTimecardCtrl($scope, $rootScope, $location) {
MobileTimecardController.load(function(result, event) {
if (event.status) {
$scope.timecards = result;
$rootScope.$apply();
}
}, { escape: false });
}
</script>
<apex:outputPanel html-ng-app=""
html-ng-controller="MobileTimecardCtrl" styleClass="container-fluid">
<div class="row-fluid">
<div class="span3">
<div class="well sidebar-nav">
<ul class="nav nav-list">
<li ng-class="navClass('{{timecard.Id}}')"
ng-repeat="timecard in timecards">
<a ng-click="nav('{{timecard.Id}}')">
{{timecard.Project__r.Name}}:
{{timecard.Week_Ending__c | date:'M/d/yyyy'}}
<br /><span class="label">{{timecard.Status__c}}</span>
</a></li>
</ul>
</div>
</div>
<div class="span9">
</div>
</div>
</apex:outputPanel>
<script
src="//ajax.googleapis.com/ajax/libs/angularjs/1.2.0rc1/angular.min.js">
</script>
</body>
</apex:page>
Listing 8.3 implements the second step, in-page navigation, with the addition of two functions for the MobileTimecardCtrl AngularJS controller. Insert it after the load function in the first script tag.
For a simple page like this, creating many Visualforce pages, one for each view, adds unnecessary overhead. An alternative is to allow the user to navigate but stay within the page, providing the page with the logic and visual templates necessary to encompass all of the user interactions. Clicks on anchors change the “route” understood by the Web framework, but it is handled entirely by the Web framework. The browser does not load a new Web page. This type of dynamic navigation within a page is typical of a Single Page Application, described in Chapter 7, “Advanced User Interfaces.”
The navClass method returns the HTML class needed to display highlighting around the “active” (selected) timecard by comparing the list element’s route to the current path reported by the browser. With every timecard displayed in the list, this method is called to determine its style class.
The nav method is called when the user clicks a timecard. Rather than using the standard href attribute, the ng-click attribute allows the navigation to stay within AngularJS. The method first finds the selected timecard in the model, the list of timecards previously retrieved using the Visualforce controller’s load method. It then sets that timecard to the edit variable so that it can be bound to the detail region of the page, to be added in the third step. It also checks to see if the timecard is in an editable state, setting a readOnly variable accordingly.
Listing 8.3 Angular Controller Addition for Navigation
$scope.navClass = function(page) {
var currentRoute = $location.path().substring(1) || '';
return page === currentRoute ? 'active' : '';
}
$scope.nav = function(timecardId) {
$location.path(timecardId);
for (var idx in $scope.timecards) {
if ($scope.timecards[idx].Id == timecardId) {
$scope.edit = $scope.timecards[idx];
$scope.readOnly = $scope.edit.Status__c == 'Submitted' ||
$scope.edit.Status__c == 'Approved';
return;
}
}
$scope.edit = null;
}
Listings 8.4, 8.5, and 8.6 implement the changes needed to allow timecards to be viewed and edited. Listing 8.4 adds a new method to simply save the timecard. The AngularJS code in the browser maintains edits made to the timecard data and passes it into the Visualforce controller where it is updated in the Force.com database.
Listing 8.4 Visualforce Controller Addition to Edit Timecard
@RemoteAction
public static void save(Timecard__c timecard) {
update timecard;
}
Insert the code in Listing 8.5 into the div element with class span9. This is the right side of the page and will contain the detail of the selected timecard. There are two portions of HTML, but only one is visible at any given moment. They are displayed conditionally using the ng-show attribute. If there is a currently selected timecard, the edit variable will contain it; otherwise, it is null. The timecard fields are rendered using input elements, and they are disabled if the timecard is not editable. The bidirectional data binding of AngularJS is demonstrated with the dynamic calculation of total hours in the timecard from the user input fields.
Listing 8.5 Visualforce Page Addition to Edit Timecard
<div class="row-fluid">
<div class="span12" ng-show="edit != null">
<form><fieldset>
<legend>Timecard for {{edit.Project__r.Name}},
Week Ending {{edit.Week_Ending__c | date:'M/d/yyyy'}}
</legend>
<div class="control-group">
<div class="controls">
<input type="number" ng-model="edit.Monday_Hours__c"
placeholder="M" ng-readonly="readOnly"></input>
<input type="number" ng-model="edit.Tuesday_Hours__c"
placeholder="T" ng-readonly="readOnly"></input>
<input type="number" ng-model="edit.Wednesday_Hours__c"
placeholder="W" ng-readonly="readOnly"></input>
<input type="number" ng-model="edit.Thursday_Hours__c"
placeholder="Th" ng-readonly="readOnly"></input>
<input type="number" ng-model="edit.Friday_Hours__c"
placeholder="F" ng-readonly="readOnly"></input>
<label>Total Hours: {{edit.Monday_Hours__c + edit.Tuesday_Hours__c +
edit.Wednesday_Hours__c + edit.Thursday_Hours__c +
edit.Friday_Hours__c}}</label>
<div ng-hide="readOnly">
<button ng-click="save('Saved')" type="submit"
class="btn">Save</button>
<button ng-click="save('Submitted')" type="submit"
class="btn">Submit</button>
</div>
</div>
</div>
</fieldset>
</form>
</div>
<div class="span12" ng-show="edit == null">
Please select a timecard to edit it.
</div>
</div>
Listing 8.6 is the final piece to the timecard entry page. Insert it into the AngularJS controller. It adds a save method, which is wired up to the Save and Submit buttons in Listing 8.5. It sets the status of the timecard and calls the Visualforce controller’s save action to save it. It then resets the page so that no timecard is selected.
Listing 8.6 Angular Controller Addition to Edit Timecard
$scope.save = function(status) {
$scope.edit.Status__c = status;
MobileTimecardController.save($scope.edit,
function(result, event) {
if (event.status) {
$location.path('/'),
$scope.edit = null;
$rootScope.$apply();
}
}, { escape: false });
}
To test this feature, install Salesforce Touch on your mobile device and perform the following steps:
1. Enable the page for Touch access. Go to the App Setup area and click Develop, Pages. Click the Visualforce page, click the Edit button, check the Available in Touch check box, and click the Save button.
2. Add a Visualforce tab for your new page. In the App Setup area, click Create, Tabs. Click the New button in the Visualforce Tabs section. Select the MobileTimecard Visualforce page, give the tab a label and name that you’d like to see on your mobile device. Select a tab style, profiles, and application visibility, and save the tab.
3. Launch Salesforce Touch on your mobile device and log in.
4. Click the List icon in the upper-left corner to overlay the list of accessible pages. You should see your Mobile Timecard page as an option. Select it to start using the mobile timecard entry feature.