
Working with Batch Apex Jobs
Batch Apex can be executed from a Visualforce page, scheduled to run automatically at specific times, or kicked off from within a trigger. But the easiest way to experiment with it is in the Execute Anonymous view in the Force.com IDE.
First, enable debug logging for your user in the Administration Setup area; select Monitoring, Debug Logs; and add your user to the list of monitored users by clicking the New button. This is no different than debugging any Apex class. Using the Execute Anonymous view, enter the code in Listing 9.2 and execute it. The batch is submitted and its unique job identifier displayed in the results box.
Listing 9.2 Running Sample Batch Apex Code
Listing9_1 batch = new Listing9_1();
Id jobId = Database.executeBatch(batch);
System.debug('Started Batch Apex job: ' + jobId);
The executeBatch method of the Database class does the work here. It queues the batch job for processing when Force.com is ready to do so. This could be in seconds or minutes; it is not specified. The Listing9_1 sample class is very simple, but in many cases you would need to pass arguments, either in the constructor or via setter methods, to adjust the behavior of a batch process. This is no different from any Apex class.
To start a batch in response to a button click or other user interface action, apply the code shown in Listing 9.2 within a Visualforce custom controller or controller extension class. Now that you have submitted your batch job, it’s time to monitor its progress. In your Web browser, go to the Administration Setup area and select Monitoring, Apex Jobs. This page, shown in Figure 9.1, allows you to manage all the batch jobs in your Force.com organization.
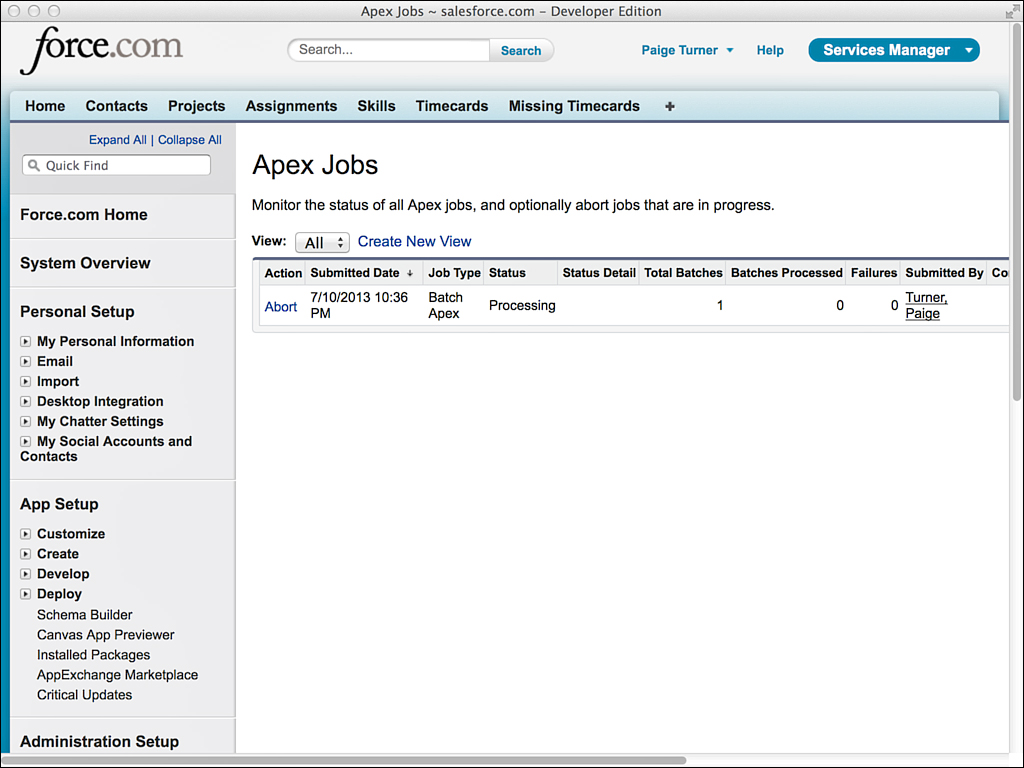
The single Listing9_1 job you executed should be visible. By this time, it is most likely in the Completed status, having few records to process. If Force.com is very busy, you might see a status of Queued. This means the job has not been started yet. A status value of Processing indicates the job is currently being executed by the platform. If a user interrupts the job by clicking the Abort link on this page, the job status becomes Aborted. A job with a Failed status means an uncaught exception was thrown during its execution. If you scroll to the right, you can also see the Apex Job Id, which should match the one returned by the Database.executeBatch method.
Take a closer look at the values in the Total Batches and Batches Processed columns. To avoid confusion, disregard the word Batches here. Total Batches is the number of transactions needed to complete the batch job. It is equal to the scope (which defaults to 200) divided into the number of records returned by the start method. The Batches Processed column contains the number of times the execute method of your Batch Apex class was invoked so far. As the processing proceeds, you should see it increment until it is equal to the Total Batches value. For example, if you have fewer than 200 Project records in your database, you should see a 1 in both columns when the batch is complete. If you have between 201 and 400 records, you should see 2 instead. If you have 1,500 records and the system is processing the 300th record, you should see a value of 8 in Total Batches and 1 in Processed Batches. All the information on the page is also accessible programmatically, contained in the standard object named AsyncApexJob.
You have seen the batch job run its course. Proceed back to the Debug Logs page. Here you can review the job’s execution in detail, thanks to the System.debug statements throughout the code. Figure 9.2 is an example of what you might see there.
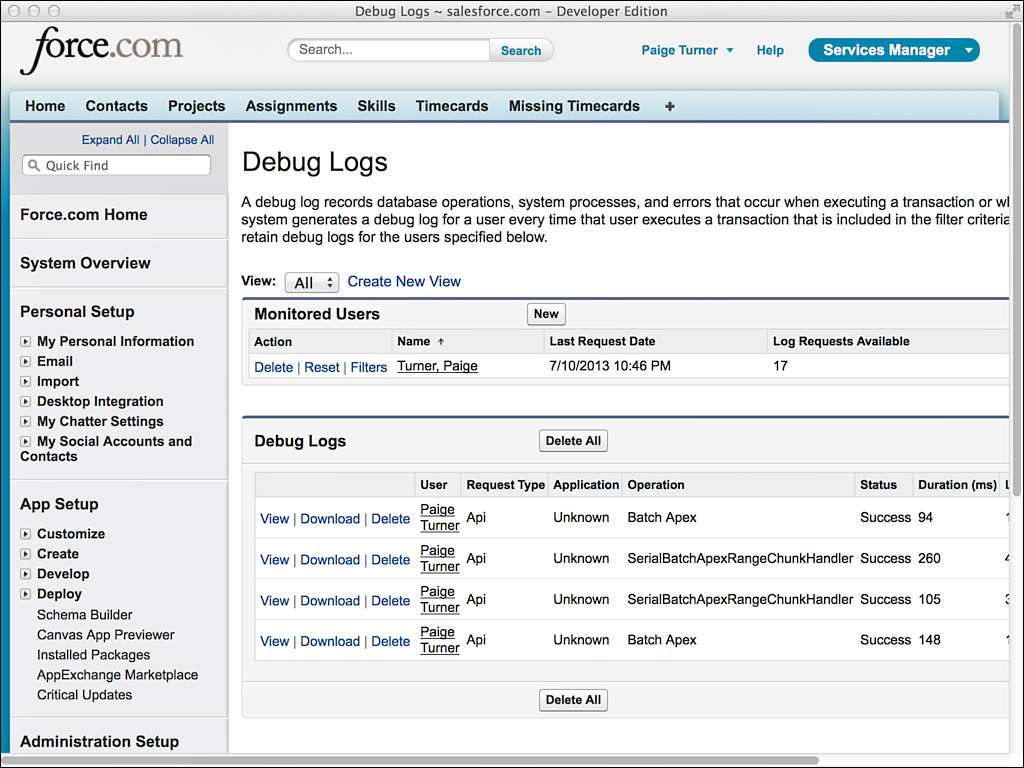
Four separate logs each cover a different aspect of the batch execution. Each is described next in the order they are executed, although this might not be the order shown on the Debug Logs page:
1. Results of evaluating the code in the Execute Anonymous view.
2. Invocation of the start method to prepare the data set for the batch.
3. Results of running the execute method, where the batch job performs its work on the subsets of the data.
4. All the transactions have been processed, so the finish method is called to allow postprocessing to occur.
These results are somewhat interesting, but appreciating what the batch is doing is hard without more data. You could add 200 more Project records, or you can simply adjust the scope to process fewer records per transaction. Listing 9.3 is an example of doing just that, passing the number 2 in as the scope, the second argument of the Database.executeBatch method. This indicates to Force.com that you want a maximum of two records per transaction in the batch job.
Listing 9.3 Running Sample Batch Apex Code with Scope Argument
Listing9_1 batch = new Listing9_1();
Id jobId = Database.executeBatch(batch, 2);
System.debug('Started Batch Apex job: ' + jobId);
After running this code in the Execute Anonymous view, return to the debug logs. You should now see two additional logs in the execute phase, for a total of three transactions of two records each. The three transactions are needed to process the six Project records.