
Getting Started with Force.com Canvas
Because so much of a Canvas application resides outside of Force.com by definition, it is a challenge to provide a generic, widely accessible example without pulling in many other technologies. This section walks through an example that leverages a local Web server and two static HTML pages to demonstrate OAuth authentication and cross-domain XHR requests.
The purpose of the example is to highlight the most common features of Canvas, and to do so without requiring an application server. In a more realistic application of Canvas, the OAuth process would originate on the Web server so the authorizations can be stored and managed securely rather than forcing the user to authenticate every time the page is rendered. Alternatively, Signed Request could be used to provide a transparent single sign-on process for the user, whereby the Force.com session is shared securely with the external Web application.
Figure 11.2 shows the sample application running within the Canvas App Previewer. The Login link has been clicked, prompting the user with an OAuth authorization pop-up. When authorization is complete, a callback Web page closes the pop-up and refreshes the parent window. The access token obtained during this process is displayed. The user can then click the My Chatter Profile link, which makes a cross-domain XHR request using the Canvas JavaScript SDK to the Chatter REST endpoint to get the current user’s Chatter profile and display the raw JSON response.

The following steps describe the process for getting the example up and running:
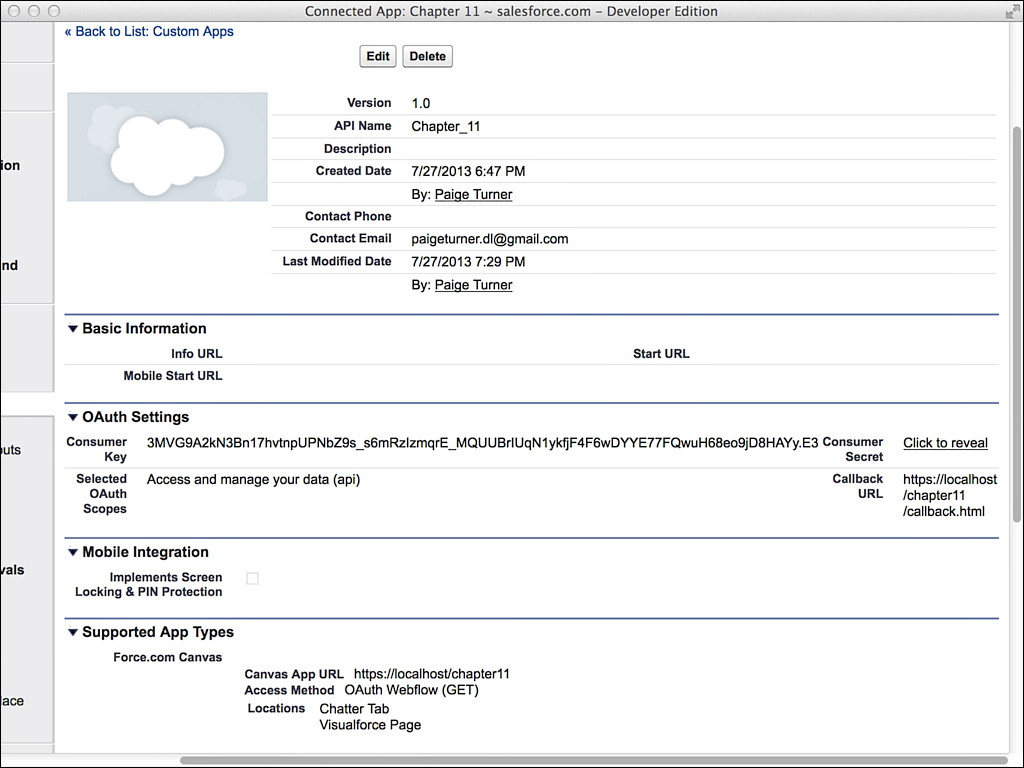
1. Create Connected App—In the App Setup area, go to Create, Apps and create a new Connected App. Set the Name, API Name, and Contact Email fields. Check Enable OAuth Settings. Provide a Callback URL, and add “Access and Manage Your Data (api)” to the Selected OAuth Scopes list. In the Supported App Types section, check Force.com Canvas. For the Canvas App URL, provide the URL to your local Web server and the path you are using to host the Canvas App pages. For Access Method, select OAuth Webflow (GET). For Locations, select Chatter Tab and Visualforce Page, and then click the Save button. Figure 11.3 shows an example of this configuration.
2. Set up local Web server with SSL—Get a Web server running on your machine to host the Canvas App. Make sure you have enabled SSL, using a self-signed certificate if necessary. Test the SSL configuration with your browser before proceeding. If there are any untrusted or invalid certificate errors, the Canvas App will fail to load or function properly.
3. Add Canvas App pages—Create the two pages in Listing 11.14 and Listing 11.15 within a directory on your Web server, naming them index.html and callback.html, respectively. In the examples here, they are located in a directory called chapter11, but you can put them anywhere as long as they match the settings in your Connected App.
4. Configure Canvas App pages—In your version of Listing 11.14, replace REDIRECT_URI and CLIENT_ID with the Callback URL and Consumer Key, respectively, from your Connected App configuration. Also update the instance URL in the SCRIPT tag used to load the Canvas Javascript API to match your organization.
5. Preview the Canvas App—You should now be able to see the Canvas App in the App Setup area, Canvas App Previewer. You can also see it in the Chatter tab. If there are issues, use your Web browser’s debugging facility to troubleshoot.
Listing 11.14 Main HTML Page for Canvas Example
<html>
<head>
<script type="text/javascript"
src="https://na15.salesforce.com/canvas/sdk/js/28.0/canvas-all.js">
</script>
</head>
<body>
<script>
function profileHandler(e) {
var profileUrl = Sfdc.canvas.oauth.instance() +
"/services/data/v28.0/chatter/users/me";
Sfdc.canvas.client.ajax(profileUrl, {
client: Sfdc.canvas.oauth.client(),
failure: function(data) {
alert(data);
},
success: function(data) {
if (data.status === 200) {
Sfdc.canvas.byId("chatter_profile").innerHTML =
JSON.stringify(data.payload);
}
}
});
}
function loginHandler(e) {
var uri;
if (!Sfdc.canvas.oauth.loggedin()) {
uri = Sfdc.canvas.oauth.loginUrl();
Sfdc.canvas.oauth.login({
uri: uri,
params: {
response_type : "token",
client_id : "CLIENT_ID",
redirect_uri : encodeURIComponent("REDIRECT_URI")
}
});
}
return false;
}
Sfdc.canvas(function() {
var login = Sfdc.canvas.byId("login");
var loggedIn = Sfdc.canvas.oauth.loggedin();
if (loggedIn) {
Sfdc.canvas.byId("oauth").innerHTML = Sfdc.canvas.oauth.token();
var profile = Sfdc.canvas.byId("profile");
profile.onclick = profileHandler;
}
login.onclick = loginHandler;
});
</script>
<h1>Force.com Canvas Example</h1>
<div>access_token</div>
<textarea id="oauth" rows="2" cols="80" disabled="true"></textarea>
<div>
<a id="login" href="#">Login</a><br/>
<a id="profile" href="#">My Chatter Profile</a><br />
</div>
<textarea id="chatter_profile" rows="20" cols="80"></textarea>
</body>
</html>
Listing 11.15 Callback HTML Page for Canvas Example
<html xmlns="http://www.w3.org/1999/xhtml" lang="en">
<head>
<script type="text/javascript">
try {
window.opener.Sfdc.canvas.oauth.childWindowUnloadNotification(
self.location.hash);
} catch (ignore) {}
self.close();
</script>
</head>
<body>
</body>
</html>