
Implementing the Data Model
This section walks through the creation of the Services Manager data model in Force.com using Force.com App Builder Tools and Schema Builder. This includes a custom application to contain the user interface components, four custom objects, and the fields and relationships on both the custom and standard objects.
To begin, log in to your DE account and click Setup.
Creating a Custom Application
It’s a good practice to define your custom application first so that you can add tabs to it as you build them. The following steps describe how to create a custom application, assign its tabs, and determine which users can see it:
1. In the App Setup section, click Create, Apps. A list of applications is displayed. Ignore the built-in applications. Most come with the DE account and cannot be removed. Click the New button.
2. Enter a label for the application, a name, and a description, and then click the Next button. The label is the human-readable label for the application, displayed to users. Name is an internal name, used by Force.com at the API level.
3. Optionally, select an image to be displayed as the logo for your application. This image is shown in the upper-left corner when your application is active. When you’re done, click the Next button.
Tip
To prepare an image for use as an application logo, first go to the Documents tab and click the New button. Check the Externally Available Image check box, enter a name to identify the image, and click the Browse button to locate a file on your computer. Click the Save button to upload the image.
4. This screen is for selecting the tabs to be included in the custom application. Home tab is a system-provided tab included in every application and cannot be removed. There are no tabs defined for the application yet, so do nothing here. Click the Next button.
5. You can restrict access to your application by profile, a grouping of user permissions discussed in Chapter 3. For now, grant access to System Administrator by clicking the last check box in the Visible column. Then click the Save button.
You are returned to the list of applications, but it now contains your new application. If you activate your application by selecting it from the list in the upper-right corner drop-down, you’ll see that it contains a single tab, the Home tab.
1. In the App Setup section, click Schema Builder. Initially, all objects, standard and custom, are shown on the canvas. System objects, a subset of standard objects, are not shown.
2. Click the Clear All link to hide all objects from the canvas. This makes it easier to focus on the task.
3. Click the Elements tab. Drag the Object item from the palette on the left onto the canvas. The dialog in Figure 2.8 is shown to capture the details of the new object.
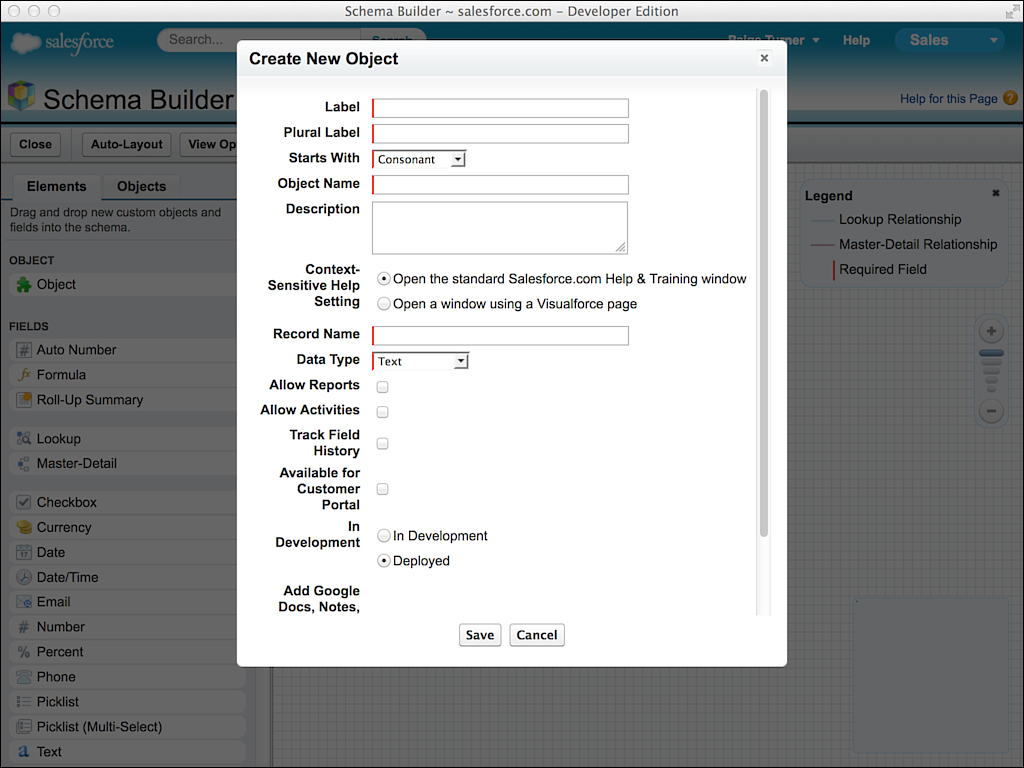
4. Enter Project for the Label and Projects for the Plural Label. The Object Name defaults to Project. Enter a one-line description of the object in the Description field. Enter Project Name for the Record Name Label, and leave the data type Text. Check Allow Reports, Allow Activities, and Track Field History; then click the Save button.
5. Now that the object has been created, it’s time to create the fields. Start with the Type field. It is a picklist field, so drag a picklist from the palette on the left to the canvas, dropping it directly onto the Project object.
6. In the resulting dialog, enter Type for the label. When your cursor exits the label, the Field Name is automatically populated. For the list of values, enter Billable. Press Enter to start a new line, and then enter Non-Billable. Click to enable the Use First Value as Default Value option. Click the Save button. You should see the Type field added to the top of the Project object.
Repeat steps 5 and 6 until all the fields of Project, listed in Table 2.4, are created. There will be different options in step 6 depending on the type of the field.
At this point, you have finished defining the first custom object of the Services Manager sample application. To create the remainder of the objects, follow the same steps.
Note
A few of the objects require that the standard field Name be changed from its default type (Text of length 80) to an Auto Number type. This cannot be done within the Schema Builder. Instead, visit the App Builder Tools (Setup, Create, Objects), click the object, click the Edit link beside the standard Name field, and proceed to set the type to Auto Number.
Creating Relationship Fields
The following steps create the Lookup relationship between Project and Account:
1. In the Elements tab in Schema Builder, drag the Lookup relationship type from the palette. Drop it onto the child object. In this case, the child object is Project.
2. In the dialog, enter the Field Label and Field Name. This is typically the name of the parent object. For the Project-Account relationship, the name is Account.
3. In the Related To drop-down list, select the parent object and then click the Next button. The parent object is Account. The Child Relationship Name and Related List Label are automatically set. The dialog should look like Figure 2.9.
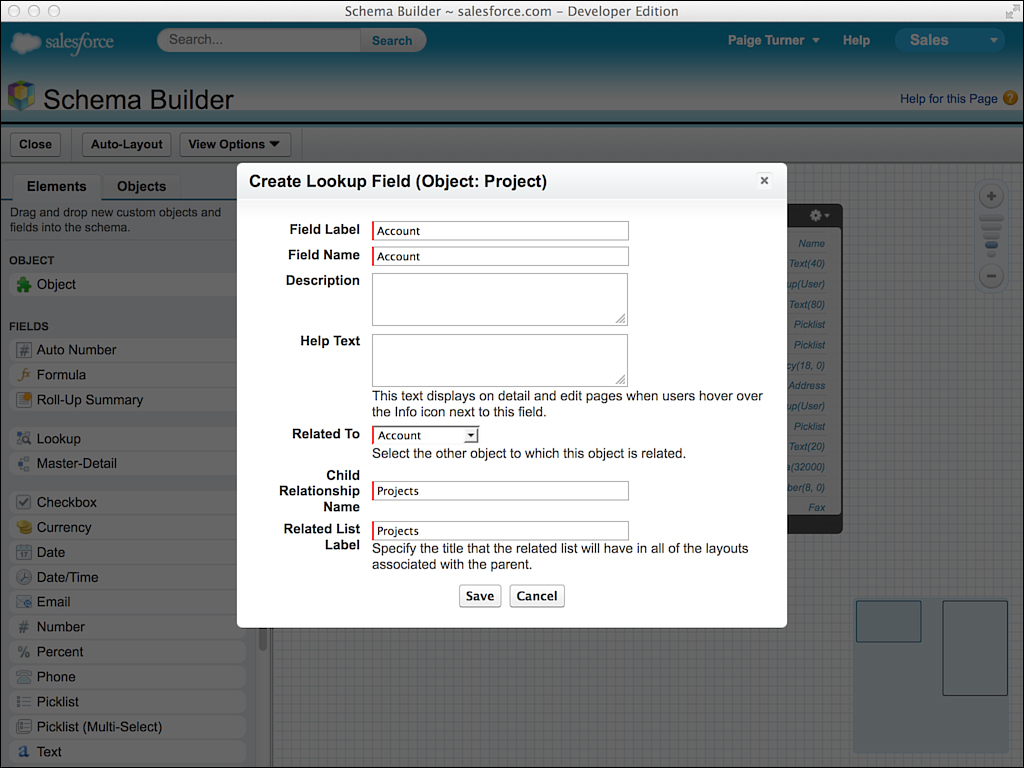
4. Click the Save button to create the relationship field. A line will indicate the new relationship between the two objects. The fork symbol at one end of the line indicates the child object. In this case, the fork appears on the Project side.
Repeat these steps until all the Lookup relationships listed in Table 2.8 are created. The steps to create Master-Detail relationships are slightly different. The following steps create the Master-Detail relationship between Project and Timecard:
1. In the Elements tab in Schema Builder, drag the Master-Detail relationship type from the palette. Drop it onto the child object. In this case, the child object is Timecard.
2. In the dialog, enter the Field Label and Field Name. This usually refers to the parent object. In the Project-Timecard relationship, the name is Project.
3. In the Related To drop-down list, select the parent object and then click the Next button. The parent object is Project. The Child Relationship Name and Related List Label fields are automatically set, in this case to Timecards. The dialog should look like Figure 2.10.
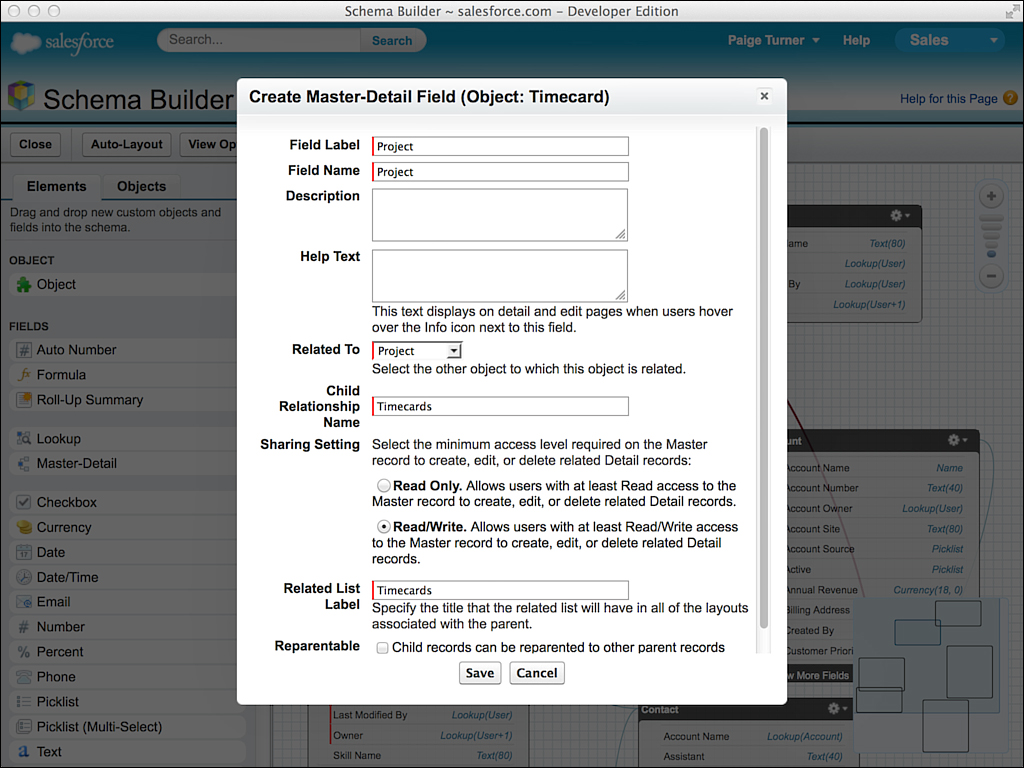
4. Click the Save button to create the relationship field. A line will indicate the new relationship between the two objects. The fork symbol at one end of the line indicates the child object. In this case, the fork appears on the Timecard side.
As you build the relationships, the visual representation in Schema Builder should resemble the diagram in Figure 2.7.
Tip
One of the most important parts of creating relationships is making sure that they are created on the correct object. In the one-to-many relationship, the “one” side is the parent, and the “many” side is the child. Always create the relationship field on the child, relating it to the parent. You can always delete the field and start over if you make a mistake.
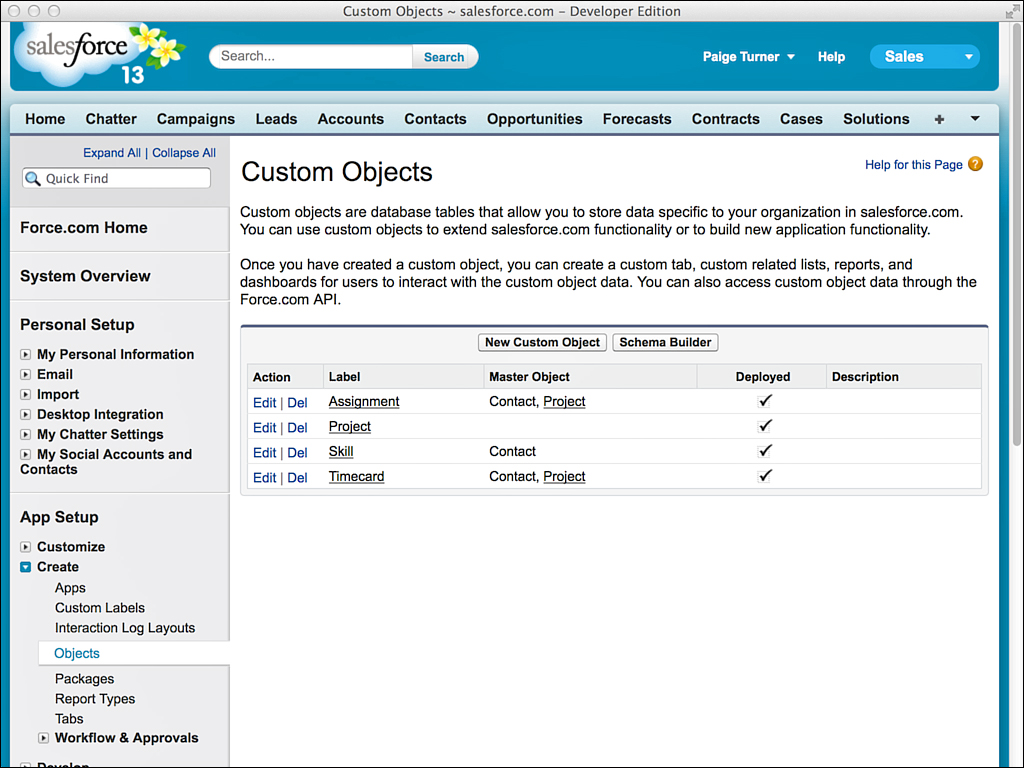
Repeat these steps for each relationship in Table 2.8. When you’re done, visit the list of custom objects (Setup, Create, Objects). Figure 2.11 shows the list. Compare it with yours, paying particular attention to the values in the Master Object column. This column is showing the Master-Detail relationships. There should be a total of five master objects listed across all of the relationships.
Creating a Validation Rule
The Skill object requires a new validation rule to enforce that Skill Type field contains a nonempty value. Although this requirement could be configured at the user interface level via a page layout, placing it on the object itself ensures that it is applied consistently across all user interfaces and other channels for data input, such as importing tools. It doesn’t make sense to have a Skill record without a Skill Type. Follow these steps to create the validation rule:
1. Go to the Objects list in App Builder Tools (Setup, Create, Objects) and click the Skill object.
2. Find the Validation Rules heading and click the New button.
3. Set the name to Type.
4. The code in Listing 2.9 checks for an empty picklist value. Enter it in the Error Condition Formula text area.
Listing 2.9 Error Condition Formula for Skill Type Field
ISPICKVAL(Type__c, '')
5. In the Error Message text area, enter “Type must contain a value.”
6. Click the Save button to create the validation rule.
Creating a Custom Object Tab
Custom object tabs are the gateway to all the native user interface functionality for managing data in your custom object. The following steps create a custom object tab for the Project object:
1. Go to the Objects list in App Builder Tools (Setup, Create, Tabs) and click the New button in the Custom Object Tabs heading.
2. The New Custom Object Tab Wizard is now displayed. Select the Project object from the Object field. Click the Lookup icon (magnifying glass) to select a style for the tab and then click the Next button.
3. Visibility of this tab by profile is easy to change later, so leave this screen unchanged and click the Next button. This means the new tab is visible for all profiles.
4. In the Add to Custom Apps screen, click the Include Tab check box at the top to uncheck it for all applications, and then check it for Services Manager only. Click the Save button to complete the creation of the custom tab.
Repeat these steps to create custom object tabs for all four custom objects in the Services Manager.
Setting Field Visibility
New custom fields are hidden by default. They are not visible in user interfaces in Force.com, and they are also invisible to external tools such as Data Loader. To start using these fields, you must first make them visible.
Perform the following steps to make the custom fields in Contact visible:
1. In the Administration Setup area, click Manage Users, Profiles.
2. Click the System Administrator profile.
3. Scroll down to the heading Field-Level Security, and click the View link beside the Contact object.
4. Click the Edit button, and enable all of the check boxes in the Visible column.
5. Click the Save button to commit your changes to the object’s field visibility.
Repeat these steps for the other four objects.