
In This Chapter
Discovering the purposes of different file formats
Recognizing interpolation options Photoshop uses to enlarge your image
Converting multiple high-resolution files for Internet uploading
Constructing matrix images from multiple files
Paper files occupy space in a file cabinet, and digital files occupy space on a hard drive. Making sure the files don't burst out of their seams means keeping track of how big they are because file size is the very foundation upon which your computer will operate — lots of big files make a computer move like molasses. And keeping track of the space you're working in is largely dependent on your file sizes.
In this chapter, many of the common file types are defined in terms of their size with respect to keeping the image intact — that is, not losing detail in the image as you manipulate and process it along the way to printing.
Files become big in a variety of ways. It happens when you're not even thinking about it. Adding a layer, using a template, and moving documents from Word to Photoshop all require space in your computer and all make your files bigger.
Tip
After you get rolling in digital photography, you'll need more space to keep the large picture files. You can get a 160 gigabyte (GB) external hard drive from LaCie for about $100. It connects through your computer's FireWire port. FireWire is an extra-fast connection that will have your files moving from your computer to your external hard drive and back at lightning speed. See Chapter 3 for more about external hard drives.
For decent quality when printing to an inkjet printer, you want an image resolution of 300 pixels per inch (ppi) so that it retains quality. See Chapter 2 for more about what pixels are and how they make up your image.
Unless you print directly from a digital camera or the camera's media, digital images from your camera are stored on your computer.
Of course, an image can get into your computer from a variety of other sources, such as a scanner or the Internet. Downloading brings these image files onto your computer. iPhoto, by default on Macintosh computers, opens automatically when you connect the USB cable from your camera to your computer and turn on your camera. The program asks whether you want to download your images from the camera. Most other camera software that imports pictures from your camera, on both Windows and the Mac, does the same.
To work with each image in preparation for printing, you need an image editing program. Most digital cameras come with some sort of rudimentary software, but the program of choice is Photoshop (for professionals) or Photoshop Elements (for those with smaller budgets and/or less demanding requirements). Photoshop CS2 is the latest version and now includes Adobe Bridge, which can be used to browse and organize your image files.
To bring into your computer a hard copy, film-based source image — whether a negative or a positive — you need to scan the image to create a digital copy. Although a dedicated film scanner is the tool of choice, purchasing a scanner that can scan both transparencies and reflective materials (such as photos and paper) lets you cover more bases for fewer dollars. See Chapter 3 for more about scanners.
Tip
If you're scanning print material and get lots of little dot overlays along with your scan, you can get rid of these in Photoshop by running your scanned material through the Gaussian Blur filter (Filter
Almost all digital cameras can use JPEG files to record images, and some use only the JPEG file format. The camera holds these files on internal memory or on removable media that you slip inside them (see Chapter 3). You then download these stored images from your camera or removable media to your computer. Many cameras store your images in the Pictures folder of your computer, giving them various and sundry (and sometime long and boring) numbers.
Tip
Few professional photographers use the software that comes with their computer or camera to download and organize their images. You, too, can find better — and affordable — software, such as iView MediaPro (www.iview-multimedia.com) and Extensis Portfolio (www.extensis.com/en/products/asset_management.jsp).
Warning
The JPEG file format uses compression to reduce file size, enabling you to store more photos on your camera's removable media than if you used the TIFF or Raw file formats. Although this is great when you're in the field, keep in mind that the process of saving in the JPEG format actual discards some of the image data. Repeatedly resaving as JPEG can severely degrade an image's appearance. Therefore, after opening a JPEG file in your image editing program and making changes, I suggest that you use the program's File
A Raw file consists of the unprocessed image data and information about that image data and the file, called metadata. (Raw means nothing less than what it says — no acronym here.) The metadata can include such information about the image as the shutter speed and f-stop, the white balance, the camera and lens used, and even (for some cameras) the actual spot at which the image was captured in the form of Global Positioning System (GPS) data. In addition, the metadata can include information about the image's file, such as the date/time the file was created, the file's size, and the filename.
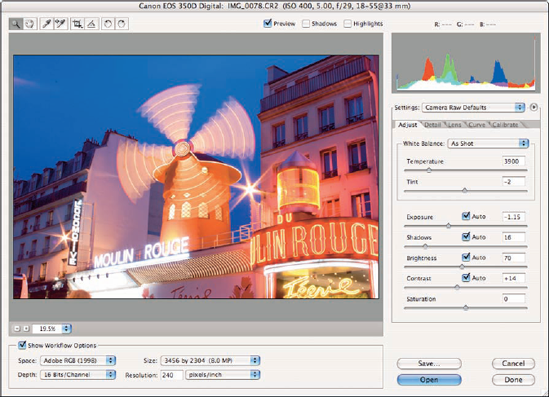
When you make changes to a Raw file's appearance using Photoshop's Camera Raw plug-in (see Figure 16-1), the image itself is not changed. Instead, all the settings you select in Camera Raw are recorded to the metadata, where they can be accessed at any time. And because the adjustments are recorded to the metadata rather than actually made to the image itself, the original image is always available — unchanged and untouched. All you need to do is reopen the file in Camera Raw and apply different adjustments. Therein lies the beauty of working with Raw images — no matter how many versions you create and no matter how many changes you apply, the original, unprocessed image data always remains but a click away!
Tip
Photoshop CS2 has a really swift way of displaying the Raw file dialog box. It uses your camera's metadata to list (along the top part of the dialog box) the vital stats of your shot — camera type, Raw file type (each digital camera has a different Raw file type; CR2 is the type of file that Canon Rebel XT shoots in), ISO value, shutter speed, f-stop, and focal length. Notice the information at the top in Figure 16-1.
Raw is an extremely valuable format for professionals; as soon as word gets out how nice this format is to tweak on your computer, everyone will join in on the fun. Several aspects of the image capture can wait until you download your photo onto your computer instead of getting bogged down to get the perfect shot in the field. Raw files are large; in the digital darkroom, the Raw conversion on multiple files can take some time. Because Raw files give more detail in terms of light and color, they are preferred among professionals to use during the editing process.
Using Raw files with Tiger and Panther
In Mac OS X Tiger and Panther (v 10.4 and 10.3, respectively), you don't need to download software for your digital camera. The Mac OS has its own utility called Image Capture (Applications
Shooting in Raw format is relatively easy (when your camera offers the capability). Within the menu (usually toggled to access while viewing your camera's LCD screen) of most dSLR cameras (for more about camera types, see Chapter 2) is an option to shoot in Raw format. Everything else stays pretty much the same as in other formats.
Warning
Some cameras do not allow you to shoot in Raw format when you're using an auto mode. (For more about auto mode, see Chapter 11.)
On most models, shooting in Raw format is only permitted in the Creative Zone, the zone where many of the settings are freed up to be set by you, the photographer.
When you edit a Raw photo, you can change the color balance and profile with the Raw data from the image just as if your camera was doing it during the shoot. If you convert the same photo to a JPEG file, much information is thrown away to make the file smaller (compressed), so you don't have as much color data to work with. A Raw photo comes to your computer as a 16-bit image so that the color and detail are strikingly clear. (16-bit color uses 16 bits — actual zeros and ones at the basic binary level — to record the color of each pixel. With 16 bits of data, you have an incredible number of possible different colors.) You need to convert the image to 8-bit color to save as a JPEG. You can convert to 8-bit color in the Camera Raw dialog box or by using the Photoshop Edit
After you finish tweaking the white/color balance and levels in Photoshop or your camera's Raw processing software, you can save this file as a TIFF file and proceed with more tweaking in Photoshop or take it straight to press.
Each camera company makes its own Raw file format, perhaps because each wants users to use its company's downloading software and browser. Maybe it's a prestige thing. In order to deal with the variety of formats, Photoshop (www.adobe.com) has come up with a free converter (see Figure 16-2) to convert your image to its .dng format, referred to as a digital negative of your camera's Raw photo format.
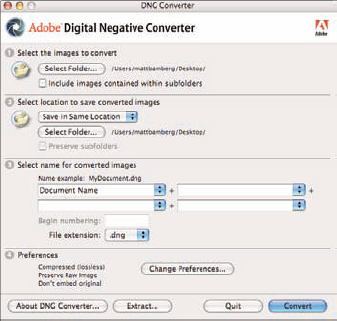
Fuji film's camera Raw files are labeled .raf. Canon has two kinds (.crw and .cr2), and Nikon and Olympus have their own, too (.nef and .orf, respectively). With so many file types (and so little time to learn about each), how does a digital photographer know what's going to be around next year or in a decade? Truth is, you won't.
Saving your files as TIFFs is the first step in keeping your image for a very long time. File
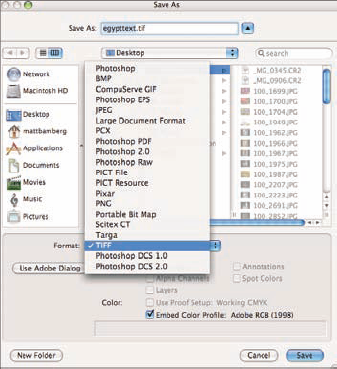
Most of the time, you'll convert to TIFF from either Raw files or JPEG files. To save hard drive space, you can make your TIFF file smaller (by about half) by compressing it. TIFF files don't compress as tightly as JPEGs do because the file is compressed in a lossless format. (In other words, when you open the file again, it's the same as the original.) Although TIFF format compressed files are still significantly larger than their JPEG brothers, some is better than none at all in terms of conserving hard drive space. See Chapter 2 for more information about JPEG file compression.
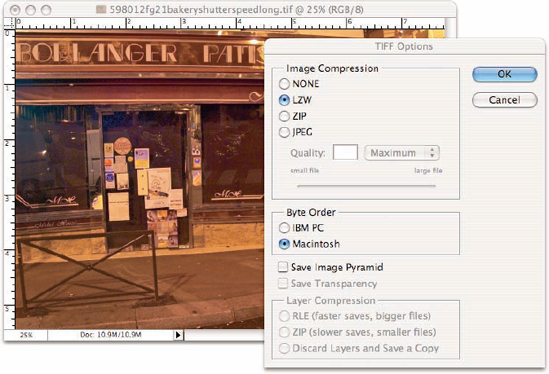
Five-megapixel cameras that shoot and store in JPEG (which most do) can give you a file anywhere from 1MB to 2.5MB, depending on the quality size you select in the camera's menu options. That same photo as an uncompressed TIFF requires about 14MB on your hard drive. With LZW compression (see Figure 16-4), the TIFF file shrinks to about 7MB, but that's still much larger than a JPEG — even at the highest quality setting.
Warning
To ensure compatibility (and to make sure you'll be able to open your TIFF files years from now), use only LZW compression. Photoshop also offers JPEG and ZIP compression for TIFF files, but stick with LZW.
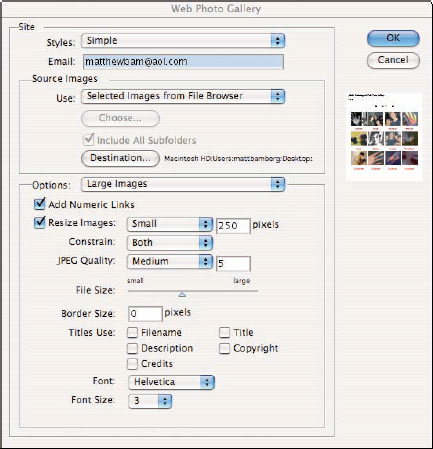
If you want to put your photos quickly on the Internet, Photoshop has a quick way of converting not only each file but also setting up everything for you so that you can upload to any Web server. Web photos are usually small JPEG photos — say, from 4 to 60K. (There's a GIF format, too, which I don't cover here.)
Say you have a set of images of fruit that you want people to see on your Web site, and you want the images displayed so that users can easily navigate to them. Use Photoshop's Web Gallery option to convert your TIFF files to JPEG and display them on a Web page. The Web accepts only JPEG files and HTML code (an Internet computer language) to understand what to do with the files after they're uploaded to your Web server. (A server is a big computer that stores a multitude of Web sites.) To convert your high-resolution TIFF files to low-resolution JPEG files and the connected HTML code for uploading to the Internet (which will put them on display quite nicely, thank you), follow these steps:
Locate the images you want to convert to JPEGs and put them into a folder.
Open Photoshop and choose File

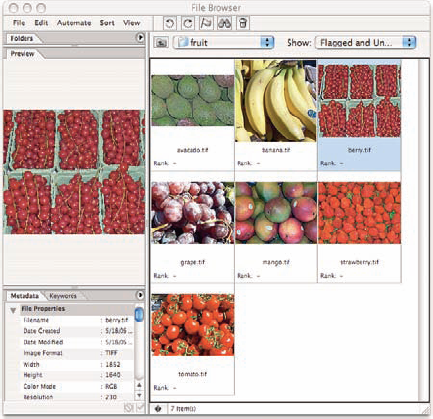
In Adobe Bridge, navigate to the folder that contains the images you want to convert.
Figure 16-5 shows the TIFF files that will be converted.
Select all the photos in the folder by pressing

Choose Tools
When Photoshop processes your request, three folders appear on your Desktop — Images, Pages, and Thumbnails.
Your new gallery opens in your default Web browser, ready for your review and approval.
Web Photo Gallery offers a variety of different templates, with which you can produce galleries both simple and complex. To make your gallery available to friends and family via the Internet, contact your Internet service provider (ISP) or another operation about hosting your Web site. Your ISP can give you specific instructions for uploading your site to a Web server and assigning an address, known as a Uniform Resource Locator (URL), by which others can find and view your gallery.
If you want a clear print, you should aim to work with an image of at least 300 ppi at your desired print size. With a high-quality inkjet printer, you can use a somewhat lower resolution, but use 300 ppi as the target resolution.
When copying and pasting lots of stuff from file to file in Photoshop, have a standard resolution in mind to which you want to set each image. Photoshop automatically resizes an image if it's moved from one file to another at different resolutions.
When you change an image's pixel dimensions with the Image
The interpolation options run as follows:
Nearest Neighbor: I don't recommend this option for art photos because it produces rough edges, but it's great for some simple illustrations.
Bilinear: This choice results in medium-quality interpolation, so it isn't a good option for art photography but can be excellent for blocky or irregularly shaped artwork.
Bicubic: This option is fine for small changes to an image, such as minor resizing or transforming selections.
Bicubic Smoother: This is a fine interpolation choice when enlarging images significantly.
Bicubic Sharper: This option is great for reducing pixel dimensions because it keeps details sharp and well defined.
Tip
When considering enlarging an image for sale as art photography, start with an artful image — one that still looks good even if it loses resolution.
Resampling an image, for all practical purposes, is enlarging or reducing the number of pixels with which the image is formed. The same image content is there (unlike with cropping), but a different number of pixels is used to represent the picture. Both increasing the number of pixels in the image (upsampling) and decreasing the number of pixels (downsampling, which you might do to create a Web version of a photo) can degrade the appearance of your image. When upsampling significantly, the image might look a little soft — out of focus. When downsampling, the fine detail in the image gets lost — eyes become blobs, grass becomes sheets of green, and diagonal and curved lines in the image can become jagged. Generally, as an art photographer, you're most likely to increase the pixel dimensions of a photo so that it can be printed at a larger size with good detail.
The left image in Figure 16-7 is a sign containing Egyptian hieroglyphics. I really liked the bird. This is a good subject for resampling because the blur that occurs when you resample softens the image — in this case, an image that took to softening well because it's etched in stone. I cropped the picture using the Crop tool from the Tools palette so that only the bird was in the image and then resampled it using the Bicubic Smoother (see the right image in Figure 16-7).
Warning
Resampling a person who is small in a picture by enlarging it ten times will likely not yield a good result, no matter how much you tweak it. Better to take another picture closer up (which, of course, could also have been done with the hieroglyph of the bird).

You make an image grow, as I demonstrate with the preceding bird image, by using Photoshop's Bicubic Smoother interpolation method. Just follow these steps:
Find an image that you think will take well to enlargement.
(Optional) If necessary, use the Crop tool to reduce the image to only the part that you want to enlarge.
Choose Image
In the Image Size dialog box that appears, mark the check boxes for Constrain Proportions and Resample, selecting Bicubic Smoother as the resampling method.
If the artwork contains layer styles, you also want to select the Scale Styles check box.
In the Document Size area of the dialog box, enter your desired print dimensions and print resolution (usually 300 ppi).
You might use the upper part of the dialog box when preparing an image for a Web page, in which case you would need to work with specific pixel dimensions.
When you're happy with the values, click OK and view your image.
Remember that you can always use the Edit
You might find a situation in which you need to change the resolution of an image while maintaining the original image's pixels. This is a trade-off: If you don't resample (change the number of pixels), you can change the resolution, but the print dimensions also change. For example, if you have an image 3000 pixels wide and the image resolution is 72 ppi, the print would be almost 42 inches wide. If you change the image's resolution to 300 ppi without changing the actual number of pixels in the image, the print size drops to 10 inches wide. Or, in a more practical sense, you can change the image's print dimensions without resampling, letting Photoshop determine the resolution.
Tip
Don't let your mind lock into 300 ppi as a must-have resolution. It's generally better to not resample an image and print at a resolution of 250 ppi (or 360 ppi or 400 ppi or even perhaps 225 ppi) than it is to resample an image to 300 ppi for print. Avoid resampling if you can — that prevents the softening or loss of detail that can come with upsampling or downsampling.
To change an image's resolution without resampling, just do this:
Open the image.
Choose Image
Deselect the Resample check box, enter your desired resolution, and then click OK.