
Comparing film and digital cameras and equipment
Exploring digital cameras
Selecting lenses, flashes, and other accessories
Downloading images from your camera to your computer
Understanding resolution
Discovering file types
So you decided to jump into this century and go digital, eh? Bully for you! This chapter (and the next) cover all those nuts-and-bolts kinds of digital photography issues — you know, the digital side of digital art photography.
Whether you're a budding photographer whose first foray involves using a digital camera or a film buff who wants to use traditional and digital film technology, this chapter walks you through some of the jargon and nuances between these two formats to help you along your path.
Any image that ends up in your computer is digital — that is, bits of data organized electronically. Even if a photo begins on film, it ends up being digital when you scan it into your computer. Ever look at a photo attachment in an e-mail? Maybe it started out as a hard copy print from film, but you view it in digital format. Your goal when making the digital leap is to manipulate those bits of data with electronic means — your computer, some image editing software, and perhaps a scanner — to create an image that looks simply fantastic and cutting edge, no matter what special effects you do (or don't) apply.
Think of your photographs taken with your digital camera or scanned from film or prints as the beginning of making a product in a factory. The image goes through a process:
Snap the picture.
Store the image.
Film: This step has two parts: The first takes place in a processing machine or dark room where the film is developed into negatives and/or positives; during the second part, the image is developed onto photo paper.
Digital: The image is stored as pixels, which are tiny picture elements made of bits of data, inside your camera.
Move the image file into your computer.
Film: Scan a printed photograph or a slide (a positive).
Digital: Transfer the image from your camera to your computer.
Leave the image as-is or tweak it within an image processing program.
Print the image.
You can use your own printer or take it to a service bureau.
To get your image through this process, you need a certain amount of equipment: camera, lens, scanner, printer, and so on. Read on for an overview of digital cameras and camera peripherals; this overview is designed to help you acquire the proper tools for your needs. I also discuss resolution issues and file types (two topics that you never need to know to use a film camera!).
Because film has been around a lot longer than digital camera sensors, take a minute to compare the new technology with the old. Sure, in some ways, photos taken with a digital camera beat those taken with a film model hands-down, but the digital world isn't a black-and-white world — as with most things in life, there are many shades of gray. For every privilege you get with the technology, you have to be careful because each format has its inherent pluses and minuses, which are described in the upcoming Table 2-1.
For example, compare the viewfinders on a film camera with a digital model. You look through a film camera viewfinder, but most digital cameras use an LCD display, akin to a mini TV screen. Viewfinders on digital single lens reflex (dSLR) models, however, are very similar to film SLR models.
Most cameras that have an attached lens come with an LCD screen viewfinder. This viewfinder (as in Figure 2-1) is a nice feature to have (no discomfort from the camera against your face), but it does have a slightly different perspective than what you actually get after your picture is taken.
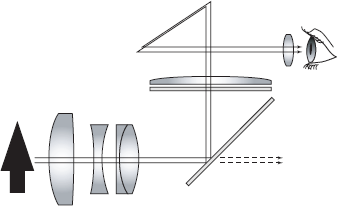
The viewfinder on a high-end dSLR camera uses what a 35mm SLR camera does. Optical viewfinders on professional digital cameras are the same ones used on professional film cameras. These use a prism to split the view, so the picture you take is pretty much what you see through the lens, as shown in Figure 2-2

If you've been a film photographer for most of your life, your eye has probably been glued to the viewfinder of your camera. Thank goodness they also put one on digital SLR cameras because that LCD viewfinder takes some getting used to.
Of course, both film and digital cameras each have other advantages and disadvantages. Table 2-1 provides a brief overview. Some factors will undoubtedly matter more to you than to someone else. Similarly, you can also compare digital and film images, as shown in Table 2-2.
Table 2-1. Shooting Digital versus Shooting Film
Factor | Pro | Con |
|---|---|---|
Convenience | Digital: They're small and portable. Film: Some folks like the weight and feel. | Digital: Some models are a bit small for some folks' hands. Film: They're more bulky. |
Instant gratification | Digital: You get to see images right away. Not only is this cool, but you can cull bad shots right away. | Film: You have to wait for processing. |
Cost-efficient | Digital: You don't have to pay for film and processing. (If you do your own image processing, though, you do need a computer, software, printer, and printing supplies.) | Film: You have to buy film and prints. (If you make your own prints, you need a darkroom setup, equipment, an enlarger, and printing supplies.) |
Durability | Digital: They have fewer moving parts to wear out. Film: They withstand bumps and drops better. | Digital: They can easily fall from a shirt pocket or get knocked about in a purse. Film: They have more moving parts. |
Accessories | Both film and digital: SLRs can use more lenses, filters, and flash accessories. | Digital: Non-dSLRs don't have as many lens options. |
Power | Digital: They eat batteries. | Film: They have much less battery consumption although flash units and motor drives are battery intensive. |
Film: You're limited only by your film roll size. Digital: Removable storage media means unlimited shots; you're limited only by the amount you have; memory can be reused. | Film: You're limited by your film roll size. Digital: Because of its size and nature, removable memory can be damaged or lost. |
Table 2-2. Digital Images versus Film Images
Factor | Pro | Con |
|---|---|---|
Storage | Digital: You can store many images in a small amount of space, like on a CD or DVD. Film: You don't need a computer. | Film: Film (negative and positive) and paper archiving takes space and environmental care. Digital: You need a computer and software to view/edit. |
Lifespan | Digital: Images don't degrade like film and paper do. Both film and digital: Hard copy images are permanent. | Digital: Images can become corrupt or be lost when a computer crashes; also, storage media lifespan is not unlimited. Film: Film and prints deteriorate over time. |
Flexibility | Digital: Images are easily edited and printed; digital images can be transmitted between computers and posted online. Film: Digitize film images for archiving and manipulation. | Digital: Images can be "faked"; you need a computer and software. Film: Making printing tweaks is limited; moving from color to black-and-white and vice versa is difficult. |
Cost | Digital: No need to buy film. | Film: Processing costs. |
Appeal/art factor | Digital: You create amazingly cool images with tweaks, filters, and layering. Film: Some folks (and art pros) like prints from film better; some galleries insist on print images, especially B&W. | Digital: Some folks are a tad snobbish in their preference for film over digital; some folks like holding a print for viewing rather than viewing onscreen. Film: You're limited in your tweaking options. |
Note
Don't ditch your scanner if you decide to use only a digital camera from now on. Just because you have all your images stored digitally on a tiny chip doesn't mean that you don't want to be able to copy some older ones from prints. (You don't want to forget about how you looked way back when.) Sure, old crackly photos can be retouched in Photoshop (see Part III), but they have to be scanned first.
Choices, choices. Just like when choosing a film camera, don't let all the options, bell and whistles, and knobs bamboozle you. Read through the following sections to help make your equipment purchasing decisions. Be prepared to pony up a bit of cash when you go high-end digital, but you can find a lot of features on moderately priced models. And prices come down all the time, so first determine what features you want/need and then shop around.
You have many types of digital cameras from which to choose. Here's a brief overview of each. Because prices for each drop so quickly, take a look at online and local newspaper ads for accurate pricing. Expect to pay a few hundred bucks for the low-end models (compacts) and work your way up into the thousands for a dSLR with bells and whistles.
Ultracompact: These microcameras are Twiggy-thin.
Point-and-shoot: About the same size as a subcompact, some of these have some manual settings.
Subcompact: These easily fit in your shirt pocket; most have some manual settings.
Prosumer: These are similar in size to a dSLR; some have detachable lenses.
dSLR: These are the best models going, featuring all the manual settings of a film SLR.
Choosing a digital camera that takes good-quality images is easy and relatively inexpensive. You can choose from a variety of megapixel (MP) prosumer digital cameras and dSLR cameras from which you can use a number of controls to create art.
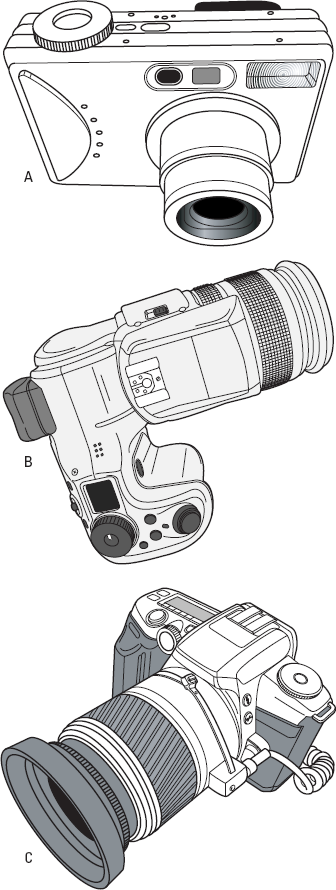
Figure 2-3 shows typical subcompact, prosumer, and dSLR models. (Note: dSLRs and film SLRs look very similar when comparing higher-end models.)
Basic digital cameras: There are dozens of digital cameras (including the ones that are an option on cellphones) that take your basic digital picture, all great for sending images to friends and/or posting images on the Web. As far as printing a clear 8″ × 10″ print, however, you're better off spending a little extra on a prosumer model, which I describe in the next bullet.
Prosumer digital cameras: Prosumer cameras offer far better quality than those cameras built into cellphones or those cheaper low-end model digital cameras. You could label these as mid-end cameras. If you're getting serious about your digital photography, these are the cameras to buy.
dSLRs: These are the gold (or platinum) standard of the digital photography world. Expensive (but coming down in price), these cameras do their best to replicate the best 35mm film cameras. (And an added bonus, you can use the lens from your film camera on the dSLRs.)
Tip
If you do have money already invested in lenses, make sure to purchase a digital camera that's compatible with those lenses. You'll also find that sticking with the same brand of camera as you go digital reduces the learning curve — most options and controls will already be familiar to you.
Digital cameras use sensors to record the images that you shoot. There are three categories of sensors:
Foveon: A kind of simulated film sensor, where pixels are processed within the sensor with an added color enhancement similar to film
CCD: A charge-coupled device, where pixels are processed outside the sensor
APS: Active Pixel Sensors, where pixels are processed within the sensor
You see the acronym CMOS (Complementary Metal Oxide Semiconductor) most commonly for APS devices.
Each uses a technology that forms the image coming through the lens into a digital format. They are easy to use and allow the user to immediately review the photo. You can keep, download, or manipulate the photo electronically in your computer, tweaking and cropping it so it looks like it could be published in a newspaper or magazine, and adjusting the image for best results. A digital camera is basically a computer with a lens that scans an image, stores it digitally on removable storage, has a built-in monitor for viewing, and can download the image to a computer. Digital cameras have most of the features found in film cameras, such as zoom lenses, built-in flashes, lens adjustments, timers, and more. Most high-end digital cameras use optical viewfinders for framing the image.
dSLR cameras look identical to their film counterparts and operate similar to them, too. Both prosumer and dSLR models have different sophistication levels of these features. In a nutshell, consider these factors:
Optics: The optics of digital cameras comprise the zooms, exposure compensations, white and color balances, and a whole slew of controls that come to your fingertips after you make your selection. The zoom is how the image can be enlarged without losing resolution. For more information about optical and digital zooms, see Digital Photography For Dummies, 5th Edition, by Julie Adair King (Wiley).
Metering: The metering in your camera helps you to use light distributions correctly within the area of the photograph you're taking.
Focusing system: The focusing systems on most digital and film cameras currently come with an autofocus and also have a manual focus system.
Sensor resolution: The sensor resolution is the number of pixels the image carries at the camera's maximum resolution setting. The more, the merrier — that is, increased clarity.
Megapixels determine the quality (clarity) of a digital image that's taken with a sensor in a digital camera. A pixel is the composition unit of a digital image. (Just like a byte is the smallest unit of memory storage, a pixel is the smallest unit in an image on a display screen.) Images that you take with your digital camera have a lot of pixels — a million or more (hence, mega). When you shop for a digital camera in a store, the first thing that the salesman tells you is how many megapixels it has.
Note
The quality of a digital camera's image is measured in millions of pixels (megapixels, MP). The higher the number of megapixels, the greater the resolution. For more about resolution concerns, see the later section, "Resolving Resolution Issues."
Thus, a 5MP camera can capture a shot with more pieces of information than a 2MP camera. Sometimes bigger is indeed better. Again, prices vary and can come down quickly. Assess your needs: For example, are you striving for gallery-quality images, or can you make do with a bit less? You can easily spend over $1,000 for high-end models (>6MP), but you can find a good 2MP model for about $100–$200. Expect to shell out $200–$350 for a model between 4 and 6MP. Of course, pricing for MP capacity also depends on whether the model is a dSLR.
You can compare prices and other options online at sites like
www.buyersedge.com/landing/digital_cameras.asp
If you're beginning to make art photos, you're best off with a camera that can take a high-quality image that can be enlarged to 8″ × 10″. After you master that arena, you can move up to giant sizes, and those are determined by the type of printer you have (see Chapter 17). Here's how to tell how much MP muscle you need:
<2MP: Under-2MP cameras aren't really capable of producing a clear enough image for a high-quality art photograph. To give you an idea of what you could expect, many cellphones have camera capabilities in the 2MP range.
2–4MP: Cameras with this oomph are great starter cameras and can produce some pretty good 5″ × 7″ prints that are great, especially if you have a series of them in similar frames.
4–6MP: These guys can produce some mighty good 8″ × 10″ images. When shooting these under the right light conditions, you can produce gallery-quality photographs.
>6MP: These beasts can produce 8″ × 10″ prints — and even larger photographs — of stellar quality.
The physical size of a digital camera's sensor also plays a role in the quality of the image captured. Generally speaking, larger is better. Some digital cameras include a sensor that's the same size as a frame of 35mm film; others use a smaller sensor. When you explore digital cameras, you might also come across the extremely expensive digital backs for medium- and large-format studio cameras, which capture images of 20MB, 30MB, and more.
How is image quality affected if you've got two cameras, both with 8 or more MP but each with a different size sensor? It's the light. The bigger sensor of a dSLR reads light better, creating deeper colors and better contrast. Images from each camera will be clear and can be used for gallery-quality photos, but the size of the sensor does make a difference.
The dSLRs in the near-$1,000 price range are 6- and 8MP models with sensor sizes around 16 × 24mm. In contrast, the two-third-inch (about 17mm) sensor size of some 6-, 7-, and 8MP digital cameras is dramatically smaller, perhaps the size of a man's thumbnail. These models are usually not dSLRs but rather point-and-shoot to prosumer models described in the previous section, "Digital camera types." About a dozen film camera companies offer a wide variety of digital cameras and dSLRs. Canon, Fuji, Hewlett-Packard (HP), Kodak, Leica, Minolta, Nikon, Olympus, and Sony: You name it, and they probably have it — from models that take pictures in JPEG format to models that shoot in Raw format, the latest in digital photography technology. Read about both file types in the later section, "Understanding File Types."
Tip
Most of the time, the closer the specifications of the camera are to those of a film camera, the better the digital camera.
You can change lenses on your digital SLR camera just like you can with a film SLR camera. And best yet, you can use some of the same lenses from your film camera. This isn't possible with a fixed-lens digital camera. If you're moving to digital for good and don't want to waste your investment in lenses, consider investing in a dSLR model of the same brand as your film camera when switching from film to digital.
The principles of lens attachments and/or digital camera zooms and wide angle lenses are similar to that of film. An all-purpose zoom lens should meet most of your photography needs. Just about every camera has one of these. A zoom lens lets you press a button (on digital camera models) to change focal lengths without changing lenses. Many film point-and-shoot cameras work the same way. The variable focal lengths of this kind of lens make it all-purpose. You can shoot at wide angle for one exposure and then use the normal (standard) or telephoto lens for another.
Note
Many cameras and digital cameras come with built-in lenses that have a limited focal point range — that is, one where it's a challenge to catch a good bit of horizontal or vertical (if you turn the camera on its side) space.
Tip
A good all-purpose lens for art photography should have at least a 28–105mm lens or the equivalent depending upon sensor size. For more about lens size equivalents for sensors smaller than 24mm × 36mm, see the "Focal lengths" sidebar, later in this chapter.
As an art photographer, you need to be quick. Life happens fast — there one minute and not the next — like people on the red carpet of a film opening, a comet in the sky, or a horseless carriage driving on the freeway. You have to think to yourself about what you want to carry with you and how much time you're going to have. If you have to tote a duffle bag with a variety of lenses that have to be changed from shot to shot, you're better off shooting things that are static and/or anchored. A good camera with an all-purpose lens is best to have with you at all times if you need to shoot your art photos fast.
Tip
Deciding what lenses to use comes down to the types of objects in your photographs and the amount of time you have to shoot them. On your digital camera's zoom lens push button zoom controller, the T means telephoto or zoom in, and the W means wide angle.
Telephoto: Use a telephoto lens (as I did in Figure 2-4 to close in on just one part of a large sculpture) and a dSLR camera if you're going to shoot from far away.
Sports photographers and the infamous paparazzi use telephotos, as do some fashion photographers (who use loudspeakers to communicate with their subjects). The telephoto lens compresses a larger area in front of the subject, which helps to soften human features and blur the background. If you're looking to get close and/or have a picture-perfect portrait, you should, too.
Wide angle: Use a wide angle lens (wide angle zoom lenses have lengths such as 16–35mm and 10–22mm; see Figure 2-5) and a dSLR camera if you're going to shoot architecture and landscapes, or in any situation where you need a panorama. For example, a shot of a swimming pool's length is best presented as a panorama so that the focus of the shot is just the pool (with little or no background), long and ready to jump into.


Tip
A panorama doesn't necessarily have to be a picture that's very wide; it can also be a vertical picture showing something extraordinarily tall. Steer your panorama shots with wide angle lenses (or your zoom set to wide angle) in an up-and-down orientation. For instance, take the elaborate doors of European architecture that are ten times the height of the average person. Set a person in the shot and you've got vertical drama, as shown in Figure 2-5.
With this type of photography, you also probably need a tripod to avoid camera shake.
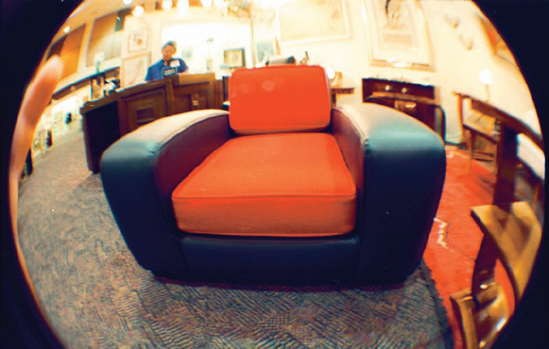
Fish-eye: A fish-eye lens gives you maximum lens distortion so that objects are magnified in the center and diminish in size and clarity in all directions in proportion to the lens's shape. Superwide angles cause this type of distortion. Some would consider it an error, but others would see it as art. Figure 2-6 is a fish-eye view, one that offers offbeat distortion for your art photos.
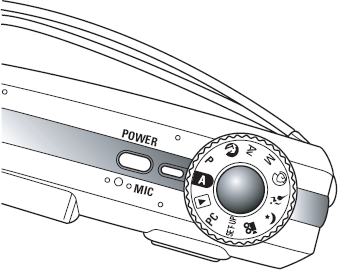
Many digital cameras come with different modes: preset settings that you can choose for certain lighting and shooting scenarios. For example, you can choose an auto setting (see Figure 2-7; let the camera choose what it thinks is best), shutter priority, aperture priority, or manual control (you make all the exposure decisions). Some cameras also have drive modes, which allow you to fire off quick shots in succession (great for sports and actions shots). See the Cheat Sheet at the front of this book where I list the modes and their functions.
Settings are influenced by the ISO setting you choose. ISO refers to how sensitive you set the sensor to read light; for more on ISO, see Chapters 5 and 6.
Of course, for total creative control, use all manual settings to control aperture and shutter speeds. For more on these settings, see Chapter 11.
Ever wonder why people who've been photographed using a flash look scared? The human eye — of the subject, in this case — isn't used to powerful bursts of light, like what a flash omits. Eyes need time to adjust to changes in light. Hence, you often get that deer-in-headlights look. This makes flash photography tricky. Too, you have to know how to achieve adequate and even illumination. To overcome these limitations when using a flash, first begin by understanding the average built-in flash:
Range: Built-in flashes have a range of up to 10 feet. If your subject is farther away than that, the flash will fall short.
Quality: Flash light is harsh unless you soften it by bouncing it off walls, whiteboards, umbrellas, and other diffusing devices.
Note
The best light is ambient light — light that comes from all around you — and that just doesn't happen with a built-in flash.
If you have a dSLR, you can always augment or replace your camera's built-in flash with a flash attachment. (The only type of digital camera that can take an additional flash attachment is a dSLR model.) Of course, any time you add an attachment to your camera, it becomes more cumbersome. Still, here are reasons why you might want to attach a more powerful flash to your camera:
Flash technology has become sophisticated. Some flash units can simulate a good lighting situation from a pretty good distance, some up to 40 feet. There are flash extender units (handy if you're using a lens greater than 300mm) that can shoot light over 40 feet when used as a flash fill. (For more about flash fill, see Chapter 5.)
You're shooting outside in low light, and no other light is available. For example, a flash attachment is very handy if you are filming the red carpet celebs at the Sundance Film Festival in Park City, Utah.
Tip
Each camera company makes its own flash attachment. For example, Nikon makes the SB 800 AF Speedlight, which is a flash attachment that is interchangeable on both its film SLR and dSLR cameras.
Tip
Work with your built-in and/or flash attachment by taking pictures with it to assess its effectiveness and range.
Your built-in camera flash is triggered when your shutter moves. You can mount different types of flash attachments to your camera. Many in-camera flashes offer uneven light, sometimes blasting all in one place so that your subject looks unevenly lit. Flash attachments work wonders to eliminate these light blasts by providing much more powerful flash over which you have more control:
A hot shoe is a space on your camera into which you can secure your external flash. Using a hot shoe enables your camera to control many aspects of the flash from the camera's flash options, such as flash exposure compensation. The flash exposure compensation lets you control the amount of light from your flash that you want cast over your subject/object.
Some flash units, such as the Canon Speedlite 580 EX, can determine your camera's sensor size so that it throws out evenly dispersed light over your entire frame. You can also adjust the way the flash gives off light through options within the flash unit settings. Many of these units swivel and tilt so that the light can be thrown at wide angles and bounced off walls and whiteboards and at varying focal lengths.
Mid- to high-level external flash attachments have motors that move the flash outward in front of the camera. (The closer the bulb is to the camera, the wider the light will be cast.) The zooming motor can be adjusted each time you change your focal length.
Many external flash units use AA batteries. Some can accommodate high voltage battery packs; all operate so that the battery life lasts throughout heavy flash picture taking at long events, such as a wedding.
For more on shooting in low-light situations, see Chapter 6.
Digital cameras use a lot of batteries. Many point-and-shoot models use two AA batteries that will usually last through several dozen shots.
Internal battery packs are rechargeable units that you take out of the camera and recharge by securing them into a charging unit that you plug into a wall outlet. Recharging time can vary from several hours to less than one hour depending on the model. If you use your camera's LCD viewfinder and flash a lot, the batteries will be sucked dry quickly. Some dSLR cameras offer optional external battery packs for extended operation.
Tip
Buy another rechargeable battery if you do a lot of shooting. When you have an extra, you can charge one while using the other (and you'll always have a charged battery on hand).
Batteries are simple to load. Look for your typical sliding/slot door. If all else fails, read the manual. Check out
www.imaging-resource.com/ACCS/BATTS/BATTS.HTM
for a comparison of batteries.
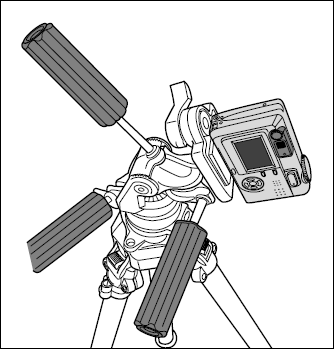
When shooting at slow ISO/ASA speeds, slow shutter speeds, or in low-light situations, you want to support the camera to prevent unintentional blur. Your best bet is to use a tripod or a monopod (see Figure 2-8). (Read more about film speeds, shutter speeds, and shooting in low light in Chapters 5 and 6.)

A tripod is a three-legged (hence the tri) stand for your camera. You attach your camera to it with a tiny screw attached to a small platform at the top. Tripods can vary anywhere from high-end ball bearing balanced tools to ultraportable, tabletop models. A monopod works in a similar fashion but (obviously) has one leg. (Just watch out when using a monopod, especially in a public building. Don't be surprised if security personnel want to inspect it. It's the times we live in.)
Tip
Just make sure that your camera has a threaded mount hole (look at the bottom plate) to marry to a tripod. Higher-end digital cameras will have this feature. Also, after you attach your camera to a tripod, you can manipulate the tripod's knobs to flip your camera on its side to take pictures vertically.
All digital cameras store exposures in digital memory of some kind. This "memory" works the way film does in a traditional camera. Lower-end cameras usually have a set amount of onboard memory; when it's full, you're done shooting until you download the stored images. (Think of this as running out of film.) Moderately priced and high-end cameras also use removable media, which is a fantastic timesaver (no more changing film!) and oh-so-convenient (just pop in a new card and keep on shooting!).
From a different angle ...
Use a tripod's moveable head (just play with the mounting base handles) to shoot on an angle and get some great canted (oblique) shots, as shown in the figure here. Adjust the tripod's knobs, twisting and turning them so that they are fixed into position. Then practice
Panning left and right: Move the tripod left and right slowly and methodically.
Panning up and down: Move the tripod up and down slowly, then quickly.
Moving from place to place: Move the tripod from one place — say, a flat ground — to another place on uneven ground. Readjust the legs so it sits evenly.
After you get used to moving the tripod head around and panning it in all directions, you can set it up — and adjust it — on the fly and quickly.
Funny thing about memory, though (and no, not just that losing it isn't fun): Different manufacturers like to use their own types, or at least different types, of memory in general. Thus, removable media formats usually aren't exactly interchangeable. Tangentially, if you download images from removable media to your computer (as compared with downloading straight from your camera via a USB cable), your computer must be able to accept these memory devices, too. Some machines come equipped with card readers on their front (usually next to the USB ports), and sometimes you need to use an external card reader (as in Figure 2-9). Sigh.

Here's the scoop, as briefly as I can write it. Check your particular camera model/manufacturer to see what you need. Of course, the greater the memory the card can hold (say 1GB versus 512MB), the more shots you can take on that card and thus not have to swap it out or cease photographing. Likewise, the price will be higher.
Here are the major players. Prices change like crazy, so shop online for the best deals. Too, all these types (with the exception of the mini-CD) come in various amounts of storage — some as high as 8GB (yes, I did say 8 gigabytes) — so that factors in to the pricing, too.
Floppy disk: Yes, believe it or not, at least one type of digital camera (a Sony Mavica model) records to a 3½″ floppy disk. This storage method is rare.
Compact CD: Some Sony Mavica models use a compact CD-R/RW storage method. These are rare, too.
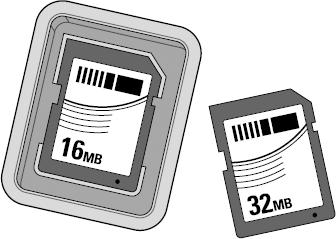
CompactFlash: This is a common memory card; see Figure 2-10. These are physically a little larger in size than a Memory Stick (see the following bullet), and their capacities range from 8MB to 8GB of storage. The two types of CF cards are
Type I: These are 3.3mm thick.
Type II: These are 5mm thick.
Cameras with Type I slots cannot use Type II cards. Cameras with Type II slots can use both Type I and Type II cards.
Tip
CompactFlash cards are generally referred to as CF cards.
Memory Stick: This is a proprietary format from Sony. These thin and flat removable memory cards are about the length of your thumb. Compared with current SD (Secure Digital) and CF cards, the original MS card is incredibly slow.
Tip
Sony uses a smaller card — Memory Stick DUO — in some of its super-compact Cyber-shot models. A Memory Stick DUO card is half the size of a regular Memory Stick. You need an adapter to bring the Memory Stick DUO card up to the size that a Memory Stick slot or card reader can handle.
SmartMedia (SM): These cards are smaller than a book of matches and not as thick as a credit card. Their design can cause incompatibility issues with cameras made before 2001. Some photog pundits predict the demise of SM cards because Fuji and Olympus — once the biggest users of SmartMedia cards — now both use their new xD-Picture Card. (See the upcoming bullet on that format.) All other camera makers, except Fuji, Olympus, and Sony (which uses its proprietary Memory Stick), have gone with Secure Digital (SD).
MultiMediaCard (MMC): These cards are similar to SD cards (see the following bullet) but are less secure and are physically thinner. A MultiMediaCard can fit into an SD slot, but an SD card can't fit into an MMC slot. MMCs are usually compatible with cameras that can use an SD Card.
Secure Digital (SD) Card: These cards are probably the most popular flash memory format for digital cameras and can also be used in other gadgets like PDAs. SD and MMCs are nearly identical on the outside, but SD cards are much faster than MMC cards. SD cards have become the flash memory card of choice for digital cameras because of their small size and low power consumption. SD Cards hold from 16MB to 2GB.
Tip
Because not all cameras that use SD can also use MMC cards, check your camera's user manual.
xD-Picture Card: Man, oh, man! These cards are about the size of a quarter! Olympus and Fuji jointly developed the xD-Picture Card, which boasts an ultracompact design and storage capacity of up to 8GB. These cards are compatible with different digital camera brands.
After you have some good pictures in your digital camera, the next step is to transfer the images to your computer. Images captured with a film camera can be transferred to a computer using a scanner. I discuss scanning in Chapter 3.
Tip
When you're ready to download images to your computer for the first time, first install your camera software onto your computer. You then have two basic methods of transfer:
From the camera itself: Connect a USB cable from your camera to your computer, as shown in Figure 2-11. On newer computers, you can find a USB port on the front of your machine. (Some super-jiffy machines have USB ports on their keyboards!)
From removable memory: Remove the memory card from your camera and place it in a card reader. These can be external devices that plug into your computer via a USB cable. (Refer to Figure 2-9.) Some computers have card readers built in.
Either way, your images are then on your computer, from which you can edit and tweak away in an image processing program like Photoshop.
Adobe Photoshop is one image editing program that meets the needs of digital artists. It has been around for a while and has many versions. Although the latest version (CS2) has the most features, almost any version from 3.x up will do. You can open your downloaded or scanned images into any version of Photoshop.
Tip
You can get a reasonable print from processing your image using other third-party image manipulation software. iPhoto (for you Mac users out there) and even your scanner software are enough to print out any image. The key here is to tweak your printer software to get the best print possible. See Chapter 17 for more about printing from programs other than Photoshop.
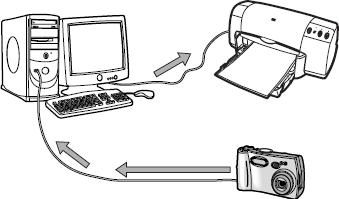
As a timesaver, you can bypass the whole download-to-your-computer path: Just directly download images from a camera to a printer. You can use
A docking system (like from Kodak), in which the camera seats directly onto a printer designed to marry with that camera model.
PictBridge, which is a standard that you can use (in tandem with a USB cable) to directly connect camera to printer. (See Figure 2-12.) Many major manufacturers support this technology, including Nikon, Canon, Olympus, Kodak, Pentax, Fuji, HP, Epson, Sony, and a gaggle of others. You can read more about it at
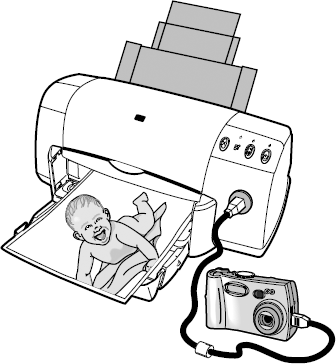
www.cipa.jp/pictbridge/index_e.html
The downside to taking a direct download-to-print shortcut is that you miss the opportunity to tweak your shots in an image editing program. For more on printing, see Chapter 17.
As I mention earlier in this chapter, megapixels determine the quality (clarity) of a digital image that's taken with a sensor in a digital camera. A pixel is the composition unit of a digital image. Remember that a pixel is the smallest unit in an image on a display screen. Images that you take with your digital camera have a lot of pixels. For more information about interpolation, resampling, cropping, and resizing, see Chapter 16.
Note
To view what a pixel looks like within an image
Find and double-click an image file on your computer.
In Photoshop, enter a magnification level in the Zoom text box at the lower left of the window (see Figure 2-13).
Input the following magnification levels: 50%, 100%, 400%, and 1600% (the maximum in Photoshop).
No need to type the percent sign; just entering the number will do.
Notice how the image changes each time.
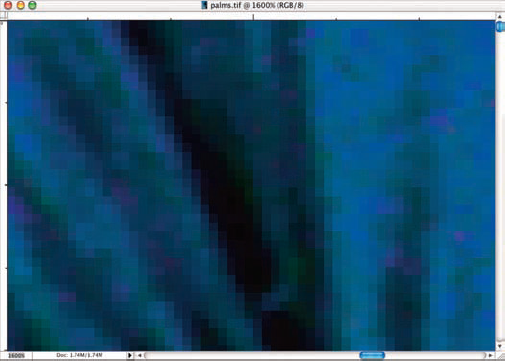
Notice how an image is clear at low magnification levels. Then the tiny squares that make up the image really take on a life force of their own at high magnification levels (as shown in Figure 2-13). The tiny squares are pixels.
Figure 2-13 probably could be an art photo in and of itself, which is what makes the digital platform a medium that has just begun to see its potential in new art forms.
Whether you take a picture with a digital camera or you take one on film and digitize it, one of your primary concerns in art photography is to maintain image resolution. In order to keep the resolution (that's the number of pixels your image contains) of your printed photo high above 300 pixels per inch, strive for the following:
When taking photographs with your digital camera, set it to a high resolution photo by navigating within your camera's menu in the LCD screen to the image type/size (varies with camera) you want to shoot.
When scanning prints, negatives, or positives, set the scanner to read at least 300 dots per inch (dpi) at your desired final print size.
For art photos, input an image size of at least 300 ppi (pixels per inch) in your image processing program before saving.
You need to know a few things about what kind of file formats your digital camera will capture and how they travel from your digital camera to your image editing software to your printer. The main players are JPEG, TIFF, and Raw.
You've probably already heard of JPEGs because they're used on the Internet and for e-mailing images. (JPEG stands for the Joint Photographic Expert Group.) If you've downloaded digital photos from your camera to your computer and saved them, you've probably seen the file extension .jpg. JPEGs have their pluses and minuses:
Pros
Good for sending images over the Web.
Easily compressed; can be saved as small files onto your hard drive.
Cons
Degrade (lose image quality) each time they're compressed and transferred. Compression reduces the file size at the expense of discarding information about the image itself. Think of it like reading the Cliff's Notes for Dickens's David Copperfield. Yeah, you get the gist, but the nuances fade away.
Not the best format for printing gallery-quality prints.
The higher-resolution JPEG format is fine for sending images to editors of newsapers for publication as long as the images haven't been compressed (opened and saved in an image processing program) multiple times.
Tip
If you must use the JPEG file format and you want to maintain the highest image quality possible, always use the maximum Quality setting on your camera and in your software.
The file from which you produce your output is a TIFF file. TIFF means Tagged Image File Format, which is a format that can be read on both Macs and PCs.
You produce a TIFF file in a graphics or photo editing program like Photoshop.
TIFF files cannot be viewed in Web browsers or on the Internet, but the file format does an excellent job of preserving image quality.
On many midrange and high-end digital cameras, you can save photos in Raw format instead of the traditional JPEG. If you've noticed that your camera has this capability, use it. Here's why: A Raw image is like a digital negative — the unprocessed image data that your camera sensor captures. Raw isn't an acronym; it just means that the image file itself is unadulterated — that is, it's in a raw state. This untouched (um, raw) state is optimal because you can do your own processing later on your computer.
Note
Different camera manufacturers use different file formats for their own versions of Raw. For example, you might see such file extensions as .nef (Nikon), .crw and .cr2 (Canon), .mrw (Minolta), .raf (Fujifilm), .orf (Olympus), .srf (Sony), and the less-common .x3f (Sigma and Polaroid) and .mos (Leaf).
When you save a Raw file, the camera creates a header file containing all the camera settings, including (depending on the camera) date/time captured, the camera used, exposure, ISO, lens, aperture, flash (if any), sharpening level, contrast and saturation settings, color temperature/white balance, and so on — in total, the metadata. When you then tweak a copy of your original Raw file, and process copies, you always leave the original image intact. Very cool. To top that, many camera settings (such as white balance and color adjustments) captured in a Raw file can be undone via special software. Think about that — that's like getting to return to the scene of your shoot and tweak the camera's settings! Time warp!
Okay, okay. Nothing's perfect. The downside to Raw is that Raw formats differ between camera manufacturers and even between cameras from the same manufacturer. Thus, you have to use proprietary software from that company or an image editing program such as Photoshop or Photoshop Elements. And because Raw files inherently contain more data, they take longer to open and process than a JPEG or a TIFF file.
Tip
The Adobe Web site (www.adobe.com) has the software plug-ins to open your camera's Raw files in Photoshop or Photoshop Elements for editing and adjustment.
Still, the creative possibilities are very tempting. And, more and more third-party editing and software programs are becoming Raw-compatible with more and more camera models and brands.
Digital cameras generate Raw files. These files are read by the software from the company that you bought your camera from or by an image editing program.
Each camera processes Raw files differently. The software to read and convert Raw files to the standard high-resolution TIFF or PSD format is available from the camera manufacturer that produced the format; you need that software to download the files from your camera to your computer. Programs like iPhoto are able to read some models' Raw format. There's also third-party software (such as that available at
www.iview-mutimedia.com) that can read most camera's Raw formats.Raw files are generally the preferred file type for producing an art photograph with a digital camera. The reason for this is that they can be adjusted for color and tonality more efficiently and with better results than can JPEG or TIFF files.
Note
Only some types of digital cameras have this setting (can capture Raw files) because it is very memory intensive. Look for file formats in the camera's specifications and see whether Raw is listed. You'll pay more for cameras that have this format, but prices are falling rapidly.
That's all you need to know about files for producing art photography. There are only three file formats you have to be familiar with when processing images: JPEG, TIFF, and Raw.