Merging files automatically in Photoshop
Identifying color for use for picture backgrounds
Using symmetry to create new pictures from photos
You can think of Photoshop as an image processing program in either two or three dimensions. In two dimensions, Photoshop can take many photos and place them side by side in a collage or montage. That you can discover in this chapter. In three dimensions, Photoshop can meld one image on top of another to create three-dimensional effects that awe. (No, no Twilight Zone or Sixth Sense here, just old-fashioned photo layer manipulation that's been around ever since Photoshop introduced layers in version 3.) That you can discover in Chapter 14.
The fun thing about Photoshop, of course, is that you can manipulate images in all sorts of cool ways. Just like in most any other application, such as Microsoft Word, you can copy and paste images side by side in a new document or add them to an existing one. You can copy and paste tables, graphs, other people's pictures — even a picture of someone's kitchen sink — into Photoshop.
In this chapter, I show you how to position images using Photoshop's Photomerge. It can sew sections of a larger photo into one cohesive image. Think of a broad, panoramic landscape view that's difficult to capture in one shot. With Photoshop, you can take individual shots — sections, if you will — of that scene and seam them into one wide, complete image. And you're not limited to horizontal images, either. For example, in this chapter, I show you how to take pieces of a giant Tiki — a tall vertical image — and put them together to make a large, whole picture of the entire Tiki.
I also show you how to integrate backgrounds into photographs and how to cut, copy, and rotate images to create symmetry that makes the items in your photograph indistinguishable, but makes your photo itself interesting and unusual.
The very first thing — the most important thing — that gives you make-or-break prints is the fine detail in your image. Certainly there are images in which you'll use creative blurring techniques, but generally you'll want to preserve as much detail as possible. For more about managing the size of your file so that your image's detail won't fall apart to noise, and so that your image stays crystal clear from the time you take it to the time you tweak it to the time you print it, see Chapter 18.
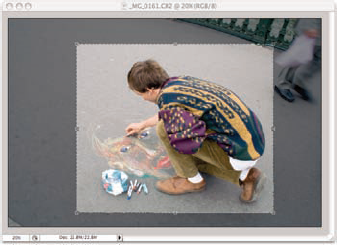
Cropping an image can be done with the Crop tool, which is located in the Tools palette in Photoshop. Figure 13-1 shows the crop selection in an image of a sidewalk artist. I crop fairly closely (because in an image like this, you want the total focus to be on the subject). Using the Crop tool without specifying a new print size in Photoshop's Options bar pares down your image to make it more appealing to you and your viewer, improving the image's composition. It also cuts down your file size without compromising detail in the image, although you might have to resize the image later to fit specific print requirements.
Note
Cropping an image is one of the most important aesthetic decisions you'll make when you edit in Photoshop or other image processing software. Follow the same rules you would while shooting, such as the Rule of Thirds and other composition rules presented in Chapter 1.
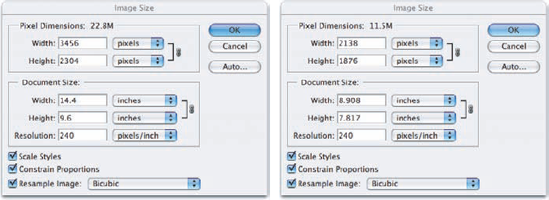
You can check the size of your image (both pixel dimensions and print dimensions/resolution) in Photoshop with the Image
You can take extra-tall things or extra-wide things and string them together to make a panoramic picture with Photoshop's Photomerge feature. Although a landscape shot piece by piece and stitched together in Photoshop has great appeal — and that is what most people use Photomerge for — you can do this same process on images of other tall and thin subjects, too, such as buildings, trees, sculptures ... even clowns on stilts.
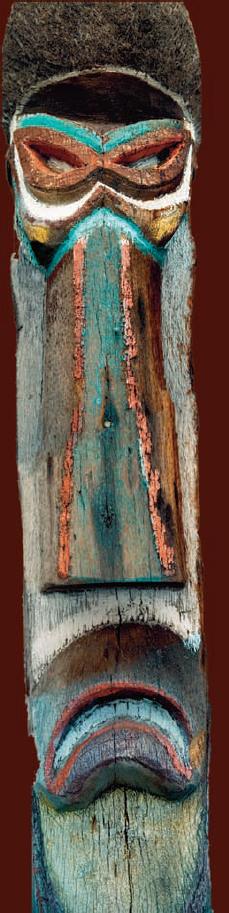
Using Photomerge to create one large, whole image of something you could never fit into one camera frame while shooting is easy. First, you need several photos of something large, either horizontal or vertical — a very tall tree, a landscape, or a building. For this example, I use photos of a Tiki, which is a very tall sculpture carved from a palm tree trunk. (See Figure 13-3.)
Note
Because of its thin width with respect to its height, fitting it in one frame — even with a wide angle lens — would at best give me a mediocre medium shot of the Polynesian god. Instead, I snapped several pictures of it (it's an original, carved in the '60s by a well-known Tiki carver) to create a clear image of the whole sculpture that I can then print out at 10″ × 42″. (I have the option to double the merged photo's size — just like the sculpture itself — without much loss of fine detail in the image.)
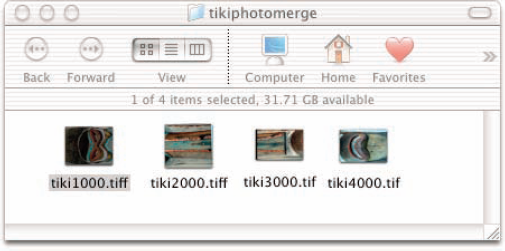
Open the photos that you want to stitch together into one large, whole picture.
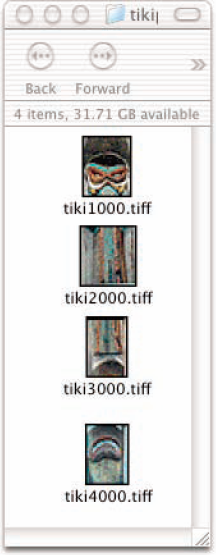
I create a folder for situations like this so that the photos are easily accessible when I'm navigating Photoshop.
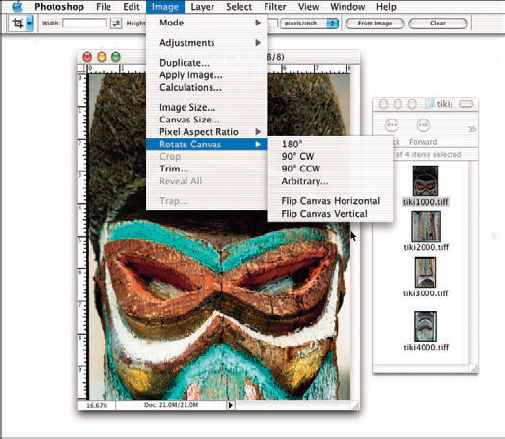
(Optional) Turn each picture to its side by opening each and choosing Image

If you're merging a true landscape — that is, something horizontal — you won't have to do this step.
Because computer monitors are more wide than tall, I rotate the images 90 degrees counterclockwise because it's easier to see them as one piece horizontally rather than vertically.
Tip
You could rotate the individual images within the work area of Photomerge. If you go that route, it would take you about the same amount of time, or maybe longer, than doing it in Photoshop first.
Figure 13-5 shows the icons of my images as they appear after I turn them on their sides. Now I'm ready to merge the photos that are in the folder on my Desktop.
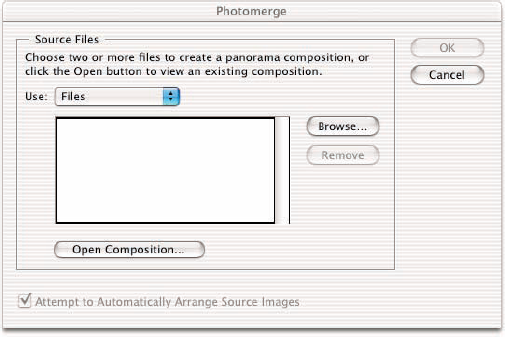
In Photoshop CS, choose File
In the Photomerge dialog box that appears (see Figure 13-6), click the Browse button to navigate to the folder.
You can also navigate to files and open documents by selecting one from the Use drop-down menu.
Browse to find the folder you're merging.
Then click Open when the Open window appears onscreen.
The program lists the images that you have in your project folder.
Mark the Attempt to Automatically Arrange Source Images check box so that Photoshop tries to connect your image using its automated process.
If you don't, Photomerge won't try to put your images together.
Because Photomerge couldn't put together my Tiki automatically, a dialog box came up to let me know that. I then arranged the images myself. In this case, I want the Tiki files that I rotate in Step 2.
Tip
You can add or remove files from the image you're merging by changing your folder selection to Files and browsing for the files you want. To remove an image, simply select the file that appears in the list and click the Remove button.
Click OK.
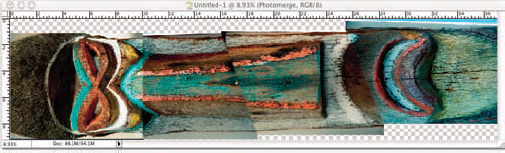
The program begins its merge. When the merge program finishes, it either displays the merged files as it sees fit or asks you to click and drag them from the top frame, where they are displayed, to the main part of the window.
If prompted, click and drag the merged files to fit them together like pieces of a seamless puzzle.
In the Tiki case, I got the prompt that said it couldn't fit my images together (probably because it sensed that it couldn't get them to mesh). I moved the images down to the main part of the window. They easily fit together because the ends are transparent, and you can see where the overlap is for each to fit them together. See Figure 13-7.
Flatten the image by choosing Layer
Photomerge makes a layer for each part of the picture. That means each picture is alone, within its own space, and the other images can be moved on top of it. (Hence, that's how you can "see through the images.") I discuss how layers work and can be manipulated in Chapter 14. Note: In Photomerge, you can't access your layers when the image is in the working space.
(Optional) If you rotated your images in Step 2, rotate the merged image clockwise to stand it upright (vertically) by choosing Image
There! You have one whole picture of that large thing you couldn't fit into one frame (whatever that one large thing is). In my case, the Tiki is back together again, as tall as ever (see Figure 13-8).
Here are some other tips to bear in mind when merging:
Minimize tweaks. Any time you transform your image, you move pixels around. That means that Photoshop has to interpolate, which can result in a loss of fine detail in the image. For more about interpolation and resampling, see Chapter 16.
Transform your image very little. For example, transform it only to fill in a small piece of the frame that was left white or to even out an image if it's slightly cockeyed. If you overdo it, your image will lose too much resolution.
Make reparations. To repair a merged photo, see Chapter 12 and do the same steps as repairing an old photo.
Tip
Tweak before you merge. If your images vary a lot in hue and tone, you should tweak them before using Photomerge. If at some point in your Photomerge process, you see that the images are off in this manner, go back and work with your original images; then run Photomerge again after you tweak and resave the images in a folder.
Tip
Admit it — you've undoubtedly sometime taken a potentially great picture only to have the subject surrounded by clutter. Maybe you weren't careful enough about image composition, or you just couldn't help it that clutter runs through the background. Sure, you could try to take the picture again or maybe move the subject in front of a better background. When you can't change life, however — whether the disturbing culprit is a palm tree rising out from someone's head or an errant phone wire marring a crystal-blue sky behind a mid-century motel sign — change it in Photoshop. To do that, create a new background.
The Tiki that I use as an example in the preceding section is an object that doesn't fill each frame evenly. After I finish merging an object like a Tiki, I have to add a new cohesive background.
Note
You can create simple backgrounds that match your picture by using the following technique:
In Photoshop, open an image to which you want to add a background.
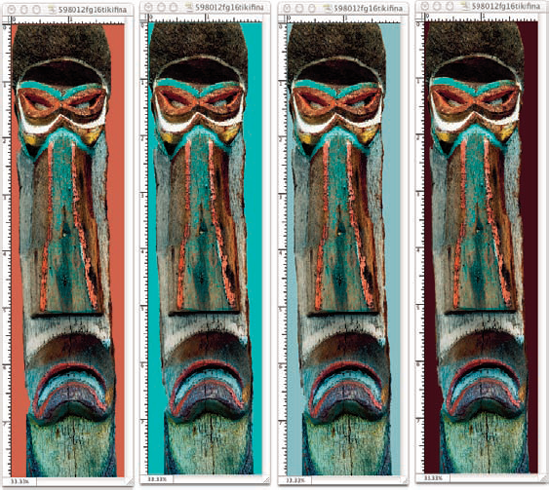
I change the background to a brick red.
With the Eyedropper tool, click somewhere on the image.
This picks a color that is included within your photograph, which is insurance that you'll get a match to apply to your background. See Chapter 1 for more about matching colors.
With the Paint Bucket tool, click the part of your picture's background that you want to change.
This changes the part you clicked to whatever color you pick with the Eyedropper tool. In my case, the background has been changed to brick red, to match colors in the Tiki. (See Figure 13-9.)
At this point, maybe you're thinking about a couple of photographs to which you'd like to add a matching color background, but those photographs aren't white. Well, it's easy to make a background white.
Note
To make a background white:
Select the object(s) for which you want the background changed by using one (or more) of the selection tools (a marquee or lasso tool, or the Magic Wand for a solid-color subject).
Choose Select
Photoshop switches your selection from the objects that you select to everything but the objects you select (the background).
After you check your selection and choose white for your background color from the Tools palette, press Delete.
Press the D key on your keyboard to set the foreground color to black and the background color to white.
Tip
You can get more natural-looking backgrounds by overlaying the Tiki onto another picture with a clutter-free background. Read more about this in Chapter 14.
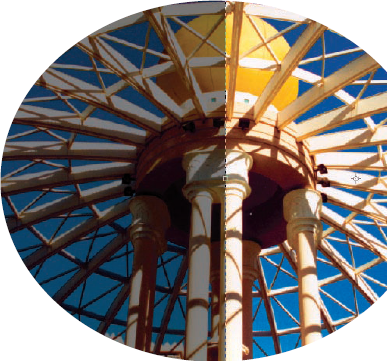
Another way to create unusual photography suitable to sell as art is to manipulate images in Photoshop by taking part of an image and duplicating it to create a symmetrical pattern. You can often find such opportunities to create symmetry from architectural sources, such as the fretwork intricacies of modern architecture, like the Eiffel Tower. Think of how a kaleidoscope takes crystals and creates several mirror images of them, or how you used to cut out valentines as a kid — half of a heart, from the folded side of a piece of paper, that opened into a whole heart.
Note
To create your own symmetrical art, follow these steps:
In Photoshop, open a picture of a shape or form that approaches a pattern of symmetry — say, a building or object.
To create something perfectly symmetrical in photography is a very difficult job — more fit for a surveyor — so don't worry if it's not perfect from one side to the other.
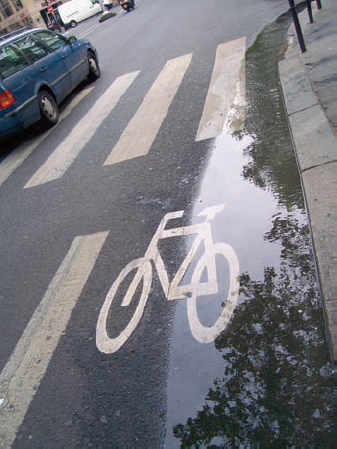
For this example, I use the photo shown in Figure 13-10. You can use any photo for this art project. The purpose is to create sets of interesting lines — to play with them and slide them around with the Move tool — to make your own quasi-symmetrical masterpieces.
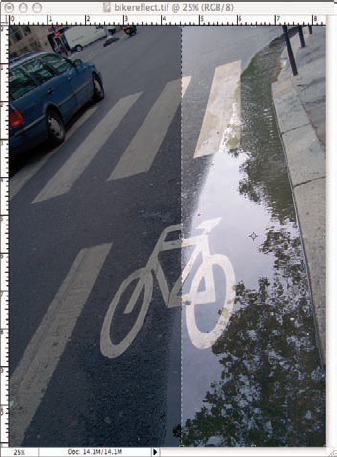
Make a selection of one half of the subject and its surrounding background.
Because you're creating your own pattern using the existing symmetry, you need only part of the photo. See Figure 13-11. I eyed the bike and the reflection of the water to where I thought would be a nice place to make a break for cropping.
Choose Edit
Choose Edit
Choose Edit
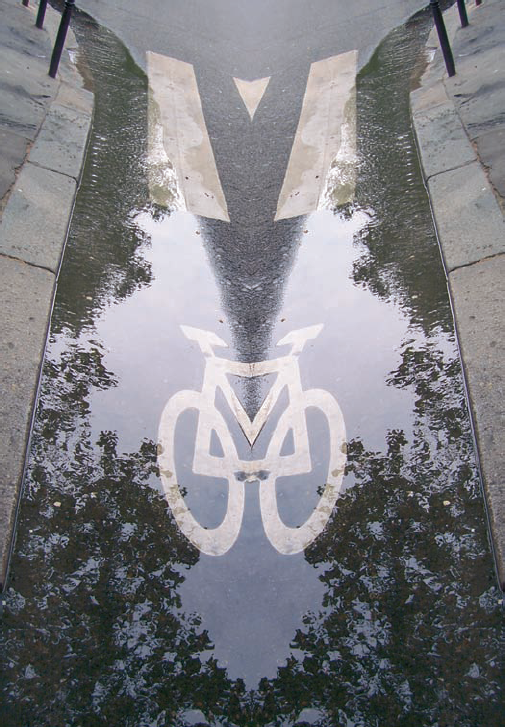
Select the Move tool in the Toolbox (or press the V key on the keyboard) and reposition the upper layer.
Try to align the center edges.
Use the Edit
You might need to rotate or skew the upper layer a bit to get proper alignment at the point where the two halves meet.
Flatten the image by choosing Layer
Flattening the layers of an image reduces the file size. For more about layers, see Chapter 14.
Crop your new image as you see fit and then save it.
Cropping provides additional balance and cuts out the parts of the images that don't appear symmetrical.
My final image is shown in Figure 13-12.