Taming moving subjects
Photographing still objects around those in action
Setting your camera for the best shot for subjects and actions
Identifying symbols and metaphors for your subjects
Panning your camera to catch action
Setting shutter speeds in wildlife photography to control blur
Photographing anything living usually requires that you establish some sort of relationship with the subject. When you work with human subjects, you have to put the people at ease. Some people appear perfectly natural for a picture, while others are like marble statues. Still others are in-between, needing encouragement anywhere from gentle prodding to full-fledged professional entertainment from you, the photographer. If you're lucky enough to have a subject who knows how to model, go with the flow and give input as to what you want, also.
Sure, sometimes you just want a simple portrait photo to record your visit somewhere — you know, with people posed, smiling, in front of an interesting building, monument, or fountain. Although these can be great shots that create memorable moments, they're probably not what you'd sell in an art gallery or put on display in a museum. Creating art portraits, though, requires a little forethought and creativity, whether you're on the road or in your own backyard. As I show you in this chapter, you can create portraits of people by playing with backdrops, posing your subjects (or not), and showing folks involved in an activity to highlight their personalities.
You can use a lot of these same techniques when creating portraits of animals, too. Okay, getting some animals to smile is a little tricky (alligators are easier than butterflies), but here I show you some artful ways to capture Fido and Fluffy and wild critters, too.
To help move your portraiture shots from the everyday toward art photos, read about shooting with the art elements mentioned in Chapter 1 in your shots. As an art photographer, you'll probably have subjects in mind who are not your friends or family when you go on a photography exhibition — say, when you're traveling to another country.
When you think of photographing people, you probably have the standard smiling portrait/head shot in mind, kind of like what you expect for a yearbook. "Tilt your head a little to the left. Now lift your chin a bit. That's it, perfect! Now smile!" Not that anything is wrong with this traditional type of portraiture, but with a little creativity, you can create portraits of people and non-living "people" with a decided art photography twist.
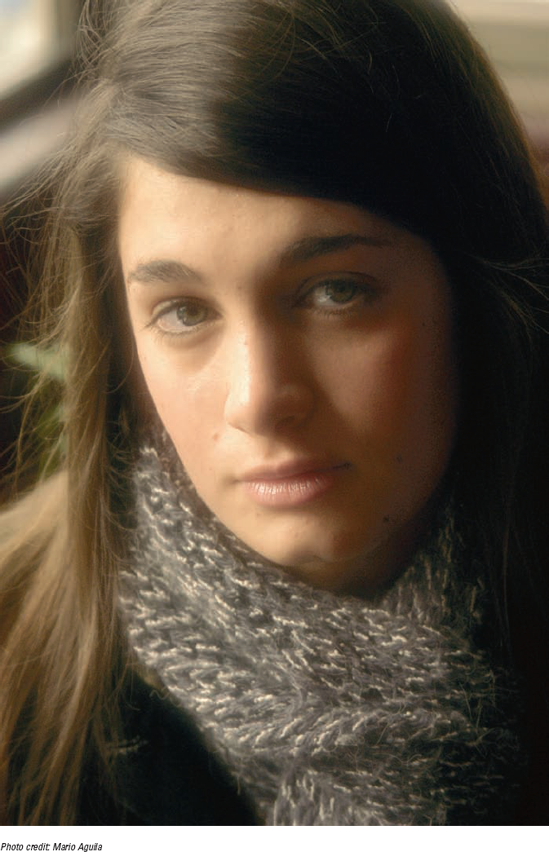
Whether photographing humans or animals, the trick is to keep the technology as transparent as possible. You get the best shots when your subjects are as relaxed and natural as possible (see Figure 7-1); you can tell right away in any shot when the subject is uncomfortable. (Think about going to the dentist, and how he conveniently places those shiny tools out of your eyesight while he's doing his thing. Smart.)

Tip
To help you be as nonintrusive as possible, try not to use a flash any more than you have to. Obviously, sometimes you need the extra light, but using a flash startles just about any subject. Remember, too, that your camera probably offers a red-eye reduction setting for the flash. Firing a preflash before taking the actual photo constricts your subject's pupils, helping prevent that spooky glowing red-eye problem.
When shooting groups of people, a flash doesn't always give you uniform illumination. Take a look at the picture shown in Figure 7-2. Because the subjects aren't the same distance from the flash, they're not evenly lit.

You can also reduce how intrusive you are (as a photographer) by getting closer with zoom lenses, which are helpful when filming athletes, people on stage, and animals. Most digital cameras have an optical zoom, which is a zoom made by adjusting your lens that yields no loss of quality of your image. This is the only zoom you want to use on your digital camera.
Tip
Don't use your digital zoom because you can do the same thing in Photoshop, which does a better job of interpolating the pixels when a picture is enlarged.
Probably the most traditional portrait is a head shot, in which you usually film your subject from a relatively close distance, capturing her from mid-chest-level up, paying attention to her face. However, before you begin to take a posed art portrait, pay attention to the background for your shot. There's nothing worse than a spot-on portrait with a jarring or junky background. (No one wants their portrait to end up showing a tree growing out of their head.) Of course, you can always use Photoshop to tweak an iffy background, but do what you can to get your shot right when you take it.
Second, decide how to light your subject (for more on lighting, see Chapter 6). Finally, work to pose and stage your subject. To smile or not to smile?
Way back when, you had to buy expensive canvas to create a traditional drape backdrop for a portrait (see Figure 7-3). If you go that route, think about spending about $400 for a 10′ × 10′ canvas. To see what you can get in terms of cloth and canvas backgrounds, check out www.dennymfg.com or www.amvona.com. For something more unusual, consider using a mural or colorful prints as a backdrop.
You can, however, judiciously use a nontraditional background to add to the flavor of your portrait — for example, filming a race car driver in front of a back-and-white checkered backdrop or a quilting fanatic in front of a colorful coverlet.
Note
Of course, you can create really cool backgrounds digitally (via Photoshop) by using your own photographs. Get creative with your backgrounds by shooting them separately from your subjects and then layering them into your photographs later in Photoshop. You can choose anything you've taken a picture of, from a medieval wall to glass blocks. However, the old-fashioned way (a backdrop) is still very effective and (in some ways) less work then manipulating an image on your computer.
People look more friendly and less intimidating when they smile. And because photographers (usually) want their subject to appear in the best possible light (pun intended), they invariably asked posed people to smile when being photographed.
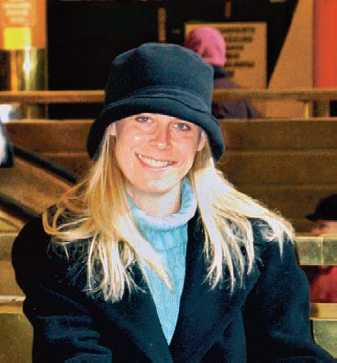
Even though more people smile in art these days (to see what I mean, check out the sidebar, "Who's smiling now?"), a good smile is one that's natural-looking and not forced. Artists, whether window dressers or masters of acrylics (a type of paint an artist uses), want natural facial expressions, including smiles, in their art. Sometimes all it takes is to say, "Smile," and then snap your camera to get your subject to smile naturally, as in Figure 7-4.
Note
As you likely know, getting a true smile on your subject can be a little tough. Some people just plain freeze when being photographed. If you have a stiff subject who is ill at ease with being photographed, telling a joke or riddle to her can elicit a natural-looking smile.
Face it, some people just don't want to smile when getting their photograph taken. Maybe they're not the biggest yukster around (think pensive novelists), maybe they're embarrassed about their dental work, or perhaps they're just downright serious folk who want to be taken seriously (think businessmen or politicians). And when you say, "Cheese!" or tell a joke to get people to smile, you can catch some unflattering laugh lines or crows' feet under the eyes, making your subject appear older than he wants to. Whatever the reason, insisting that someone smile who doesn't want to will give you a forced, unflattering portrait. Not what you or your subject wants. However, a non-smiling portrait doesn't have to be grim and boring. It can be dramatic, as in Figure 7-5.
When faced with a serious-natured subject, let his wishes dictate how you photograph him. If he wishes to appear a little gruff or dramatic, so be it. That is, after all, part of his personality, which is what portraiture is all about.
And sleeping subjects make for excellent art photos. Of course, unless your subject is having a most wonderful dream, she won't be smiling. And not only is your subject relaxed and peaceful, but you can usually set your camera for a longer exposure in low light. (You can risk this longer exposure because your subject isn't moving terribly much.)
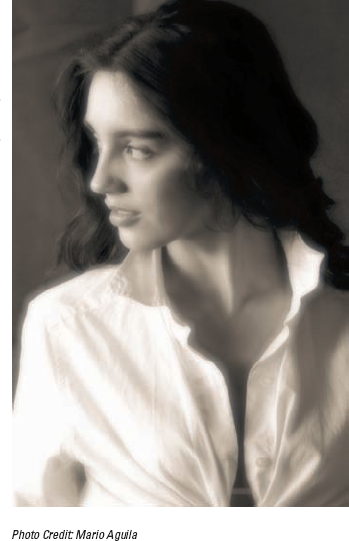
To help bring out your subject's personality — and get them to lighten up a tad — get your subject to do something or show you something that they love, like a hobby or an avocation (or vocation), like the young woman shown in Figure 7-6. If you don't know your subject well, talk to him to find out his interests: If he does yoga, ask him to assume the lotus position for a photo; if you come upon an artist working, ask her if you can take a picture of her doing her craft.

Depicting your subject's personality in the photo makes the photo more personal to that person — which obviously makes the photo more appealing. If the subject — or member of that person's family — finds a photo of himself or herself appealing, you are more likely to have a sale.
Note
Incorporating items that symbolize something about that person's interests or hobby or getting multiple subjects to interact with one another can make a good photo even better, as shown in Figure 7-7.

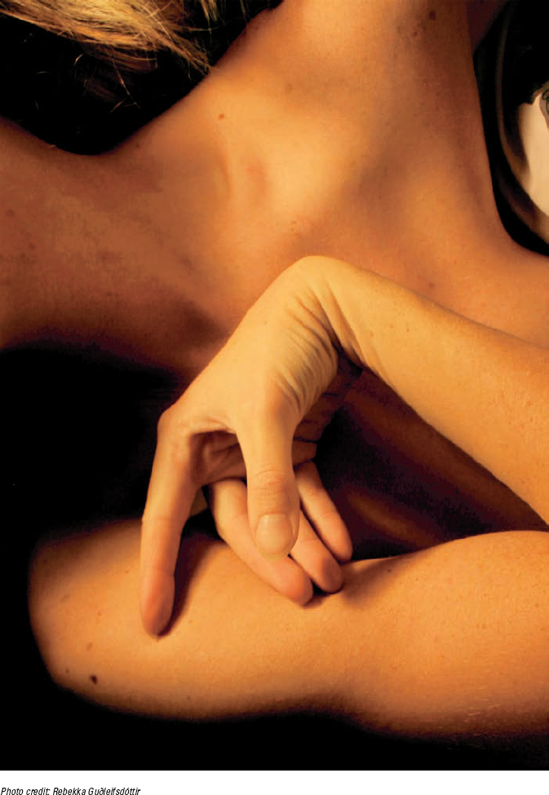
Human portraiture doesn't have to be limited to faces. Any part of the human form is fair game to show a miniportrait, or piece, of your subject's personality. Keeping these examples family-friendly, shooting facial features or other body parts is a great way to play with light and exposures, creating some fantastic art shots of curves and lines. See Figures 7-8 and 7-9.
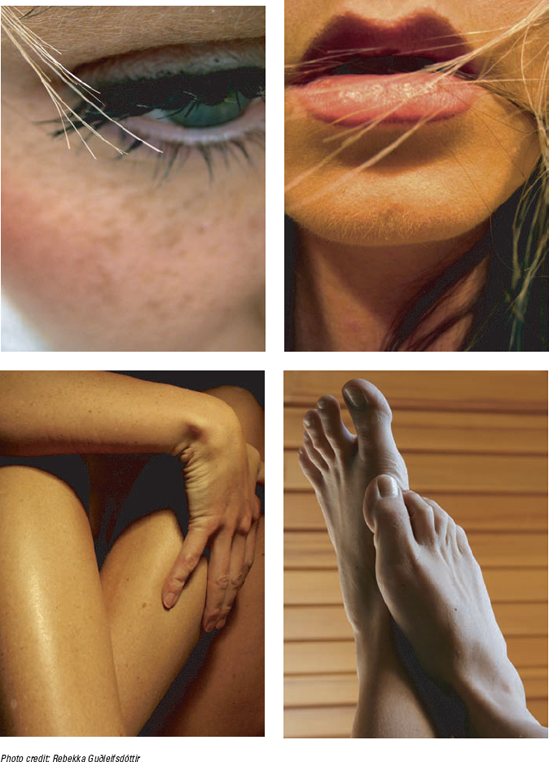
For art shots, consider honing in on these elements:
Eye(s) and eyebrows
Lips
Facial lines
Noses
Hair and hairlines
Hands and arms
Legs and feet
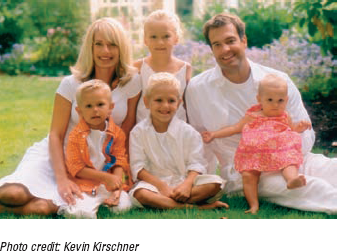
When taking photos of groups, consider using the classic diamond pose. In a nutshell, the diamond pose involves posing subjects in groups of four, placing one person in the center, two others to the left and right of — and slightly behind — the center person, and finally the fourth directly behind the center person, but elevated (so that you can see person #4!). The four posed subjects make up the four points of a diamond: hence, the name.
For groups larger than four, start with the diamond pose and then cluster more diamond groups around that initial one until everyone fits in the frame. You might have to consider using a wide angle lens or shooting from creative angles (such as from above) to fit everyone in, but this gets easier the more large groups you photograph. Remember that you can always go with a closer shot when photographing groups (you don't always have to show everyone's legs, as shown in Figure 7-10) and sometimes a nice touch is to incorporate items that define the group, like sports equipment or musical instruments.
Tip
For a better composition, have your subjects stand or sit without space between them. They can be sitting adjacent or behind one another.
Some of the best portraits are the informal — and sometimes unplanned — ones. As I mention in earlier sections, try to capture your subject involved in activities that interest her, keeping your eye alert to elements to incorporate in the shot to add visual appeal and depth. Remember that life is spontaneous and not all portraits have to be composed and set up, like the one shown in Figure 7-11.

Athletes can present you with great candid photo opportunities. Take advantage of showing them engaged in an action integral to the sport: serving in tennis, shooting close to the hoop in basketball, hitting the ball in baseball, and so on. (See what I mean by looking at the image in the nearby sidebar, "Drew Brashler: Sports photographer, full digital shooter.") Just remember to keep the focus on your subject. And don't overlook the opportunity, circumstances and decorum permitting, to capture candid portraits of people when they're in less-than-optimal moods. A photo capturing the torment of an angry toddler speaks volumes as does the angst of an athlete who didn't perform well.
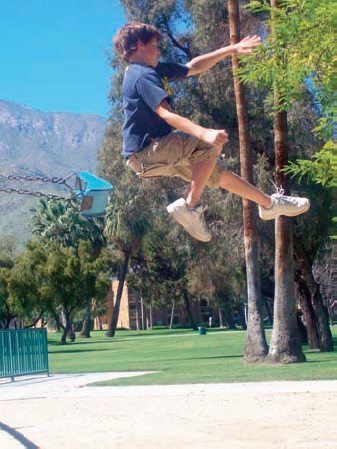
Train your eye to capture action at its peak moment, when gravity is most defied. This lad flying from a swing seat (see Figure 7-12) will always be airborne now in this simple candid portrait.
Note
Set your camera beforehand for action shots to help you shoot faster. Get as close to your subject as you can, keeping your f-stop low (big aperture) — as low as you can go on your camera (f/4.5 or lower).
Drew Brashler: Sports photographer, full digital shooter
Mesa, Arizona-based freelance photographer Drew Brashler looks through the lens of his Nikon for action shots that capture goal-based players stoked at playing their game. He shoots with a Nikon D1H (a pro dSLR) and Nikon AF 50mm f1.8 and Nikon AF 80–200mm f2.8 lenses.
Comparing shooting film versus digital, Brashler says, "For action, film doesn't even compare in my mind. For basketball, I shoot off about 115 to140 photos for one game. With film, to shoot that much, I would have to change rolls three or four times. And think about rewind times and loading times. You would miss at least one main play ... probably two, if you weren't quick.
"Now think of developing costs. That's four rolls of 36 (exposures), $10 each roll for developing. That comes out to $40 plus sales tax. I'm a college student, do most college students have that much cash laying around each time a basketball game happens?? No, because I go to Starbucks!
"Then there is the LCD screen. Being able to look at your photos between plays is HUGE for the starting-out photographer." (This is called chimping, thanks to www.sportsshooter.com.) "Sports is all about timing. With an LCD screen, you can look through your images and find out whether you need to hold back before pressing the button or be quicker at pressing the button.
"Finally, the last thing is turnaround speed. Every newspaper and Sports Illustrated have had their photographers switch to digital. One of the main reasons is the turnaround speed. With digital, you can shoot up until 30 minutes before a newspaper deadline to e-mail the photos to the office and have the photo editor edit the photos and turn them in for press. You can't do that with film: With film, you have to process the film, and then make prints and scan them, or just scan the negatives."

Note
Use the burst series of pictures, a setting available on some point-and-shoot models. (Normally, point-and-shoot models aren't as fast at shooting pictures as their dSLR and SLR counterparts.) The burst gives you the option of taking a certain number of pictures (dependent on model) in quick succession (less than 2.4 frames per second. A Nikon D2H can shoot 8 frames per second (fps), which is great for sports photographers who want to get all of the action in a short period of time. First set the camera and then press the shutter halfway down to set the autofocus and exposure for all the pictures in the burst. Then press the shutter all the way down and hold it to take several pictures quickly.
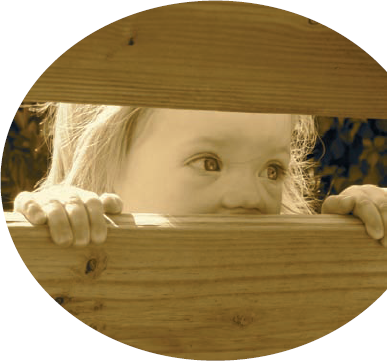
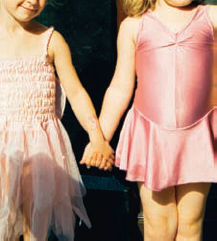
Candid portraits don't have to be of only one subject, either. An interaction between two people in a photograph makes the photo tell a story, even if the interaction is as simple as two kids holding hands. Figure 7-13 tells the story of two little girls holding hands in friendship.
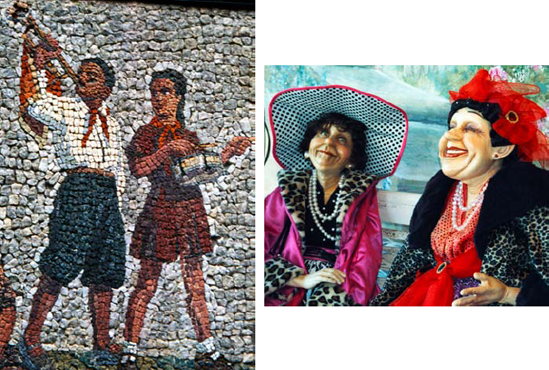
For a little whimsy, don't overlook the opportunity to capture portraits of nonliving people — including statues, mannequins, murals, and art work — as shown in Figure 7-14. You can even pair inanimate "people" with live ones for a wonderfully artsy juxtaposition of realities. See Chapter 9 for more on how to photograph statues in black and white. And one of this book's bonus chapters on the Web (see www.dummies.com) shows how to arrange photos of statuary in a cohesive photo set.
To capture portraits of favorite animals, the best place to go is to a zoo or an aquarium or a circus. But there are other places, too, from private farms to your own back yard, where wildlife abounds. Photo opportunities are different for each, and each carries some precautions you'll want to take before filming:
The circus
What works: Telephoto lenses (at least 105mm) and 400 ISO. Try to shoot when the lights are up.
Watch out for: Avoid using a flash so you don't spook animals or performers. And remember that the effective range of your flash is likely only 10 or 12 feet.
Make an art photo by: Filming a lion in a roar to show how big its mouth is. Or zero in on one lion in the cage while blurring the others for added dramatic effect. (See Chapter 11 for more about intentional blurring for an added artistic edge.)
The zoo
What works: Use a tripod for steady shots. Use telephoto lenses (at least 105mm) and 400 ISO.
Watch out for: Waking nocturnal animals. Avoid using a flash so you don't spook animals. Also watch out for flash glare when shooting in front of plate glass exhibit windows. (And, must I add — don't go beyond the exhibit barriers!)
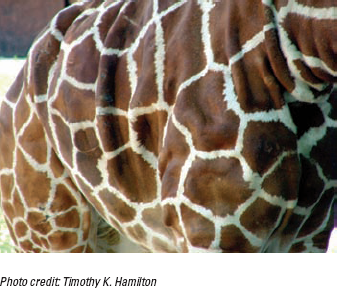
Make an art photo by: Shooting a giraffe up close so that the "animal portrait" is also a study in texture and pattern, as in Figure 7-15. Other ways might include shooting at night with longer exposures, shooting wide angle, or capturing comfy sleeping animals.
Out and about (your own backyard, on the street, in a park)
What works: Everyone has animals in their yard or at the local park. If you're a city dweller, you likely have horse police patrols or pigeons on the roof. Time permitting, use a tripod for steady shots. Use telephoto lenses (at least 105mm) and 400 ISO.
Watch out for: Be quick on the shutter draw. Critters move fast, so be alert. Set your camera to auto mode after every shot. Don't try to handle animals you don't know or know much about. Squirrels are indeed cute, but they pack some nasty teeth. Avoid using a flash so you don't spook animals.
Make an art photo by: Capturing animals in black-and-white (as shown in Figure 7-16) to evoke emotion, or a pet doing a trick (for an example, check out Figure 7-18 in the upcoming section, "Pet Portraiture").
When you create portraits of animals, remember that safety comes first — especially if you're in the wild, photographing animals in their habitat. If an animal you don't know senses that you're uncomfortable or frightened of it — for even one moment — the charm can go very quickly.
Note
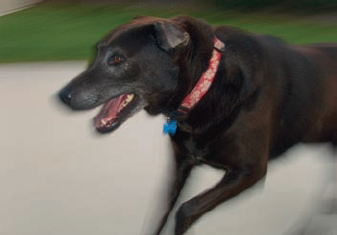
If Fido is a black blur tearing after his fave Frisbee (or postal carrier), show off his speed by blurring the background during an action scene, like when he's running (as shown in Figure 7-17). When you capture something fast-moving with the action setting on any camera, the aperture tightens, so that everything is clear. That's not what you want for this effect. Rather, to blur the background, manually set the shutter speed to 1/30 second in your camera's Tv mode, the mode that lets you set the shutter speed while your camera sets the f-stop. (Note that the Tv mode might not be available on non-dSLR cameras.) Then move your camera to mirror the animal's direction and speed (panning) while you make the exposure.
Note
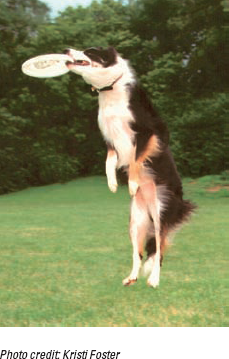
If Fido is the type of dog who loves to jump high in the air after a toy (like a Frisbee), photographing him clearly with a blurred background may require that you take many shots. It's great fun though to see your pet gliding through the air with the greatest of ease. See Figure 7-18.
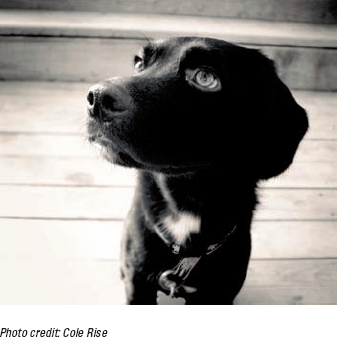
Remember, too, that not all pets have personalities that are action-oriented. Take a look at Figure 7-19, which you might consider to be "pet as still life." And as I mention in an earlier section about filming sleeping animals in a zoo, don't overlook the opportunities a sleeping pet gives you. Except for an occasional twitching leg, you're guaranteed that Fluffy will be still. You can also do some wonderful up-close studies of their fur.
Warning
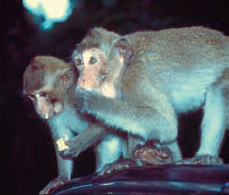
Goin' bananas
The cute primates eating banana pieces are on top of a cab on the way back from the ruins in Angkor Wat, Cambodia. Photographing them did indeed get dicey. They made themselves quite at home inside the car, making the photographer more than a little nervous. As cute as any animal is, wild animals are just that — wild. Photograph with care, not petting nor feeding nor handling wild animals.