Buying or making mats
Configuring mats for your photography
Buying and assembling frames
Framing on the cheap
How you frame your print has a great impact on its value. Your options are many in terms of finding a display for your digital photographs. If you're on a budget or just starting out, you can refurbish old frames or learn the craft of making or putting together the frames and mats yourself. If you're preparing high-end art for galleries and upscale stores, there are many places from which you can order frames and mats and other accessories online or through traditional retail.
Note
Many galleries want only frame jobs that comprise professional mounting and acid-free papers. Read more about using acid-free papers and why they're important in the section, "Takin' It to the Mats."
Finding mats for your photographs goes hand-in-hand with finding frames for your photographs. When making framing choices, consider both the presentation of your work as well as how to protect it. You also have to consider the tastes and styles of your potential clients.
For the examples in this chapter, I show mats that are on the conservative end of the art spectrum because galleries and many stores want simple mats and frames for photography. You'll likely see many other options when you view mats for sale online or in catalogs, so keep your creativity and tastes in mind if you go with more fancy matting and framing.
At the end of the chapter are a few tips to help you put a picture inside ready-made frames. For the purposes of clarity in this book, the two types of frames that I refer to are
Ready-made frames: These frames are put together for you, ready to accept your photo. They typically include the glass, the frame, and backboard (and sometimes the mat). All that's left is to put your picture inside. You can buy ready-mades in bulk.
Custom-made frames: These frames are ones in which the entire frame is made for you with your picture in it. Although the convenience factor is high, this is an expensive method and I don't recommended using these for art photos that you sell.
Mats, which are placed between the photo and the glass for both protective and aesthetic purposes, come in all colors, shapes, and sizes. Just about anything you want in terms of mat geometry is available. By mat geometry, I mean that you can find mats with openings other than the traditional squares and rectangles — oval, round, triangular. And complementing your photograph with a decent, reasonably priced mat is easier than ever. Stores today — both online and brick-and-mortar — can supply you with what you need to make your own or make them for you. Photography frames are easy to order, too, because of the specialized mats just for this purpose. I usually get my frames and mats together at the same place. To cut costs (especially when I try to sell a print for a higher profit), I shop around for the least-expensive mats that fit the frames I get from another supplier. Read more about where you can get mats and frames wholesale later in this chapter.
Before you start searching for mats, a little lesson in mat lingo will make things easier when you order. It's the language the mat guys use so they can build the right mat for your work. When you order your mats, whether you do so online or in a local frame shop, the framers will want to know how you want your image orientated, what size it is, as well as a few other pertinent pieces of information:
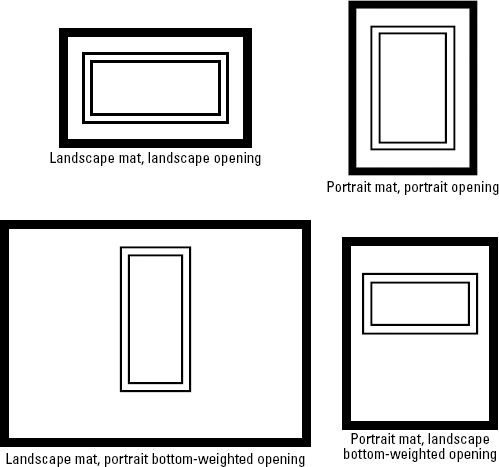
Orientation: Let the framer know how you want your picture set up in the mat. Figure 18-1 shows you the ins and outs of landscape, portrait, and bottom-weighted orientation for mats and their openings.
Size: State the shorter dimension first. For example, use 11 × 14 (inches) and not 14 × 11 (inches). That is, an 8 × 10 is always an 8 × 10 regardless of whether you display it landscape or portrait.
Double matting: You don't need to state the dimensions of both mats. If your outer mat is 11″ × 14″, your inner mat will be one inch less, or 10″ × 13″. One inch on each side is the industry standard. For art photos, double matting is not common. Instead, many professionals choose a thicker mat.
Acid-free: Sometimes called conservation quality, an acid-free mat isn't as susceptible to fading as ordinary mats and is important to prevent degradation of the photo paper.
Color: Stick with basic white for a mat for your photo to satisfy the harmony it gives with the medium, especially if you're going to be evaluated by a professional for a gallery presentation. I think that white is the best color to use for a mat. If you have to play with color, go with pastels, like robin's egg blue. Of course, though, you might think that gray or black best complements your photograph.
Tip
If your piece is designed to match OPP (a 1980s abbreviation meaning other people's property — most likely, their sofa), go to the local furniture store and ask the clerk what items people have been buying lately. Or, work with your client to match colors appropriately.
Whether you present your work to a high-brow gallery or sell your work in the neighborhood shabby chic palace, the advantages and disadvantages of mat buying for each kind of mat are described in Table 18-1. Prices in the table reflect the prices for acid-free mats.
Table 18-1. Mat Basics
Type of Mat | Advantages | Disadvantages |
|---|---|---|
Handmade from large mat boards | You can cut a custom mat for images in nonstandard sizes. (No need to resize the image in Photoshop.) Easily cut your mat's inside to match that of your printed photo. Costs fall rapidly after equipment purchase. | Good equipment takes up space, takes time to to master, and can be a bit expensive (About $200.) |
Precut mats from retail | No waiting (like an order) and no cutting. (Comes prepackaged in a variety of sizes and colors.) Mat price varies from $5 to $8, but many packages come with double mats. | Expensive. Sizes are limited, usually to 11″ × 14″ or 16″ × 20″. |
Precut mats from wholesale | Professionals cut these, so any size is possible. Inexpensive (prices as low as $5 for and 18″ × 22″ mat with an 11″ × 17″ opening). Mats can be made/ordered with a frame as lower-priced package. | Usually takes a week to get made. Large orders as required. |
Recycled | Very cheap; good for the environment. | Old mats can be discolored. |
You can certainly save money and have a lot of creative control when you cut you own mats. Purchase a mat cutter and mat boards and have at it. A variety of mat cutters are available. Check out www.rockler.com to find small mat cutters starting at $20 as well as a serious 40-inch cutter for $195. (At this site, on the left, under Departments, choose Tools
Buying mat board to cut is simple. You can easily order board online from places like http://jerrysartarama.com, which features acid-free mat boards that are reasonably priced. (Acid-free mat boards are made with materials that won't destroy your photos.) Boards (30″ × 42″) from this site run from $4 to $7 per piece. (A minimum order of 12 boards is required, and returns are not accepted.)
Small mat cutters, available at local art supply stores, allow you to make hand cuts with small guides (but you have to keep a steady hand). They're not easy to use, requiring great coordination to make the right kind of cut. An example is a Dexter Mat Cutter ($26.88) with a plastic knob that allows for cutting at any angle or depth.
Note
When you cut a mat opening, you create a beveled edge — a very small 45° angle on the edge of the opening — while you cut, working within the thickness of the board, a place that's only a fraction of an inch thick. This can be a little tricky. Still, if you're adventurous and want to cut your own mats, it's not like you need the dexterity of a heart surgeon. It's only cardboard. Cutting your own mats lets you make any size you want and ends up being cheaper in the long run.
Keep these hints in mind when you do:
The more you do, the easier it gets. Go ahead and take the first step. That's the hardest step — actually doing it.
Gather all your framing tools upfront. You need a mat cutting kit, ruler, tape (double-faced), a burnishing tool, a razor blade, and linen tape.
You can find mat kits at
www.logangraphic.com.
A mat doesn't have to be a physical piece of board; it can alternatively be something you craft within Photoshop as part of the image itself. Here's how:
From an open image, choose Window

For more about layers, see Chapter 14.
Double-click the Background layer in the Layers palette and rename the layer.
This converts the background layer into a regular layer so that you can add a layer mask.
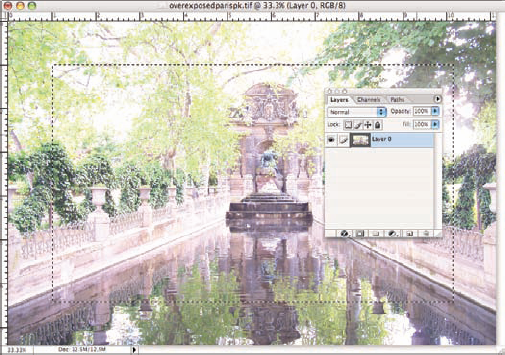
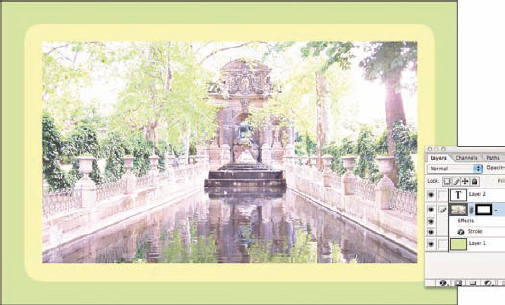
To mask out part of the image so that you can frame it, use the Rectangular Marquee tool to select the part of the picture that you want framed, as shown in Figure 18-2.
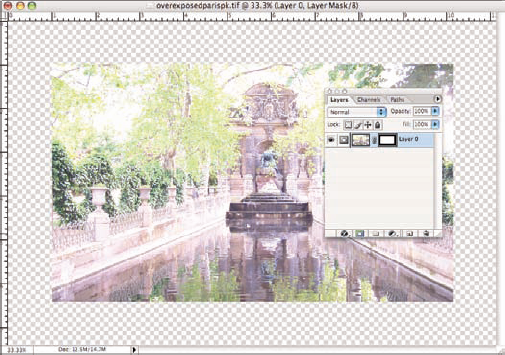
Click the Add Layer Mask button at the bottom of the Layers palette.
See the result in Figure 18-3.
The checkerboard area that you can see in the figure means that there's nothing there yet — no color, no picture, nothing. That's where the mat goes. Don't think that Photoshop tried to be "helpful" and created a checked mat for you.
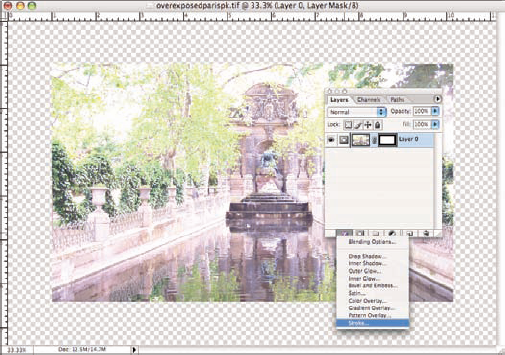
To add the equivalent of a mat, use the Stroke effect. Click the second icon — the Add a Layer Style button — at the bottom of the Layers palette, as shown in Figure 18-4.
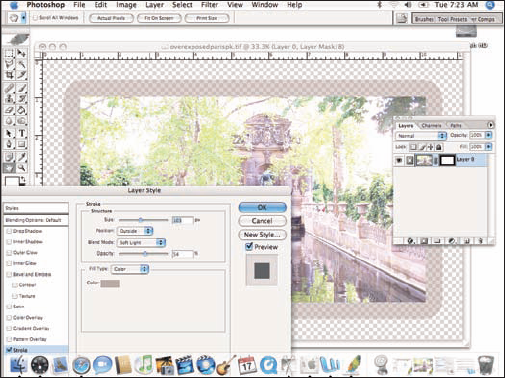
Choose your stroke settings — color, size, and position (Outside to create a mat effect). Drag the Layer Style dialog box to the side and watch what happens to the image as you move each slider.
Make sure the Preview check box is marked and move the sliders until you get what you like. You can see the settings I chose in Figure 18-5.
Add a new layer by clicking the New Layer icon in the Layers palette (next to the trash can at the bottom) and move the new layer below your image layer in the Layers palette.
To change the order of the layers, click the new layer in the Layers palette and drag it downward until you see a heavy black line below the original layer; then release the mouse button.
Select a color for the mat.
Click the foreground color swatch in the toolbar.
Select the Eyedropper tool.
Find a place on the image where you like the color and click around until you see a color that you like in the foreground color swatch.
Select the Paint Bucket tool.
Click anywhere in your image to fill the lower layer with the selected color.
The "matted" image is shown in Figure 18-6.
Make your own poster
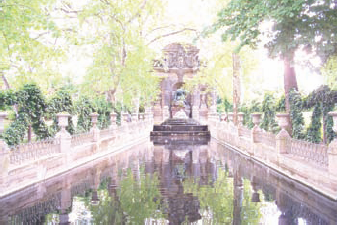
To gain your own sense of style, you can make a poster with text and image. You can decide on an era you want to re-create or a specific theme you want to create and choose a text that matches it. Images that are taken of shady spots (like under a tree over a lake in a park) and overexposed by +1.5 result in an exposure can look Impressionistic when printed. Add some borders and text that matches the image and you've got your own poster. Mass-produced posters are some of the most common saleable art in stores today.
Tip
Try using different Photoshop filters — Noise
Framing can be just as artful as the photography itself. If the frame isn't right for the photograph, you lose the total effect. And if you're trying to market your art, people won't buy it.
Your framing options are varied:
Frame kits: You can order framing kits that include everything — glass/Plexiglass, hangers, pads (so the frame doesn't knock against the wall), mats, backing boards — but that need to be assembled. See the later section, "Buying online; finding Internet deals," for shopping sites that carry these kits.
Speaking of hangers ... there are a few kinds:
Wires that stretch from one side to the other on the frame: These are time consuming to put on.
One-piece metal hangers: These are my favorite because all you have to do is hammer them onto the frame.
Metal hangers with screws: Ugh. You need to have microscopic vision and robot hands to set and screw those beasts into the frame.
Order by parts: You can order everything in parts from the four sides of aluminum frames to the hardware to put them together, each at its own price. Many artists order metal frames from Light Impressions this way. Their frames are professional quality but need to be assembled. Check out
www.lightimpressionsdirect.comfor their aluminum frame kits.
When choosing a frame, always consider your photograph. For example, you probably wouldn't want to put a heavy carved wooden frame around a photograph that's light and feminine (say, of your friend, the supermodel, splashing in the pool). Here are some examples of frame types and appropriate art to place within them:
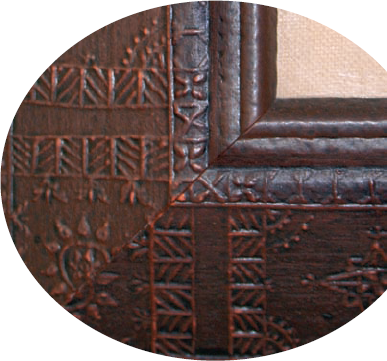
Thick carved wooden frames: These are great for cowboy/western or rustic photos. Sometimes a slimmed-down version of these frames can be a pleasant surrounding for nature photos.
Traditional black photography frames: Sepia and black-and-white (B&W) photos look clean and professional in these types of frames.
Silver metal frames: Something very modern looks good inside a metallic frame — say, glistening skyscrapers or city lights reflected on a body of water.
Bamboo-style frames: Especially popular nowadays, a frame like this fits well with a print that's tropical or Polynesian themed. Try a bamboo-textured mat to add to the theme. (Color families are important here; use accents in reds and browns. See Chapter 1 for more about color families.)
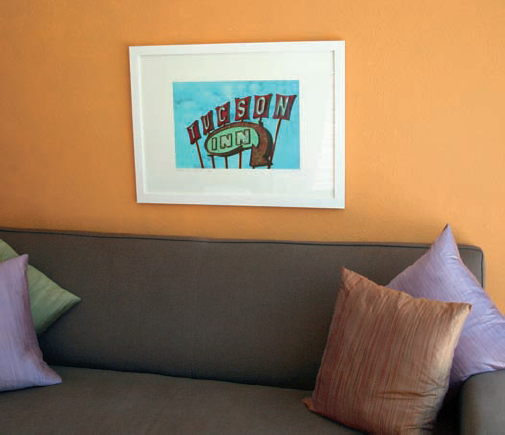
Bright white frames with bright white mats: This is what I use for my midcentury images. Many people in Southern California have modern homes with white walls. Framing signs in pure white blends with the walls so viewers can imagine they're looking at a real sign.
Here are other frame considerations:
Size: Frame dimensions are usually given from the inside of the frame, so 11″ × 14″ is the size of the opening of the frame and of the mat you'll put inside it. Obviously, if the molding (the actual frame material) is wide, the outside frame dimensions can be bigger.
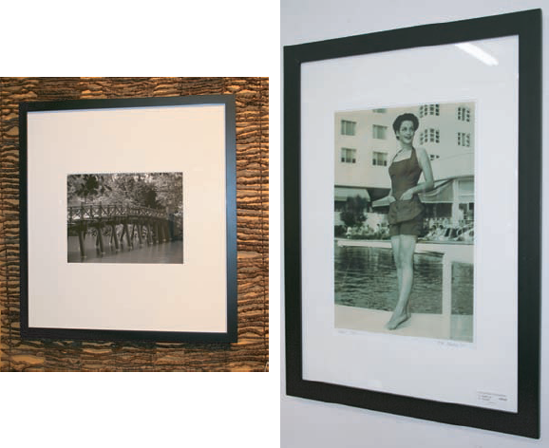
Style: Think of style as you would a bureau of drawers or other piece of furniture. Styles range from simple 18th-century Americana to embellished Spanish Colonial to (of course) simple contemporary, which is usually the most popular for photography. Figure 18-7 shows two types of frames that work with different photographic subject matter.
Material: Frames come in a variety of materials, from synthetic material, such as polystyrene, to natural woods and metals. Any are suitable for photography.
Color: Basic black, the best choice of colors for your frame, is what galleries choose when displaying photographs. This has been the trend, but it's changing as photographers are getting more creative. Basic white, a color befitting a contemporary style, is more popular now, and I use it often (see Figure 18-8).
In fact, I frame in all white because my most popular subject — mid-20th-century signage — looks good that way.
Cut: Choosing a frame can be daunting because of the thousands of moldings to choose from. Molding, the material from which framemakers make the frame, comes in a variety of widths, thicknesses, and cuts. The cuts can be flat or angled or curved, sometimes using multiple inundations in the cut, all according to the style of the frame.

Here's what you should have on hand before you order and buy:
The size of your image: I prefer making 8″ × 10″ images because I can sell them at a reasonable price. Making and printing them is less expensive both because of the ink required for the printer and the reasonably priced paper you can get at that size.
Know the size of your frame opening: The size of your mat is the same size as your frame opening. With a good area of white space (yes, I recommend white mats only for photography), the viewer is directed toward the image.
You can find dozens of framing shops all over the world. However, you pay for convenience and expertise: Most retail custom framers charge three to four times more than what you'd pay buying a ready-made frame and putting the picture in yourself.
Quality is important in a frame, and when you shop online, you obviously can't tell how substantial the frame in terms of its weight or size. However, my experience has been that after you get used to buying on the Internet, frames and mats you end up with are as good as what you buy retail — and sometimes even better.
I went shopping for a 14″ × 18″ frame at a couple of outlets on the Internet. I realize that the quality of some frames is better than others, and thus, more expensive. For you bargain-hunters, here are the details and prices I found at the time of writing:
SendAFrame,
http://sendaframe.com: A bony wood, beveled, classic 11″ × 14″ frame with glass display is $22; arctic white, acid-free mat is about $10. Shipping costs vary by number of items shipped ($6 for the first and $2 for each additional; arrives in 3 to 5 business days [shipping is higher for faster delivery]; minimum order for most frames is two pieces. Some frame models come in packages of a dozen (like the ebony, black, wooden basic by Perennials; a pack of 12 is $81).pictureframes.com,www.pictureframes.com: The Black Tie Affair 14″ × 18″ frame is $39. Very-white rag (acid-free) 14″ × 18″ mat is about $12. Shipping costs vary by the price of the order, starting at $7 for orders less than $25 to $35 for orders around $300, all for next-business-day delivery. A 40 percent mix-and-match discount is available.Picture Frames R Us,
http://picture-frames-r-us.com: A black gallery 14″ × 17″ (yes, really, 14″ × 17″) frame with mat is about $40. Shipping is a flat rate per order of $8, arriving in 5 to 10 business days. Minimum orders vary with stock ordered.Picture This...Framed,
http://Picturethisframed.com: A flat black 14″ × 18″ wall frame, with single conservation-grade mat (acid free), clear acrylic glazing (glass substitute), and rigid board backing is about $64. Shipping charges range from $7 to $20; arrives in 3 to 5 business days. No minimum order is required.
Although you can save a ton of money by buying your framing materials online, you can also find a local wholesaler or dig through thrift stores. In this section, I discuss how to buy wholesale and offer a few other cash-saving ideas for getting great frames and mats.
Tip
You want to contact wholesale framers if you're buying large quantities of frames — say, 30–40 or more. These are the folks to cozy up to when you want to find the people who make the frames, cut the mats, cut the glass/Plexiglas, and assemble the parts so that all you have to do is open up the frame and put in the photo.
Buying frames and mats wholesale usually means you need to buy in bulk. However, bulk in the frame world doesn't mean that you have to spend thousands of dollars. Most places, both online and traditional stores, accept orders starting at $100–$200 dollars. If you plan to sell in a high-end store or work with a gallery, you need the same frame or type of frame for your images — and a lot of them — so buying in bulk makes sense.
As for buying mats in bulk, you can buy them for about $2 per piece, cut to a variety of sizes and for a variety of odd-sized prints.
Tip
If you're in the United States and order abroad — even from Canada — those businesses will likely ask you for your Social Security number. The Security Assistance Act of 2002 requires full electronic filing of all export information, which means that you must provide your Social Security number when you are shipped items from another country. And you always have the choice: If you don't want to give out your number, find a domestic supplier. For more information, go to customs.ustreas.gov.
Table 18-2 lists places where you can get ready-made frames wholesale. These shops offer a consistent supply so that you can go back and buy the same frame.
Tip
Many retail outlets and chain art stores such as Aaron Brothers Art Marts offer a wide selection of frames at good prices. Be on the lookout for sales via the Internet and in the newspapers. Get on mailing lists to receive coupons. These places are a blessing if you run out of stock when people want pictures fast: Vendors like this offer a wide selection of photography frames and pre-cut mats at good prices.
Table 18-2. Frame/Mat Wholesalers
You can find great deals on frames and framing supplies if you're willing to look around a bit. This list offers just a few more ideas on where to find great frames at great prices:
Discount designers: Many contemporary designers use mass production to make affordable high-brow decorations for the home. This trend is a throwback to the 1950s when famous designers mass produced good-quality furnishings and made them cheap enough so more people could afford them. Here are just two examples:
Umbra (
www.umbra.com), a home design company, offers frames that are great for photography and for your smaller pictures. An 8″ × 10″ inch frame by Tom Vincent has layered glass inserts that make the multiple photos this frame holds look as if they're floating. Umbra also has 11″ × 14″ Media frames ($22) available in six variations, made of aluminum with white, bevel-cut mats to hold your photo sets.Ikea (
www.ikea.com), a Swedish company, has huge outlet stores in major cities around the world that offer a great selection of frames. Most of their frames, however, do not come with mats, so look over the "Takin' It to the Mats" section, earlier in this chapter, and then order your mats using metric measurements. Any framer will understand these dimensions. For more about metric measurements, see the nearby sidebar, "It's English in the U.S. but metric everywhere else."
Thrift stores: There they are, dozens of cast-offs stacked in a lonely corner, stray frames looking for new life in someone's home.
Refurbishing used frames from a thrift store is the most inexpensive alternative to traditional framing. Your options are limitless; millions of old but perfectly good frames are given to charities for sales at thrift stores every year. And the good news is that not many people sift through them, looking for a standard frame that you'd use for photography. Put in a good mat, and you have a saleable art piece. And if you're lucky, a useable mat will come with your frame.
Tip
You might have to sand and paint a thrift store frame because of bumps and nicks. Overall, though, ones I find in thrift stores are very refurbish-able. When painting a frame, sand it lightly first (wood or metal) and then apply a flat or semigloss paint.
Nonprofit organizations: Many nonprofit organizations, faith-based work programs, and other charities are in the framing business. A good example on the Internet is
www.kandu.org, which works with the Michigan Rehabilitation Services and Community Mental Health to train workers. From their picture frame manufacturing plant that employs these workers in Holland, Michigan, you can order mats and frames by the box (from a selection of 150 molding choices). Orders can be placed by phoning 800-747-0728.Garage sales/flea markets: The possibility of finding great frames at a garage sale or flea market can be as limitless as at a thrift store. You have to scour these venues to find a gem or two — and you also probably have to refurbish what you find — but the prices can't be beat.
Tip
At some point, you'll put your ready-made frame together: that is, put your picture inside. Here are some steps to help you through the process:
Gather the appropriate materials.
Figure 18-9 shows the parts:
Photograph: Your masterpiece!
Frame/mat: Chosen and cut for this particular photo.
White artist's tape/scissors: To affix the photo to the mat.
Glass cleaner/cloth: To clean the frame before assembly.
Pencil/eraser: To sign and clean up your mat.
Staple gun: To put the frame backing on the frame when you're done.
Disassemble the frame.
The backing typically comes stapled to the frame. You need to remove the backing (and also the mat, if you ordered one from the same company) so you can put the picture inside.
Sign and number your mat.
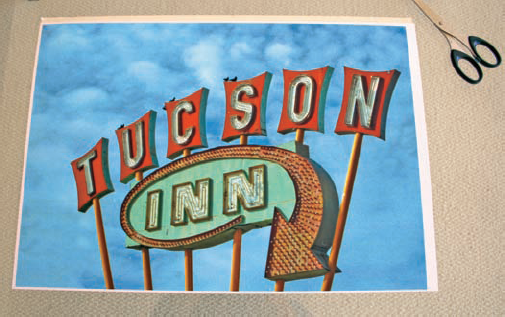
Create a unique artful signature of your very own. Your signature should go on the bottom right of your mat; put the number of the print on the bottom left. If you have a name for your print, put it there also. The name for my print is Tucson angled because it's my second version of this picture. It will be numbered 1/50 because I make limited editions of 50.
Tip
Signing your name in pencil on the mat is perfectly appropriate for photography artwork. If you use pencil and make a mistake when writing on your mat, use a magic Rub eraser (available at art stores) to get pencil marks and other smudges off your mat.
Put just one piece of white artist tape, sticky side up, on your print along the top, as shown in Figure 18-10.
Tip
Attaching your mat to your picture requires only one piece of white art tape at the top of your picture. Using only one piece of tape allows the paper to grow and shrink in different weather conditions without rippling in the frame. Hint: You could also use acid-free photo corners along with the tape to help hold the photo in place.
Another method is to mount the picture. While some folks think that this hurts the true artistic quality of the print, it makes it impossible for your picture to wrinkle. Most frame shops have mounting machines as do FedEx Kinko's.
Clean the inside of the frame with glass cleaner and let it dry.
Place the mat (with the photo taped to it) inside the frame.
Clear away any dust or other foreign material inside the frame and then staple the backing to the frame.
Attach a hanger if necessary.
For more on hanger options, see the earlier section, "The Great Frame-Up."
My final product is shown in Figure 18-11.