Following a step-by-step printing process
Matching your image in Photoshop with your printer output
Processing your photo for superlative prints
You have many options before you when printing your photos in the digital realm. You can print directly from iPhoto (on a Mac) or from the options within the software that came with your digital camera, which also likely contains some basic editing tools such as cropping and enhancing. However, most professionals and many amateurs use Photoshop to tweak their photos for the final output. Photoshop provides more alternatives to make sure your image keeps its detail, color, and contrast. (For more information about your photo's life as it's processed in Photoshop, viewed on your monitor, and transferred to a printer, see Chapter 3.)
In this chapter, I use a higher-end Epson Stylus Photo printer. Of course, models vary, but I think Epson makes excellent printers for art photos. (Many similar models are available, each printing at a variety of large sizes and able to print at sizes of 11″ × 14″ and larger.)
After your monitor is calibrated (as discussed in Chapter 3), you can make a proof — an estimate of what your print will look like when printed on the type of paper that you have in your printer — in Photoshop so that what you see onscreen is what you get in your print. The proof system works pretty well after you get the hang of it.
Here are the two ways you see an image in the proof-making process:
How the image is displayed on your monitor in Photoshop's working space: This comprises Photoshop's tools and options and your image(s) displayed on your monitor.
From a soft proof: In Photoshop, you can change the color and contrast of what you see in your working space to the color and contrast of how your image will look after printing. This copy of your image is a soft proof. The final result — a hard proof — is the output from your printer.
Warning
Your hard proof will never be exactly the same as your soft proof. There are just too many variables for that to happen, from how your monitor is calibrated to what interpretations Photoshop and your printer make from the colors it passes from one to the other.
You can tweak your soft proof (the copy that will be printed) two ways:
Look at it and tweak it using your own judgment. This way, you can just make your original soft proof by going through the steps in "Preparing for Output" and then tweak it by eye for printing.
Create a duplicate copy (one that you'll tweak to look like the original) before you set up the proof and apply the steps to your duplicate while you have your original onscreen until the soft proof and the original copy look alike.
Setting up a proof is a concept that has been taken from the hard copy print world to your LCD screen. Basically, a soft proof (which I refer to simply as a proof from here on out) is set up onscreen to see what your printer will print.
Warning
There are a multitude of choices in paper and printer models, each with specific profiles that you need to consider and set in Photoshop. In this example, I use an Epson printer and print on Epson enhanced matte paper. (The paper is what takes the ink and makes the color, so this is very important.) Profiles change when you change the paper you use. (More about that later in this section.) In the following steps, I show you how to set up your proof and save it as a profile you can later access. Note: I use Photoshop CS for this example, but I include notes regarding any changes in Photoshop CS2.
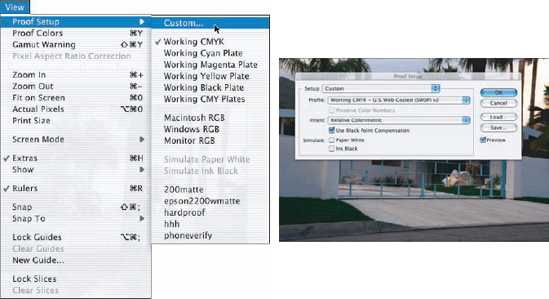
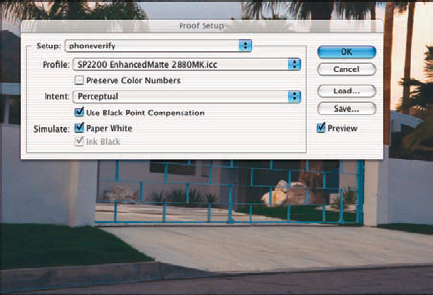
With your image open in Photoshop CS, choose View

The Proof Setup dialog box (right, Figure 17-1) opens, offering choices (Setup, Profile, Intent, Simulate) that I describe throughout this step list.
For Setup, choose Custom.
I choose Custom because I want a setup that matches my monitor and enhanced paper. Then I save this setting as phoneverify (see Figure 17-2) so that I can access it all the time. You have to pick a new paper if you change to glossy or other fancy papers.
For Profile, choose the type of paper you're printing on.
Your printer driver software puts settings inside Photoshop from which you can choose for printing. It is from these settings that Photoshop recognizes the color of the medium (typically, paper) on which it's printing. This is important because the mixture of the paper's color and texture with the inks that are set into it is variable. A glossy paper takes ink differently than a matte paper, for instance.
I choose EnhancedMatte 2880 (refer to Figure 17-2) because that's the paper I'm using, and I want a print at the highest resolution (the 2880 part). Epson has other choices in this drop-down list, so when I change paper, I can change this setting.
For Intent, choose Perceptual and select the Use Black Point Compensation check box.
I choose Perceptual because it's the choice that's natural to the human eye. I could have gone with Relative Colorimetric. For vivid images like graphs or charts, I'd go with Saturation, which is standard and preserves the original colors more.
For Simulate, select the Paper White and the Ink Black check boxes.
This tells Photoshop to match my image colors to the white of the matte paper.
Save the profile by clicking Save and entering a name so that you can select it each time you later want to print, on any size enhanced matte paper.
To soft-proof the image — that is, to see an onscreen representation of what the image will look like when printed — choose View
Tip
Adobe has a system from which you can purchase technical help to solve any problem you have bringing your final Photoshop image to any type of printer. Help gurus can take you step by step through each Photoshop dialog box after you give them the type of paper and printer model that you have. The plan is worth its cost.
With proof in hand, printer turned on, and Photoshop opened to the image you want to print out, you're ready to produce your final paper output.
To get proper image quality for printing and selling, you either need to
Scan your image from a negative or positive, sizing it or saving it when you download from your camera to your computer.
Take a picture with a high-end (6 or more megapixels; MP) dSLR camera and download the picture to your computer and then open it in Photoshop. (Choose File
Tip
Point-and-shoot cameras larger than 6MP can also be used for taking pictures to print at 13″ × 19″ inches and larger. That doesn't mean you can't print your images fairly clearly with a camera that takes pictures whose size is smaller than 6MP. It just means they won't be as clear as those that do.
Sometimes, you need to rotate your canvas if the image looks slightly cockeyed. I usually eye it by a line that would be horizontal in a natural setting, like the horizon if you can see it in your image. Open the file in Photoshop and do a final rotation of your canvas. Choose Image
Tip
Select Photoshop's Measure tool (under the Eyedropper tool in the Toolbox). Drag the tool along some line in the photo that should be horizontal or vertical. Now choose Image
After rotating your image, there are likely to be some areas of white along the edges. You can use the Clone Stamp tool to cover those areas or crop the image to eliminate them.
Many of Photoshop's automate tools are great for making art pieces. For instance, you can create a group of portraits side by side in a new Photoshop document for an art collage.
One of the great things about Photoshop is its ability to work with virtually any image of any size. Use the TIFF format for the best results using any of Photoshop's file image manipulation packages in the Automate option (File
The following example will help you to understand how to set up multiple files so that they work together to create one image. Just take a series of images, of anything you want, and then put them together in Photoshop.
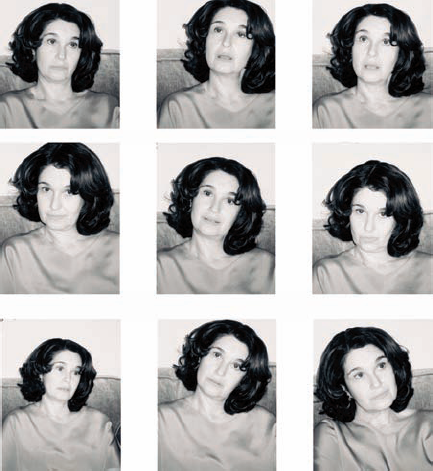
Take a series of nine photos by setting your camera on an automatic timer mode.
Make sure that the background of each is at about the same focal length, as shown in Figure 17-3. Of course, you could make a contact sheet out of existing photos, in which case you would skip this step and go straight to Step 2.
Download the images into a folder on your computer in your camera's best-quality JPEG format.
You can convert the entire photo collage to TIFF format at the end.
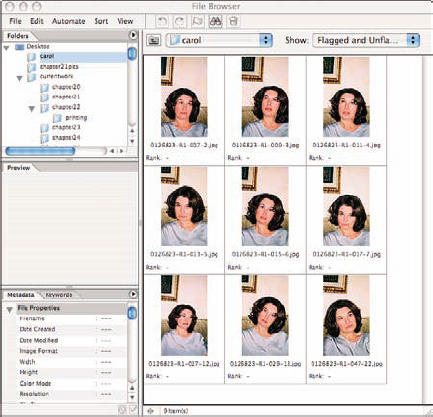
In Photoshop, choose File
Choose your page size/resolution and select the number of rows and columns necessary to fit all the images in that folder onto one page.
Remember to choose the printable area of your page (such as 8″ × 10″) rather than the paper size (8.5″ × 11″) to allow room for the printer's margins. Because this image is destined to be printed as art, make sure to use 300 pixels per inch (ppi) as your resolution.
Deselect the Use Filename as Caption option (for an art photo) and click OK.
Save your image as a TIFF file.
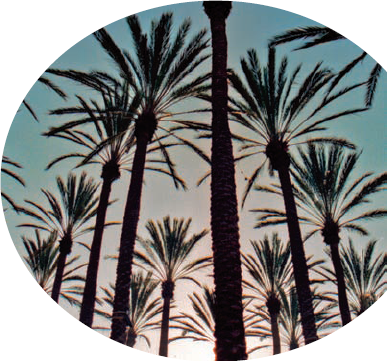
You can, of course, apply some of your Photoshop magic to the resulting image. You might, for example, decide that the collage has more impact as a grayscale image (see Figure 17-4).
I continue processing my image for print within the Print with Preview dialog boxes. It's here that you set your printer to use Photoshop's colors and not Epson's or Canon's (or whatever printer model you have); you also specify the size of your paper and where on the paper you want your print.
To access Print with Preview, choose File
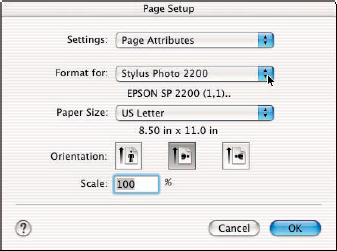
When the Print dialog box comes up, click the Page Setup button to specify your paper size and print orientation (in the resulting Page Setup dialog box).
I set my printer for (Epson) Stylus 2200 Photo US letter size. (All the Epson 2200 size possibilities are within this menu pop-up.) I also click the Orientation icon that indicates landscape mode. See Figure 17-5.
After you make your choices, click OK to close the Page Setup dialog box.
Back in the Print dialog box, set your printing options.
In particular, in the Print Space profile (Printer Profile in CS2), make sure to select the printer's profile for the paper on which you're printing.
Click Print and select your preset quality print choice.
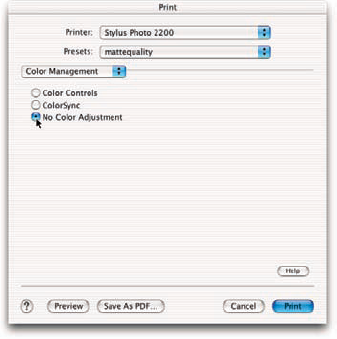
The printer's own Print dialog box opens, from which you make a selection from the Presets drop-down list.
I choose the mattequality preset. I saved this option because I print on this paper type again and again.
Warning
If your preset is already chosen, scroll through the drop-down menu and then reclick the preset to set it again. Otherwise, the image falls into default mode.
Turn off the printer's own color management.
The last thing that I do is to choose Color Management from the drop-down menu that falls after the Printer and Presets menus. Because I don't want the printer to decide my colors for me — I want Photoshop to decide — I select the No Color Adjustment radio button, as shown in Figure 17-6.