
Project 10: Shetland Pony
We bought Moonlight about fifteen years ago, not knowing that we were getting two for the price of one! Several months later, Moonlight gave birth to a tiny foal we named Epona. Both mother and daughter have been our pets ever since.

Reference Photo
Materials
Paints
Burnt Umber
Payne’s Gray
Raw Sienna
Ultramarine Blue
Titanium White
Yellow Oxide
Brushes
no. 1, 3, 5 and 7 rounds
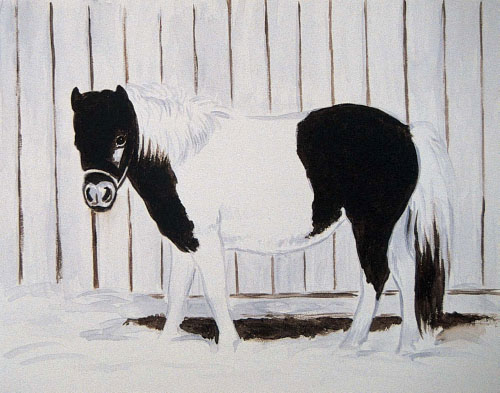
1 Establish the Form and the Dark Values
Lightly draw the pony onto the panel with your pencil, using a kneaded eraser for corrections. With Payne’s Gray thinned with water and a no. 5 round, paint the main lines and values, switching to a no. 3 round for details.
Mix the black for the pony’s coat with Burnt Umber and Ultramarine Blue. Paint with a no. 5 round, switching to a no. 3 round for details. For the dark brown eye color, mix more Burnt Umber into a portion of the black.
Iused the black mixture and a no. 5 round to paint the dark spaces between the boards with sketchy, vertical strokes. Next I added the pony’s shadow in the straw with dabbing strokes.

2 Paint the Middle Values
Mix a middle value blue-gray for the pony’s nose, halter, highlight under the left eye, lower legs and the line of the belly with Titanium White, Ultramarine Blue and Burnt Umber. Paint with a no. 3 round.
A mixture of Burnt Umber, Titanium White and Raw Sienna works well on the nose and around the pony’s eyes.
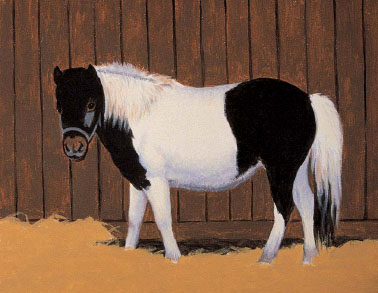
3 Paint the Light Values
Mix a light blue-gray with Titanium White and small amounts of Ultramarine Blue and Burnt Umber. Paint this color on the belly, legs, back, mane and tail with a no. 5 round to indicate shadows and shape.
Mix a warm yellow with Titanium White, Yellow Oxide and Raw Sienna. With a no. 3 round, paint some long strokes on the mane and tail.
Mix a warm white from Titanium White and a touch of Yellow Oxide. Paint with a no. 7 round, with dabbing strokes on the body and long, flowing strokes on the mane and tail.
For the barn wood, I used the same color that I did for the nose and around the pony’s eyes—Burnt Umber, Titanium White and Raw Sienna. I painted with a no. 7 round, dabbing vertical brushstrokes (horizontal for the baseboard). I re-established the dark spaces between the boards with a no. 3 round and black.
4 Blend the Colors and Add Detail
Using separate no. 3 rounds for the black from Step 1 and the middle value blue-gray from Step 2, begin detailing the pony’s head. Blend with the neighboring color. Add detail to the forelock with both colors, using flowing strokes and a small amount of paint.
With the warm brown from Step 2, drybrush details in the black part of the hindquarters, neck and chest. Use a separate brush to add detail with the middle value gray, blending with a no. 5 round and the black.
Add detail to the warm white part of the body, mane and tail with the light blue-gray from Step 3 and a no. 5 round. With a no. 3 round, paint some of the warm brown from above onto the halter, letting some of the middle value blue-gray remain.
Here, Itook a portion of the barn wood color and added some Raw Sienna. With this color and a no. 3 round, Ipainted shadow detail in the straw with basically horizontal, slightly curved strokes that varied in direction.
At this point, Ibegan detailing the barn. For this, Imixed together a lighter color for the barn wood with Titanium White, Raw Sienna and Yellow Oxide. With a fairly dry no. 5 round, Ifollowed the wood grain with light-pressured brushstrokes. Iused a fresh no. 5 round and black to detail the dark wood grain.
Tip
The middle value blue-gray may appear too bright in some areas. Tone it down by mixing in a little black.

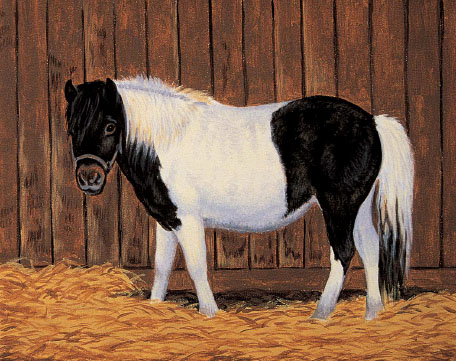
MOONLIGHT
Acrylic on Gessobord
8” × 10” (20cm × 25cm)
5 Paint the Finishing Details
Add some detail to the mane and tail. Use a no. 3 round and Titanium White to soften and tone down the blue shadow line at the crest of the mane, then add hair tufts from the mane, tail and legs.
Tone some of the middle value grays and light blue-gray areas by selectively painting some of the warm yellow onto the belly, back, legs, mane and tail. Using a no. 5 round, drybrush the color on the body with long strokes, and short, light strokes on the mane and tail. Tone down and blend with a separate no. 5 round and the light blue-gray from Step 3.
Use a no. 3 round to tone down the nose with a wash of black and water. Refine this area with the middle value blue-gray and a no. 3 round.
For the highlight in the eye, paint a small curved arc with a no. 1 round and the middle value gray. Make corrections with a fresh no. 1 round and the dark brown eye color.
Idecided to tone down the dark lines between the wood boards. They were too strong, leading the eye away from the pony and out of the painting. To tone them down, I used a no. 7 round to drybrush some of the barn wood color over the dark lines so that they became lighter toward the top. Once I was satisfied with that, Imoved on to the straw. With a no. 7 round, Ilaid a glaze of the warm yellow over the straw. Next Idarkened the pony’s shadow on the floor with black and a no. 5 round, adding a few dark strokes to the straw with a thinned black. Imixed a bit of Titanium White with a portion of the warm yellow to paint some highlights.
With no. 3 rounds for the middle value blue-gray and the warm white, I worked to make the pony’s feet show a bit more through the straw. Iused another no. 3 round and the warm yellow to overlap the hooves with a few blades of straw.