
Project 29: Cottontail Rabbit (Side View)
The cottontail is the most common breed of rabbit in North America and lives primarily in the wild. Check to see if there’s a local wildlife rescue in your area you might visit to sketch and photograph some cottontails for painting reference.
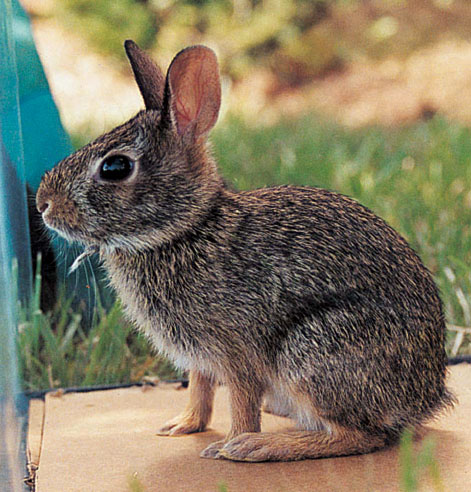
Reference Photo
Materials
Paints
Burnt Sienna
Burnt Umber
Payne’s Gray
Raw Sienna
Raw Umber
Scarlet Red
Titanium White
Ultramarine Blue
Brushes
no. 1 and 3 rounds
no. 2, 4 and 6 filberts
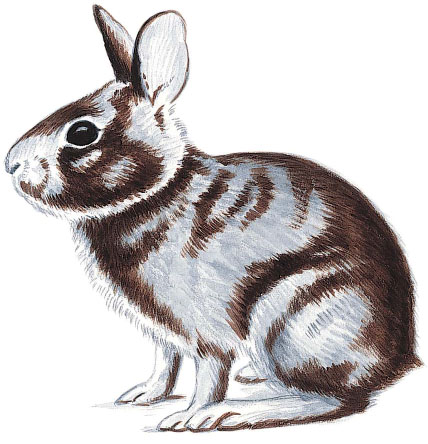
1 Establish the Form and the Dark Values
Over a light sketch, use Payne’s Gray thinned with water and a no. 1 round to paint the basic darks and lights. Use a no. 6 filbert for the broader areas. For the dark color of the rabbit’s coat and eye, mix Burnt Umber and Ultra marine Blue. Paint the eye with a no. 1 round, leaving a white space for the highlight. (If you paint over the highlight by mistake, you can always add it later.)
Use a no. 1 round (for details) and a no. 4 filbert (for the broader areas) to begin painting the darkest shadowed areas around the neck, haunch, under the eye, etc. Use brushstrokes that follow the way the hair grows. It will take more than one layer of paint to cover the dark areas. As soon as one layer is dry, you can darken it by adding another layer.

2 Paint the Middle Value
For the brownish middle value color, mix Raw Sienna, Burnt Sienna and Titanium White. Apply with a no. 4 filbert. First dip the tip of your brush in water, then in the paint. Paint right up to the dark areas, overlapping with short, uneven brushstrokes at the edges where the two colors meet.
3 Begin the Fur Details
With the dark fur color and a no. 1 round, begin painting fur detail over the middle value color, following the fur pattern. Mix a lighter fur color using Titanium White and Raw Umber. With a no. 3 round, begin painting the chest fur against your background, and begin adding lighter hairs around the eye, head, shoulders and haunches. Use the same color and brush to paint the lighter parts of the legs and feet. For the pink color inside the ear, mix Scarlet Red, Burnt Umber, Titanium White and a little Ultramarine Blue. Apply with a no. 2 filbert.
Tip
• Make fur more realistic by painting some tufts of fur—triangular in shape with the top end open. Some artists make the mistake of painting fur as if it were just a series of thin lines all going in the same direction.
• Tone down any areas of light-colored fur that look too bright or stand out too much with a thin glaze of Burnt Umber and water.
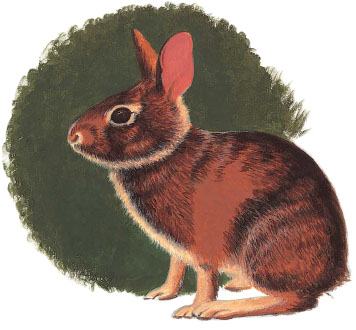
EASTERN COTTONTAIL RABBIT
Acrylic on illustration board
8” × 10” (20cm × 25cm)
4 Finish the Details
Add more dark hairs with a no. 1 round and the dark value you mixed in Step 2. Vary your brushstrokes so they aren’t all in the same direction. Use a no. 1 round and the light fur color to continue the fur. Integrate the areas where the light and dark fur meet by stroking one color into the other at the edges, using separate brushes for each.
Paint a highlight on the edge of the closest ear with a no. 1 round and some of the light fur mixture. For areas where this mixture would be too light, mix a little of the light and middle value fur colors together. Use short strokes on the head and slightly longer strokes on the body. Mix a little Titanium White with Ultramarine Blue and paint the eye highlight with a no. 1 round, then blend the edges.
Use a no. 1 round and a mixture of Scarlet Red, Burnt Umber and Titanium White to paint the veins inside the ear. Use some of the pinkish ear color mixture from Step 3 (thinned with water) and a no. 1 round to tone them down. Paint the shadows inside the ear with a mixture of the pinkish ear color and Burnt Umber, then blend.
With a no. 1 round, paint the whiskers with some of the light fur color and enough water so the paint flows. Use a no. 1 round and some of your background color to tone them down as needed.