
Painting Materials
The list of materials you’ll need for painting is more extensive than for drawing. However, basic painting supplies are well worth the expenditure since they’ll provide you hours of satisfaction and enjoyment as you create your own paintings.
SURFACE
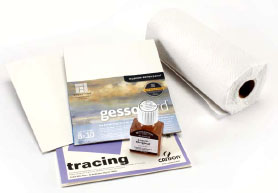
The surface for most of the oil and acrylic painting demonstrations in this book is Gessobord, a pre-primed Masonite panel with a nice texture for realistic painting. It comes in a variety of sizes. I completed most of the demonstrations on 8″ × 10″ (20cm × 25cm) panels. Illustration board is fine for acrylic paintings, but since it is paper based, it is not suitable for oils. Although I prefer Gessobord for finished oil and acrylic paintings because of its permanence and smoother surface, illustration board has the advantage of being less expensive to buy, and it can be easily cut to any size you desire.
PAPER TOWELS
Paper towels are useful for blotting excess paint, water, turpentine or medium from your brush. Keep a folded paper towel by your palette and a crumpled one in your hand or on the table.
MEDIUM
Medium improves the flow of the paint so it is easier to spread and blend, and it can also be used for glazing. For acrylics, I use plain water instead of a manufactured medium. For oil painting, I use Winsor & Newton Liquin. It improves the flow of paint, makes the paint dry faster and is good for blending and glazing. I use turpentine or a turpentine substitute to thin a neutral color for blocking in the form in the first step of the painting and for cleaning brushes.
When painting with acrylics, it’s important to change the water fairly frequently so it doesn’t get too murky with paint. For oils, you may have to change your turpentine occasionally if it gets too saturated with paint. Always wipe as much paint from your brushes as possible with a paper towel before cleaning them.
NO. 2 PENCIL AND KNEADED ERASER
You’ll need a pencil and an eraser for drawing or tracing the image onto your panel. The kneaded eraser is good for making corrections and for lightening pencil lines so that they won’t show through the paint.
TRACING PAPER
You’ll need tracing paper if you want to trace your sketch or the template drawing provided with each demonstration. After tracing your sketch, you can transfer it to the Gessobord using homemade carbon paper. The advantage of doing the sketch on a separate piece of paper, and not directly onto the panel, is that you have much more control over the size and placement of the subject, often resulting in a better painting.
VARNISH
When an oil painting is completely dry (which can take six months to a year, depending on how thick the paint is), it should be varnished with a final picture varnish for total surface protection and to restore colors. You should keep a schedule and inform people who receive your art that they or someone else must apply the varnish to preserve the value of their acquisition. Although it isn’t necessary, some artists also choose to varnish acrylic paintings because they want the painting to appear glossier or to add a protective layer.
Versatile Materials
Many of the same materials used for oil painting can also be used for acrylics —brushes, surface (Gessobord), palette knife, paper towels, no. 2 pencils and tracing paper. The difference is in the paints (oil or acrylic), medium (Liquin or water) and type of palette (disposable wax paper or Masterson Sta-Wet Palette).
PALETTE
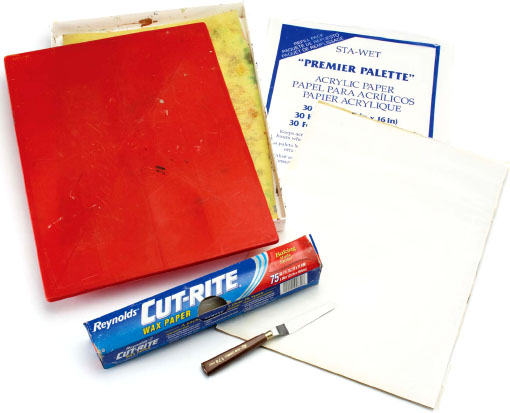
The Masterson Sta-Wet Palette works well for acrylics because it keeps your paints from drying out for days or even weeks. The 12″ × 16″ (30cm × 41cm) size is best as it gives you plenty of room to mix colors. The palette consists of a 13⁄4-inch (4cm) deep plastic box with a sponge insert that fills the bottom of the box when wet. A special disposable paper, called acrylic film, sits on top of the sponge insert. The box has an airtight lid.
For oil painting, I use a 12″× 16″ (30cm × 41cm) disposable wax paper palette. When you are finished with a sheet, you just tear it off and discard and use the new sheet underneath. A plastic box with a lid (similar to the one for the Masterson Sta-Wet Palette) will help keep your paints from drying out.
PALETTE KNIFE
You’ll need a palette knife for mixing both oil and acrylic colors. A tapered steel knife works best, and the trowel type with a handle lifted above the blade is the easiest to use. Be sure to clean your palette knife between colors. Wiping it on a paper towel is usually sufficient, but occasionally you’ll have to rinse it in water or turpentine.
WAX PAPER
It’s useful to keep wax paper on hand for times when you want to paint a thicker acrylic layer (the Sta-Wet Palette always adds some water to the paint). Simply transfer some color from your palette to the wax paper. The wax paper will prevent the paint from becoming diluted, and the paint will immediately begin to dry out and thicken. Lightly spray the paint with water to keep it from drying up completely.
Acrylic Palette Tip
The directions that come with the Masterson Sta-Wet Palette tell you not to wring out the wet sponge. However, I find that if I don’t gently press out some of the water, my paints become too runny after a short time. If the paints start to dry out, spray them lightly with water from a spray bottle.
Palette Types
Oils and acrylics require different types of palettes, but you can use the same palette knife for both mediums.
Keep Multiples of Each Brush Size
It’s a good idea to have two or three copies of each of the round sizes and at least two of each of the filberts. That way, you can use two or three brushes alternately with different colors to blend without having to stop and clean your brush each time.
BRUSHES
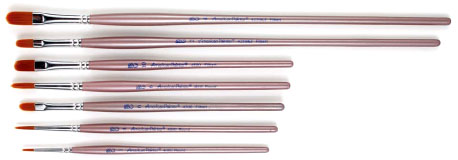
I keep on hand dozens of brushes in all different brands, types and sizes. The numbers used to designate the sizes of brushes vary widely from one manufacturer to another. For example, a no. 1 round of one brand could be a very small brush used for detail, while a no. 1 round of a different brand could be much larger and not at all suitable for small detail. I’ve found that even within one brand, the length of the handle (long or short) can make a big difference in the size number. When I paint, I tend to pick up any brand of brush in a size and type that looks right for what I am doing. This method seems the most practical.
The brushes I use are made of a synthetic sable called golden Taklon and have firmness as well as flexibility. In order to have the right mix of types and sizes, I have used both long- and short-handled brushes.
There are several brush sizes used for the demonstrations in this book, including:
Rounds: no. 1, 4 and 6 with short handles.
Filberts: no. 6 and 10 with short handles and no. 2 and 4 with long handles.
Brights: no.10 (a stiff, short-haired flat brush).
Shaders: no. 8 and 10, good for backgrounds.
Rounds come to a fine point and are best for detail, such as animal eyes or blades of grass. Filberts are good for broader areas like large areas of grass or sky. They hold a lot of paint and are tapered so that it’s easier to paint around objects.
It’s best to have two or three of the more frequently used brushes, such as no. 1, 3, 4 and 10 rounds and no. 2 and 6 filberts. As you’ll see in the demonstrations, you will often need two or three of the same size brush, each with a different color, so you can use them alternately while blending.
You can use the same brushes for the oil and acrylic demonstrations in this book. Just be sure to wash the brushes well at the end of your painting sessions. For acrylics, you need only to rinse the brushes well in water. For oils, you must rinse the brushes out well in turpentine or turpentine substitute, blot on a paper towel, then use water and a brush cleaner such as the Masters Brush Cleaner and Preserver to complete the cleaning. You can also use dish soap for this purpose.