
11. Selecting Regions
When you edit audio in Pro Tools, you don’t alter the original audio files saved on disk. Rather, you edit regions (usually displayed as waveforms) that represent the original audio files. Editing regions involves two steps:
Selecting regions (choosing the portion of recorded material you want to edit),
Working with regions (performing edit functions such as moving, duplicating, trimming, aligning, and so forth on selected regions).
This chapter covers selecting regions in Pro Tools. We’ll introduce you to three selection types: Edit selections, Timeline selections, and Track selections. You’ll learn how to make each type of selection, and you’ll learn how to link and unlink Edit selections with Timeline and Track selections to make your editing session more productive.
Then you’ll learn a few tricks for fine-tuning your selections, including how to extend, nudge, and change the length of a selection.
In addition, we’ll show you how to select waveforms at locations of minimal volume to avoid adding unwanted noise (pops and clicks) or jarring transitions to your recordings.
About Selections
Selections in Pro Tools are classified in two ways: Edit selections and Timeline selections. An Edit selection refers to the actual audio region and/or track space that becomes highlighted when you make a selection (Figure 11.1). Edit selections can include a single region or multiple regions, and can include the space before, after, and in between regions. You can make Edit selections on single tracks or across multiple tracks.
Figure 11.1. An Edit selection. Edit selections apply only to the selected track. Shift-click on additional tracks to extend the Edit selection.

When you make a Timeline selection, you select a range of time in any Timebase ruler (Figure 11.2). Timeline selections automatically apply across all tracks in a session.
Figure 11.2. A Timeline selection. Timeline selections automatically apply across all tracks.
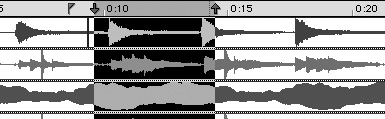
Timeline selections are indicated in the ruler by blue arrows called Playback markers (Figure 11.3). Playback markers turn red during recording. Pre- and post-roll flags accompany Playback markers. These indicate the current pre- and post-roll times and turn green when the Pre- or Post-Roll buttons in the Transport window are enabled.
Figure 11.3. Playback markers with pre- and post-roll flags in the Min:Secs ruler.
![]()
Linking and Unlinking Edit and Timeline Selections
Edit and Timeline selections are linked by default. This means that when you select inside a track, the corresponding range in the timeline is also selected.
You may, however, want to unlink Edit and Timeline selections to perform certain editing tasks. For instance, if you’re working with video, you may want to retain a Timeline selection of video while you search for sounds to accompany it elsewhere in the session. Once you’ve found the desired sound, you can return to the current Timeline selection and apply the sound to the video.
When Edit and Timeline selections are unlinked, Edit selections are displayed in the ruler as Edit markers, which appear as black brackets (Figure 11.4).
Figure 11.4. Edit markers, which indicate an Edit selection, appear when Edit and Timeline selections are unlinked.
![]()
To unlink Edit and Timeline selections
• Deselect Options > Link Edit and Timeline Selection.
or
• Click the Link Selection button in the upper left area of the Edit window (Figure 11.5).
Figure 11.5. The Link Selection button.
![]()
The Link Selection button is unhighlighted, and the Link Edit and Timeline Selection function is disabled.
Linking and Unlinking Track and Edit Selections
You can link and unlink Track and Edit selections in the Edit window. When you link Track and Edit selections, selecting material in the Edit window automatically selects all associated tracks. This way you can quickly change track parameters (such as track height or track view) on multiple tracks during a session.
Unlinking Track and Edit selections disables the automatic selection of tracks when selecting material in the Edit window.
To link or unlink Track and Edit selections
• Select or deselect Options > Link Track and Edit Selection.
or
• Click the Link Track and Edit Selection button in the upper left of the Edit window (Figure 11.6).
Figure 11.6. To link and unlink Track and Edit selections, click the Link Track and Edit selection button in the upper left corner of the Edit window.
![]()
The Link Track and Edit Selection button becomes highlighted and Track and Edit selections are linked.
Selecting Regions
The Selector tool in the Edit window lets you select portions of audio regions within individual tracks. Using the proper technique to select regions is key to making smooth, noise-free edits.
Editing waveforms
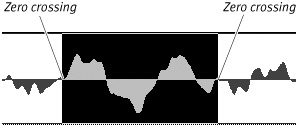
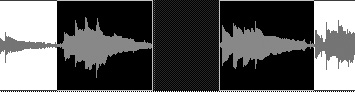
When you select a portion of an audio region in Waveform view, make sure that your selection does not begin or end at a point of high waveform amplitude. This can introduce audible clicks and pops at the boundaries of a newly created region. Instead, make sure your selections begin and end as close as possible to a zero crossing. A zero crossing is a point where the waveform crosses its center line, and the waveform’s amplitude is zero (Figure 11.7).
Figure 11.7. An Edit selection that begins and ends at a zero crossing.
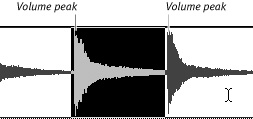
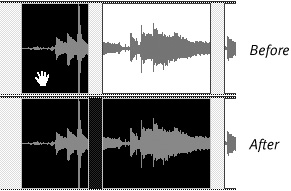
In addition, try to begin your selections immediately before a volume peak, and end them immediately before another volume peak (Figure 11.8). Selecting at zero crossings and before volume peaks—both points of low volume—will help ensure that your edits flow seamlessly and are free of clicks and pops.
Figure 11.8. An Edit selection that begins before one volume peak and ends before another volume peak.
To select a portion of a region
• Drag the Selector tool over the portion of the region you want to select (Figure 11.9).
Figure 11.9. Drag the Selector over a portion of a region to make an Edit selection.
The selected portion is highlighted.
To select an entire region
• Click the region with the Grabber.
or
• Double-click the region with the Selector.
To select two regions and the time range between them
1. Click with the Grabber on the first region.
2. Shift-click the second region.
Both regions and the time range between them (including any other regions) are highlighted (Figure 11.10).
Figure 11.10. A selection including two regions and the time range between them.
To select an entire track
1. Click in the track with the Selector.
2. Choose Edit > Select All.
or
Triple-click in the track with the Selector.
To select all regions in all tracks
1. Select All in the Groups list (Figure 11.11).
Figure 11.11. Click All in the Edit Groups list to group all tracks in a session.
![]()
2. Click in any track with the Selector.
3. Choose Edit > Select All.
or
Triple-click with the Selector in any track.
To make a selection on the fly
1. Use the Selector to click in the track before the start location of the range you want to select.
2. Click Play in the Transport window.
3. When playback reaches the start location, press the Down Arrow key.
4. When playback reaches the end location, press the Up Arrow key.
The selected range is highlighted.
5. Click Stop.
Changing a Selection’s Length
You can make an existing selection longer or shorter by pressing the Shift key while clicking or dragging (or by dragging the Playback markers in the ruler).
To change the length of a selection
• Shift-click or Shift-drag with the Selector to the left or right of the existing selection.
or
• In the ruler, drag the Playback markers for a selection’s start or end point (Figure 11.12).
Figure 11.12. Drag the Playback markers in the ruler to move a selection’s start or end point.
![]()
Nudging Selections
Nudging is useful for fine-tuning the boundaries of a region selection. You can nudge a selection by the current Nudge value. You can also nudge the start and end points for a selection by the current Nudge value.
To nudge a selection range
1. Make a selection with the Selector.
2. Enter a Nudge value in the Nudge Value field, located in the upper right area of the Edit window (Figure 11.13).
Figure 11.13. The Nudge Value field.
![]()
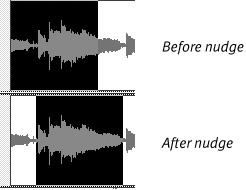
3. Hold down the Shift key, and press the Plus or Minus key on the numeric keypad.
The selected range moves by the Nudge value (Figure 11.14).
Figure 11.14. To nudge a selection forward or backward, hold down the Shift key, and press the Plus or Minus key on the numeric keypad.
To nudge a selection’s start point
1. Make a selection with the Selector.
2. Enter a Nudge value in the Nudge Value field, located in the upper right area of the Edit window.
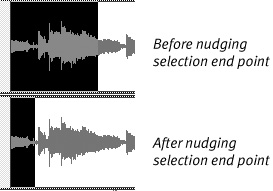
3. Hold down Option-Shift (Macintosh) or Alt-Shift (Windows), and press the Plus or Minus key on the numeric keypad.
The selection’s start point moves by the Nudge value (Figure 11.15).
Figure 11.15. To nudge a selection’s end point, hold down Command-Shift (Macintosh) or Control-Shift (Windows), and press the Plus or Minus key on the numeric keypad.
To nudge a selection’s end point
1. Make a selection with the Selector.
2. Enter a Nudge value in the Nudge Value field, located in the upper right area of the Edit window.
3. Hold down Command-Shift (Macintosh) or Control-Shift (Windows), and press the Plus or Minus key on the numeric keypad.
The selection’s end point moves by the Nudge value.
Extending a Selection
You can extend a selection in three ways: to region start and end points, to include an adjacent region, or to markers and memory locations.
To extend a selection to a region’s start point
1. Select a portion of a region with the Selector.
2. Press Shift-Option-Tab (Macintosh) or Shift-Start-Tab (Windows).
The selection extends to the region’s start point.
To extend a selection to a region’s end point
1. Select a portion of a region with the Selector.
2. Press Shift-Tab.
The selection extends to the region’s end point (Figure 11.16).
Figure 11.16. To extend a selection to a region’s end point, select a portion of the region and press Shift-Tab.
To extend a selection to include an adjacent region
1. Select a region with the Grabber.
2. Press Shift-Control-Tab (Macintosh) or Shift-Start-Tab (Windows).
The selection extends to include the next region (Figure 11.17).
Figure 11.17. To extend a selection to include the next region, select a region with the Grabber, and then press Shift-Control-Tab (Macintosh) or Shift-Start-Tab (Windows).
or
Press Shift-Control-Option-Tab (Macintosh) or Shift-Start-Control-Tab (Windows).
The selection extends to the previous region.
To extend a selection to a marker or memory location
1. Make a selection with the Selector or Grabber.
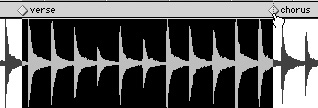
2. Shift-click a marker in the Markers ruler (Figure 11.18).
Figure 11.18. To extend a selection to a marker, Shift-click the marker in the Markers ruler.
or
Shift-click a memory location in the Memory Locations window.
The selection is extended from the original insertion point to the marker or memory location.
• If a long selection doesn’t fit in the Edit window, press the Left Arrow key to jump to the beginning of the selection, or the Right Arrow key to jump to the end of it.
Using Selection Indicators
The selection indicators at the top of the Edit window let you make precise edit selections. They use the time format of the session’s Main Time Scale.
To make a selection using the selection indicators
1. Click in the track you want to select.
2. Enter a value for the selection start point in the selection indicator’s Start field (Figure 11.19).
Figure 11.19. The selection indicator in the Transport window.
![]()
3. Enter a value for the selection end point in the selection indicator’s End field.
4. Press Enter.
The selected range of track is highlighted.
Tabbing to Transients
The Tab to Transients button automatically locates the cursor to the next transient peak in an audio waveform. A transient is a sound—such as a drum hit, a piano note, or a guitar strum—that occurs for a brief time period. The transient peak is the instance of strongest attack in the transient. For example, a snare drum hit consists of a strong initial attack—a transient peak—followed by a period of decay.
Tabbing to transients is quite handy for locating the precise start and end point of audio regions.
To set the start and end points of a selection using Tab to Transients
1. Click the Tab to Transients button to enable it (Figure 11.20).
Figure 11.20. The Tab to Transients button.
![]()
2. Click in the audio track before the material you want to select.
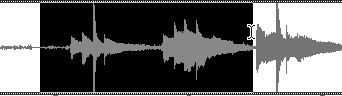
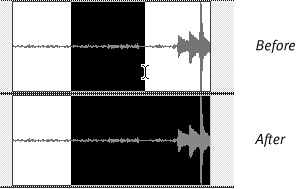
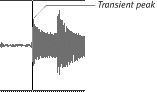
3. Press the Tab key repeatedly until the cursor locates to the transient at the start of the selection (Figure 11.21). If necessary, press Option-Tab (Macintosh) or Control-Tab (Windows) to return the cursor to the previous transient peak.
Figure 11.21. Press the Tab key to locate the cursor to the next transient.
4. Press Shift-Tab until the cursor locates to the end of the selection. If necessary, press Shift-Option-Tab (Macintosh) or Shift-Control-Tab (Windows) to move the selection end point to the previous transient.
• Use the Edit window’s Smart tool (Figure 11.22) whenever possible during editing. It lets you quickly access the Selector, Grabber, and Trimmer tools, and create fades, all from within a region. The Smart tool is very intuitive, and will save you time and reduce fatigue in your mousing hand.
Figure 11.22. The Smart tool in the Edit window.

Making Timeline Selections
When you make a Timeline selection, you select a range of time in a Timebase ruler. The current Timeline selection (as indicated by the Playback markers) always determines the range for playback and recording.
When Edit and Timeline selections are linked, edit selections are mirrored in the timeline. When Edit and Timeline selections are unlinked, however, you can make Timeline selections that are distinct from Edit selections.
To make a Timeline selection
• Drag with the Selector in any Timebase ruler (Figure 11.23).
Figure 11.23. A Timeline selection. To make a Timeline selection, drag with the Selector in any Timebase ruler.
![]()
All tracks in the session are highlighted within the selected range.
or
1. Place the cursor over the first Playback marker (down arrow).
The Grabber appears (Figure 11.24).
Figure 11.24. The Grabber appears when you place the cursor over any Playback marker.
![]()
2. Drag the first Playback marker to set the desired start point.
3. Drag the second Playback marker (up arrow) to set the desired end point (Figure 11.25).
Figure 11.25. Drag the second Playback marker to make a Timeline selection.
![]()
All tracks in the session are highlighted within the selected range.
To move a Timeline selection in the ruler
• Hold down Option (Macintosh) or Alt (Windows), and drag either Playback marker to the left or right.
The Timeline selection slides backward or forward along the timeline while the selection’s length is maintained.