
2. Software Basics
Now that you’ve connected your Pro Tools 7 LE hardware, you’re no doubt itching to lay down some tracks. But first, you’ll need to familiarize yourself with some Pro Tools 7 software basics and configure your system.
This chapter introduces you to the key elements of a Pro Tools 7 session, including session files audio files, tracks, waveforms, regions, playlists, channels, and I/O setup
You’ll also learn how to configure your Pro Tools 7 LE hardware and allocate your computer’s CPU resources for optimal performance.
Understanding Sessions
A Pro Tools session is the virtual workspace in which you record audio. Think of it as a recording studio inside your computer: It contains all the elements you need to record, edit, process, mix, master, manage, and store audio recordings.
Before you begin recording in Pro Tools 7, it’s a good idea to acquaint yourself with the following basic elements of a Pro Tools session.
What is a Session file?
When you start a new Pro Tools project, you create a new session file. A session file is the “control center” of a Pro Tools session: it maps and directs all the elements in a session, including audio files, MIDI data, edits and mix information (Figure 2.1).
Figure 2.1. A Pro Tools 7 LE session file (.ptf) icon.
![]()
Keep in mind that a session file is not an audio file (a session file contains no audio data). Rather, a session file is linked to audio files recorded into a session; and it contains data that tells Pro Tools how to manipulate these linked audio files.
You can edit a session and save it as a new session file. This lets you save multiple versions of a project, and easily back up your editing and mixing work. A session file is stored in a Session Folder.
About Session file format (.ptf) in Pro Tools 7
Session files in Pro Tools 7 have a new file format: ptf (Pro Tools File). Each session file name must end with the three-letter (.ptf) extension to be recognized properly. .ptf session files created in Pro Tools 7 are not compatible with earlier versions of Pro Tools software.
For more information on Pro Tools sessions, see Chapter 4: Starting a New Session.
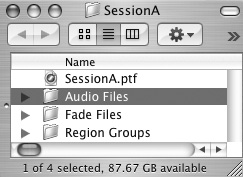
What is an audio file?
When you record audio into a Pro Tools session, it’s saved on your hard disk as an audio file (Figure 2.2). Audio files are stored in the Audio Files folder within the Session folder (Figure 2.3).
Figure 2.2. Audio file icons.
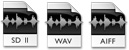
Figure 2.3. An Audio Files folder inside a Session folder.
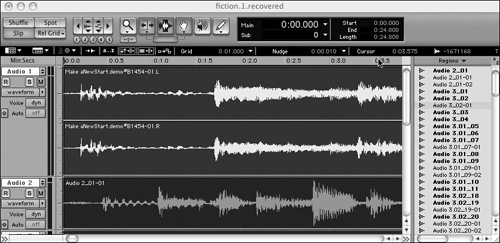
Audio files are listed in the Regions list and are displayed as waveforms on separate tracks within the Pro Tools Edit window (Figure 2.4).
Figure 2.4. Audio files are represented by waveforms. The Regions list (right side of Edit window) shows session audio files.
What is a MIDI file?
MIDI (Musical Instrument Digital Interface) is a data protocol that lets digital audio devices (such as keyboards, synthesizers, sound modules, samplers, sequencers, and computers) communicate with each other. MIDI is most often used to record and play parts performed on a keyboard to trigger sounds on a synthesizer.
When you record MIDI tracks in Pro Tools, your performance is stored in the Pro Tools session file. You can later play back the MIDI tracks and duplicate your performance exactly. You can also export MIDI tracks as Standard MIDI Format (SMF) files.
For more information on MIDI in Pro Tools 7, see Part VI: MIDI Sequencing.
What are tracks?
A Pro Tools track is where audio, MIDI, and automation data is recorded, displayed and edited. Tracks also let you route audio in and out (input and output) of your system from external audio sources; and tracks let you route audio to and from other tracks (internal busses).
Pro Tools 7 gives you five types of tracks: audio tracks, MIDI tracks, Instrument tracks, Auxiliary Inputs, and Master Faders.
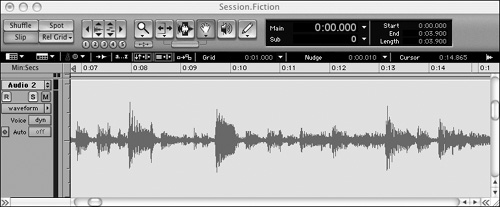
When you record audio into a session, it’s displayed as a waveform on an audio track in the Edit window (Figure 2.5). Audio tracks in Pro Tools LE can be mono or stereo. (Pro Tools HD systems also support multi-channel, surround-sound formats.)
Figure 2.5. An audio track in the Edit window.
Similarly, when you record MIDI into Pro Tools, the MIDI data is displayed on a MIDI track in the Edit window (Figure 2.6).
Figure 2.6. A MIDI track in the Edit window.

Instrument tracks integrate both MIDI and audio track capabilities into a single track (Figure 2.7). You can use Instrument tracks to record MIDI parts while monitoring a MIDI instrument’s audio output, which simplifies the MIDI recording process.
Figure 2.7. An Instrument track in the Mix window.

Auxiliary Input tracks are used for routing audio signals and for adding effects to other audio tracks (Figure 2.8). Auxiliary Inputs accept audio routed from internal busses and external audio sources.
Figure 2.8. An Auxiliary Input track in the Mix window.

Master Fader tracks route audio signals from (output) a session (Figure 2.9). Master faders let you adjust volume and pan, and add effects to audio output.
Figure 2.9. A Master Fader track in the Mix window.

For more information on tracks, see Chapter 5: Working with Tracks.
What are waveforms and regions?
Audio files are displayed as waveforms in the Pro Tools Edit window (Figure 2.10). A waveform is a graph of an audio signal’s sound pressure level (in decibels) versus time.
Figure 2.10. Audio waveforms in the Edit window.

A waveform’s appearance will vary depending on the audio source. Drums, for instance, will have sharp peaks and valleys that represent the sudden attack and decay of a drum hit (Figure 2.11). Instruments with softer attacks and longer decays, such as keyboards or vocals, will generally have smoother waveform shapes (Figure 2.12).
Figure 2.11. A waveform of a drum part. The sharp peaks and valleys indicate the fast attack and decay of a drum hit.
![]()
Figure 2.12. A waveform of a keyboard part. Its smooth shape indicates the slow attack and decay of a keyboard.
![]()
A region is a visual representation of audio file data (or MIDI data) stored on hard disc. Regions are displayed in tracks in the Edit window. They are also listed in the Edit window’s Regions list.
A region can be any length—from an entire audio file to a single verse, hook, bar, or note. You can create new regions by selecting a segment of a larger region in a track (Figure 2.13). The selected region points to that segment of the original audio or MIDI data on your hard disk. 7Once you create a region you can easily copy, loop, and arrange them in playlists to create new song structures (Figure 2.14).
Figure 2.13. A selected audio region. You can create smaller regions from larger ones.
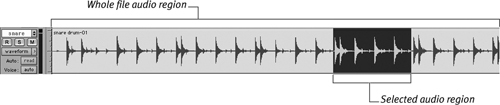
Figure 2.14. Use the Duplicate or Repeat command to copy an audio region multiple times and create a drum loop.
![]()
Audio regions are most frequently displayed in waveform view. Audio regions let you work freely with your recordings (play, edit, mix, process, automate) without fear of losing or damaging irreplaceable recordings.
For more information on waveforms and regions, see Chapter 5: Working with Tracks and Part IV: Editing Audio.
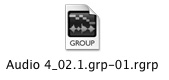
About Region Group file format (.rgrp) in Pro Tools 7
Pro Tools 7 also introduces a new Region Group file format: (.rgrp) (Figure 2.15). Region Group files store references to selected portions of audio or MIDI files. This lets you quickly import and export audio and MIDI tracks constructed from multiple source audio or MIDI files.
Figure 2.15. A Region Group file (.rgrp) icon.
For more information on Region Group files, see the Pro Tools Reference Guide.
What is a playlist?
A playlist is a group of regions arranged on a single audio or MIDI track. You can create several different playlists on a given track and use the Playlist Selector pop-up menu to choose which one to play (Figure 2.16). You can then easily switch between them on the fly during a mix.
Figure 2.16. The Playlist Selector pop-up menu.
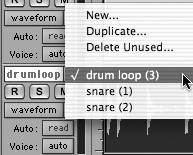
A playlist can include a single region or multiple regions. It can include the same sound, such as regions from a vocal or guitar part, or different sounds, such as individual sound effects.
• By using multiple playlists and switching between them, you can try alternate arrangements of material on a single track, instead of using up an additional track.
For more information on playlists, see Chapter 7: Recording and Playing Back Audio and Part IV: Editing Audio.
What is a channel?
The term channel has two separate but related meanings in Pro Tools. The first refers to the actual physical inputs and outputs of the Pro Tools system. For example, the Digi 002 and Digi 002 Rack both have 18 channels each of input and output (I/O). (See Chapter 1: Setting Up Your Pro Tools LE System.)
A channel also refers to a mixer strip in the Pro Tools Mix window, which is called a channel strip (Figure 2.17). Channel strips let you control the mix functions of a track, such as level, mute, pan, and sends. Channel strips will vary slightly depending on whether the track is an audio track, MIDI track, auxiliary input, or master fader.
Figure 2.17. An audio channel strip in the Mix window.

For more information on channels, see Chapter 3: The Mix and Edit Windows.
What is an I/O Setup?
The way that audio is routed in, out, and through a recording system is called a signal path. In Pro Tools you can create many different configurations of signal paths. Each configuration is called an I/O Setup.
The I/O Setup dialog box (Figure 2.18) lets you create I/O Setups. You can assign track inputs and outputs, inserts, and internal busses for routing to internal plug-ins or external hardware effects.
Figure 2.18. The I/O Setup dialog box.
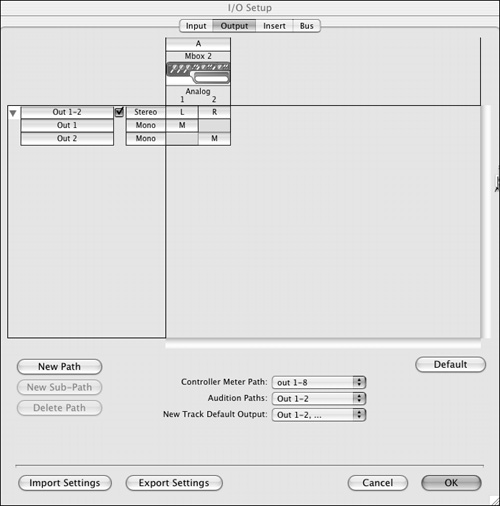
You can also export and import I/O Setup configurations as I/O Settings files. This lets you save your favorite I/O Setups and reuse them in future sessions.
• Pro Tools LE includes default I/O Setups, so you can quickly begin recording. For more information on I/O Setup, see Chapter 4: Starting a New Session.
Configuring Your Pro Tools 7 LE System
When you first launch Pro Tools LE, you’ll need to allocate your host computer’s CPU resources, and select Pro Tools LE hardware settings from within the program.
For information on launching Pro Tools LE, see the Getting Started Guide that comes with your Pro Tools LE system.
Allocating CPU resources
Pro Tools LE systems use the host computer’s CPU to process all audio recording, playback, mixing, and effects processing. The program provides the following adjustable parameters, which let you allocate your CPU’s resources for optimal performance of these tasks.
Hardware Buffer Size
The Hardware Buffer Size (H/W Buffer Size) determines the amount of hardware cache used for host processing tasks, including audio and MIDI track playback, mix automation, and RTAS plug-in processing. Higher buffer sizes allow for more audio processing and RTAS effects. Lower buffers decrease monitoring latency.
To set the Hardware Buffer Size
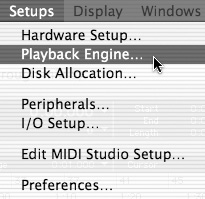
1. Choose Setup > Playback Engine (Figure 2.19).
Figure 2.19. Choose Playback Engine from the Setup menu.
The Playback Engine dialog box appears (Figure 2.20).
Figure 2.20. The Playback Engine dialog box.

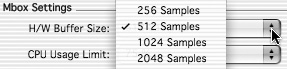
2. From the H/W Buffer Size pop-up menu, select the audio buffer size (in samples) (Figure 2.21).
Figure 2.21. Select an audio buffer size for host processing tasks from the H/W Buffer Size pop-up menu.
3. Click OK.
CPU Usage Limit
The CPU Usage Limit controls the percentage of CPU resources allocated to Pro Tools host processing tasks. Higher CPU Usage Limit settings reserve more processing power for Pro Tools and are useful for playing back large sessions or adding more RTAS effects.
To set the CPU Usage Limit
1. Choose Setup > Playback Engine.
The Playback Engine dialog box appears.
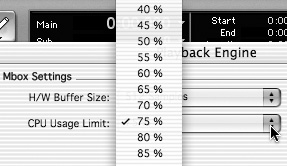
2. From the CPU Usage Limit pop-up menu, select the percentage of CPU processing you want to allocate to Pro Tools (Figure 2.22).
Figure 2.22. Select a percentage of CPU resources to allocate to host-processing tasks.
3. Click OK.
DAE Playback Buffer Size
Digidesign Audio Engine (DAE) is Digidesign’s real-time operating system for digital recording systems. Running in the background and directing traffic between Pro Tools and the computer’s CPU, DAE provides much of the digital recording, effects processing, mix automation, and MIDI functionality of Pro Tools.
The DAE Playback Buffer Size determines the amount of memory allocated within DAE to manage disk buffers. Smaller buffer sizes can improve playback and recording initiation speed, but performance can become unreliable on slower hard drives. Large buffer sizes will let you make more edits but may cause time lags to occur before playback or recording begins.
To set the DAE Playback Buffer Size
1. Choose Setup > Playback Engine.
The Playback Engine Dialog Box appears.
2. From the DAE Playback Buffer pop-up menu, select a playback buffer size (Figure 2.23).
Figure 2.23. Select a playback buffer size from the DAE Buffer Size pop-up menu.

3. Click OK.
Configuring system hardware
The Hardware Setup dialog box in the Setup menu lets you select your system’s default sample rate, clock source, and input format. (Input format options vary somewhat, depending on which Pro Tools LE hardware system you are using.)
Default Sample Rate
The Hardware Setup dialog box displays the current session’s sample rate. You cannot change the sample rate of an open session. The default sample rate setting is available in the Hardware Setup dialog box only when no session is open (after the Pro Tools application has been launched). The Default Sample Rate setting determines the selected sample rate when you open the New Session dialog box.
You can change this sample rate when you create a new session.
To change the default Sample Rate
1. Close the current session. If necessary, launch Pro Tools LE from the application icon. Make sure no session is open.
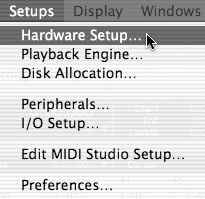
2. Choose Setup > Hardware (Figure 2.24).
Figure 2.24. Choose Hardware from the Setup menu.
The Hardware Setup Dialog box appears (Figure 2.25).
Figure 2.25. The Hardware Setup Dialog box.
3. From the Sample Rate pop-up menu, select a sample rate (Figure 2.26).
Figure 2.26. Choose the desired sample rate in the Mbox Hardware Setup dialog box.
![]()
4. Click OK.
Clock Source
The Hardware Setup dialog box lets you select a Clock Source for your system. When recording analog signal directly into Pro Tools, you’ll generally want to use Internal as the clock source.
When recording digital signal into Pro Tools from an external digital device, you’ll generally want use the external digital device as the clock source.
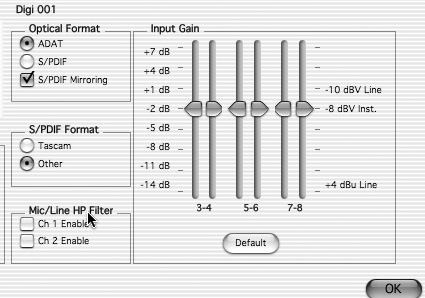
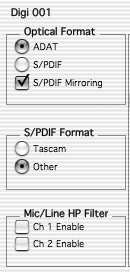
All Pro Tools LE hardware systems accept SPDIF/RCA external digital devices as the clock source. Additionally, Digi 002 and Digi 002 Rack accept ADAT Optical (or “Lightpipe”) and Optical S/PDIF external digital devices as the clock source.
To select the Clock Source
1. Choose Setup > Hardware.
The Hardware Setup dialog box appears.
2. From the Clock Source pop-up menu, select the desired clock source (Figure 2.27).
Figure 2.27. Select the desired clock source in the Clock Source pop-up menu. Use Internal when recording analog signal into Pro Tools.

3. Click OK.
Input Formats
The Hardware Setup dialog box lets you select the audio input format for your system. The input format options available in the Hardware Setup dialog box differ, depending on the Pro Tools LE system.
When recording from a digital source into Pro Tools, it is necessary to select the appropriate digital input format. The Digi 002 and Digi 002 Rack Hardware Setup dialog box lets you select ADAT optical, Optical SPDIF, and SPDIF/RCA (Figure 2.28). Selecting an input format is only necessary when connecting a digital input to these systems.
Figure 2.28. The Digi 002 and Digi 002 Rack Hardware Setup dialog box lets you set ADAT optical, Optical SPDIF, and SPDIF/RCA digital input formats.
If you’re an Mbox user, you’ll need to choose between analog or digital input formats. The Mbox Hardware Setup dialog box lets you set Input Channels 1–2 to Analog or SPDIF/RCA digital format.
To set the Input Format
1. Choose Setup > Hardware.
The Hardware Setup dialog box appears.
2. When recording from a digital source, select the desired digital input format (Digi 002, Digi 002 Rack).
or
In the Channel 1–2 Input box, select either analog or SPDIF/RCA digital format (Mbox) (Figure 2.29).
Figure 2.29. When using Mbox or Mbox 2, set Channel 1–2 inputs to either Analog or SPDIF/RCA digital input formats.

3. Click OK.
For more information on Input Formats, see the Getting Started Guide that came with your Pro Tools LE system.