
6. Getting Ready to Record
The instruments are plugged in, the microphones are turned on, and you’re ready to record. Well, almost. There are just a few more critical steps to take before you press the Record button. This chapter will take you through them.
We’ll start with a look at Pro Tools’ record modes: Non-destructive, Destructive, Loop, and QuickPunch. You’ll learn how to record-enable tracks, and how to set proper audio input and output levels.
Then we’ll discuss how to monitor audio in Pro Tools. We’ll cover monitor modes and show you some useful workarounds for minimizing monitoring latency.
We’ll finish with a look at Pro Tools’ features for allocating hard drives and generating a click track for your session.
Setting Record Modes
Pro Tools LE has four record modes; each provides a different method of recording audio to hard disk.
Non-destructive Record: This is the default record mode. When you record on a track with existing audio regions, the regions are protected and both old and new audio files remain on your hard drive. The files are available as regions from the Regions list.
In Non-destructive Record mode, you can select a record range within a track’s playlist, or you can input a start and stop time in the Transport window.
Destructive Record: In this mode, recording over existing regions permanently replaces the original audio. Although this mode can help you save hard disk space, it’s generally best to use Non-destructive Record mode, because it helps prevent you from accidentally erasing your recordings.
Loop Record: This mode lets you record multiple takes while the same section of audio repeats. It’s helpful when you want to quickly record multiple takes of a part without losing spontaneity. Loop Record mode is non-destructive. For more information on Loop Recording, see Chapter 7: Recording and Playing Back Audio.
QuickPunch: This mode lets you punch in (initiate recording) and punch out (stop recording) on a record-enabled audio track at any time during playback. See Chapter 7: Recording and Playing Back Audio.
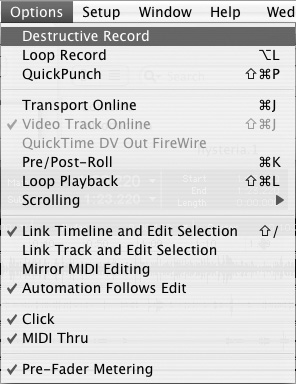
• Pro Tools is automatically set to Non-destructive Record mode. To enable Destructive Record, Loop Record, or QuickPunch mode, select the desired mode from the Options menu (Figure 6.1).
Figure 6.1. Choose a different record mode from the Options menu.
or
• Control-click (Macintosh) or right-click (Windows) the Record button in the Transport window to cycle among the four modes. The Record button displays a blank circle for Non-destructive, D for Destructive, a loop symbol for Loop Record, and P for QuickPunch mode (Figures 6.2 through 6.5).
Figure 6.2. The Record button displays the current record mode: a blank circle for Non-destructive...
![]()
Figure 6.3. D for Destructive...
![]()
Figure 6.4. A loop symbol for Loop Record...
![]()
Figure 6.5. ...and P for QuickPunch mode.
![]()
• If you want to set a record range by selecting within a track’s playlist, you must first link the Edit and Timeline selections. To do this, click the Link Selections button in the Edit window (Figure 6.6). For more information on linking Edit and Timeline selections, see Chapter 12: Working with Regions.
Figure 6.6. The Link Selections button in the Edit window.
![]()
Record-Enabling Tracks
Before you can record an audio or MIDI track, you must first record-enable it. This opens the track to audio or MIDI input. You can record-enable individual tracks or multiple tracks simultaneously. When you have record-enabled a track, you can then set appropriate audio input level and start recording.
To record-enable an audio or MIDI track
• In either the Mix or Edit window, click the track’s Record-Enable button (Figure 6.7).
Figure 6.7. Click a track’s Record-Enable button to prepare for recording.
![]()
To record-enable all audio or MIDI tracks
• Option-click (Macintosh) or Alt-click (Windows) the Record-Enable button on any audio or MIDI track.
To record-enable all selected tracks
• Shift-Option-click (Macintosh) or Shift-Alt-click (Windows) the Record-Enable button on any selected track.
• To select multiple tracks, Command-click (Macintosh) or Control-click (Windows) their track names.
• Record-enabling a track that belongs to a group does not record-enable other tracks in the group. To record-enable all tracks in a group, click to the left of the group name in the Groups list. This selects the group. Then Shift-Option-click (Macintosh) or Shift-Alt-click (Windows) the Record-Enable button on a selected track.
• If the Latch Record-Enable Buttons check box (Figure 6.8) in the Operation Preferences window is selected, you can record-enable multiple tracks simultaneously.
Figure 6.8. The Latch Record-Enable Buttons check box in the Operation Preferences window.
![]()
• If you want to record-enable only one track at a time, clear the Latch Record-Enable Buttons check box. Record-enabling a subsequent track will take a previously record-enabled track out of Record-Enable mode.
• Record Safe mode deactivates a track’s Record-enable button. The Record-enable button must be on for recording to occur on a track. Thus, Record-Safe mode prevents any recoding on that track. To put a track in Record Safe mode, Command-click (Macintosh) or Control-click (Windows) a track’s Record-Enable button (Figure 6.9). To put all tracks in Record Safe mode, Command-Option-click (Macintosh) or Control-Alt-click (Windows) the Record-Enable button on any track.
Figure 6.9. To put a track in Record Safe mode, Command-click (Macintosh) or Control-click (Windows) the track’s Record-Enable button.

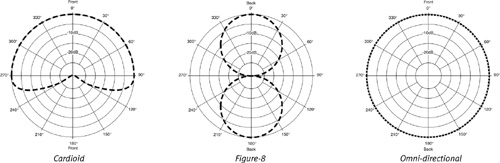
Figure 6.10. The three most common microphone polarity patterns are cardioid, figure-8, and omni-directional.
Setting Audio Input Levels
The mic pre-amps built into the Digi 002 and Digi 002 Rack (Mic/Line 1–4), Mbox 2 and Mbox (Mic/Line 1–2) interfaces have gain knobs, which let you boost and cut audio input levels.
Digi 002 has 4 additional line-level inputs (analog inputs 5–8). These inputs cannot be adjusted inside Pro Tools. To get proper input levels for these inputs you need to adjust the level output at the audio source.
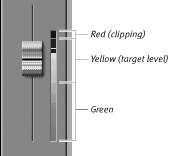
Set audio input levels to the loudest volume possible without clipping the signal. Ideally, a signal should top out in the yellow zone of a track’s level meter. An audio signal that enters the red zone is too loud and should be reduced to prevent clipping and digital distortion.
At the same time, make sure the signal isn’t too soft. If you have to boost it later, you may add unwanted noise to your track. For more information on clipping and distortion, see the What is Clipping? sidebar on this page.
To adjust the input level on the Digi 002 or Digi 002 Rack (Mic/Line inputs 1–4)
1. Connect an instrument or microphone to the input. (Apply phantom power to the mic by pressing the 48V switch on the Digi 002’s back panel, if required.)
2. Create an audio track by choosing Track > New, or press Shift-Command-N (Macintosh) or Shift-Control-N (Windows).
3. Assign a track input (Mic/Line 1–4) using the Input selector.
4. Click the track’s Record-Enable button.
Play the instrument or audio source at the same volume you’ll play it at when you record.
5. Adjust the input gain for the channel using the gain knob on the Digi 002’s front panel.
To adjust the input level on the Mbox 2 or Mbox (Mic/Line inputs 1–2)
1. Connect an instrument or microphone to the input. (Apply 48V phantom power to the mic, if required.)
2. Create an audio track by choosing Track > New.
3. Assign a track input (Mic/Line 1 or 2) using the Input selector.
4. Click the track’s Record-Enable button.
Play the instrument or audio source at the same volume you’ll play it at when you record.
5. Adjust the input gain for the channel using the gain knob on the front of the Mbox 2 or Mbox.
Increase or decrease the gain until you achieve the highest possible signal level without clipping (Figure 6.11). Ideally, the levels should top out in the yellow zone of the track’s level meter.
Figure 6.11. Ideally, your audio input levels should be in the yellow zone of the level meter.
For information on connecting external audio devices to your Pro Tools LE system, see Appendix A: Connecting Your Studio.
Monitoring Audio
Pro Tools offers two modes for monitoring audio input while recording.
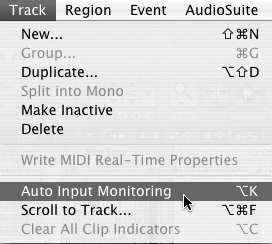
Auto Input Monitoring: This mode lets you monitor the playback of an existing track until a punch-in point is reached. At the punch-in point, the track is automatically record-enabled and monitoring switches to the audio input signal. When the punch-out point is reached, monitoring switches back to playback of the existing track. When this mode is enabled, the Record button in the Transport window is gray.
Input Only Monitoring: This mode monitors only the audio input of record-enabled tracks. When this mode is enabled, the Record button in the Transport window is green.
To enable Auto Input Monitoring
• Choose Track > Auto Input Monitoring (Figure 6.12).
Figure 6.12. To enable Auto Input Monitoring, choose Track > Auto Input Monitoring.
To enable Input Only Monitoring
• Choose Track > Input Only Monitoring.
Linking Record and Playback faders
Pro Tools remembers both Record and Playback fader levels for each audio track, so you can set different fader levels for each function. Linking the faders in the Preferences window keeps them from unexpectedly changing positions when you record-enable a track.
To link Record and Playback faders
1. Choose Setup > Preferences.
2. Click the Operation tab.
3. Select the Link Record And Play Faders check box (Figure 6.13).
Figure 6.13. The Link Record And Play Faders check box in the Operation Preferences window.
![]()
• To toggle between Auto Input Monitoring mode and Input Only Monitoring mode, press Option-K (Macintosh) or Alt-K (Windows).
Table 6.1. Decibel Levels of Common Sounds
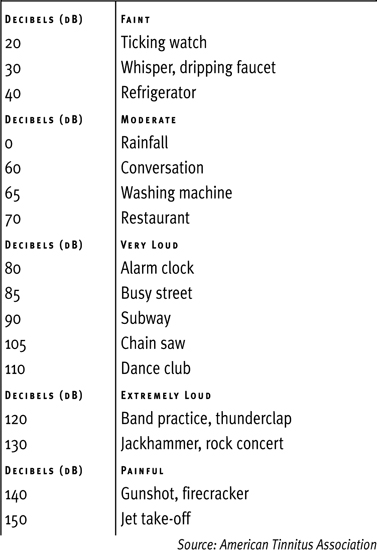
Sounds May Damage Your Hearing If
• The noise hurts your ears.
• It makes your ears ring.
• You’re slightly deaf for several hours after being exposed to the noise.
• You have to shout over background noise to make yourself heard.
Did You Know?
• The longer you’re exposed to a loud noise, the more damaging it may be.
• The closer you are to the source of intense noise, the more damaging it is.
• Stuffing cotton balls or wads of tissue paper into your ears is not adequate protection; it reduces noise by a mere 7 dB.
• Properly fitted musician’s earplugs or ear muffs reduce noise by 15 to 30 dB.
Source: American Tinnitus Association
Minimizing Monitoring Latency
The lag time between audio entering and leaving your recording system is known as latency. Pro Tools LE systems are susceptible to latency because of the heavy processing load placed on the host computer’s CPU.
You may experience latency during recording as a delay between when an audio signal is recorded and when it’s heard back in the monitors. Latency is, of course, disconcerting to performers, causing time problems, and in rare cases, insanity. Either way, it can mess up your session.
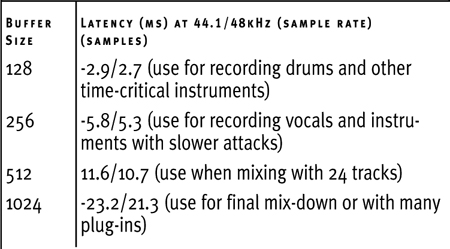
Fortunately, Pro Tools provides effective workarounds for latency. There’s a direct relationship between latency time and the Pro Tools LE hardware buffer size: The larger the buffer size, the larger the latency (Table 6.2). While you may want a larger buffer size to handle extra tracks or additional plug-ins, if you want to minimize latency, you’ll need to set a smaller buffer size.
Table 6.2. Hardware Buffer Size and Monitor Latency
To set the hardware buffer size
1. Choose Setup > Playback Engine.
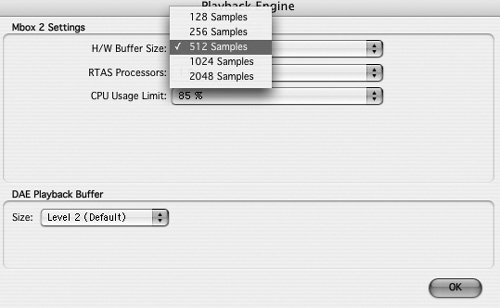
2. Choose the number of samples for the hardware buffer from the Hardware Buffer Size pop-up menu (Figure 6.14).
Figure 6.14. Set the hardware buffer size in the Playback Engine dialog box.
3. Click OK.
Using low latency monitoring (Digi 002 and Digi 002 Rack only)
Reducing the hardware buffer size will minimize latency, but it won’t eliminate it. For this reason, Digi 002 and Digi 002 Rack systems provide a low latency monitoring option. This lets you monitor audio at a latency of only 3.0 milliseconds, which is the time it takes for a signal to pass through your system’s D/A (digital to analog) and A/D (analog to digital) converters.
When using low latency monitoring, the following limitations apply:
• You can record only on a track with inputs set to an audio interface (not a bus).
• You can monitor only tracks assigned to outputs 1–2.
• All plug-ins and sends assigned to record-enabled tracks (routed to outputs 1–2) are automatically bypassed.
• Record-enabled tracks will not register on master fader level meters.
• When using the Bounce To Disk command, only audio tracks are included—auxiliary inputs are ignored.
1. Record-enable the audio track (or auxiliary input).
2. Assign each track to either output 1 or 2 using the Output selector.
3. Select Options > Low Latency Monitoring.
For more information on Low Latency Monitoring, see the Pro Tools Reference Guide.
About Zero Latency Monitoring (Mbox 2 and Mbox)
Mbox 2 and Mbox hardware interfaces include a Mix knob that lets you monitor your audio input signal without latency. The Mix knob lets you blend the analog audio input signal with the audio output signal leaving Pro Tools.
For more information on zero-latency monitoring see the Getting Started with Mbox 2 or Mbox Guide provided with your system.
Allocating Hard Drives
To enhance system performance, Pro Tools lets you record audio tracks simultaneously to different hard drives. You can automatically distribute audio to drives using the Round Robin feature in the Disk Allocation dialog box.
To allocate audio hard drives
1. Choose Setup > Disk Allocation.
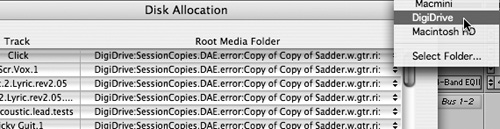
2. In the Disk Allocation dialog box, assign a hard drive for each track by clicking in the Root Media Folder column and selecting a volume in the Disk Allocation pop-up menu (Figure 6.15).
Figure 6.15. Assign a hard drive to each track by clicking the Root Media Folder column in the Disk Allocation dialog box.
A new Session folder is created on each hard drive.
3. To automatically distribute new audio tracks among system hard drives, select the Use Round Robin Allocation for New Tracks check box (Figure 6.16).
Figure 6.16. Select the Round Robin allocation check box to automatically distribute audio to multiple hard drives.
![]()
4. To save new audio files to an existing folder (without creating another new Session folder), select the Custom Allocation Options check box, click the Change button, and choose the folder.
To create subfolders in this folder, select the Create Subfolders for Audio, Video, and Fade Files check box.
5. Click OK.
• If you run out of space on an external hard drive, you can allocate recording to the system drive. Although Digidesign doesn’t generally recommend doing this, it can be a lifesaver in an emergency. To allocate recording to the system drive, select the Round Robin Allocation option in the Disk Allocation dialog box and click OK. Next, open the Workspace browser and set the Volume Designator for your system volume to Record (Figure 6.17). This lets you record and play back audio from the volume.
Figure 6.17. In the Workspace browser, set the Volume designator to Record if you want to record audio to your system volume.

• For more information on Workspace volume designation, see Chapter 9: Managing Audio Files with DigiBase or the Pro Tools Reference Guide.
Allocating Hard Drive Space
You can also allocate the amount of hard drive space used for recording on individual drives. By managing a drive’s recording space, you can prevent it from slowing down as it fills up with audio files.
To allocate a portion of your hard drive for recording
1. Choose Setup > Preferences.
2. Click the Operation tab.
3. In the Open Ended Record Allocation section, select the Limit To check box and enter a number of minutes to allocate (Figure 6.18).
Figure 6.18. Use the Open Ended Record Allocation option to limit a disk’s audio recording.

4. Click Done.
Recording Audio with the Click Plug-in
No matter how musically proficient you are, recording to a click track is a good idea. A click track provides an absolute time reference, which can help you produce takes with a steadier feel. It can also help you keep your tracks properly aligned later on when you’re overdubbing, editing, and mixing.
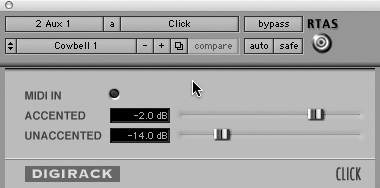
Pro Tools provides a MIDI-based Click plug-in (Figure 6.19), which generates an audio click track during a session. You can set the Click plug-in to a tempo and meter of your choice. Because the Click plug-in receives its tempo and meter data from the current session, if your session contains tempo and meter changes, the click will follow those changes accordingly. The Click plug-in lets you choose from several different preset click sounds.
Figure 6.19. The Click plug-in window.
To use the Click plug-in
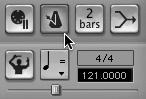
1. In the MIDI controls panel of the Transport Window, click the Metronome Click button to enable the Click option (Figure 6.20).
Figure 6.20. In the MIDI controls panel of the Transport Window, click the Metronome Click button.
2. Create a mono auxiliary input and insert the click plug-in.
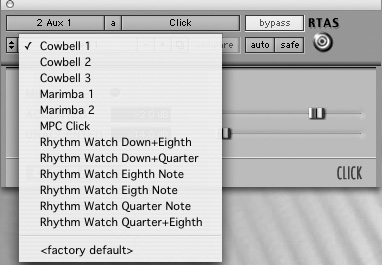
3. From the Click plug-in settings pop-up menu, select a click sound preset (Figure 6.21).
Figure 6.21. From the Click plug-in settings pop-up menu, select a click sound preset.
4. Choose Setup > Click.
or
Double-click the Metronome Click button or Countoff button in the Transport window (Figure 6.22).
Figure 6.22. Double-click the Countoff button to open the Click/Countoff Options dialog box.
![]()
The Click/Countoff Options dialog box appears (Figure 6.23).
Figure 6.23. The Click/Countoff Options dialog box.
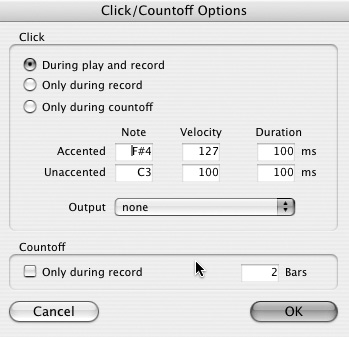
5. Select Click and Countoff options as desired.
6. Begin Playback. A click is generated according to the Click/Countoff option settings and the current tempo and meter of the session.
Setting Click tempo and meter
The click plug-in follows the tempo and meter information displayed in the Tempo and Meter rulers at the top of the Edit window (Figure 6.24). When you open a new session, the Click plug-in automatically defaults to a tempo of 120 beats per minute (BPM) and a meter of 4/4 (4 beats per measure). You can, however, set the default click tempo and meter of your session as desired.
Figure 6.24. Tempo and Meter rulers in the Edit window.
![]()
To set the default tempo
1. Click the Tempo Ruler Enable button (Conductor) in the Transport window.
2. Double-click the Song Start Marker in the Edit window (Figure 6.25).
Figure 6.25. Double-click the Song Start Marker in the Edit window.
![]()
The Tempo Change window appears (Figure 6.26).
Figure 6.26. The Tempo Change window.
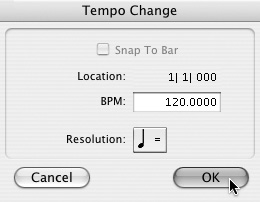
3. Enter the desired BPM for the session.
4. Set Location to 1|1|000. This replaces the current default tempo with the new default tempo.
5. Set Resolution to the note value you want the tempo based on. The default note value is quarter note.
6. Click Apply to set the new tempo.
Using Manual Tempo Mode
In Manual Tempo mode, Pro Tools ignores events in the Tempo Track ruler and instead plays back at the tempo displayed in the Transport window. You can set the manual tempo with the tempo slider or by tapping in the tempo on the keyboard.
1. Click the Tempo Enable button (Conductor) in the Transport window to disable the Tempo Ruler.
The Tempo Enable button becomes unhighlighted and Manual Tempo mode is enabled.
2. Drag the tempo slider to set a manual tempo in the tempo field (Figure 6.27).
Figure 6.27. Set the manual tempo with the tempo slider or with the Tap button.
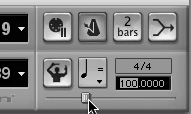
or
Click in the Tempo field until it is highlighted and press or tap “T” on your keyboard repeatedly for the tempo desired.
Pro Tools calculates the tempo from the last eight taps (or fewer).
To set the default meter
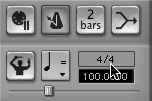
1. Double-click the Current Meter button in the Transport window (Figure 6.28).
Figure 6.28. Double-click the Current Meter button in the Transport window.
The Meter Change window appears (Figure 6.29).
Figure 6.29. The Meter Change window.
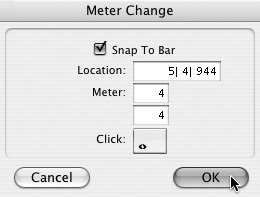
2. Enter the desired meter for the session.
3. Set the Location to 1|1|000. This replaces the current default meter with the new default meter.
4. Set the Click note value to the desired number of clicks per measure. The default note value is quarter note.
5. Click Apply to set the new meter.
For additional information on tempo and meter see Using Rulers, Chapter 10: Editing Basics. For information on generating a click track from a MIDI device, see Chapter 18: Recording MIDI.