
19. Editing MIDI
If you’re new to MIDI sequencing, Pro Tools MIDI may be all you’ll ever need. If you’re an experienced sequencing geek accustomed to another application, you’ll still find a lot to work with in Pro Tools. Pro Tools 7 adds the ability to mirror MIDI edits in copied or looped MIDI regions and to edit a number of MIDI properties during playback.
In this chapter, you’ll learn to edit MIDI to correct mistakes made with previously recorded MIDI tracks and to enter new tracks from scratch. We’ll show you how to enter MIDI data manually and transform it directly in the Edit window. We’ll also explore how the MIDI Operations tools can automatically edit MIDI data. Finally, we’ll look at the MIDI Event List, which offers the deepest level of MIDI control in Pro Tools.
MIDI Regions
When you edit audio in Pro Tools, you must often create regions or move regions within a session. Editing MIDI also requires the use of regions. You can string MIDI regions together to form a playlist, just as you can when working with audio.
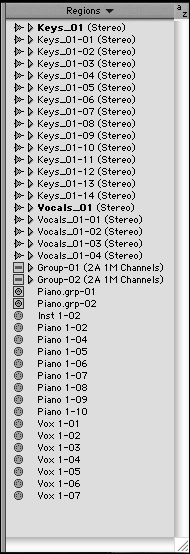
MIDI regions are displayed in the Regions list (Figure 19.1) along with audio regions and region groups. You can use this list to add regions to a session, as well as move and rename them.
Figure 19.1. MIDI regions appear in the Regions list along with audio regions and region groups.
To add a MIDI region to a MIDI track
1. In the Regions list, select the MIDI region you want to add to the session.
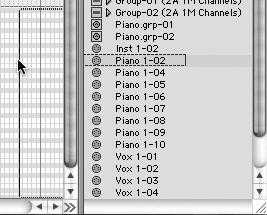
2. Drag the region to the track where you want to play it (Figure 19.2).
Figure 19.2. Drag a region from the Regions list to a MIDI track.
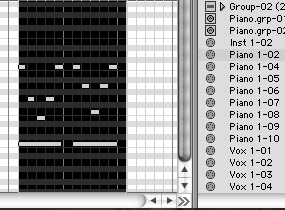
The region is now visible and will play back at this location (Figure 19.3).
Figure 19.3. The MIDI region after it has been placed on the track.
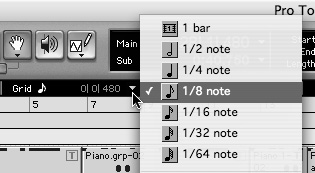
• Many MIDI editing processes, including simple ones like moving regions, are most easily done in Grid mode. The Grid value, which determines the meter or time division to which edits will snap, affects how these editing processes behave. The Grid value is displayed at the top of the Edit window (Figure 19.4). Most grid-based editing for MIDI is best done in Bars & Beats mode to coincide with the musical performance.
Figure 19.4. Clicking the arrow in the Grid Value field opens a pop-up menu, where you can set the Grid value.
Views for Editing MIDI
Pro Tools gives you many ways to view MIDI data. We’ll cover a number of them in this chapter, but two views—the Regions view and the Notes view—merit special attention, since they do much more than just change the way a track looks.
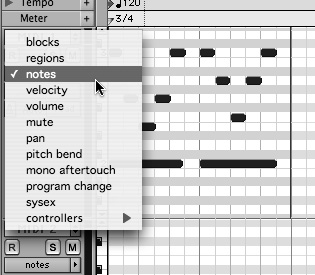
Use the Track View pop-up menu in the Edit window (Figure 19.5) to select how you want to view a MIDI track.
Figure 19.5. The Track View pop-up menu for a MIDI track. The Track view determines what’s displayed in a MIDI track in the Edit window.
Regions view
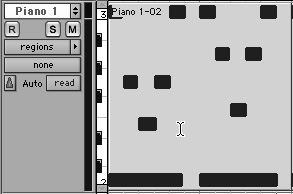
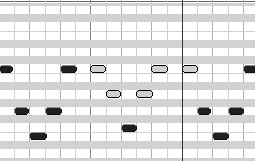
In Regions view, the MIDI region displays notes on a colored background (Figure 19.6). You can’t edit single notes in Regions view; instead, regions are moved as a unit. Edits also automatically move MIDI data like MIDI controllers, sysex, and program changes. Use Regions view to move chunks of notes and data, for example, to copy a bar or group of bars to another place in a session.
Figure 19.6. A MIDI track in Regions view.
The starting point of a MIDI note is important in Regions view. If a note starts before the region starts, it will not be included in cut, copy, and paste edits. This is true even if the note extends into the region. If a note starts in a region and extends outside of it, it will be included in cut, copy, and paste edits.
Notes view
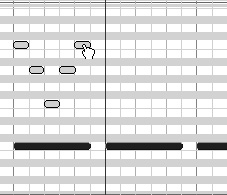
The MIDI track shown in Figure 19.6 looks a bit different in Notes view (Figure 19.7). Here, you can add individual notes with the Pencil tool or move them with the Grabber tool. Notes view also lets you edit a group of notes or single notes for duration and timing.
Figure 19.7. The same MIDI track in Notes view.
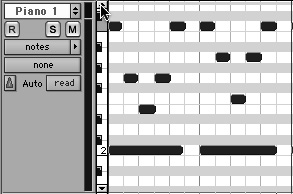
Notes view is best for detailed editing of notes or other MIDI data. Use it to perform tasks like delete a bad note in a performance, copy just the snare part of a track to another measure, or draw a filter cutoff curve for a synthesizer patch.
For more information on MIDI track views, see the Pro Tools Reference Guide.
Mirrored MIDI Editing
Pro Tools 7 offers the option to use Mirrored MIDI Editing, which applies edits to all copies of a MIDI region with the same region name. If you are working with looped MIDI regions, you can use this option to edit one region and all other instances of the region in the session will update accordingly. If you are working with copies of a region and want your edits to apply to the current copy only, you should turn off Mirrored MIDI Editing.
To turn on Mirrored MIDI Editing
• Select Options > Mirror MIDI Editing.
or
• Click the Mirrored MIDI Editing button in the upper left area of the Edit window (Figure 19.8).
Figure 19.8. The Mirrored MIDI Editing button.
![]()
When Mirrored MIDI Editing is on, the Mirrored MIDI Editing button flashes when any edit applies to more than one region in the session.
MIDI Playlists
Pro Tools derives a significant part of its audio editing power from the concept of a playlist. Quite sensibly, Pro Tools’ MIDI implementation borrows extensively from this tool to manage MIDI parts and session arrangements.
Edits to MIDI data are not permanent until you choose to make them so. Original performances can always be restored until you feel confident that your edits are final. Then the new Flatten Performance command lets you lock the current state of selected MIDI notes.
To work on a copy of a playlist
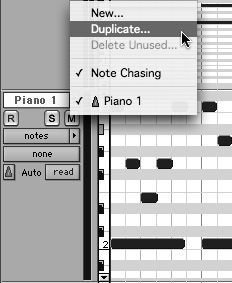
1. Click the Playlist selector to open its pop-up menu.
2. From the pop-up menu, select Duplicate (Figure 19.9).
Figure 19.9. Select Duplicate from the Playlist selector pop-up menu.
A dialog box opens.
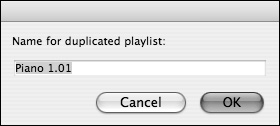
3. Enter a name for the new playlist and click OK (Figure 19.10).
Figure 19.10. Enter a name for the new MIDI playlist.
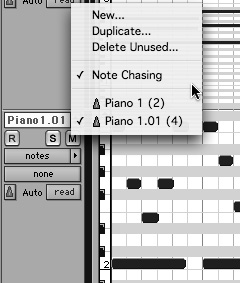
The new playlist is automatically chosen in the track’s Playlist selector (Figure 19.11).
Figure 19.11. The new playlist is automatically chosen in the Playlist selector.
You can do more with playlists than create copies of MIDI regions. All of the great things that you can do with audio playlists, such as try out different edits and arrangements and automation on a track, can also be done with MIDI playlists.
Pro Tools has a Restore Performance function, which lets you return to an original MIDI-based performance at any time. Working in this non-destructive manner, you can experiment unhindered with the assurance that you can always recover from adjustments made during the course of your project. Of course, if you’ve settled on changes, the Flatten Performance feature solidifies your edits and gives you a new, permanent basis from which to proceed. Once flattened, a MIDI performance can no longer be restored to its original state.
Entering and Deleting MIDI Notes Manually
Now that you’ve made a copy of your MIDI data, you can begin editing your MIDI track.
MIDI notes are usually recorded into Pro Tools via an instrument. If you miss or botch a note, however, it’s often easier to manually enter the missed note or delete the mistake than it is to replay it on an instrument.
To enter a MIDI note manually
1. If you’re not in Notes view, select Notes from the Track View selector, as previously explained.
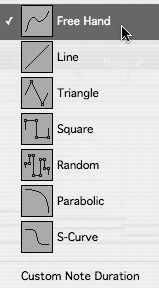
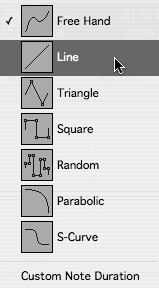
2. Click the Pencil tool to display the pop-up menu, and select Free Hand (Figure 19.12).
Figure 19.12. The Pencil tool pop-up menu.
3. If necessary, zoom in to find the location on the track where you want to enter the note.
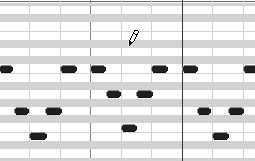
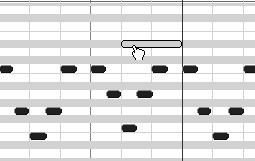
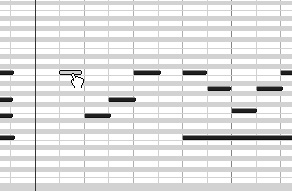
4. With the Pencil tool, click the location where you want to add a note (Figure 19.13).
Figure 19.13. Clicking in a track with the Pencil tool adds a note at that location.
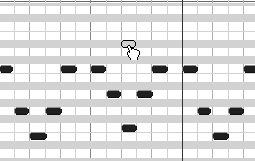
Pro Tools adds a new note at that location (Figure 19.14).
Figure 19.14. The new note is added, and the Pencil tool becomes the Grabber.
• The Pencil tool allows you to trim MIDI notes and controller data. The Pencil tool has a Custom Note Duration command, which lets you define the note duration for inserting notes manually.
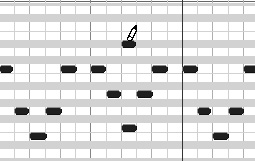
• The Grid value determines the location and duration of a manually entered MIDI note. The preceding example uses a Grid value of a quarter note; clicking on the track adds a quarter note at that location. If you set the Grid value to a sixteenth note, the Pencil tool will add a sixteenth note instead (Figure 19.15).
Figure 19.15. Clicking on the same location with the Pencil tool but with a different Grid value will enter a note of a different length.
• The Pencil tool’s various modes enter notes differently. See the Pro Tools Reference Guide for more information.
To delete a single MIDI note manually
1. Be sure you’re in Notes view.
2. Select the Pencil tool.
3. Press and hold Option (Macintosh) or Alt (Windows) and position the Pencil tool over the note you want to delete.
The Pencil turns upside down to indicate that it will erase notes.
4. Click with the upside-down Pencil tool to delete the note (Figure 19.16).
Figure 19.16. Press and hold Option (Macintosh) or Alt (Windows) and click with the Pencil tool to delete a single MIDI note.
To delete a multiple MIDI notes manually
1. Be sure you’re in Notes view.
2. Select the Grabber tool.
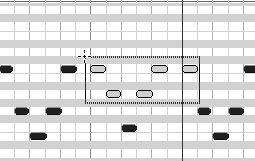
3. Drag the Grabber over an area of the track to select all the notes in that area (Figure 19.17).
Figure 19.17. The Grabber tool drags over a group of MIDI notes.
4. The selected notes are highlighted: Instead of appearing as a solid color, they are white with a colored outline (Figure 19.18).
Figure 19.18. The selected notes are highlighted, whereas the unselected notes are still solid.
5. Press the Delete or Backspace key to remove the selected notes.
Editing MIDI Notes Manually
You can use the Grabber tool to manually move, copy, and transpose MIDI notes. This is an easy way to fix minor timing problems or to copy notes to other parts of a session.
To copy MIDI notes manually
1. If you’re not in Notes view, select Notes from the Track View selector.
2. Using the Grabber tool, drag over an area of the track to select the notes to be copied.
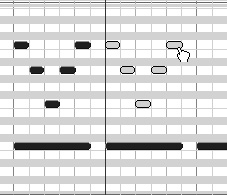
3. Position the Grabber tool over any of the selected notes (Figure 19.19).
Figure 19.19. The Grabber tool is positioned to copy five notes. Dragging any individual note copies all selected notes.
4. While pressing Shift-Option (Macintosh) or Shift-Ctrl (Windows), drag the MIDI notes to the new location.
The Shift key keeps MIDI notes from changing pitch when you move them (more on this soon). The Option or Ctrl key copies the notes.
The notes are copied and selected (Figure 19.20).
Figure 19.20. The copied notes (right) are selected after the edit is completed.
• The preceding example was done in Slip mode. If the example was done in Grid mode with a half-note Grid value, the copied notes would snap to the nearest half note.
• To move notes without transposing them, press Shift while dragging them to the new desired location.
Editing MIDI Velocity
MIDI supports a wide variety of performance parameters. In addition to pitch and note duration, MIDI can transmit information like breath control for wind instruments; aftertouch, which simulates how much pressure is applied to a key after it’s struck; and whether a keyboard’s sustain pedal is pressed.
Another common MIDI parameter is note velocity. Although velocity can be used to modulate a wide range of parameters in a synthesizer, it’s most often used as a volume control for individual notes. Editing velocity is a good example of how MIDI parameters other than pitch and duration work in Pro Tools.
To edit MIDI velocity for a note
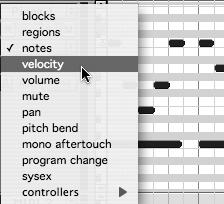
1. Click the Track View selector.
From its pop-up menu, choose velocity (Figure 19.21).
Figure 19.21. Choose velocity from the MIDI Track View selector pop-up menu.
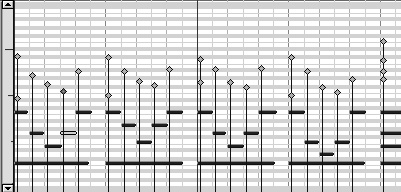
2. Pro Tools displays the velocity of each note as a stalk. A diamond atop each stalk does double duty: It represents the velocity value for that note and acts as a handle that you can drag to edit the value (Figure 19.22).
Figure 19.22. Notes and their velocity stalks. Taller stalks mean higher velocity, so the notes with the tallest stalks were struck the hardest.
3. Using the Grabber tool, click the diamond atop any of the velocity stalks.
The stalk is selected and the diamond turns blue (Figure 19.23).
Figure 19.23. Using the Grabber tool, click the diamond atop the velocity stalk.
4. Drag the stalk to the desired velocity level (Figure 19.24).
Figure 19.24. The same stalk after its velocity has been reduced with the Grabber tool.
• To edit multiple velocity stalks simultaneously, select a group of MIDI notes with the Grabber tool. All of the notes’ velocity stalks will be selected. Dragging any individual stalk will modify all of them.
Editing velocity with the Pencil tool
When working with audio, the Pencil tool lets you perform extremely precise, sample-level edits. The Pencil tool is also useful for performing many types of automated MIDI edits, including velocity edits.
Let’s use the Pencil tool to draw velocity for multiple notes—in this case, a volume swell.
To edit MIDI velocity with the Pencil tool
1. Click the Track View selector.
Select Velocity for the track you want to edit.
2. Velocity stalks appear for each note.
3. Click and hold the Pencil tool selector to view the pop-up menu.
Select the Line tool from the pop-up menu (Figure 19.25).
Figure 19.25. Select the Line tool from the Pencil tool pop-up menu.
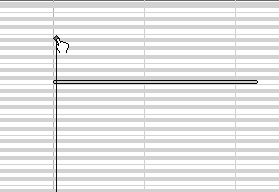
4. On the MIDI track showing the velocity stalks, click a low velocity, and then drag to a higher velocity later in the track (Figure 19.26).
Figure 19.26. Use the Pencil tool in Line mode to draw velocity for multiple notes.
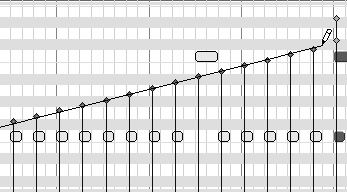
5. Release the mouse at the location where you want the velocity to reach its highest value.
• You can use the Trimmer tool to trim MIDI note duration on MIDI tracks set to Velocity view.
• The Pencil Line tool is probably most often used to draw a velocity swell for a sixteenth-note snare fill in a dance tune. You can also use it to fade sounds in and out or to gently modify the volume of part of a drum track.
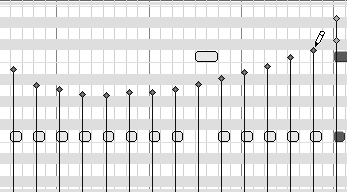
• Other tools also work well with velocity. For example, the Pencil tool in Free Hand mode makes it easy to draw the velocity curve in Figure 19.27.
Figure 19.27. The Pencil tool in Free Hand mode lets you draw a softer velocity curve.
Editing MIDI Controller Data
MIDI’s designers were smart enough to realize that synthesizers would use more than one kind of data to make sounds. Many parameters were predefined as MIDI Continuous Controllers (CCs), and nearly all devices adhere to the MIDI specification for defining controllers. For example, the Mod Wheel on a keyboard sends CC 1.
Pro Tools records CC information along with MIDI notes. Once CC data is on a MIDI track, you can edit it with the same tools used to edit velocity. In addition, you can enter completely new CC data with the Pencil tool.
In this example, you’ll enter a curve for CC 1 on a keyboard part. One use for this would be if CC 1 on the synthesizer were set to change the cutoff point of a filter or the feedback on a delay.
To edit CC data with the Pencil tool
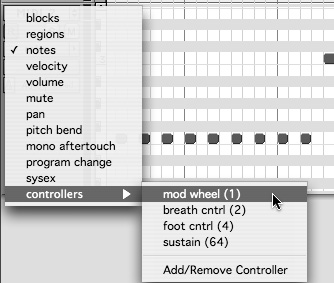
1. Click the Track View selector, and select Controllers > Mod Wheel (1) (Figure 19.28).
Figure 19.28. Select the Mod Wheel for editing in the Track View selector.
2. Click and hold the Pencil tool to open the pop-up menu.
3. Select Free Hand mode (Figure 19.29).
Figure 19.29. Use the Pencil tool in Free Hand mode to custom-draw controller curves.

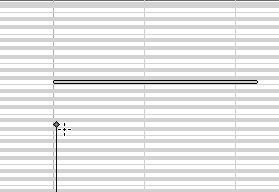
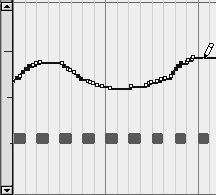
4. Click and draw on the track to enter the CC data.
The closer you draw to the top of the track, the higher the CC value will be.
When you’ve finished, Pro Tools creates breakpoints for the curve that you’ve just drawn (Figure 19.30). Breakpoints mark changes in MIDI data and can be grabbed for further editing.
Figure 19.30. Pro Tools creates breakpoints for the curve drawn with the Pencil tool.
The Pencil tool’s other modes make drawing certain common shapes much easier.
To edit MIDI with other Pencil modes
1. Click the Track View selector and select CC 1, as explained previously.
2. In the Pencil tool pop-up menu, select a different mode.
For this example, select the Triangle mode.
3. Click in the track at the point where you want the center of the controller data to be.
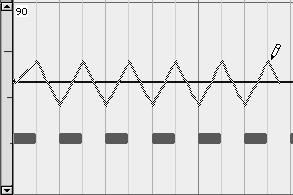
4. Drag to horizontally define the number of bars and beats where you want to enter the CC data (Figure 19.31).
Figure 19.31. Drag with the Pencil tool in Triangle mode.
In this case, click on the leftmost corner of the track and drag to the right.
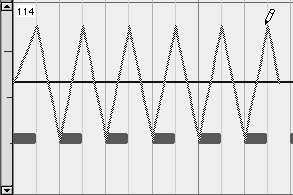
5. Drag vertically to increase or decrease the degree of change that the Triangle mode creates (Figure 19.32).
Figure 19.32. Dragging vertically increases the depth of the triangle.
6. Release the mouse when the CC data appears as you want it.
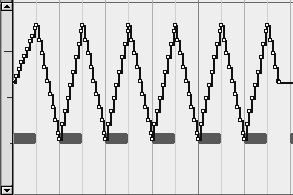
Pro Tools draws the correct breakpoints (Figure 19.33).
Figure 19.33. Pro Tools draws the breakpoints after you drag in Triangle mode.
• The Grid value is very important for entering CC data with the Pencil tool and its various modes. The Triangle and Square modes, for example, change the density of their shape according to the Grid value.
• Since there’s a Square wave and a Sawtooth wave Pencil tool, MIDI geeks may wonder where the Sine Pencil tool is. There isn’t one—you’ll have to draw carefully in Free Hand mode or enter data with something like the Mod Wheel on a keyboard.
• To get more mileage out of your MIDI-aware digital effects box, learn its MIDI parameters and modulate them with CC messages. You can vary sounds from subtle to dramatic by creating controller data with the Pencil tool in Square and Triangle wave mode, and then having that data modulate parameters like delay feedback, filter frequencies, EQ settings, and reverb. In Grid mode, you can even use these tools to automatically create tempo-synchronized modulations.
• These examples only scratch the surface of what you can do with CC editing. See the Pro Tools Reference Guide for more information.
Using Pro Tools MIDI Operations
Most of the editing you’ve done so far has been fairly simple manual additions, deletions, or modifications to MIDI data. Pro Tools can also automatically perform more complex edits on MIDI data via MIDI operations. These functions, located in the MIDI Operations window, modify data offline. In other words, after you select a group of MIDI notes (or an entire track), Pro Tools modifies parameters such as timing, note length, and pitch for the entire selection or track. The MIDI Operations window floats over other Pro Tools windows, which helps make MIDI recording and editing faster and more efficient.
Covering all the ways you can use MIDI Operations is beyond the scope of this book, but some basic rules apply. We’ll use a common MIDI operation called quantizing to show how MIDI operations work in Pro Tools. Quantizing is the process of automatically changing the timing of a group of MIDI notes. You can use it to either tighten up the timing of sloppy playing or to add a certain rhythmic feel to notes that were not played as desired.
1. Select the notes that you want to quantize.
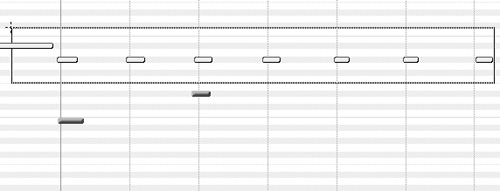
In this example, you’ll tighten up the timing of the hi hats in a drum part. By zooming in closely and setting the Grid value to eighth notes, you can see that the hi hats vary quite a bit. Use the Grabber tool to select only the hi hat (Figure 19.34).
Figure 19.34. The hi hat notes selected on an eighth-note grid. Note that the kick and snare notes are not selected and will not be quantized.
2. Select Event > MIDI > Grid/Groove Quantize.
The MIDI Operations dialog box opens; Grid/Groove Quantize is already selected (Figure 19.35).
Figure 19.35. The MIDI Operations dialog box with Quantize selected.
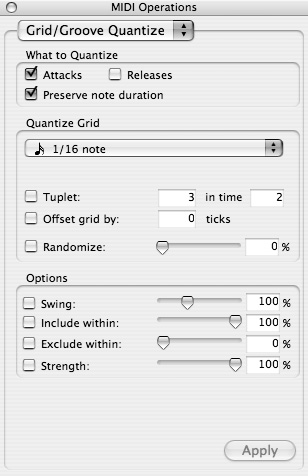
3. For this example, accept most of the default Quantize parameters (Figure 19.36):
Leave Attacks checked, because you want to quantize according to the start of the notes.
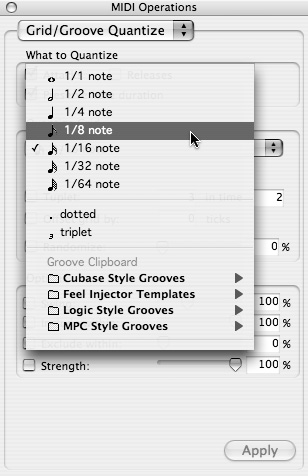
Figure 19.36. Choosing 1/8 note will snap the selected notes to an eighth-note grid.
Leave “Preserve note duration” checked. This will keep the note length as is.
Choose 1/8 note (eighth note) from the pop-up menu to set quantizing on an eighth-note grid.
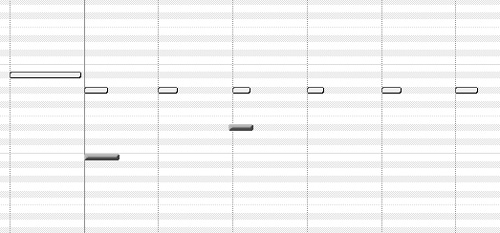
Pro Tools moves the selected notes to the nearest eighth note (Figure 19.37).
Figure 19.37. The hi hat notes have all been moved to fall exactly on an eighth note, but the kick and snare remain unchanged.
MIDI Operations use the same methods to transpose, change velocity, shorten or lengthen, split, and select MIDI notes. See the Pro Tools Reference Guide for more information about editing with MIDI Operations.
• Quantizing affects only the selected notes; other notes on the track remain unchanged. This is helpful for changing the timing on only one part of a drum track.
• Quantizing can make a part sound extremely exact and robotic. Sometimes this is the desired effect, but if it’s not, you can modify both the degree to which a note is quantized and the rules that are used to select notes for quantizing. See the Pro Tools Reference Guide for more information.
• Pro Tools allows numerous different Groove Quantize models (Figure 19.38). This allows any performance to be modeled after rhythm templates that have been created by other programs, such as Logic Audio or Cubase, or after the MPC drum machine patterns.
Figure 19.38. Groove Quantize options in the MIDI Operations window.
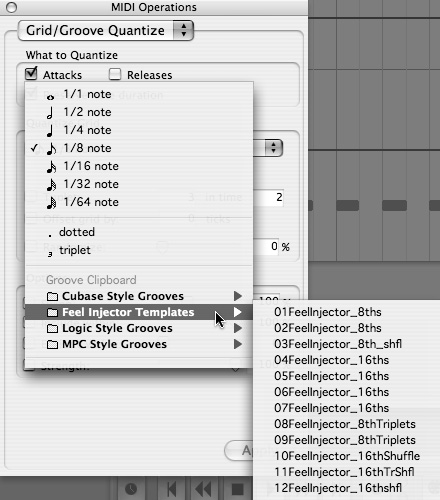
Another option unique to Pro Tools is Digidesign’s Feel Injector templates. These various groove quantizers add feel to shuffle, swing, and straight quantization, making for much less robotic-like quantizations of your performance.
Using MIDI Real-Time Properties
Pro Tools 7 lets you edit certain properties of MIDI data and audition their effects in real time during playback. This feature makes it easy to try out changes while playing through or looping a passage but without committing the edits. You can then choose whether you want to apply the real-time changes to the MIDI data after auditioning them.
These MIDI Real-Time Properties can be enabled for editing on an entire track or on individual selections or regions using the Real-Time Properties window. The Real-Time Properties window is another floating window that helps speed up MIDI editing.
We’ll show one of the uses of MIDI Real-Time Properties with MIDI Velocity as an example. Other MIDI properties that can be adjusted in real time include quantization, duration, delay, and transposition.
To audition MIDI Real-Time Properties for velocity
1. Select a MIDI or instrument track whose MIDI velocity you want to adjust in real time.
or
Select a region in a MIDI or instrument track where you want to adjust MIDI velocity in real time.
2. Select Event > MIDI Real-Time Properties.
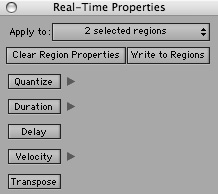
The Real-Time Properties window appears (Figure 19.39).
Figure 19.39. The Real-Time Properties window.
3. Click the Velocity button to activate Velocity Real-Time Properties.
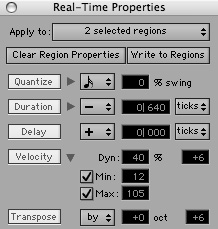
4. Click the triangle next to Velocity to display the expanded Velocity settings (Figure 19.40).
Figure 19.40. Expanded Velocity settings in the Real-Time Properties window.
5. Start playback.
6. Enter values in the value fields and press Return (Macintosh) or Enter (Windows) to change MIDI velocity by doing any of these:
Enter a percentage in the Dynamics field to adjust velocities relative to a median value of 64.
Enter a value to add or subtract a fixed amount to velocities.
Enter minimum or maximum value for velocities.
7. Click the Velocity button on and off to audition the effect of the change in Real-Time Properties.
8. When you have arrived at the sound you want, click the Write to Regions or Write to Track button in the Real-Time Properties window.
• If you are working with regions in a track, you can enable Loop Playback to audition changes to Real-Time Properties while the selected regions are looping.
• Before they are applied, changes in MIDI Real-Time Properties are heard during playback, but by default they are not shown in the MIDI data in the Edit window. You can enable the “Display Events As Modified by Real-Time Properties” option in the MIDI Preferences to update the display of MIDI data to reflect real-time changes.
The MIDI Event List
The MIDI Event List displays every last bit of MIDI data for a selected region or track, letting you view and edit nearly any MIDI event in a session. Although it may not be the easiest or most intuitive MIDI feature, it can’t be beat for precision and control.
The following example inserts a program change message at a particular point in a song to change the drum loop from mono under the verse to stereo for the chorus. The sampler is set so that patch 10 has a kit mixed to mono, and patch 11 is the same kit mixed to stereo. You can use the Event list to change the patch in the sampler at precisely the right time.
To send a patch change with the MIDI Event List
1. In the Track View selector for the MIDI track, select Notes view.
2. Find the location in the track where you want to send the patch change.
For this example, send the change at bar 21, beat 1.
3. With the Grabber tool, select the first note in this bar (Figure 19.41).
Figure 19.41. With the Grabber tool, select the first note in the bar.
4. Select Event > MIDI Event List.
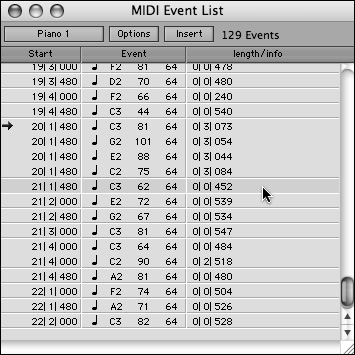
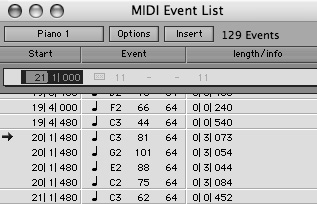
The MIDI Event List window opens. The selected note is highlighted, and an arrow next to the nearest MIDI event indicates the cursor position (Figure 19.42).
Figure 19.42. The selected note is highlighted in the MIDI Event List; the arrow indicates the cursor’s location.
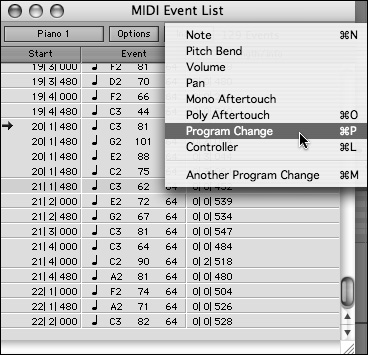
5. On the Insert menu, select Program Change (Figure 19.43).
Figure 19.43. Use the Insert menu to create a new program change event.
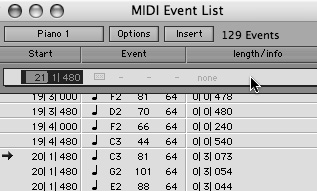
This creates the MIDI event at the top of the MIDI Event List, but Pro Tools does not put the event in the list (Figure 19.44). You still need to change a few parameters.
Figure 19.44. The new MIDI event is at the top of the MIDI Event List window, where you can edit it.
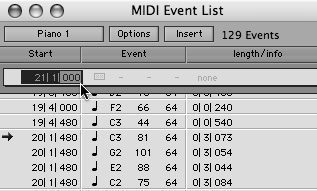
6. You want the program change to occur a bit before the first note of the chorus.
Double-click the last three numbers of the Bars:Beats number and change it to 000 (Figure 19.45).
Figure 19.45. Change the timing of the event to 21|1|000.
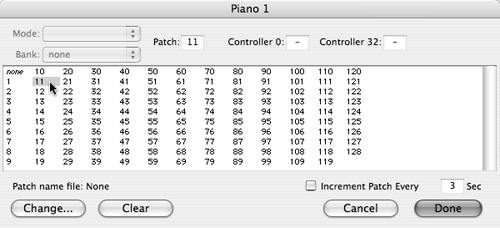
7. Click on the value under the length/info column, where the value is entered as None.
The Patch window opens.
8. Select patch 11 (Figure 19.46).
Figure 19.46. Select patch 11 to be sent as the program change.
9. Click Done to close the Patch window.
This changes the event so that at 21|1|000, Pro Tools will send the patch change 11 to the selected device for this track (Figure 19.47).
Figure 19.47. The event is edited for the proper time and patch, and is ready to be entered in the Event List.
10. Press the Return key (Macintosh) or Enter key (Windows).
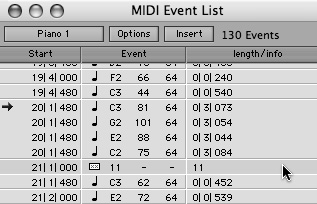
The new MIDI event is added to the MIDI Event List (Figure 19.48).
Figure 19.48. The new MIDI event is added to the MIDI Event List.
You can use the MIDI Event List for much more than program changes. For more information, see the Pro Tools Reference Guide.