
21. Optimizing Performance
In Pro Tools LE, every processing task—from the number of tracks you can record and play back at one time to the performance of RTAS plug-ins—depends on the CPU power of your computer. Thus, using the fastest computer possible is the best way to optimize your system’s performance.
But computer speed is not the only factor. The amount of RAM in your computer makes a big difference too, as does the way you allocate your system’s CPU power. Allocating CPU resources judiciously allows your system to handle audio processing tasks without interruption. This chapter offers some useful tips for enhancing your computer’s performance. We’ll show you how to manage CPU power by assigning resources where they’re needed. And we’ll provide suggestions for running plug-ins efficiently, and for maximizing limited hard drive space.
If your system’s performance starts to lag, you may want to try some (or all) of these tricks. In other words, keep this chapter bookmarked.
Managing CPU Power
Managing CPU power in Pro Tools LE is somewhat of a balancing act. Because you’re limited by the host computer’s processing power, it’s sometimes necessary to juggle CPU resources among different functions. and you may occasionally need to shuffle plug-ins around. The good news is Pro Tools has many features that can help you manage CPU power quite effectively.
The System Usage window
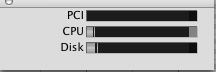
The System Usage window (Figure 21.1) lets you keep an eye on the overall performance of your Pro Tools system. It displays how much CPU power Pro Tools is using. Keep this window open so you can monitor CPU resource allocation and make adjustments, if necessary.
Figure 21.1. The System Usage window helps you track your system’s overall performance.
CPU usage limit
The Playback Engine dialog box lets you set the amount of total CPU power dedicated to Pro Tools. Single processor computers running Mbox 2 or Mbox 2 Pro systems let you allocate up to 85 percent. Single processor units running Digi 002 systems let you allocate up to 99 percent of your CPU to processing tasks.
Multiprocessor computers let you use between 90 and 95 percent of each CPU depending on the number of processors selected in the RTAS plug-in for RTAS plug-in processing.
1. Choose Setup > Playback Engine.
The Playback Engine dialog box appears.
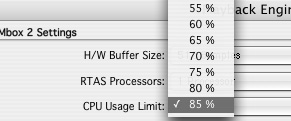
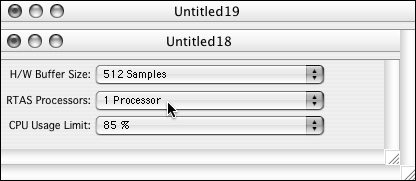
2. From the CPU Usage Limit pop-up menu, select a percentage of CPU resources to allocate to host processing (Figure 21.2).
Figure 21.2. The Playback Engine dialog box lets you set the amount of total CPU power dedicated to Pro Tools.
For more information on the Playback Engine dialog box, see Chapter 2: Pro Tools Software Basics.
Hardware buffer size
The Playback Engine dialog box also lets you set a hardware buffer size (Figure 21.3).
Figure 21.3. The Playback Engine dialog box also lets you set a hardware buffer size.
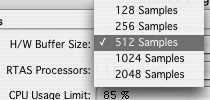
This determines the size of audio data blocks that are sampled and processed at one time by the CPU. Larger buffer sizes let you use more plug-ins but increase latency. Smaller buffer sizes decrease latency but decrease the number of plug-ins that you can use.
During recording, use a smaller buffer size (128 or 256 samples) to keep latency to a minimum. During mixing, when latency is less relevant, increase the buffer size so you can use more tracks and plug-ins.
To set the hardware buffer size
1. Choose Setup > Playback Engine.
The Playback Engine dialog box appears.
2. From the H/W Buffer Size pop-up menu, select the audio buffer size (in samples) for host-processing tasks.
For more information on the Playback Engine dialog box, see Chapter 2: Software Basics.
DAE playback buffer size
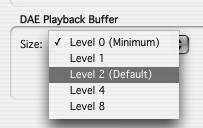
The DAE Playback Buffer Size option controls the amount of RAM that’s allocated as a holding area for data coming from your hard drive. The buffer size determines initial time lag that occurs when you initiate playback or recording. The higher the buffer size, the longer the time lag.
Smaller buffer sizes can increase system responsiveness but may make recording and playback on slower hard drives less reliable. Larger buffer sizes can make hard drive performance more reliable but may cause time lags to occur before recording or playback begins.
To set the DAE playback buffer size
1. Choose Setup > Playback Engine.
The Playback Engine dialog box appears.
2. From the DAE Playback Buffer pop-up menu, select a buffer size (Figure 21.4).
Figure 21.4. The DAE Playback Buffer pop-up menu.
For more information on the DAE Playback Buffer, see Chapter 2: Software Basics or the Pro Tools Reference Guide.
Reducing levels of undo
Pro Tools lets you undo up to 32 editing operations. These operations are stored in a temporary queue inside your computer’s RAM. Reducing your system’s levels of undo will free up RAM for other uses.
To reduce levels of undo
1. Choose Setup > Preferences.
2. Click the Editing tab.
3. In the Levels of Undo field, enter a number from 1 to 32 (Figure 21.5).
Figure 21.5. Reducing levels of undo can help free up RAM and enhance system performance.
![]()
Consolidating regions
Consolidating multiple separate regions into a single region reduces the number of edits on a track. This creates fewer edits for Pro Tools to manage, which saves CPU power.
To consolidate regions
1. Select the regions that you want to consolidate.
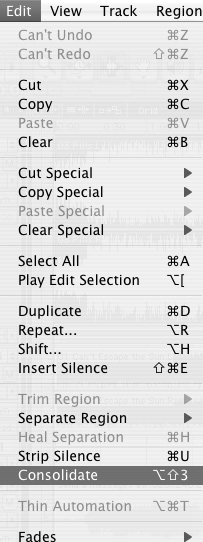
2. Choose Edit > Consolidate (Figure 21.6).
Figure 21.6. Consolidating regions is another way to save CPU power.
Smoothing and thinning automation
Pro Tools writes automation data as a series of events called breakpoints. Smoothing and thinning automation removes superfluous breakpoints and makes automation playback less CPU intensive.
To smooth and thin automation data automatically after an automation pass
1. Choose Setup > Preferences.
2. Click the Automation tab.
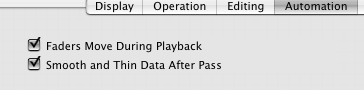
3. Select the Smooth and Thin Data After Pass option (Figure 21.7).
Figure 21.7. Smoothing and thinning automation removes unnecessary breakpoints and makes automation playback less CPU intensive.
For more information on thinning automation, see Chapter 16: Automating a Mix.
Making tracks inactive
In Pro Tools you can make audio, auxiliary input, and master fader tracks inactive. You can also make individual sends, inserts, plug-ins, bus paths, and track inputs and outputs inactive. When items are made inactive, they release their CPU resources (although their setting configurations are saved).
To make a track inactive
1. Click the track name to select it.
2. Choose Track > Make Inactive.
or
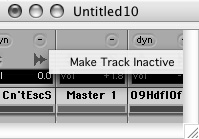
Command-Control-click (Macintosh) or Control-Start-click (Windows) on the track type indicator in the Mix window (Figure 21.8).
Figure 21.8. To make a track inactive, in the Mix window, Command-Control-click (Macintosh) or Control-Start-click (Windows) on the track type indicator.
The track becomes inactive. Its name is italicized and the track’s channel strip turns a monotone shade of gray (Figure 21.9).
Figure 21.9. The names of inactive tracks (and other items) become italicized and their channel strips become a monotone shade of gray.

For more information on making tracks and other items inactive, see Chapter 4: Starting a New Session and Chapter 14: Mixing Basics, or see the Pro Tools Reference Guide.
Disabling page scroll during playback
Disabling the Page Scroll During Playback setting frees your computer’s CPU from having to constantly redraw the screen during playback. This can save a lot of processing power that may be better used elsewhere.
To disable page scroll during playback
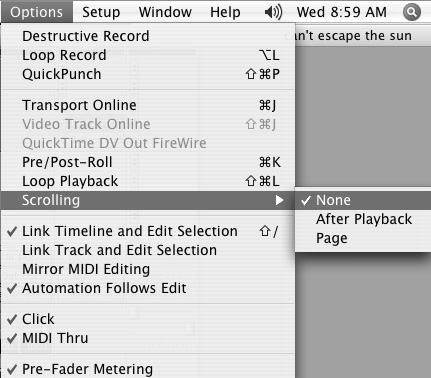
• Choose Options > Scrolling > None (Figure 21.10).
Figure 21.10. Disabling the Page Scroll During Playback setting can help free up processing power.
Disabling moving faders
Although being able to display automated moving faders is a nice feature, it can monopolize a fair amount of CPU power, because Pro Tools constantly redraws the screen. Try disabling this setting to recover some of that CPU power.
To disable moving faders
1. Choose Setup > Preferences.
2. Click the Automation tab.
3. Deselect the Faders Move During Playback option.
Disabling Sends View meters
Sends View meters can also monopolize CPU power. Try turning this option off to regain some processing power.
To disable Sends View meters
1. Choose Setup > Preferences.
2. Click the Display tab.
3. Deselect Show Meters in Sends View.
or
Choose View > Sends A–F or Sends F–J > Assignments.
Using Plug-ins Efficiently
Real-time DSP plug-ins are undoubtedly one of the most useful features in Pro Tools, but they’re also one of the most power hungry. Here are a few ways to ease the power crunch.
Allocating RTAS Processors
Pro Tools LE now supports multiprocessor computers. Pro Tools lets you decide how many processors to devote to RTAS plug-ins.
To designate the number of RTAS processors (multiprocessor computers only)
1. Choose Setup > Playback Engine
The Playback Engine dialog box opens.
2. Open the RTAS Processors pop-up menu and select the number of processors you want to dedicate to RTAS Plug-in processing (Figure 21.11).
Figure 21.11. Select the number of processors you want to allocate to RTAS plug-in processing (multiprocessor computers only).
The number of processors available in the pop-up menu will depend on how many processors the computer contains.
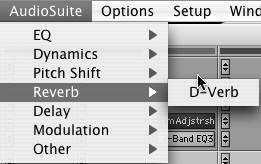
Using AudioSuite plug-ins instead of RTAS plug-ins
RTAS plug-ins consume lots of CPU power because they apply effects in real time. If you’re hitting the limit on the number of real-time plug-ins you can use, try using a non-real-time AudioSuite plug-in instead.
Most RTAS plug-ins also come in AudioSuite versions. You can save RTAS plug-in settings and then import them into the AudioSuite version. This lets you find effects in real time, but apply them in non-real time. For example, if you have a favorite EQ setting created with an RTAS EQ plug-in, import the setting into the AudioSuite version and process your audio while Pro Tools is not playing back. This conserves CPU power for other power-intensive RTAS plug-ins such as delays and reverbs.
To switch from an RTAS plug-in to its AudioSuite version
1. Configure and save the desired RTAS plug-in settings.
2. Remove the RTAS plug-in from the track insert.
3. In the Edit window, select the same track using the Selector or Grabber tool.
4. Choose the desired AudioSuite plug-in from the AudioSuite menu (Figure 21.12).
Figure 21.12. Using nonreal-time AudioSuite plug-ins instead RTAS plug-ins is a good power-saving alternative.
5. Import the saved setting.
6. Click Process.
The desired effect is applied to the track.
Using fewer CPU-intensive plug-ins
Some plug-ins are more CPU intensive than others. Generally speaking, RTAS plug-ins consume the following amounts of CPU power:
• Delay effects (such as flange, slapback, chorus, and echo) and reverbs tend to consume large amounts of CPU power.
• Single-band EQs, gates, compressors, limiters, expanders, and dither require small amounts of CPU power.
Using effects loops
Effects loops let you apply the same effect to multiple channels of audio simultaneously. They work especially well for reverbs and other CPU-intensive plug-ins that are frequently used on more than one track. By making one plug-in available to multiple tracks simultaneously, an effects loop can help you get the most out of power-hungry plug-ins like delays and reverbs.
When you create an effects loop, audio is sent from audio tracks to an auxiliary input, where an inserted effect is applied. The effected signal is then returned to the main mix, where it’s combined with the original signal. For more information on effects loops, see Chapter 15: Adding Effects to a Mix.
Using Hard Drives Efficiently
Recording digital media (audio and video) requires significant hard disc space. Fortunately, the relatively low cost and high capacity of hard drives these days make it possible for most users to outfit their systems with adequate hard drive storage space.
If you’re storage space is limited, however, or you find yourself running out of storage space in the middle of an project, consider the following methods to get the most out of your hard drive.
The Disk Space window
Similar to the System Usage window, the Disk Space window (Figure 21.13) lets you gauge how much space remains on each disk. Keep an eye on this window: You don’t want to run out of disk space in the middle of recording.
Figure 21.13. The Disk Space window lets you keep an eye on how much space remains on each disk.
![]()
To view the Disk Space window
• Choose Window > Disk Space.
Using disk allocation
Pro Tools lets you record audio tracks simultaneously to different hard drives. Using disk allocation can help ease the workload on individual hard drives. For more information, see Chapter 6: Getting Ready to Record.
Removing unused regions and deleting audio files
Removing unused regions is a great way to keep your sessions organized. And if you’re not using the underlying audio files, deleting them from your hard drive can help you recover valuable hard drive real estate.
To remove unused regions or delete audio files
1. From the Regions List pop-up menu, choose Select > Unused (Figure 21.14).
Figure 21.14. Removing unused regions is a great way to keep your sessions organized.
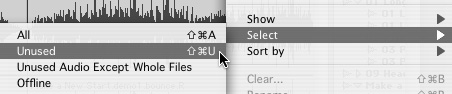
Currently unused regions are highlighted in the Regions list.
2. Choose Clear from the pop-up menu.
The Clear Regions dialog box appears (Figure 21.15).
Figure 21.15. The Clear Regions dialog box.
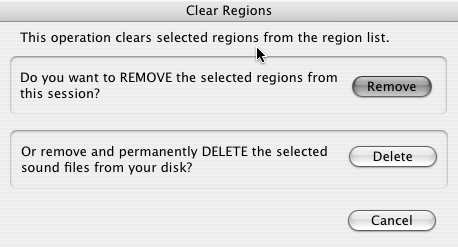
3. Click Remove to clear the unused region from the session.
or
Click Delete to erase the underlying audio file from the hard disk.
For more information on using the Regions list, see Chapter 10: Editing Basics.
Compacting audio files
Another good way to recover hard drive space is to compact audio files. This process deletes unused portions of an audio file that aren’t referenced by a region in the session. If an audio file is referenced in the session, compacting erases the entire audio file except the referenced portion.
Be careful when compacting audio—it permanently erases audio data from your disk. In fact, it’s a good idea to wait until the session is over and the audio is mixed before you compact any files.
To compact audio files
1. Select the regions you want to compact in the Regions list.
2. Choose Compact from the Regions List pop-up menu.
The Compact Selected dialog box appears (Figure 21.16).
Figure 21.16. The Compact Selected dialog box.
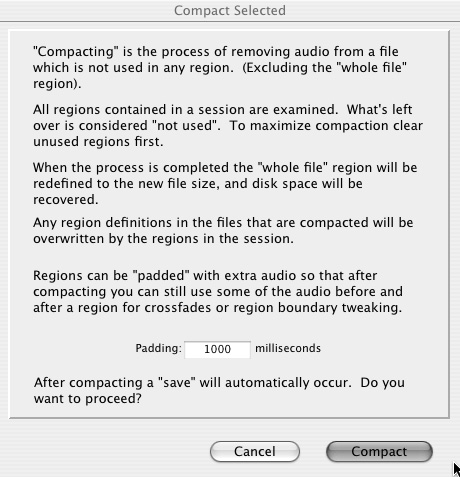
3. Enter the amount of padding in milliseconds.
4. Click Compact.
For more information on compacting audio files, see Chapter 8: File Management Basics.
Creating submixes
When you create a submix, you bounce multiple audio tracks down to a premixed mono or stereo track. Once you’ve created a submix that you want to keep, you can delete the parent audio files and free up additional disk space.
For more information on submixes, see Chapter 14: Mixing Basics.
Using lower bit depths and sample rates
Audio file size is determined by the bit depth and sample rate at which it’s recorded. Recording at 16-bit/44.1 kHz (CD quality) consumes about 40 percent less hard drive space than recording at 24-bit/48 kHz. And 16-bit/44.1 kHz audio still sounds quite acceptable.
For more information on hard drive space requirements, see Chapter 1: Setting Up Your Pro Tools LE System. For more information on bit depth and sample rate, see Chapter 4: Starting a New Session.